Design
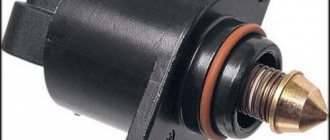
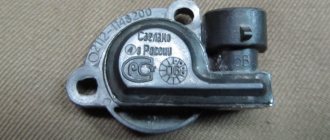
The sensor is an electric motor operating from the vehicle's on-board network, respectively, on direct current. There are magnets inside the sensor, between which a core with a winding is placed. The sensor shaft has a worm gear, at the end of which there is a conical “hat”, which is necessary to block the air supply channel in the throttle assembly.
Conclusion
Replacing the idle speed control is not a panacea in the fight against floating speed or a throbbing engine. Most automotive electricians have a tester in their arsenal to check the operation of the regulator. To do this, remove yours and give it for inspection. The regulator glitch may be intermittent, but the tester will show the correct picture.
Sometimes I have the same problem, the speed jumps, but the engine does not stall. Now I understand, most likely it is the idle speed sensor. I watched the video, in principle, now I can change it myself.
If the revolutions on 16 valves “float”, then the first thing you should check is the idle speed sensor. The only thing is that not all novice car enthusiasts know where it is and how to change it. It’s good that there are videos with which you can easily figure out what’s what.
A meaningful article that will be useful to every Lada Grant owner who does not want to spend their money on a hundred.
Comments from the same laymen as the author of the article... Do you even understand what you are writing about?
The idle speed sensor in the injection system of the Lada Kalina model is a special electronic device. Such a component can be found in any other car that runs on gasoline and has distributed injection. The design of the sensor is represented by an electric motor, paired with a conical needle by the manufacturer. Note that the device is controlled by an ECU.
The idle speed sensor rarely experiences malfunctions, but if such a fact occurs, it causes a malfunction in the idle speed of the engine. They begin to “float”, and the engine, in turn, ceases to function normally. As a result, achieving a timely return to operating temperature after a cold start becomes problematic.
Where is
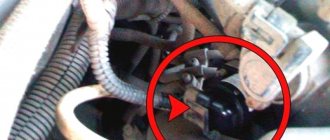
The sensor is located on the end part of the throttle assembly, namely between the heater insulation and the remote control. It is attached to the housing with two bolts, and its tightness is controlled by a special sealing ring, which prevents unwanted air leaks.
It should be noted that the idle speed sensor is available on Priors only with a mechanical throttle valve. Cars with the E-GAZ system do not have this sensor!
Symptoms of a problem
The difficulty in diagnosing the regulator is that if the mechanism breaks down, the “Check” alarm signal does not appear on the dashboard. The regulator is not included in the general circuit of the ECU, so you need to focus on the characteristic features:
- sudden abrupt change in the number of revolutions of the internal combustion engine;
- when the speed is reduced to idle, there is no change in engine operation;
- after the start, when additional cabin equipment is activated (air conditioning, heater, lighting), the speed drops;
- The engine stalls between idle speeds when the gas pedal is pressed.
The cause of a malfunction of the regulator may be natural wear of the guide needle bushing or lack of power after an electrical circuit break. The Priora is equipped with a standard VAZ sensor, which is also used on other brands; when replacing, it is possible to use related components.
Examination
The sensor is checked by applying voltage to it and inspecting the mobility of the shaft. It is best to check by unscrewing the sensor from the throttle body without removing the connector, turn on the ignition on the car and see how the shaft moves. The movement of the shaft “cap” should occur without any biting or twitching.
You should also check the integrity of the sensor housing. Quite often, the metal rivets securing the connector to the sensor body fall out, and air can leak from there. The sensor must be clean and free of traces of contamination; if any, the sensor must be cleaned.
Inspection
Once the part is removed from the car, you can easily determine and decide whether it is worth replacing it with a new unit or just cleaning it. If a visual inspection does not reveal mechanical damage and it does not cause suspicion, you can clean the carbon deposits. To do this, you will need a clean rag and carburetor cleaner. It must be poured into all holes and wiped with a clean cloth, then allowed to dry. If mechanical damage is found on the regulator, it will have to be replaced with a new one.
Replacement
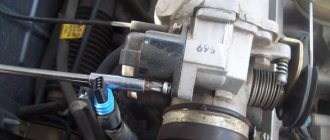
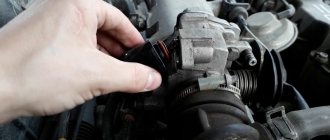
To replace, you only need a short Phillips screwdriver.
- We disconnect the negative terminal from the battery, since the work will be carried out on the electrical equipment of the car.
- Remove the connector from the sensor.
Unscrew the two screws securing the sensor to the body and remove the sensor.
- We install the new sensor in the reverse order, not forgetting to install the O-ring.
If after replacement the problem does not go away, you need to clean the throttle valve; read how to do this here.
When to change the idle speed sensor on a Priora
The vehicle requires maintenance; owners are required to regularly diagnose the mechanisms on which the vehicle’s health depends. The list of such parts includes the Priora idle speed sensor.
Problems with the sensor are reflected in engine operation. If the problem is not addressed in a timely manner, the driver will have to pay for major repairs.
Technical recommendations should be followed and a component should be replaced when it reaches the end of its useful life.
In the article, the reader will learn where the sensor is located, how to check its serviceability and when to replace it.
Symptoms of a problem
The idle speed sensor on a Priora will need to be replaced if the driver notices one of four symptoms:
- The tachometer shows a floating speed. If the engine operates in one mode, the indicator reflects a stable figure. When the sensor fails, the number of revolutions during operation of one mode either decreases or increases.
- RPM drops/increases sharply when changing gear.
- The idle speed is turned on and the gas pedal is pressed, but the engine stops running.
- The engine is switched to idle mode, but the speed does not change.
These signs may indicate other problems, but the experience of auto mechanics shows that more often the cause of these problems is a malfunction of the IAC.
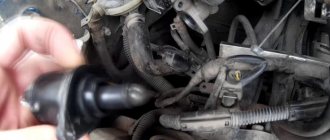
Where is the IAC located?
If you want to replace the idle air control yourself, you need to find out where the idle speed sensor is located on the Priora. To find a part, follow the instructions:
- open the hood;
- remove the plastic plate (casing) by unscrewing all the screws;
- find the throttle assembly, the regulator is located on the right;
- move the valve securing the plug to the left. To remove the IAC, you will have to unscrew all the bolts attaching the sensor to the throttle assembly.
When working with the engine, be sure to follow safety rules. Checking or replacing the IAC is carried out only with the engine turned off.
To get to the IAC, you will need a regular screwdriver with a magnetic handle. If you suspect a sensor malfunction, it is advisable to carry out diagnostics. You can check the part yourself or by contacting a car repair shop.
How to diagnose IAC
Have you noticed the above “symptoms”? Make sure that it is a faulty sensor that is causing the problem. If you have a voltmeter among the tools, you can carry out the diagnostics yourself. To check the IAC Priora, do the following:
- secure the car by tightening the handbrake and making sure that the car does not move;
- open the hood, unscrew the screws on the plastic casing, remove the plate;
- take a voltmeter, a couple of cut wires;
- remove the component securing the harness block;
- disconnect the pads from the regulator;
- use the voltmeter probe marked minus and connect it to the engine;
- turn the ignition on in idle mode.
If the readings are below twelve volts, you will have to change the IAC, because it cannot be repaired.
If you are going to buy a new sensor and install it yourself instead of a new one, pay attention to the length of the IAC needle. In the new one it should not exceed twenty-three millimeters.
If you do not have experience working with automotive mechanics, it is advisable to contact a car repair shop.
How to check the Hall sensor
There are several verification methods. Briefly, they work like this:
Checking the serviceability of the hall sensor (diagram)
- Creating a simulation of the presence of a Hall sensor. This method of checking is the fastest and is suitable if there is power at the ignition system components, but there is no spark. For this purpose, the three-pin block is removed from the distributor. Next, you need to turn on the car’s ignition and connect (short with a piece of wire) outputs 3 and 2 (negative pin and signal contact). If during this process a spark appears on the central wire of the ignition coil, it means that the sensor has failed. Please note that in order to detect sparking, you need to hold the high-voltage wire near ground.
- Checking the Hall sensor with a multimeter is the most common method. For this check, a multimeter (tester) is used. To do this, it is enough to measure the voltage at the output of the sensor. If it is working properly, then the voltage should be within 0.4. 11 V.
- Replacing a faulty device with a known working one. You can borrow it from friends who have a car with the same sensor. If after replacement the problems that bother you disappear, you will have to buy and replace the Hall sensor with a new one.
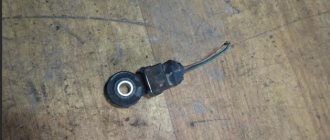
Hall sensor check
Hall sensor, checked with a multimeter.
Another common method is to check for resistance at the sensor. To do this, you need to make a simple device consisting of a 1 kOhm resistor, an LED and flexible wires. A resistance is soldered to the LED leg, and two wires of a length that is convenient for operation (not short) are soldered to it.
Then remove the distributor cover, disconnect the distributor and plug box. Next, check the serviceability of the electrical circuit. To do this, an electronic multimeter (voltmeter) is connected to terminals 1 and 3, after which the car’s ignition is turned on. Under normal conditions, the value obtained on the screen of the measuring device should be within 10.12 V.
Air conditioner radiator for Priora cars (Hala type)
- Characteristics
- Equipment
- Applicability
- Questions
- Reviews
Main characteristics
Equipment
Air conditioner radiator with receiver assembly
Applicability
| Brand | Model | Engine | Year |
| Lada | Priora (07-) | 1.6i/1.8i | 2007 - present |
Questions
Hello. When buying a condenser (Halla climate), what should you look for so as not to buy a counterfeit? Are there any distinctive features of the original?
Is it possible to install this radiator on a car that has a radiator block (cooling + condenser) or does it have its own radiators and they are not interchangeable?
Hello! Please tell me what diameter the O-rings are for connecting the pipes of the Halla air conditioner to the radiator of the Luzar air conditioner
FakeHeader
Comments 37
Everyone is right in their own way, it depends on the firmware and model of the ECU.
What kind of hat do they write? It would be better if they advised you to clean the throttle valve before installation and then put a new IAC on everything clean and that’s it. No need for any dances with tambourines, just started and went!
I already cleaned it, thanks)
You take out the old one, put in a new one, there is a chance that after starting the engine will go to the cut-off point, if it goes to the cut-off point, turn it off and start it again and that’s it...
When it’s warm, if you pull off the pxx chip, the rod will simply be pushed out more, making it easier to clean.
I don’t know, I installed it without lubricating anything, I just turned the ignition on/off 5 times and started everything 6 times and everything works fine
Now, there is no need to regulate it!
If you pull out the chip, more than an error will pop up, nothing will happen.
The main thing is to recess the rod before installation. There is no need to lubricate anything. To do this: 1. Connect IAC. Ignition ON2. Pull the chip off the IAC. Turn off the ignition3. After 30 seconds, put on the chip 4. Repeat steps 1-3 one more time, if necessary, the rod will retract almost all the way. Usually ONE cycle is enough!
After setting the ignition on and off, auto-calibration will be performed, or rather, the “0” position will be set, wait 30 seconds and calmly start the car.
(The main thing is to recess the rod before installation) how?
Yes, easily.1. Connect IAC. Ignition ON2. Pull the chip off the IAC. Turn off the ignition3. after 30s Put on the chip 4 Repeat step 1-3 one more time The rod will retract almost all the way. Usually ONE cycle is enough! Everything is extremely simple.
Well, it’s not that simple, for the average user with a complete lack of understanding of the operating principle. Here you need to fill your hand. Otherwise, if you got things wrong or hesitated and the new RXH shoots off like a shuttle from a rocket)) In general, by default they fly in the cocked position.
I replaced it with a new one 3 times, and I can’t remember how many times I cleaned it, I never adapted anything, installed it and started it, idle is always normal. On the packaging of the new sensor it is written that there is no need to adjust or configure anything.
(The main thing is to recess the rod before installation) how?
Another option is to assemble a mini SD driver. The so-called "walker"
The topic is this: when you change the rxx, look at the numbers on the sensor. After replacement, it may turn out that with the new rx the speed will fluctuate, and after releasing the gas it may stall. I adopted the adaptation method from an experienced diagnostician. That is, you installed a new rcx, turn on the ignition, but don’t start it, pump up the pump, turn off the ignition, then turn on the ignition again, press the gas pedal smoothly all the way and smoothly return it to its original position, turn off the ignition. Then you just start the car. This is necessary for the ECU to set the rod gap for the new sensor and synchronize the pxx sensor with the DPZ. Replacement of the DPDZ is carried out with the same interface system. For some this is nonsense, but I use this repeatedly and there have been no malfunctions.
Tell me, if you remove the chip from the IAC while it is running, what should happen? I’m filming and nothing happens at all, but I’m filming with the TPS and it stalls.
When you remove the chip from the RXX, nothing will happen, but when you press the gas there will be a failure. When the chip is removed from rrx, the responsibility for xxx falls on the emergency control system and the ecu mode becomes emergency. And if you unplug the connector from the DPD, the car stalls. It should be.
Tell me, if you remove the chip from the IAC while it is running, what should happen? I’m filming and nothing happens at all, but I’m filming with the TPS and it stalls.
That's right, with TPS it stalls
The topic is this: when you change the rxx, look at the numbers on the sensor. After replacement, it may turn out that with the new rx the speed will fluctuate, and after releasing the gas it may stall. I adopted the adaptation method from an experienced diagnostician. That is, you installed a new rcx, turn on the ignition, but don’t start it, pump up the pump, turn off the ignition, then turn on the ignition again, press the gas pedal smoothly all the way and smoothly return it to its original position, turn off the ignition. Then you just start the car. This is necessary for the ECU to set the rod gap for the new sensor and synchronize the pxx sensor with the DPZ. Replacement of the DPDZ is carried out with the same interface system. For some this is nonsense, but I use this repeatedly and there have been no malfunctions.
The gas pedal is definitely superfluous in this algorithm. ON/OFF ignition and IAC are positioned in the “0” position is guaranteed.
It’s not difficult to “distort” the pedal))) I use it the way I was taught. If you don’t pull the throttle, you won’t get synchronization with the DPD, which means the sensors will work inconsistently (like a swan with a pike…) and the ECU will try to collect them together. Therefore, I don’t want to argue or assert, all people are adults, I gave advice, and whether they use it or not is up to everyone.
Injection system
Nowadays, cars have become more advanced and technologically advanced. The control process from a carburetor engine switched to an injection engine. A car engine injector is much more reliable than a carburetor.
The injection system will allow you to more correctly control the car engine, which allows you to use fuel more economically. Modern cars are equipped only with injection engines, since using a carburetor engine is not advisable.
The injection system uses a large number of different sensors that send signals to the electronic engine control unit. Since the injection system uses a large number of sensors, they often fail. This is due to aging or improper operation of the car.
In this article we will talk about all the sensors installed on Lada cars, what role they play and what they are needed for.