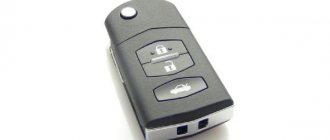
On the updated Lada Granta FL family, as well as on the Lada Granta Cross, in some trim levels a folding ignition key has appeared, which also acts as a remote control for the central locking of the car. This innovation is not available to everyone; Lada Granta FL cars will be equipped with a folding key in the Luxury trim level, and on Lada Granta Cross cars the folding key is available in the Comfort and Luxury trim levels.
Lada Granta car keys (for various trim levels)
The Lada Granta car is supplied with two ignition keys (Fig. 1a) with special encoding devices built into the key head. The ignition switch key with a black mark on the end combines the functions of: – a key for the door locks, including the trunk lid; – car ignition switch key; – key to activate the immobilizer*.
In a variant version, instead of an ignition switch key with a black mark on the end, the car is supplied with a key with a remote control (Fig. 1b), which also performs all the above functions. The key with a red mark combines the functions of: – a key for the door locks and trunk lid; – ignition switch key; – immobilizer training key. The key code number is printed on the tag. Remove and save tag. Using this number, you can make a new key - you must contact a certified technical center. The production of new ignition switch keys to replace lost ones is carried out at the expense of the consumer.
Please note that the ignition switch key with a red mark on the end must be stored separately and not carried on the same ring with the working key and used only if the working key is lost. This key may later be useful for restoring what was lost, as it has the properties of a “training” key
Remote door opening on the Lada Granta (central locking control is an option)
(in a variant) The remote control system for electrical accessories is designed for: – remote locking (unlocking) of door locks with simultaneous activation
Rice. 1a. Keys for Lada Granta car - the norm
Rice. 1b. Keys for the Lada Granta car (luxury version) * The immobilizer blocks the engine from starting and provides additional protection of the car from unauthorized use. Remember that the immobilizer is only an additional barrier on the way of an attacker and does not provide absolute and complete protection of your car from unauthorized use
Source
AvtoVAZ key training procedure (Video)
And once again about learning ignition keys on cars produced by AVTOVAZ. Not everyone apparently understands the technology for reading the key code and, accordingly, the learning procedure causes difficulties.
The key code is read remotely! And in fact, there is no need to even insert the key into the ignition switch, because you can turn on the ignition with a simple jumper (connect the pink wire on the ignition switch block and the blue-black one) and the ignition is on.
The main thing is the presence of both a training chip (in a key with a red plug) and then a working chip or control panel in the reader area (communication coil). Correct operation is ensured when the chips are located at a distance of up to 3 cm from the coil and approximately in the center.
general information
The main task of the immobilizer is to prevent possible unauthorized attempts to start the engine. Typically, Ladas (in particular Prioras, Kalinas and Grants) are equipped with standard APS-6 anti-theft devices. On Luxury vehicles, standard immobilizers are activated by the manufacturer before the car goes on sale, but on vehicles of other configurations this must be done independently. Below we will provide instructions for learning the key and activating the immobilizer, and now we will take a closer look at its kit.
The kit consists of two working keys (black) and one master key (red), its task is to train the system. Using the control lamp, signals are sent about the current state of the programming process, and if it starts flashing quickly (five times within a second), then the learning process is proceeding correctly.
Stopping blinking is a sign of incorrect actions or breakdown. It may also indicate that the allotted time for training has been exceeded or that the key used was trained by another immobilizer.
The process of activating the standard immobilizer
Activating the immobilizer requires the following actions:
- The doors are closed, the ignition is turned on with the red key and they wait for six seconds;
- The key is pulled out, and the car icon on the panel begins to blink rapidly (five times per second);
- Then, as quickly as possible (after a maximum of five seconds), the ignition is turned on with the black key;
- Normally, three and then two squeaks will be heard, after which the ignition is turned off and the key is removed;
- No later than five seconds later, the ignition is turned on with the red key;
- When you hear three and then two squeaks, the ignition turns off, but the key is not removed from the lock;
- After one squeak, the ignition is turned on again (again spending no more than five seconds on this) for two, maximum three seconds;
- Then the ignition is turned off, but the key is not removed;
- There are three beeps, the machine goes out, but you don’t need to remove the key right away; you need to take it out after ten seconds;
- Check the activation of the immobilizer by turning on the ignition with any of the keys. Successful activation of the device will be indicated by a non-lit machine icon.
Crib:
- The doors are closed and the ignition is turned on for six seconds with a red key, which is then removed from the lock;
- Next, the ignition is turned on with the black key, after three, and then two squeaks, the key is removed;
- Turn the ignition back on using the red key, after three and then two squeaks, turn it off and hear another squeak;
- The ignition is turned on for a few moments, after which it is immediately turned off; In the future, the ignition should not be turned on for at least ten seconds.
When performing subsequent code synchronization, turn on the ignition with a black key, then wait about six seconds. A warning light flashing once a second will indicate an error, then turn off the ignition and wait ten seconds. Then it is turned on again, the motor starts, and the lamp stops flashing. If it lights up three seconds after turning on the ignition and continues to burn, this will indicate that the anti-theft function is not working, and therefore the key learning process will need to be repeated.
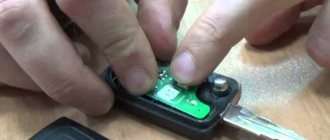
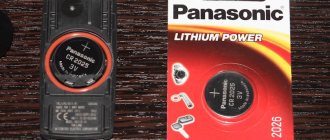
Battery replacement process
Many Lada cars (for example, Priors, Kalinas, Vestas, Grants, etc.) use ignition keys with a factory alarm, controlled by a remote control using a central lock. And if such keys stop functioning normally, then you need to immediately change the battery.
You can calculate whether the battery is really dead like this. In Largus, Vesta and XRAY, a dead battery will affect both the clarity of operation and the operating range of the remote control unit; these indicators will significantly decrease. On Kalinas, Grants and Priors, a faulty battery will indicate itself through two short-term flashes on the indicator when you press one of the remote control keys. In addition, a complete absence of flashes will be a signal for the need to replace the battery.
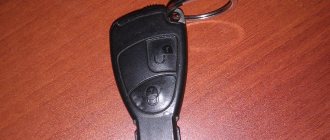
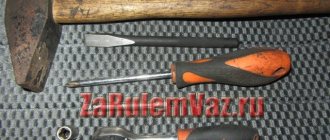
First of all, you will need to disassemble the key; to carry out this manipulation you must:
- On Vesta and XRAY, the case opens quite simply, but first you will have to unclip the latches located along its perimeter using a slotted screwdriver;
- On Lada Largus, Grants, Priors and Kalinas, you need to remove the mounting screw using a Phillips screwdriver, then open the case by snapping the latches in the manner described above.
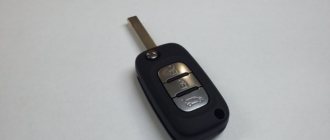
Inside the case you will see a battery shaped like a tablet; to remove it you will need to slightly pry the battery with a screwdriver. After installing a new battery, the case is closed using the same steps as opening it, performed in reverse order. It is better to close the case from the top, this will greatly simplify the process.
Lada Granta how many keys are included?
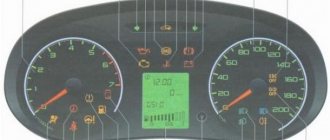
= When you turn on the ignition, the yellow icon lights up on the display - number 6? If it is not lit, then the Immobilizer (immo) is activated. And when opening doors with a key in the lock, it is the chip (activated immo) that recognizes and sounds the buzzer - “key in the lock, door is open.”
A duplicate chip from the key (maybe together with the key) is installed in the IMMO bypasser when installing an alarm with auto start; without this, the alarm will not be able to start the engine (an activated IMMO will not work). Either the IMMO is not activated and the owner thereby saves on the crawler.
Added after 6 minutes With the red key you can train new keys. All keys that do not participate in the new training will no longer be able to start the car.
Using the jack button (on the signal) you can request the number of registered key fobs - you never know, maybe the seller is not completely clean and has both a key and a key fob.
The immobilizer is designed to prevent unauthorized engine starting.
The immobilizer for cars of the LADA GRANTA and LADA KALINA 2 families consists of an immobilizer control unit integrated into the instrument cluster, a communication coil structurally located in the ignition switch, a training key 3 (Fig. 1) with a red container 4, a working key 2 with a remote control door locking, warning light 1 located in the instrument cluster and the corresponding part of the ECM software.
Rice. 1. Immobilizer composition
:
1
— immobilizer warning light in the instrument cluster;
2
— working ignition key with remote control (RC);
3
— training ignition key;
4
— a red container with a transponder (encoding device).
The operating modes and states of the immobilizer are displayed using a warning light and a buzzer inside the instrument cluster.
The instrument cluster communicates with the ECM via the CAN bus.
The ECM and instrument cluster can be in one of two states:
— with the immobilization function turned off (“clean”). In this condition, the ECM and instrument cluster are not a single system, and engine starting is permitted regardless of the instrument cluster;
— with the immobilization function turned on (“trained”). In this condition, the engine can only operate if the ECM receives the correct password from the instrument cluster.
The ECM and instrument cluster enter the trained state after completing the immobilizer training procedure, which is performed using a training key. After its execution, both blocks go into a trained state, and it is impossible to return them to a clean state.
When the learning procedure is completed, the system generates a new password, which is stored in the non-volatile memory of the ECM and instrument cluster. This new password is also written into the training key. After completing the training procedure, the training key with which it was performed becomes “its own” for the data of the instrument cluster and controller. In the future, the training procedure must be carried out only with “your” training key.
ATTENTION. The training key cannot be used to train any other instrument cluster-ECM pair.
During the procedure for transferring the immobilizer to the trained state, the working key is also trained. This key is used to disarm the immobilizer when operating the vehicle.
After completing the learning procedure, the door lock remote control is also activated.
IMMOBILIZER TRAINING PROCEDURE (How to train the immobilizer on Grant and Kalina 2)
1 Close all doors.
Insert the learning key (the key with the red container) into the ignition switch. Turn on the ignition, after 6 seconds the indicator in the instrument cluster will light up with a constant light, indicating the untrained state of the immobilizer. ATTENTION.
During subsequent training of the immobilizer, the warning light will not light up when the ignition is turned on.
2 Turn off the ignition. The indicator should flash 5 times per second. Remove the training key from the ignition switch.
3 Within no more than 6 seconds after turning off the ignition, insert the working key and turn on the ignition. The buzzer in the instrument cluster should emit three beeps.
If the buzzer does not sound and the indicator stops blinking, this means:
— the time interval of 6 s has been exceeded and it is necessary to repeat the learning procedure, starting from step 1;
— the working key has already been trained with another immobilizer;
- the working key is faulty.
4 After the buzzer gives three beeps, wait 6 seconds until the buzzer gives two more beeps, turn off the ignition and remove the working key.
5 After turning off the ignition for no more than 6 seconds, while the warning light is flashing, insert the learning key and turn on the ignition. The buzzer should beep three times. Wait 6 seconds for the buzzer to emit two more beeps.
6 Turn off the ignition, do not remove the training key. The buzzer should emit a single beep and the indicator should flash twice as fast.
The time between the moment the ignition is turned off and the indicator switching to an accelerated flashing mode depends on the type of ECM controller, but should not exceed 15 s.
If the sound signal does not sound and the flashing indicator stops, you should return to step 1 and repeat the learning procedure.
7 After the buzzer gives a single sound signal, no later than 10 s, turn on the ignition. The direction indicators should flash three times and the buzzer will beep three times. After three beeps are heard, turn off the ignition.
ATTENTION.
When performing step 7, after turning on the ignition, the process of memorizing the codes by the ECM and instrument cluster begins, therefore it is strictly forbidden to turn off the ignition until three beeps from the buzzer have sounded. To guarantee completion of the code memorization process, the time between turning the ignition on and off must be at least 5 seconds.
Failure to comply with the above conditions may result in the ECM becoming locked.
8 Remove the learning key. Wait with the ignition off for at least 5 seconds.
9 Check the operation of the door lock remote control. To do this, press the door lock button on the remote control - the locks should lock and the direction indicators should blink once. Then press the unlock button on the remote control - the driver's door lock should unlock and the direction indicators should blink twice. To unlock passenger doors, press the unlock button on the remote control again
10 Check the operation of the immobilizer. To do this, turn on the ignition with the working key; the immobilizer warning light should not flash or stay lit. Perform a test run of the engine. If the engine starts, the learning procedure is completed and the system is operational.
ATTENTION.
If for any reason the training procedure was interrupted after performing step 4, then it must be repeated and completed without changing the system components (ECM, instrument cluster, code keys). If one of the system components, after an incomplete training process on one car, is trained on another car with different components, then software failures in its operation are possible.
DIAGNOSIS OF IMMOBILIZER FAULTS
When the system is in good working order and activated, the immobilizer warning light does not light up and there are no buzzer signals.
If, when you turn on the ignition, the immobilizer warning light comes on with a constant light or starts flashing, and after about 10 seconds the immobilizer buzzer sounds and the same signal is repeated after another 10 seconds, this means that the immobilizer is either untrained or there is a malfunction in the immobilizer system.
The number of beeps and indicator signals indicates the type of malfunction.
1
1 buzzer sounds and the immobilizer warning light flashes - “Key cannot be read” fault.
Possible reasons:
a) Malfunctions of the transponder circuit - this group of malfunctions is characterized by the absence of a “signal about the key left in the ignition switch” when the ignition is turned off and the driver’s door is open:
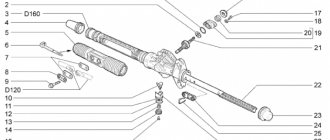
— a malfunction in the ignition switch communication coil circuit.
Measure the resistance of the communication coil between the contacts of the 2nd terminal block from the ignition switch, which should be within 6 - 8 Ohms.
If the coil resistance is normal, check the continuity of the circuit between the 2-terminal block to the communication coil and contacts “16” and “18” of the instrument cluster;
— there is no transponder in the training key.
Check the presence of the transponder and its designation (must be PCF7936AS). If there is no transponder, take a “clean” training key and a “clean” ECM controller and retrain the immobilizer system;
— the transponder in the key is faulty (detected during pre-sale preparation).
In the training key - you need to take a “clean” training key and retrain the immobilizer system.
In a working key with a remote control (RC) - it is necessary to replace the remote control with a “clean” one and retrain the immobilizer system;
— malfunction of the input transponder circuit of the instrument cluster — it is necessary to replace the instrument cluster and retrain the immobilizer system.
b) “foreign” remote control - this malfunction is characterized by the presence of a “signal about the key left in the ignition switch” when the ignition is turned off and the driver’s door is open.
It is necessary to replace the remote control with a “clean” one and retrain the immobilizer system.
2
2 buzzer sounds and the immobilizer warning light flashes - “No communication with the ECM” malfunction.
Possible reasons:
a) CAN bus break - restore the circuit between contacts “7”, “8” of the instrument cluster and the corresponding contacts “X2/D2”, “X2/F1” of the ECM;
b) Malfunction of circuits in the instrument cluster or ECM via the CAN bus - to identify a faulty product, it is necessary to test replace them one by one. If after replacing the product the fault code does not recur, it must be replaced;
c) There is no power supply to the instrument cluster or ECM.
Check for voltage at the ECM contacts:
— contact “X2/F1” — power supply from terminal “15” of the ignition switch;
— contacts “X2/H1”, “X2/H2” — power supply from terminal “30” of the ignition switch after the main relay.
3
3 buzzer beeps sound, and the immobilizer warning light is constantly on or flashing - the fault “The code of the read key is not in the instrument cluster memory.”
a) If, after turning on the ignition, the immobilizer indicator lights up continuously for 20 seconds and 3 buzzer sounds sound, then the immobilizer system has not been trained; the system should be trained;
b) If, after turning on the ignition with the training key, the immobilizer indicator flashes and 3 buzzer signals sound, then the instrument cluster is “foreign” or the key is “foreign”:
— “Alien” instrument cluster.
If the instrument cluster turns out to be “foreign”, to restore functionality it is necessary to retrain the system with a “own” training key for the ECM;
— “Alien” training key.
If the training key turns out to be “foreign”, to restore functionality you need to take a “clean” training key and a “clean” ECM controller and retrain the immobilizer system.
4
The buzzer sounds 4 times and the immobilizer warning light flashes - fault “The ECM does not confirm permission to start the engine.”
This means that the ECM was previously trained with a different system; it is necessary to replace the controller with a “clean” one and retrain the immobilizer system.
5
If, after turning on the ignition, the immobilizer warning light is on for 20 seconds and the buzzer does not sound, then the immobilizer is trained with its keys, but the ECM is not trained.
The system needs to be retrained.
Replacing a faulty ECM
In the event of a controller malfunction, a “clean” (untrained) controller must be used for replacement. To restore the functionality of the immobilizer after replacement, it is necessary to perform the immobilizer training procedure using the existing training and working key.
Replacing a faulty instrument cluster
If the instrument cluster malfunctions, any functional instrument cluster of the appropriate type must be used for replacement. To restore the functionality of the immobilizer after replacement, it is necessary to perform the immobilizer training procedure using the “own” training key for the controller.
Resynchronization of remote control codes
In cases where the remote control buttons are pressed outside the range of the radio channel, the “floating” code counter in the remote control goes out of synchronization with the counter in the system control unit. If the number of button presses outside the signal reception area of the system exceeds 1000, the system stops responding to remote control commands. In this case, the remote control training procedure should be repeated.
Updated August 01, 2013
Due to the increasing number of cases of lost training (master) keys for car owners of Kalina, Priora, Grant, Niva-Chevrolet, we are introducing a new type of service: registration of working keys in these cars, without a master key!
Usually in such cases, it is necessary to change a set of blocks: ECU (electronic engine control unit), APS unit, glass control unit, ignition switch complete with door cylinders and new keys, etc.
Now in our company you can register a working key with buttons without a training key, and for an additional fee you can receive a new training (red) key for your car. For this procedure, you need to come by car and leave it while the work is being carried out. The work includes dismantling the necessary units (ECU, APS, etc.) from the car, programmatically changing data, installing units on the car and registering keys. We emphasize that a key registered in this way will cost more than registering a remote control yourself if you have a training key, but naturally cheaper than buying and replacing a set of blocks with new ones.
Update January 05, 2014
Attention! It is now possible to make a duplicate chip for autostart using a working key with remote control buttons! A master or training key is not required. The chip obtained in this way can be used both for installation in the immobilizer bypass unit to implement autostart, and for everyday use, starting the engine of Lada Kalina, Priora, Niva-Chevrolet cars. Such a duplicate is more expensive than a regular chip, which can be registered using a master key, but this is a real solution in cases where the master (training) key is lost. To create a duplicate, you need a car, a working key with remote control buttons (and it doesn’t even matter if it is partially faulty, for example, the buttons don’t work, etc., the main thing is that the ignition key starts the engine). The entire copying procedure takes 10-15 minutes. Contact us by phone in contacts.
Training procedure:
Carrying out the training procedure leads to the following consequences:
- the engine control controller activates the anti-theft function if it has not been activated;
- the system changes its password to a new one chosen at random;
- a new system password is written into the training key;
- all remote controls that were previously trained are erased from memory;
- The codes of those remote control units that were trained in this training procedure are stored in memory.
The training procedure is applied in the following cases:
- activating the anti-theft function in the controller (for example, in a new car or replacing a faulty controller);
- erasing old and training new remote controls if lost;
- changing the system password if the owner admits that his system password may have been read (for example, when selling a car from one owner to another)
- remote control training when replacing a faulty immobilizer with a new one.
Only new remote control units or those that were previously trained using the training key used in this training procedure can be trained. It is impossible to learn a remote control key from another car into your car.
Please note: Due to the importance of the training key, it is not recommended to use it for everyday use and should be kept in a safe place.
Before starting the training procedure, fill the car with at least 10 liters of gasoline so as not to get confused by the squeaks.