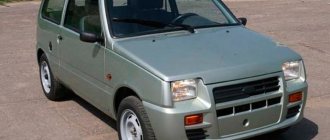
Europanel for VAZ 2114 is the best option for car tuning.
After all, even modern models of this series have an old-style panel installed, which has a number of disadvantages, namely:
- the low quality of the plastic from which the “tidy” is made fills the car with a characteristic squeak literally after 500-1000 km;
- the view of some of the instruments is blocked by the steering wheel;
- at night, the dashboard is reflected on the windshield, which distracts the driver;
- The air ducts installed in the body of the torpedo are poorly fitted and, as a result, problems arise with the ventilation of the car.
These and some other disadvantages push owners of almost new cars to replace their original panel with a Euro panel VAZ 2114. It should be noted that on models with an injection engine such a panel is installed directly at the manufacturer.
Euro torpedo VAZ 2114: advantages and disadvantages
The Europanel is perfect for installation on a VAZ 2114 and does not require additional alteration or adjustment.
Its quality significantly exceeds that of the panel provided by the factory, due to such points as:
- more modern design;
- better quality material (plastic);
- availability of built-in VDO devices (with internal lighting);
- presence of a digital odometer;
- original design of signal lamps;
- the presence of several additional compartments for storing small items;
- well-equipped air duct, etc.
In addition, the VAZ 2114 Europanel allows the driver, if necessary, to connect various additional sensors (for example, levels of antifreeze or windshield washer fluid or open doors).
Of course, the europanel has some disadvantages, including:
- not full amplitude (does not reach the edges of the slots) and tight movement of the air damper control levers;
- poor adjustment of rods and cables, etc.
Despite the existing shortcomings, installing a Europanel changes the appearance and comfort of the VAZ 2114 interior so much for the better that car drivers are increasingly resorting to this procedure.
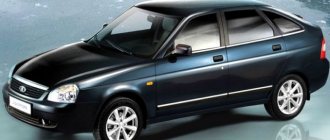
Installation of an instrument panel from Priora on a VAZ 2110-2112
There is another method of modifying and tuning the instrument panel, which consists of replacing the dashboard from the Priora - VAZ 2170. Of course, the appearance will be much more interesting than even the Europanel, but connection and installation require a lot of investments, both financial and physical.
The main problem with this modification is that the connectors for the under-panel wiring of the Priora and the under-hood of the VAZ 2110, which of course need to be connected, are different, and the connectors simply do not fit together. In this case, there are two ways:
- Completely take all the wiring from the Priora, including the engine compartment harness, interior harness, power window control unit, comfort unit, etc.
- Join completely two different types of wiring manually, cutting off the connectors and insulating almost every wire.
Everyone decides for themselves whether the game is worth the candle, namely whether the result obtained is worth the money and time that will be spent on all these improvements and alterations. Even if you take the price of the Europanel, you will have to pay up to 20,000 rubles for it. new or from 8000 for a used one, it’s already expensive. As for the panel from Priora, everything here will be even more expensive - the assembled panel alone can cost 25,000 rubles. new and from 10,000 rub. boo. at a car wrecker.
Europanel: standard equipment
With a total weight of 17 kg, the panel has overall dimensions (in cm) – 170x90x100.
The package includes all the elements necessary for quick installation and further operation:
- Instrument panel (qty. - 1 pc.).
- Set of devices (qty. - 1 pc.).
- Under-panel wiring harness (qty. - 1 pc.).
- Central console (qty. - 1 pc.).
- Floor tunnel (qty. - 1 pc.).
- Control unit for the heater (qty. - 1 pc.).
- Top cover for the glove compartment (qty. - 1 pc.).
- External lighting switch (qty. - 1 pc.).
- Rear fog light switch (qty. - 1 pc.).
- Heating switch for rear window (qty. - 1 pc.).
- Set of plugs for switches (qty. - 4 pcs.).
- Heater air duct deflector (qty. - 5 pcs.).
- Cigarette lighter (qty. - 1 pc.).
- Metal frame (quantity - 1 piece).
Installation without completely disassembling the panel
The panel, as many people know, consists of three parts, but the Europanel of the VAZ 2110 is, in fact, only the upper part of the dashboard. And if the goal is only to replace it, without any modifications or other tuning, then you can safely do a partial disassembly without removing all the equipment.
You will need:
- Drill;
- Screwdriver;
- Self-tapping screws.
The dismantling process goes like this:
Remove the dashboard; Open the glove compartment and unscrew the three screws from the inside. It is quite difficult to unscrew the screw near the windshield, but still doable; Next to the ECU, pull out 4 buttons and unscrew the screws from the inside; We loosen the fastening of the backlight adjustment. You can unscrew it completely, as is more convenient; Having opened the instrument fuse box, we also unscrew 2 screws from the inside; There are still two self-tapping screws that hold the panel trim, but they cannot be unscrewed without complete disassembly
Therefore, either these screws are carefully broken out, or even cut out by lifting the overlay on the right, using a metal file. At the same time, the appearance of the future updated “face” of the interior will not be affected, since the Euro trim will cover these places; Now you can safely remove the cover.
How to install europanel 2114?
All actions are performed in the following sequence (for greater convenience, you can remove the seats and column):
- The old panel is removed.
- The europanel is “attached” to the installation site and screwed (together with the column).
- The central frame is installed.
- The stove control is screwed on.
Please note that even new VAZ 2114 cables may not be suitable for installation. In this case, you can make them yourself.
- Wiring is being laid.
- The “beard” and side pads are installed in the legs.
Installing the panel will not take much time, since it does not require special adjustment to the interior features.
Modification of the rear of the car
Tuning the trunk of a VAZ 2109 includes the following work:
- making your own shelves;
- lighting.
To make a shelf, you will need plywood, cardboard, upholstery, glue, 2 furniture hinges, handles. We first determine the location of the shelf. Then we make holes. On the template of the future design we mark the moving part. We attach the model to the plywood. We first cut out the lifting part of the structure. We connect it to the stationary part of the shelf (hinges).
Then the structure is installed. We use any material for its upholstery. The shelf is covered with PVA glue in 2 layers. We carefully place the upholstery on top of the structure. To secure the fabric at the edges, use double-sided tape. If the glue has dried, install LED lighting in the trunk. Similar tuning can be done in the VAZ 21099 model. The electrical circuit of the vehicle is first studied. To illuminate the luggage compartment you will need an indicator, 5 m of two-core wire, pliers, electrical tape, a pipe, and a 5A fuse.
We install a button with an on/off indicator in the shelf for the rear speakers. To make a hole, use a drill. An LED strip is glued to the trunk threshold. An additional wire is laid under the floor covering; it is connected through a fuse to the power supply. The ground of the limit switch is connected to the backlight. The advantages of such tuning include:
- Multiple sources ensure uniform illumination of the luggage compartment.
- The light turns on only after pressing the corresponding button.
- Saves battery charging.
Tuning the trunk on the VAZ 21099 involves reworking the floor. For this, plywood, piano hinges, an electric jigsaw, and glue are used. The trunk is pre-lined with fiber (2 mm thick). Then we cut the plywood to the size of the carpet and the hatch for the spare tire. The next stage is making a frame from 20x30 mm bars. The resulting structure is fixed to the trunk floor. Then splen and soundproofing material are laid. Sheathing is being installed.
The downside of this modernization is the accumulation of condensation inside the optics. This is due to the low quality of the material and lack of tightness. At the same time, black headlights, unlike their standard counterparts, are less efficient (by 30%). To partially solve this problem, we install more powerful light bulbs in the tuned headlights of the VAZ 2109. High power lamps should not be used. Otherwise, the lights will overheat or begin to melt. You can make your own optics. But such tuning is recommended for the rear lights (to reduce the risk of accidents).
Product delivery options
Note! Below are the shipping methods available specifically for this product. Payment options may vary depending on the delivery method.
Detailed information can be found on the delivery and payment page.
Transport companies
Available payment methods:
- Using cards Sberbank, VTB, Post Bank, Tinkoff
- Yandex money
- QIWI
- ROBOKASSA
Delivery is possible to any locality where there is a representative office of the transport company. Delivery time – from 2 to 10 days. Sending large parcels is approximately 50% more profitable than by Russian Post.
Courier delivery in Togliatti
Available payment methods:
- Cash upon receipt
- Using cards Sberbank, VTB, Post Bank, Tinkoff
- Yandex money
- QIWI
- ROBOKASSA
Delivery time from 1 to 12 hours.
Pickup from our warehouse
Available payment methods:
- Cash upon receipt
- Credit
- Using cards Sberbank, VTB, Post Bank, Tinkoff
- Yandex money
- QIWI
- ROBOKASSA
Pickup times must coincide with store opening hours.
Catalog number: 2114-5325012
Standard price:
1540.00 rub. Your price
Price For registered:
1430.00 rub.
Before visiting the store, check product availability!
Instructions for installing a new panel
If you want to replace a low tidy with a more advanced, high one, then in any case you will have to change the entire center console.
Removal and installation instructions look like this:
- First, you need to turn off the power to the on-board network; to do this, disconnect the battery, remove the steering wheel, as well as the steering column switches and the ignition switch. You will also need to disconnect the ignition relay.
- Next, unscrew the two bolts that secure the control panel visor and remove it.
- Now you need to compress the spring and remove the shield itself from the center console. Disconnect all wires and connectors connected to the dash, including the speedometer cable, the econometer hose, and the odometer cable. After this, the tidy can be moved to the side.
- Then remove the regulator from the hydrocorrector of the optics light, the tidy light switch knob, as well as the interior heater and fan regulators. To do this, pull the controls towards you.
- After this, unscrew the two bolts securing the center panel trim on the sides; the trim itself can be moved towards you. Then you need to disconnect the connectors.
- Now the key in the lock should be turned to position “0”, this will disable the anti-theft system. A connector with wires is connected to the lock itself; it must be disconnected. Next, unscrew the two nuts and two bolts, after which you can remove the steering column pipe with the switch.
- Remove the choke handle located under the instrument panel. Pull it towards you so that you can feel the pull. You need to unscrew the two bolts that secure the damper guide rod, after which the choke can be removed.
- Now you can unscrew four more screws that secure the heater control panel in the car. Unscrew the bolts located on the side of the shield on both sides. Also unscrew the lower console mounting bolts with nuts that secure the control panel lighting switch and the optics hydraulic corrector. To do this you will need a 22mm socket wrench, it must be high.
- After completing these steps, you need to unscrew the bolt that secures the center console in the glove compartment. Then all you have to do is unscrew one bolt at a time on each side securing the center console. The console itself can then be dismantled.
- As for installing a new high panel with tidy, this process does not present any particular difficulties. All dimensions at the mounting points on the body are the same, but this procedure also has its own characteristics. To install your new console, you will need the appropriate wiring harness. If you use an existing harness, then you will need to rearrange the terminals in it, taking into account the connection diagram. In addition, it will be necessary to change the cables leading to the heater to longer ones, the same applies to the speedometer cable. If you are installing a new console, you will also need other roof pillar side trims, these must be installed before you install the console. Since the new dashboard will not use a flow meter, the tube from it will need to be plugged. In addition, the signal to the tachometer will need to be supplied from wire K on the coil, which is connected to the speed sensor cable bracket.
- Immediately before installation, you should reassemble the new console, and wrap the connection points of the blowers with electrical tape and, preferably, glue them with foam rubber or anti-creaking agent. It is also necessary to change the foam rubber of the heater, since the old one will no longer be able to perform its functions. Also make sure that the choke can close completely and remember that the cable from the new speedometer should be installed before you install the console. The assembly procedure begins with laying a new wiring harness and connecting all connectors. Before you finally assemble everything, turn on the dashboard and check how all the indicators and gauges work. After this, the console can be put back in place.
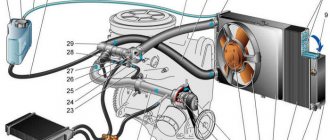
VAZ 2110 panel, removal, installation of dashboard, sound insulation of VAZ 2110 panel
The VAZ 2110 panel or the “tens” dashboard has become a new word in the interior design of Lada cars. Despite its interesting shape and ergonomic appearance, panel 2110 eventually begins to make a lot of unnecessary sounds when the car is moving. This is especially noticeable on cars with high mileage. Therefore, very often the “tens” torpedo is completely disassembled in order to carry out total sound insulation and eliminate squeaks.
Let's say right away that disassembling the VAZ 2110 panel is not difficult in principle, but it is a very labor-intensive job that requires time and attention. The fact is that to remove the panel you will have to completely unscrew the steering wheel and disconnect a lot of electrical connectors. In order not to damage the electrics, before disassembling the VAZ 2110 dashboard, be sure to disconnect the battery. This is how the “tens” panel looks schematically.
This figure shows in detail, in the smallest detail, all the fasteners of the VAZ 2110 panel.
- 1 – panel
- 2 – side nozzle for ventilation and heating of the cabin
- 3 – instrument panel trim
- 4 – cover fastening screws
- 5 – panel fastening screws
- 6 – box
- 7 – console trim
- 8 – cover
- 9 – instrument panel panel
- 10 – mounting block cover
If you remove the panel completely, then only this should remain, look at the photo -
The red arrows indicate where the nuts and screws are attached, and the two large white arrows indicate the special mounting pins. When installing the panel, it must be installed on them; they serve to center the dashboard relative to the body.
Installation of a multimedia system and other elements
With the spread of touch screens, they have become quite often used in the production of multimedia systems that are installed in cars. Of course, you can purchase a GPS navigator that will be mounted on top of the panel. But still, this design option is impractical, as it takes up a lot of free space and impairs visibility.
If desired, you can implement a multimedia system into the torpedo. For this:
1. Select a multimedia system. 2. Find out its exact dimensions. 3. We mark the area on the dashboard. 4. We cut out the plastic. 5. Install the multimedia system. 6. Connect the system. 7. We carry out decoration.
In the same way, you can install control units for additional functions, for example, self-installed fog lights or interior lighting. In order to significantly simplify the work, you can buy a disassembled control panel from another car, also mark the location on the dashboard and cut out a place to install the panel.
In general, we can say that it is possible to modify a factory torpedo almost beyond recognition.
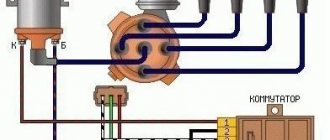
VAZ 2109 wiring diagram
The VAZ 2109 car has remained one of the most popular in the country for many years. Not just popular, but also prestigious. In the social hierarchy, owners of nines were not much lower than owners of used Cadets and Jettas. One could argue with the reliability of the car, but since there was no alternative, the car filled the entire CIS and was even assembled using the hub method in Finland, but this has little to do with the 2109 model.
This is interesting: 10 ways that will save you from frequent car washing
Content:
Wiring diagram VAZ 2109
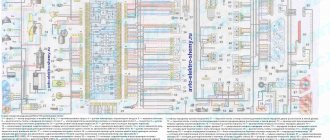
Like the entire car, the electrical equipment was not at the highest level, so owners of nines should know the VAZ 2109 wiring diagram thoroughly. To do this, we have provided the factory diagram in good resolution, which can be used with adjustments for changes made from time to time.
This is a diagram of the canonical nine with factory markings and explanations. In principle, the circuit is quite simple, but the electrical appliances themselves caused difficulties, the problems with which we will talk.
Basic problems with electrical wiring 2109
The biggest problem with the electrical equipment of the VAZ 2109 was the low quality of components and unsatisfactory build quality. Despite the fact that Togliatti traditionally blames suppliers for all mortal sins, in the end we have to take the rap, and as ordinary users, we should not be interested at all in why the spirals on the double-filament rear light bulbs constantly burn out. Also, in principle, we don’t care which factory made the housing for the fuse box - we only see the inadequate operation of the electrical equipment when pressing the brake pedal turns on the right turn.
And a lot of such examples can be given. If the factory is not confident in the quality of the components, then why install them on the car. Therefore, rhetorical questions only lead to unnecessary vibrations in the air, and do not solve the problem. The above problem with feet can be solved quite simply:
- the rear light cover is removed;
- the power terminals are disconnected from the trunk;
- the entire strip on which the lamps are mounted is unscrewed;
- The contact on the flexible board at the point of attachment to the lamp socket is checked.
Short circuits of the tracks of this board occur due to contamination of the contacts and tracks. Then the signal sent to the stop lamp can simply be redirected to the turn signal lamp. This can be radically solved by replacing the entire board with a new one, but the new strip will not last as long as we would like due to poor sealing of the lamp from inside the luggage compartment. It seems like a trifle, but we spend precious time solving trivial problems that are solved at the production level with the right approach, not the VAZ approach.
Improvements and correction of factory errors
In light of the above, a breakdown of the electronics control unit is very typical for the nine. The reason is very simple - its body simply allows water, dust and moisture in the form of condensation to pass through. Its very placement on the air supply shelf is not entirely clear, but there are also more significant disadvantages that can be eliminated with your own hands. The factory provided a tiny groove to drain water from the housing, but it constantly gets clogged, the housing fills with water, and the control unit slowly and surely dies. It is not cheap, so such negligence of the designers cannot be explained. There are two ways out of the situation - constantly clean the water drainage channel, or change the block at least once a year.
It is also worth paying attention to the fact that the power wiring on the bottom shelf of the radiator is constantly exposed to high temperatures. In addition, in this place it is in no way protected from water and dirt. This is also a difficult moment to explain. The category of wiring harness oversights includes the harness under the carpet next to the driver's seat. Moisture constantly accumulates there, and in order to remove it, you need to dry the floor, inevitably tugging on the rope. Of course, this problem cannot be solved on your own - the amount of work required to re-tighten all the wiring in the car is too large.
It is worth paying special attention to the power terminals on the generator. They very often become loose, heat up, spark and melt the wiring. But that's not the worst thing. The wires may short out, and it already smells burnt. Therefore, you should not be lazy, but check this unit as often as possible for tightness of the terminals.
Wire harness insulation 2109
No one will disassemble half a car for the sake of insulating the harnesses, but if necessary, you need to do this for your own safety. Using the diagram that we placed at the beginning of the article, all the work will not take much time, but you will be confident in the quality of the wiring insulation. For this you will need:
- Corrugated hose for electrical wires.
- Insulating tape.
- Wire cleaner.
Before wrapping old wiring in a sleeve, treat the wires with a cleaner, which is widely available in aerosol cans. Next, following the instructions and checking the electrical diagram, we proceed as follows:
- Disconnecting the battery
- Disconnect the terminals and remove the harness.
- We treat it with an aerosol.
- We carry out a visual check of the contacts.
- We lay the tourniquet in the corrugation.
- We fix and seal the entry points of the harness into the corrugation.
- We put the finished cable in place.
- Referring to the diagram, connect the terminals.
Particular attention should be paid to sealing the harnesses in places where they come into direct contact with water or hot surfaces. Also, when assembling, pay attention to the integrity of the pads and the condition of the contacts and terminals.
Thus, having spent very little time, we will save the wiring and get rid of unnecessary problems with short circuits. Keep an eye on the wiring, and good luck on the road!
What types of overlays are there?
If you just need a Euro pad, then there are two options:
Euro-1 rubber, another name for which is Caprice. It has the same instrument cluster as the VAZ 2110, the only thing is that there is no shelf on the passenger side;
Panel trim VAZ 2110 Euro-1
Euro-2 is practically no different except for the presence of the mentioned shelf.
Panel trim VAZ 2110 Euro-2
There is also a Euro-3 overlay on sale. But it is for later and more advanced VAZ cars - Priora, Kalina. The fact is that this version provides more devices, for example, there is a unit for climate control, which is not observed in the top ten. Although, in principle, if desired, installing this option is also possible.
Panel trim VAZ 2110 Euro-3
Any Euro pad mentioned above is a quality product, unless, of course, it is a cheap fake. It is softer and even, according to manufacturers, less traumatic, like the old one. In addition, after its installation, the supply of warm air to the side windows should improve.
Components
When purchasing, you will receive what is included in the kit, namely:
- Europlate;
- Inserts for switches (buttons) of devices;
- Trim on the instrument panel;
- Since your instrument combination may differ from those whose installation is structurally provided, there should also be six plugs; they can be inserted instead of buttons;
- The buttons themselves and two pads for them: • Double – for low beam and dimensions; • To turn on the fog lights; • Heated rear window.
- Air ducts;
- Block and wiring harness designed to connect a double button for side lights and low beam;
- Brackets securing the instrument panel.
In addition, if you are not entirely satisfied with this combination, and you need more buttons for other devices, then they, as well as the pads for them, can be purchased separately.
Popular methods for changing a torpedo
To begin with, here is a list of the most popular methods for changing the front panel. We include:
1. Complete replacement. Installing a new torpedo, which was taken from another car, can be called a rather difficult job. Note that if instrument panels and other small tuning parts can be found on sale, then suppliers of such parts do not create a torpedo (it can be found on sale extremely rarely). This is due to the fact that such tuning is carried out quite rarely. However, only by completely replacing the panel can you get rid of cheap plastic and put an end to the crickets that can make long-distance travel simply unbearable.
2. Quite often, partial modifications are carried out, which is represented by the creation of additional niches for the multimedia system, a control unit for new functions, and so on. Such work cannot be called difficult, since plastic is used in the manufacture of the torpedo - a material that can be easily processed using available tools. The main thing is to carry out such work carefully, since if mistakes are made, important electrical elements and so on can be damaged.
The first method is implemented quite rarely, but allows you to achieve truly unsurpassed results. The second is easier to implement, but does not allow you to completely get rid of low-quality plastic.
To change the torpedo trim, it is not necessary to remove it completely!
So let's get started, let's look at the panel overlays, which are divided into:
Euro-1, another name is “Caprice” and has an index of 21104. The features of this lining are that it does not have a passenger shelf.
Euro-2, index 2110L, cover but already comes with a passenger shelf.
Euro-3, a cover without a shelf, but under the instrument panel of Kalina, Priora, and has a climate control module with 3 knobs and an emergency stop button.
There are also exclusive panel overlays that make the interior of the VAZ 2110 similar to the Nissan Primera, where the instrument panel is in the center.
In addition to these Euro-overlays, there are overlays that are installed on top of them. For example, the overlay of the Chestnut panel.
It is not difficult to install the Kashtan overlay on the dashboard, so we will not dwell on this, but changing the old panel overlay to the Euro one is already more difficult.
The euro overlay for the panel consists of:
- The pad itself
- Inserts for buttons (small insert 2110L-2120031, large 2110L-2120032)
- Air ducts (2114-81080623)
- Device panel trim (2110L-5325124)
- Double button for turning on the headlights and low beam
- Key for turning on the rear fog lights (with fixation)
- Rear window heating switch (latching)
- Key pads - 2 pcs.
- Plugs instead of keys - 6 pcs.
- Wiring harness for connecting the dual side position switch and low beam headlights
- Block
- Device panel fastenings
- It may be necessary to purchase separately different keys for the VAZ-2114 and pads for them.
The cover gives the impression of a high quality product. It is softer than the old pad and, as the developers say, is more injury-proof. They also promise improved air flow to the side windows.
Now we are moving towards installation, and here we can distinguish 2 methods, each of which has its own advantages and disadvantages: