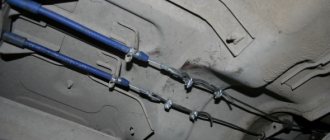
The handbrake is a recoil system designed to hold the vehicle in place during stops and long periods of parking. On most cars it is mechanical and operates from a cable-driven lever that acts directly on the brake pads. The weak point of the mechanism is the cable, which stretches over time, causing the handbrake to stop functioning. To solve the problem, it is not necessary to visit a car service; you can tighten or change the element yourself.
Types of hand brake
Depending on the make and model of the car, the parking brake has the following classification according to the type and principle of operation:
- mechanical; Mechanical type parking brake system drive: 1 – lever fixation button; 2 – parking brake drive lever; 3 – protective cover; 4 – traction; 5 – cable equalizer; 6 – adjusting nut; 7 – lock nut; 8 – cable; 9 – cable sheath
- hydraulic;
- electromechanical (aka electronic);
- pneumaticPneumatic hand brakes are installed on heavy trucks. Hydraulic ones are rarely used.
The most common type of handbrake is mechanical. In general, passenger cars are equipped with either a mechanical or electronic parking brake.
Design
Many people mistakenly believe that the handbrake is a simple lever located near the gearbox, on the right hand of the driver. In fact, it is a whole system of elements that are connected to each other.
When the hand brake fails, in 90% of cases the culprit is a cable or a pair of cables that go to the rear brake pads from the equalizer.
To determine the reasons for the failure of the handbrake, it is necessary to understand the circuit diagram of the device and its components.
Handbrake diagram
The device includes a number of structural elements. Namely:
- Lever arm;
- Traction;
- Springs;
- Lever button;
- Main cable axis;
- Bolts;
- Washers;
- Drive unit;
- Equalizer;
- Case;
- Locknuts;
- Cotter pins;
- Right and left lever;
- Expansion left and right strip;
- Lock washer, etc.
Parking brake device
The main element that activates the brakes is the cable. The cable is better when it consists of a large number of thin veins with a diameter of 0.01 mm. These thin steel wires are twisted and twisted into one rope. If the cable consists of one wire, then its reliability is less, since it is a single-core cable that is easy to break. The cable material is high-strength steel.
The diagrams show the design of a mechanical parking brake of the mechanical type.
Mechanical type parking brake system drive: 1 – lever fixation button; 2 – parking brake drive lever; 3 – protective cover; 4 – traction; 5 – cable equalizer; 6 – adjusting nut; 7 – lock nut; 8 – cable; 9 – cable sheath Design of the rear wheel drum brake mechanism: 1 – hub fastening nut; 2 – wheel hub; 3 – lower tension spring of the pads; 4 – brake pad; 5 – guide spring; 6 – wheel cylinder; 7 – upper tension spring; 8 – expansion bar; 9 – finger of the parking brake drive lever; 10 – parking brake drive lever; 11 – brake shield
According to the manufacturing technology, the cables are hardened and lubricated in order to minimize the friction force that occurs in the cable casing.
In the last article, I discussed how to replace brake pads with your own hands. Look.
On the outside, the cable is wrapped in metal wire and covered with a polymer material (rubberized plastic). At the ends, the cable shell has special steel shells and sleeves that are pressed into place.
1 — lever; 2 — button; 3 — thrust spring; 4 — latch rod; 5 — cover; 6 — front cable; 7 — rear cable guide; 8 — spacer sleeve; 9 — tension spring; 10 — spacer bar; 11 — lever for manual drive of brake pads; 12 - rear cable.
Working principle of manual mechanical brake with drum brakes:
- The driver raises the brake handle until a certain click is heard. If the cable is tightened, then perhaps you can only put it on the first latch with more force. If it is too weak, then even at the last latch the brake pads will not secure the wheels 100%.
- The rod pulls the main cable, and it pulls the secondary cables through the mounting bracket.
- The lever that is located inside the brake drum begins to turn and the spacer bar equally moves the pads apart, as a result of which the pad linings are pressed against the drum and do not allow it to rotate.
- When the driver lowers the handbrake, the cables are loosened, the springs in the drums return the spacer and the lever (the one in the drum), the pads are compressed and no longer act with their linings on the drum.
On cars with disc rear brakes, the principle of operation of a mechanical handbrake is approximately the same. The cable pulls a lever, which in turn compresses the brake disc. The lever on disc brakes is mounted behind the hub and on the outside.
Operating principle of the electronic handbrake:
- The truck driver presses the handbrake button, the electronic unit receives the command.
- The controller includes 2 electric motors with gearboxes that are installed on the rear wheels.
- Electric motors compress the brake pads around the disc. The sensor determines how hard to compress the pads. If the brake pads are worn down, the pads compress with greater force.
- To disable the electromechanical handbrake, just press the button.
Pros of an electronic brake:
- If the driver forgot to turn off the parking brake, then after starting the internal combustion engine while starting the car, the controller will release the pads.
- To unlock the rear wheels, the driver will not be able to release the brake by simply pressing. You must first start the engine, buckle up, put your foot on the brake and press the button.
- On vehicles with electric brakes, there is an Auto Hold anti-recoil button. When the car stops with the internal combustion engine running, the wheel locking is automatically activated immediately. This allows drivers to take off on different inclines.
Electronic brakes are more reliable than mechanical ones, although electric brakes have this disadvantage: they will not work with a dead battery. Mechanical brakes are simple in design, but a common cause of failure or reduced effect is cable contamination, stretching or breakage.
When to tighten and when to change?
During operation of the machine, the steel cable gradually stretches and begins to sag. Then part of the lever stroke is used to remove this slack (the first 2-3 clicks), and only then the force is transferred to the brake pads of the rear wheels. As a result, they are weakly pressed against the surface of the discs or drums and the car does not brake reliably.
The first sign of a malfunction is that the handbrake stops working on the first two clicks of the handle and is raised by hand without any effort. In this case, it is definitely necessary to tighten the hand brake, or rather the cable drive.
But the operation of the mechanism also depends on other factors:
- on the degree of wear of the brake pads;
- from the depth of excavation on the surface of the steel disk or drum.
Abrasion of the linings does not have much effect on the operation of the main system, since the stroke of the hydraulic pistons is quite large. But the effect of the mechanical “handbrake” gradually weakens. To return it to working condition, it is necessary to compensate for the wear of the elements by tensioning the drive. If the cable itself is in satisfactory condition, the extension of the tension pin will be enough to ensure the operation of the parking brake at any degree of wear on the linings.
The cable is replaced in the following situations:
- The element has stretched to such an extent that at maximum tension the pads do not grip the discs and the car rolls away on any slope.
- Due to the constant ingress of water under the cable casing, it rusted and became tightly jammed. This happens when a motorist rarely uses the handbrake.
Cable jamming also occurs in winter, when water trapped under the casing freezes inside. In this situation, do not rush to change it; first warm up the car in the garage, and then drive out the moisture using WD-40 aerosol lubricant.
We recommend: Antifreeze G13: is it necessary to switch to it from G12+?
Adjusting the parking brake
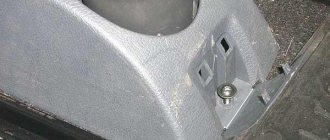
If the pads are normal, that is, the linings on them are not completely worn out, then adjustment is carried out only by tensioning the handbrake cable. As a rule, the brake cable adjustment is carried out directly in the cabin. The tension bracket is covered with a decorative panel in the area of the handbrake handle. If possible, you need to park the car in an inspection hole or on an overpass and inspect the integrity of all mechanisms of the braking system. If the inspection reveals no problems, such as cable kinks, etc., then we proceed in this order:
- Raise the handbrake handle all the way. This is usually 4-5 clicks of the latch.
- Remove the decorative trim covering the parking brake tension control unit.
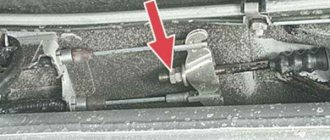
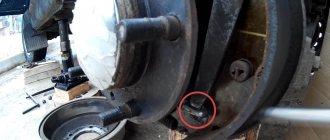
- Using a 12 wrench, turn the central nut clockwise - this is the process of tensioning the cable. At the same time, we check the rotation of the rear wheels, whether they rotate with this tension. If the wheel can still be rotated, then turn the nut further.
- Release the brake handle. If the pads do not loosen the wheels, unscrew the nut half a turn.
After adjusting the parking brake, its functionality should be checked on a slope of 10-15 degrees.
WHICH CABLE TO CHOOSE
When choosing any car part, you must first of all be guided by its compatibility with your specific brand. Obviously, the cable from Chevrolet will not fit the Zhiguli. But there are times when people purchase unsuitable cables.
In our case, it is difficult to confuse anything. The handbrake cable of the VAZ 2114 is exactly the same as that of similar models of the domestic manufacturer. It can be found at any auto parts store. Several manufacturers produce cables, and all are usually of the same quality. This is understandable, the detail is not complicated.
There shouldn't be any problems when choosing. The prices are quite reasonable and there is not much difference. The only thing worth doing is to read on the packaging about compatibility with your car, just in case.
After following all the instructions, you can replace the handbrake cable on VAZ cars yourself . This will have to be done quite often, due to the design features of the brake system and its fragility. Having such skills is always useful. Now you know how to change the parking brake cable on a VAZ 2114.
How to replace the parking brake
If after adjustment the parking brake does not work, it barely holds, and the cable is tightened to the maximum until it stops, then it’s time to make a replacement.
To replace the main cable or those extending to the wheels, you must also put the car in an inspection hole.
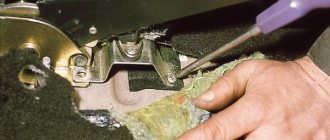
From the interior, remove the decorative trim at the base of the handbrake and unscrew the nut with which the adjustment was made. For auxiliary cables, the equalizers must be disconnected by turning 90 degrees.
Remove the brake drum, brake pads, and use a screwdriver to pull the cable tip out of the groove on the release lever. Using pliers (pliers), we open the spring retainer and remove it from the shield.
Lubricant for hand brake cable
It is better to lubricate the cable with a grease that has good performance characteristics: a high maximum melting point and resistant to oxidation.
Litol 24 cable lubricant is excellent. You can also use its foreign analogues.
Used or flushing oil is not suitable for cable lubrication. Such oils do not have preservative properties and contain sulfur with water, resulting in oxidation.
Dismantling and replacement
It is difficult to confuse the cable from the handbrake with anything else under the bottom of your VAZ 2114, which greatly simplifies the repair and replacement procedure.
Dismantling works
We provide detailed instructions for replacement, and additionally recommend watching the video.
- We advise you to get the car in order in terms of cleanliness in advance. This will make it easier for you to find all the nuts and fasteners.
- Additionally, treat the nuts with the almighty WD40. This will make it much easier for you to unscrew the sometimes sticking and rusting nuts.
- Place the handbrake lever all the way down.
- Start with the adjusting nut and locknut that you used recently to try to tighten a loose cable. In this situation, you should loosen the nuts and remove them from the handbrake rod.
- Remove the washers and cable equalizer. Although this can be done after you jack up the car. But be sure to do it before removing the wheels.
- Raise the rear of the car with a jack, unscrew the wheel bolts and remove them.
- Tap the brake drum locking pins. This will allow them to be removed from the brake pads.
- Remove the block.
- You now need to disconnect the ends of the two cables from the equalizer. The fasteners can be removed from their places with the simplest pliers, so don’t bother.
- The shifted spacer lever has hooks from which the cable loop can be removed.
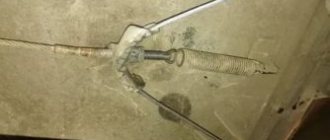
- The cable sheath must be removed from the entire suspension of the rear of the car. To do this, the mounting bolts are first unscrewed.
- Pull the cable out of the holes through the brake flaps.
- We got rid of the old cable, so all that remains is to replace the old one with a new element. The procedure is performed exactly in reverse order.
- Thread the new cables through the washers and hook the loops. You can additionally make bosses - this is a special clamp that allows you to fix the cable even more tightly.
- Reassemble the entire disassembled wheel structure.
- Route the cable along the suspension through the sheath and secure the bolts.
- Pull the handbrake in the cabin.
- Check the correct tension and operation of the new hand brake, or rather the cable.
It is not uncommon for the parking brake to cause an unpleasant squeaking noise from the rear. By changing the cable, you can get rid of this problem at the same time. To do this, rubber seals are installed under the cable fasteners on the body frames.
Functionality check
After replacing the cable, check its operation.
- Place the car on a hill and turn on the handbrake. If the car starts to roll, the new cable needs adjustment.
- Loosen the parking brake lock nut in the handbrake, tighten the adjusting nut, and then pull the cable using the lever.
- The optimal lever stroke should include 2-4 strokes. If this happens, tighten the locknut and check it again.
- We drive up a hill and turn on the handbrake. Now the car should definitely stand still. Unless the cable turned out to be fake or an error was made during the assembly stage.
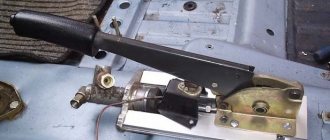
Disassembled handbrake
Before frost, it is recommended to lubricate the parking cable, which will significantly extend its service life. Under the influence of negative temperatures, the cable breaks down faster. The tips, axle and rod of the equalizer should be lubricated.
Tightening and replacing the handbrake cable is not a difficult task. Even if you don't have a lot of experience working on cars, you will be able to do this job.
But if you are not confident in your own abilities or simply do not have time to do such things on your own, contact a service station. A lift will cost about 500-700 rubles, but for a replacement they will ask for at least 1,500 rubles.
cableThe role of the car’s braking system in ensuring safety is unlikely to be disputed by anyone, but the importance of the “handbrake” is still underestimated by many. Some motorists are negligent about its technical condition, believing that in extreme cases they will be able to lock the car in the parking lot by engaging the gear. At the same time, they do not take into account that a tightened handbrake will also help in a critical situation on the road. Therefore, it is better to monitor its condition from the first days and make timely repairs to the system.
We recommend: Why did antifreeze turn brown?
Adjustment or replacement
In some situations, you can get by with simply adjusting the cables, but sometimes they have to be changed completely.
| Repair method | Causes |
| Adjusting the RT cables |
|
| Replacing the cable |
|
Before making a final decision, we advise you to check the current condition of the PT and determine whether you just need adjustment, or whether you will have to change the cable.
Procedure
As practice shows, repairing the parking brake comes down to replacing the handbrake cable, but in most cases, the operation of the unit can be restored with the help of a tensioner. If you follow clear instructions, then no problems with adjustment should arise.
Tools
To adjust the handbrake, you need to prepare the following tools:
- flat screwdriver;
- a set of keys, including a cylinder key;
- wrench with nozzle 18;
- wheel chock or other wheel supports;
- jack;
- work gloves.
Minimum required set of tools
To adjust the cable, it is advisable to use a telescopic jack to raise the car to a greater height. But if this is not the case, then a different type of jack will do, for example, a rack and pinion jack. After all the tools are prepared, you can begin to work.
Instructions
There are several requirements that must be met before making adjustments. First of all, the brake system must be fully operational and free of air. The driver must also make sure that all holders, cables and the lever itself are in good condition. Now you can get started. Below are step-by-step instructions that allow you to make adjustments in the shortest possible period of time.
Step 1. Secure the car with a wheel chock and lift the rear of it and place it on the stumps. You can use old wheels or tires.
Raise the rear of the car
Step 2. To gain access to the handbrake adjustment mechanism, unscrew the special plastic panel (it is located between the seats). Evaluate the location of the ends of the cables and loosen them by unscrewing the fixing nut.
Remove the plastic panel
Step 3. Set up the “soldier”, that is, adjust its position. This should be done only in cases where the part has shifted in one direction or another.
Adjust the position of the “soldier”
Step 4. Change the distance between the working surface of the brake pad and the drum - this is the main principle of adjustment. To do this, you need to move the “soldier” until the minimum distance between the friction surfaces of the parts is obtained. Ideally, the brake drum should slide into place with little effort.
Set the optimal position between the drum and the pads
Step 5. After adjusting the handbrake, put the wheels in place. Then proceed to adjust the handbrake. The cables should be parallel to each other (as in the photo). Using the adjusting nut, adjust the handbrake so that you can rotate the wheel by 1 click when the handbrake is tightened, but after 3 clicks it should no longer rotate.
Install everything in reverse order
Why do you need a handbrake on a car?
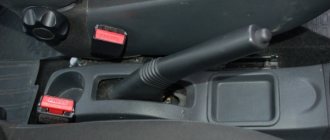
Before moving on to considering the issue of adjusting the handbrake, you need to understand what its task is. Many drivers do not use the car’s handbrake at all, and in some modern cars it is even “hidden”, for example, under the armrest, which is most often lowered for the driver.
The main task of the handbrake is to prevent the spontaneous movement of the car when it is on a hill. For example, this can be useful in a parking lot or in a traffic jam on an uphill slope. In addition, it is much easier to drive uphill or downhill using the handbrake, especially if the car is equipped with a manual transmission.
In addition, the handbrake can be used in case of brake failure. If the car does not respond to normal pedal braking, the parking brake will stop the car, but this will negatively affect the car's braking system.
How to check the handbrake
Before you begin the rather labor-intensive work of tightening the handbrake, you need to check whether this is really necessary. You can diagnose the parking brake using a special stand in the service center.
The easiest way to check the handbrake is to lift one of the rear wheels of the car, put the car on the handbrake and try to manually turn the wheel. If the wheel spins, it means that the parking brake is not working properly and most likely requires adjustment or replacement of the cable.
There is another way to check the car’s handbrake, but it is more “cruel” in relation to the car’s brake pads and other elements of the braking system. The method is to put the car on the handbrake, then engage first gear and press the gas pedal to the floor. If the handbrake holds the car well, it will jerk slightly and immediately stall.