Print this article Font size 16
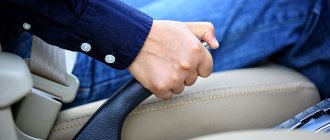
The handbrake helps keep the car in one place during long periods of parking. It is also required for emergency braking.
Using the handbrake for drifting, which is popular among young drivers, is strongly discouraged.
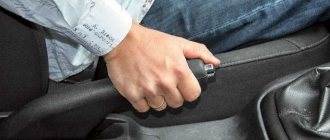
View from the salon
Adjusting the handbrake cable on the LADA Granta
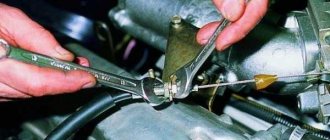
To carry out the work, access to the cable from the bottom is necessary, so adjustment of the Grant handbrake cable after replacement is carried out while the muffler heat shield is not yet in place. Next you should do the following:
- lower the handbrake lever all the way;
- loosen the locknut on the adjusting device (if it is tightened);
- screw the adjusting nut onto the cable shank until the latter is tensioned;
- make sure that the free play of the lever in the cabin is from 2 to 4 clicks;
- if necessary, adjust the cable tension;
- tighten the locknut while holding the adjusting nut with a wrench;
- Install a muffler heat shield.
When the handbrake cable is adjusted, you can check the car while driving.
Sources
- https://autovaz-2114.ru/brake-system/samostoyatelnaya-zamena-trosika-ruchnika-na-vaz-2114/
- https://autovaz-2114.ru/brake-system/chto-delat-esli-ne-derzhit-ruchnik-na-vaz-2114/
- https://ladaservice.info/lada-granta/raznoe-lada-granta/zamena-i-regulirovka-trosika-ruchnika-lada-granta/
How to change the handbrake cable
In fact, the replacement process is very simple, just look carefully and remember how it is attached.
If the handbrake cable flies off the handbrake lever
There are situations when the cable and pads are in excellent condition, but the cable falls off the handbrake lever. To prevent it from flying off, when installing it in place, it is recommended to cover it with imported sealant, which securely holds the cable on the lever; it can be easily opened when changing pads.
Note! After using the sealant, you need to wait about an hour until it dries completely.
Is the muffler removed when tightening the handbrake?
Parking brake VAZ 2109
There is no need at all to dismantle the muffler, it is simply pulled back slightly, and the handbrake is tightened using a spanner. True, it won’t be possible to tighten it much, but this is easier to do than when removing the muffler. Since the disc tension is implied, you will have to crawl under the car. First you need to jack up the required side of the car. For safety reasons, it is advisable to place a brick under the wheel or place a small stump near the jack. It’s good if there is an inspection hole in the garage, then you won’t have to take an awkward position. The cable is tensioned with a nut, so you need to find the place where it is located:
- You need to get under the car.
- Find the stud with the nut to which the cable is attached.
- Find the ends of this cable.
- Screw the nut until the handbrake is raised 4 clicks.
If the nut is tightened and the handbrake holds well at the 4th click, then the desired result has been achieved.
Note! If the handbrake does not stay in the required position even after tightening the cable, the brake pads will most likely need to be replaced.
Since services for replacing and adjusting mechanisms are not cheap at service stations, it is advisable to perform the steps after watching video and photo materials with your own hands. The main conditions for successful work are competent instructions and good spare parts, the price of which must correspond to the quality.
Checking status
Normal PT adjustment ensures that the vehicle is held on a slope. This corresponds to 3-8 clicks of the handle on newer nines or 5-7 clicks on a VAZ 2109 produced before 1995.
To carry out the test, follow a few simple steps:
- Find a slope that has about 25 degrees;
- Turn the handbrake to the required position;
- If the car starts to roll, the handbrake does not hold, adjustment is required;
- If there is no such slope nearby, the check is carried out in a garage;
- Place the car on a flat surface, raise the handbrake handle all the way;
- Approach from behind and try to push the car with maximum force;
- If the car begins to move, the RT requires adjustment;
- Check the operation of the handbrake at 2 clicks on newer versions of the VAZ 2109 and not reaching 5 clicks on versions before 1995. If the handbrake is working at full strength, the cable will be tightened. It will also need to be adjusted.
Operating a car with a tightened PT cable is also dangerous, as this leads to overheating and wear of the rear brake pads.
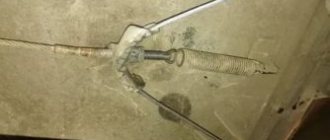
Bottom view
Adjustment
To adjust the PT cable you will need a pit, overpass or lift. Next we proceed according to the following algorithm.
- Raise the handbrake handle 2-3 clicks from the passenger compartment.
- Get under the car and loosen the locking nut of the parking brake cable equalizer. Before doing this, it is better to treat the nut with a wire brush to remove all dirt.
- Then act according to the circumstances. If the cable is overtightened, it must be loosened by appropriate manipulation of the nut. If the cable holds too weakly, the nut must be tightened more tightly.
- If tensioning the cable does not produce any result, then the element is already at the limit of its capabilities. Therefore, the only solution to this situation is replacement.
- When adjusting the degree of tension, be sure to evaluate the adjustment of the cable along the PT lever. As you remember, normally it is 3-8 clicks for more recent versions of the VAZ 2109, or 5-7 clicks for nines that were produced before 1995.
- Check the freedom of rotation of the rear wheels. If you overtighten the cable, the wheels will spin with difficulty and not as freely as they should.
- After making the adjustment, tighten the locking nut back and check the operation of the handbrake again by driving up a slope or pushing the machine with the PT on.
Adjustment process
Replacement
In some cases, heavy movement of the cable in the sheath is due to lack of lubrication. To eliminate this defect, fill the shell with transmission or engine oil. Pour until grease flows out of the opposite end of the cable casing. Remember to move the cable while adding lubricant.
Cable replacement procedure
But lubrication is more of a temporary measure. If signs of cable wear are detected, it is better to replace it with a new one. This is done as follows.
- Loosen the tension on the PT cable locking nut.
- Unscrew the equalizer adjusting nut, which will loosen the handbrake drive cables.
- Raise the rear of your VAZ 2109 using a jack, then remove the brake drum and brake pad.
- Unscrew the drive cable end from the drive arm.
- Disconnect the fastening nut, and then remove the PT cable holder on the rear suspension beam of the vehicle.
- Remove the shell bushing from the hole in the brake shield.
- Pass the end of the PT cable through the hole in the brake shield.
- Remove the PT cable from all holders on the body of your car.
- Disconnect the end of the PT cable from the equalizer.
- Push the cable end out of the bracket to remove the cable.
- Install a new, tested cable, proceeding in the reverse order.
- Do not forget to adjust the cable tension and the performance of the restored RT at the final stage of assembling the unit.
VAZ 2110 hand brake (parking): tightening and replacing with your own hands (video)
- Is adjustment necessary?
- Pulling up the handbrake
- If the adjustment does not help
- Replacement
In fact, the VAZ 2110 handbrake is quite simple. The principle of its operation is not based on anything complicated. The mechanical drive is a cable. When the parking brake handle is pulled, the driver also tightens the cable and creates uniform tension on the wheel pads.
Handbrake
If the handbrake malfunctions, it is recommended to perform an adjustment. And if it does not help, then repairs are carried out by replacing the faulty cable. On a car like the VAZ 2110, adjusting the cable is as simple as replacing it. If this malfunction is ignored, the car may move on its own, or you, on the contrary, will not be able to move.
You don’t have to go to a car service center to solve your problem. If you have some experience, understand the essence of the handbrake, and also apply the data from the repair and operation manual for the VAZ 2110, you can do everything yourself.
Is adjustment necessary?
First you need to determine whether the adjustment will really solve the problem of the handbrake malfunction.
Adjusting the parking brake
To do this, a small test is carried out. Moreover, it is recommended to do a similar procedure after every 30 thousand kilometers, even if you are sure that the parking brake works well.
Drive your vehicle to an area where there is a slight slope. Place the car on it, turn on the handbrake and shift to neutral. If the car starts to roll down, everything is obvious - the handbrake needs repair.
Pulling up the handbrake
It is likely that you just need to tighten the parking brake on the VAZ 2110 to fix the problem.
- Drive to the inspection hole, from where it is most convenient to make adjustments. Another option is a lift. You'll find something here. This way you can easily get to the necessary nodes.
- Make sure the brake lever is in its lowest position.
- Take two keys. You will loosen the lock nut first and tighten the adjusting nut second.
- Tighten the adjustment nut until the cable is properly tensioned.
- It is strongly recommended to hold the rod when tightening the adjustment nut with pliers.
- Now make sure that the lever makes full travel in 2-4 clicks, no more.
- If after checking everything turned out to be good and the working stroke is correct, tighten the equalizer locknut while holding the adjustment nut with a second wrench.
- Release the handbrake lever down and turn the rear wheels by hand. Rotation should occur evenly without any jamming.
- But if the adjustment did not allow the cable to be tensioned, then the element must be replaced.
Checking the effectiveness of the parking brake adjustment is also simple. You drive onto an area with a slope, put the car on the handbrake and watch the car’s reaction. If the car does not move in neutral, it means you have done a good job.
If the adjustment does not help
There are not many cases when adjusting the parking brake did not have any effect. However, this is no reason to despair.
It is possible that the handbrake cable has broken. This is a rare occurrence, but all options need to be considered. Especially if your VAZ 2110 is not new. By the way, on newer models the cable also breaks if the car is used very intensively. The braking system is simply not designed for such loads.
There are several situations in which it is necessary to replace the parking brake cable:
- The cable broke;
- The tips gave way;
- The cable threads have stretches, which over time can turn into a full-fledged rupture;
- The cable is difficult to move inside the sheath even after abundant lubrication.
And in conclusion
The serviceability of the brake system must be monitored first of all, because your safety and the safety of the car depend on it. Moreover, such a VAZ hand brake has a simple design, and repairs do not require complex tools. Domestic cars do not have complex elements or non-standard fasteners and are repaired with the usual garage equipment of the average motorist.
Take care of your car, and it will repay you with longevity and trouble-free operation.
The most easily fixable and fairly common malfunction of the LADA Granta brake system is problems with the parking brake that arise “due to the fault” of the handbrake cable. Replacing the Grant hand brake is easy and does not require special equipment or expensive tools. The only thing that needs to be organized is access to the bottom of the car.
VAZ 2109: replacing the parking brake yourself
Is it becoming difficult to put the car on the handbrake while parked? Does the handbrake lever make more than 8 clicks when lifting? Or does it start to bite while lowering? So, the question arises what happens to the manual brake drive. On the VAZ 2109, the parking brake is replaced after inspecting the entire system. Replacing the parking brake of a VAZ 2109 can be easily done on your own.
Adjustment
After replacement, it is necessary to adjust this element of the brake system. In general, the manufacturer recommends adjusting the cable tension every 20,000 kilometers. To work you will need 2 keys for 13. Make adjustments in the following order:
- Hanging out the back of the car. You can do without this, for example, drive a car onto an overpass, but then it will be more difficult to check the result;
- One key is used to keep the adjusting mechanism from turning. Others tighten the cable. Sometimes the nuts may rust, in which case they will need to be treated with a liquid wrench;
- Let's check the result. After 4 clicks, the wheels should lock securely. This is where you will appreciate the convenience of hanging wheels. To check, it will be enough to simply try to spin the wheel. When working on an overpass, you will have to push the machine or place it on an incline.
Conclusion
How to tighten the cable correctly
- Drive the car onto the overpass.
- Move the handbrake to its highest position.
- Using wrenches, loosen the locknut and tighten the adjusting nut.
- The adjustment nut must be pulled until the cable is fully tensioned.
- Check that the travel of the handle in the interior is at least two clicks, maximum four.
- If everything is in order, you need to tighten the lock nut, holding the adjusting nut in place.
- Move the handbrake down and spin the rear wheels. They should spin freely.
You need to check how the parking brake works now. If all is well, then the information on how to tighten the cable saved the person some money.
If the lift does not give anything, then a replacement is necessary. Before you go for a new cable, you should find out its exact length. As a rule, the length of the cable that is installed on the VAZ 2110 is 1620 millimeters.
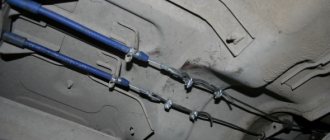
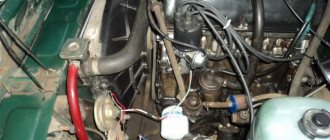
Design and location of the hand brake cable for the LADA Granta
The purpose of the LADA Granta handbrake cable is to transmit force from the lever in the cabin to the rear brake pads. It is enclosed in a multi-layer protective shell and has tips for attaching to the handbrake lever and the rear wheel brake drive. The adjusting nut on the cable allows you to adjust the length of the drive, and the return spring returns the system to its original state after lowering the drive lever. The handbrake cable is located under the bottom of the car and is partially covered by the muffler thermal shield.
Causes and signs of failure
The main reason why you have to change the handbrake cable of the LADA Granta is mechanical wear. The constant forces to which the cable is subjected eventually lead to its deformation (stretching) or rupture. The cause of cable breakage can also be wheel bolts of non-standard length, which catch and fray the steel threads of the cable. Signs that the parking brake cable needs to be replaced:
- the cable stretches or breaks, as a result the handbrake lever rises all the way without effort and “does not hold” the car;
- the cable jams in the braid, the pads do not release the brakes, the brake drum heats up when moving.
When a cable jams in the braid, you can try to lubricate it and, if the cause is not frayed threads, the problem may disappear. In all other cases, it is necessary to replace the Grant hand brake cable.
Advice: do not try to “save” the handbrake, using it as little as possible. If the cable moves infrequently in the sheath, it will eventually jam and break.
What is needed to replace the handbrake cable of the LADA Granta
To change the handbrake cable, you need access to the bottom of the car. Therefore, work must be carried out on a lift or inspection pit. In the latter case, you will additionally need a jack. In addition, you need the following tools and materials:
- wheel wrench;
- keys for 10, 12, 13;
- 2 bolts M8x60 mm;
- pliers;
- flat screwdriver;
- WD-40;
- metal brush;
- handbrake cable for LADA Granta.
Modification and replacement of the VAZ 2110 parking brake cable - Crafts for cars
Hi all!
I recently modified the hand brake (handbrake) mechanism on my TAZ, and would like to share my successful experience))) A little about the problem:
New cast iron brake drums were installed + new pads for them, but the handbrake didn’t really hold. Tightening the cable did nothing but only tightened the cable more. And something had to be done about this VAZ misunderstanding.
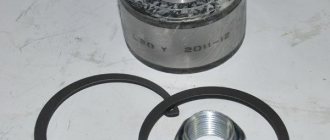
And so: Were purchased - Handbrake cables - Handbrake repair kit - Small and large springs (you can leave the old ones if they are normal)
What was done:
I immediately shortened the springs on the cables by 6 turns so that when tightening the spring would not rest. Just don’t cut off too much because... the spring will not throw back the lever!
I also spilled engine oil on the cable. P/S do not fill it with brake fluid because... it tends to absorb moisture and in the future the cable will rust and jam!
New repair kit for handbrake 08-10
This is where the dog is buried; when the handbrake is tightened, the lever rests on the spring and does not allow the brake pads to open normally.
We modify the lever with a triangular file, the groove is about 5 mm, but no more, because when tightening, the lever can rest against the hub.
Comparison: How it was before and after modification
Everything is assembled!
I was very pleased with the result of the work done. While coasting at 20 km/h, I pulled the handbrake and the car stalled. I put 4 people in the car and drove up the overpass and lo and behold. holds the handbrake. The handbrake was also tested on winter roads. Well, you know what I mean...))
I know that I didn’t create a bicycle, but maybe my little experience will be useful to someone! Don’t “kick” too much, good luck to everyone on the winter roads!
Author; Max Tokarev
Similar articles:
Adjustment or replacement
In some situations, you can get by with simply adjusting the cables, but sometimes they have to be changed completely.
| Repair method | Causes |
| Adjusting the RT cables |
|
| Replacing the cable |
|
Before making a final decision, we advise you to check the current condition of the PT and determine whether you just need adjustment, or whether you will have to change the cable.
Replacement
Inspection
To carry out the inspection, you need to prepare the car:
- Wash the entire lower part of the VAZ body and rear chassis. Wait until it dries a little.
- The inspection can be carried out on the overpass.
- Raise the lever 2-4 clicks.
Replacing the parking brake on a VAZ 2109
- Get under the car.
- Check the tension of the handbrake cable. If there is noticeable sagging, if several strands of wire are torn, it is necessary to replace it.
Note: if more than 2 strands are broken, the cable must be replaced. Broken wires can cause snagging when using the handbrake.
It is advisable to replace the cable in a garage with an inspection hole. If there is no inspection hole, you need to prepare an old blanket or several large corrugated sheets of cardboard.
Advice: carrying out repairs while lying on concrete is very harmful to health. Spread the cardboard on the floor in two or three layers.
To replace the cable you will need the following equipment:
- the cable itself, which must be purchased at a car store;
- a set of keys;
- jack;
- standard metal stationary stands;
- wheel chocks;
- metal brush;
- lighting lamp with protective mesh;
- acetic acid – 70%;
- rags;
- cotton gloves
Note: acetic acid will be needed to wet the threaded connections when unscrewing the nuts.
Removing the cable
- Place the vehicle level in the pit.
Replacing the parking brake cable of a VAZ 2109
- Engage first gear.
- Lower the handbrake lever to the lowest extreme position.
- Open the hood.
- Disconnect the negative terminal from the battery.
- Place wheel chocks under the front wheels.
- Go down under the car body.
- Clean the equalizer rod with a metal brush.
- Try to loosen the lock nut.
Note: if it does not give in easily, then moisten a rag with acetic acid, place it on the thread of the rod, and leave for 20-30 minutes.
Clean the rod threads with a metal brush again and try again to loosen the nuts. The nuts should come out easily. Let's continue:
- Unscrew them from the equalizer rod.
- Go to the back of the car.
- Loosen the wheel rim bolts.
- Raise one side with a jack and install the stand.
- Perform the same operation on the other side.
- Remove the wheel rims.
- Unscrew the brake drum locking pins.
- Tap the locking drums in a circle, for this use a wooden block or a plumber's hammer.
- Take them off.
- The end of the cable is attached to the drive lever of one block.
- Remove this block.
- Disconnect the cable.
- Unscrew the bolt that secures the cable sheath to the beam of the suspension system.
- From the beam into the body, remove the sealing sleeve from the brake shield.
- Pull out the cable.
Do the same procedure with the other brake drum. Then release the remaining shells from the fastenings under the bottom. After this, remove the ends of the brake cable from the equalizer.
Installation
Replacing the parking brake cable on a VAZ 2109
Installing a new cable is done in the reverse order. Clean the casings from accumulated dirt, rinse with gasoline or solvent. Pour clean oil inside, you can use graphite lubricant. Clean all threaded connections from rust. Lubricate with graphite grease. Do the same procedure with the nuts. There is an opinion among car enthusiasts that the less you put the car on the handbrake, the longer it will serve. But this is a mistaken opinion. According to all technical conditions, the handbrake cable often fails with little use. Since its coking occurs in the shells due to accumulating dirt and oil residues. For this simple reason, you should always use the handbrake when parking the car. Replacing the VAZ 2109 parking brake cable does not end there. This is only half of the work done.
Diagnostics
Replacement of the handbrake cable on VAZ 2114 and 2115 is carried out in case of obvious malfunction. To avoid problems, you should know all the possible signs of problems with the handbrake. The easiest way to diagnose is to try to turn the rear wheel with the handbrake raised. To do this, hang the rear wheel on a jack. We raise the handbrake and try to spin the wheel. If it rotates freely, then the cable may have broken or stretched. To clarify the diagnosis, ask someone to press the brake pedal. The wheel should not spin; if it continues to spin, the brake pads are most likely worn out. Sometimes drivers simplify the diagnosis, put the car on the handbrake, and try to push it away. The assessment principle is exactly the same. The check should be carried out in the following cases:
- We noticed that the handbrake began to hold worse or does not hold at all;
- The drums began to warm up. The reason is that the pads are not fully pressed;
- When raising/lowering the lever, the cable does not react quite correctly. This is due to a worn cable getting stuck, which reduces work efficiency;
- A cable break or wear on its sheath has been noticed.
Restoring the hand brake on a VAZ 2109
Repairs must begin with adjusting the cable. Typically, correct installation is considered when the brake lever passes three to four clicks before the wheels lock.
If there is nowhere else to tighten the cable (or tightening does not produce results), you need to remove the rear wheels and make sure that it moves freely on both sides, inspect the places where the cable is attached to the body and the brake shield. Then you should remove the rear brake drums and check the condition of the pads.
At this stage, the diagnosis and repair of the VAZ 2109 handbrake can be considered complete.
Advice. Sometimes, when the handbrake cable is strongly stretched or the brake drums are worn out, it makes sense to place a 1-2 cm thick bushing under the adjusting pin, thereby extending the service life of the handbrake.
When replacing pads or cables, re-adjustment must be done after 1 thousand - 1.5 thousand. km/mileage. It is also necessary to adjust the parking brake when the number of clicks when pulled is more than five.
The handbrake helps keep the car in one place during long periods of parking. It is also required for emergency braking.
Using the handbrake for drifting, which is popular among young drivers, is strongly discouraged.
View from the salon
Replacement at a car service
Why shouldn't you contact a car service? The answer is simple - not economically, and not always of high quality. It seems that the procedure is not complicated, but the cost of the work is daunting. In addition, at most service stations they try to slip in their own cable, which is also not cheap. The average price in a store will be 200 rubles, while the service can rip off 500 just for a part. The cost of the handbrake cable varies depending on the manufacturer.
By making the replacement yourself, you will know exactly how well the work was done. Replacing the handbrake cable of a VAZ 2114 is a responsible matter. If you do everything according to the instructions, then there should be no problems. The main thing is not to forget about safety precautions.
What does a handbrake consist of?
To successfully carry out any repair work, you need to know what the element that requires it consists of.
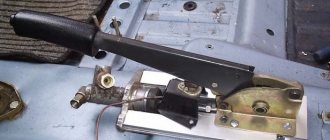
The handbrake device is not complicated, but still, you need to pay attention to it. The visible elements of the handbrake drive include the locking button and the lever itself
The remaining parts are hidden, including: a protective cover, a handbrake rod, a cable equalizer, an adjustment nut, a control nut and a sheathed cable.
The visible elements of the handbrake drive include the locking button and the lever itself. The remaining parts are hidden, including: a protective cover, a handbrake rod, a cable equalizer, an adjustment nut, a control nut and a sheathed cable.
There is a mechanism on the rear wheel that is responsible for braking directly. This is where the pads are located, which need to be changed regularly, the drum, the condition of which also needs to be monitored, and other parts that make up the wheel locking mechanism.
How to adjust the handbrake
Sometimes, after replacing the cable, it becomes necessary to adjust the brake. It's easy to check whether adjustments are needed. We put the car on the handbrake down the slope. If it moves, then it needs to be adjusted.
Incorrect operation of the handbrake is expressed not only in poor fixation of the car when using the parking brake. A creaking sound near the rear wheels also indicates that the cable tension needs to be loosened.
Adjusting the hand brake of the VAZ 2114 is quite simple:
- It is necessary to remove the muffler from its mountings
- Unscrew the parking brake lock nut
- Tighten or loosen the nut, depending on the situation (if it doesn’t hold, tighten it, if it creaks, then loosen it).
The lever travel should be in the range of two to four clicks until it is completely locked. After this procedure, you need to check the car again on a hill.
Replacing the handbrake cable on a VAZ 2110 or how to tighten the handbrake
Replacing the hand brake cable of a VAZ 2110 is a pressing problem for all owners of this vehicle model and not only that. The parking brake plays an important role in the operation of the car. For this reason, its frequent use leads to rapid wear. Knowing how to change a handbrake cable with your own hands or how to tighten the handbrake will save you the cost of car repairs.
Possible causes of failure and phased replacement
Before starting repairs (replacement), it is recommended to find out the reason why the handbrake does not work. The fact is that in case of some breakdowns, when the handbrake does not work, its complete replacement may not be necessary.
The main and most common root cause why the working mechanism fails is wear of the brake unit.
A cable extends from the handbrake lever, which stretches to a mechanism that activates the brake assembly. Despite the fact that the cable is constantly subjected to heavy loads, its rupture is extremely rare. Often the cable jumps off or wear (grinding) of the tips in the drum occurs. Brake pad wear or drum brake wear may also occur.
The steel fibers of the parking brake can stretch during intensive use, which makes it difficult for them to move in the shell, and the device fails.
Replacing the handbrake cable on a VAZ 2110 is not difficult, but for convenience it is better to call an assistant.
Next you should do the following:
- The vehicle must be released from the parking brake. To do this, you need to lower the handbrake to the floor to the maximum (all the way).
- Remove the wheel brake drum.
- Removing the muffler and resonator from the rear cushions.
- Removing the equalizer. After the exhaust pipe is moved to the side, you need to crawl under the car and unscrew the adjusting nut and locknut. After unscrewing, the equalizer can be removed from the rod. You need to clean the handbrake rod of the VAZ 2110 with a brush.
- Removing the cable end from the control.
- The handbrake cable is attached to the car using special brackets. They need to be bent.
- Removing the rear brake pads and disconnecting the cable end.
- There are nuts on the rear axle beam that secure the handbrake. They need to be loosened and the cable pulled out of the device holder.
The work on removing the VAZ parking brake cable has been completed. Before installing a new cable, it is recommended to clean all fastening points from dirt and rust. To do this, you can use special products that are sold in car dealerships, or use acetic acid. When working with any chemicals, you need to be very careful and follow all safety rules. To put a new cable in place, all the steps listed above are carried out in reverse order. It is worth paying attention: in the bracket that is located under the bottom of the body, the cables are installed crosswise.
If the parking brake warning light on the dashboard does not light up, you will need to check the fuse. It may be necessary to replace the handbrake switch on the VAZ 2110.
Adjusting the parking brake
After the replacement has been made, the hand brake needs to be adjusted. It is recommended to carry it out with the operating manual for the vehicle at hand.
The handbrake on the VAZ 2110 has a lever travel of 2-4 clicks when adjusted, and in working condition - from 2 to 8 clicks.
The car must be placed on jacks so that the wheels can rotate freely. The handbrake is set to the locked position. To adjust the bolt and nut, you will need a 13mm wrench. The nut must be tightened until the wheels are completely locked, and then the locknut must be tightened.
When the repair has been made and the handbrake has been adjusted, you need to check it in operation on the road. You need to find a slope whose length will be at least 4 m and 1 m in height (1:4). On this slope, the car is put on the parking brake, and the car should not stand at speed. If everything is done correctly, then the car should not move (roll down the slope), because the handbrake is holding. If it doesn't hold, the handbrake needs to be tightened.
Next, it is recommended to check the operation of the entire brake system. You need to drive a short distance and then use the brake several times. After stopping the car, the drum is immediately checked. Its temperature should not differ from the ambient temperature. Otherwise, if the drums get hot, you need to loosen the cable tension a little. After the modification is done, you need to wait about an hour (cooling time) and repeat the test.
The hand (parking) brake is designed to prevent the car from moving while parked; it can be useful in case of emergency braking (when the main brakes fail), and is also necessary for repair work (jacking up, changing wheels, etc.).
The handbrake has one feature, and if the VAZ 2109 handbrake does not work, first of all you need to pay attention to it. The fact is that one trip with the handbrake pulled is enough for it to fail. The design of the handbrake in the drum allows only 14 parts of the shoes to be pressed against the braking surface. When moving, this part of the pads quickly wears out and stops reaching the drum.
You can try and fix this by adjusting the handbrake cable. As a rule, after driving with a tense handbrake, it must be tightened approximately three to four times. Then the pads are completely worn out and to restore the functionality of the handbrake, they need to be replaced.
A common cause of handbrake failure is jamming of the cable as a result of dirt and moisture, rust, and mechanical damage. In this case, you can try to repair the handbrake by lubricating and developing the cable itself. But, usually this action does not help for long, and therefore it is advisable to still replace the cable.
Another malfunction of the handbrake can be considered a breakage, jamming or jamming of the lever or ratcheting mechanism of the ratchet located in the handle. In this case, the lever cannot be fixed in the working position.
Less work - longer operation?
Many drivers believe that rare use of the handbrake ensures maximum performance of this unit. In fact, such an attempt to preserve the RT resource gives a completely opposite effect.
The less often you use the handbrake on your car, the less movement the cable makes in its sheath. This leads to loss of efficiency and performance of the cable. Loss of mobility leads to the appearance of breaks when the handbrake is rarely applied. As a result, at the most inopportune moment the car does not stand still as it should.
To prevent problems with the RT, periodically inspect the condition of the unit, and also do not forget to squeeze the parking brake handle when necessary and required by traffic rules.
Loading …
How to Adjust the Parking Brake Safety and Comfort
- The lever rises by 2-3 clicks, the number depends on the model;
- We jack up the car. It is most convenient to carry out work in the inspection hole;
- Then, loosen the tightening nut of the adjusting unit. By rotating the other nut, tighten the cable until braking force appears on the suspended wheel;
- Let go of the lever, the wheel should spin without much interference. Raise the lever again to its maximum position. The wheel should stop spinning. This is repeated several times;
- Once you are sure that the settings are correct, you should tighten the locknut.
Why do you need a handbrake?
Due to the hand or parking brake, the machine is held in one position during long-term parking conditions. In addition, it is used for emergency or emergency braking when driving. In essence, this is a braking device used in cases where it is impossible or difficult to use the main and foot brakes.
Note! The need to use the handbrake also arises when you need to “gas” and at the same time keep the car from rolling away.
Handbrake design
This braking system is quite simple in design. It includes:
- brake mechanisms for the rear wheels specifically for this class of car;
- mechanical drive.
The drive itself consists of:
- the handbrake lever of the VAZ, which is located directly in the cab near the driver’s seat on the center line;
- front and rear drive cables.
The ends of the rear cable are connected to the manual brake shoe levers. In the area where the front cable is brought to the rear sections the following are located:
- equalizer;
- nut for adjustment;
- a locknut and a release spring, by means of which the front cable is attached to the engine body bracket.
Note. When the control lever is released, the spring loosens the cables and helps return the equalizer to its original position. This is where the handbrake is adjusted.
Design
The handbrake (RT) system on VAZ 2109 cars is quite simple. It includes two main nodes:
- Braking devices for rear wheels;
- Mechanical drive.
The drive, in turn, consists of:
- Handbrake lever located in the cabin on the right hand of the driver;
- Front and rear drive cables.
The ends of the rear cable are connected to the levers of the manual brake shoes. In the section where the front cable is brought to the rear area we are dealing with the following elements:
- Equalizer;
- Adjusting nut;
- Tension spring and locknut. They connect the front cable to the car body bracket.
By releasing the lever, the spring releases the tension on the cables and the equalizer returns to its original position. This is where adjustment is required.
Dismantled RT handle
Additional recommendations
If you cannot depress the brake cylinders, open the cap of the brake fluid reservoir to reduce the pressure. If the pads wear unevenly, pay attention to the caliper. Most likely it will need repairs. When replacing rear pads, replace all springs as well.
They are inexpensive, but they will protect you from possible failures until the next replacement. The front caliper guides can be lubricated with graphite grease for smoother operation.
Replacing the pads on the front axle will not cause problems even for “dummies” of automotive repair. But from the back it’s not so simple. Assess your strengths and capabilities in advance: can you reach the handbrake cable and cope with a stuck brake drum? If yes, then everything will definitely work out.