Remote control battery
The battery voltage of the remote control is 3 volts.
You can use batteries from the following series: CR1620, ECR1620, DL1620, 5009LC, SB-T17. These are lithium cells with a diameter of 16 mm, a thickness of 2 mm, and a capacity of 68 mAh. The self-discharge of the element is no more than 1% per year, so they have a long shelf life - from 5 to 10 years. Remain operational at ambient temperatures from –30 to +85 °C. The battery life directly depends on the frequency of use of the key. Average duration of work: from 1 year to 2 years. CR1620 battery
Signs that the battery needs to be replaced
The remote control provides communication at a distance of up to 1 meter. The range of confident control of the door and trunk locks is within a radius of 80 centimeters from the external receivers located next to the locks. When the battery potential decreases, the driving distance is reduced.
When you have to move the remote control closer to the door handle every time you open the door, this is a sure sign of low battery power.
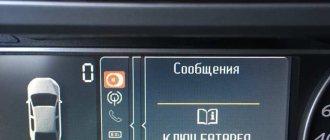
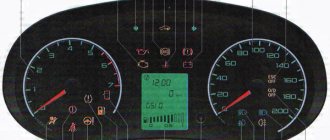
If the Advanced Key card battery is low, the green “KEY” icon will flash for 30 seconds after the starter button is pressed to turn the ignition off. The icon is located in the tachometer area on the vehicle's instrument panel. This signal serves as a warning that the battery needs to be replaced.
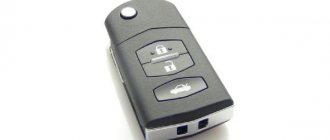
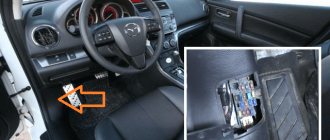
1 – indicator; 2 – lock button; 3 – unlock button; 4 – button to disable the interior intrusion sensor
Note. The “KEY” indication can be disabled in the personal settings system. If the card is not detected, the indicator will turn red, one of the reasons is that the card’s battery is completely discharged.
If the car security system does not respond to pressing the remote control buttons. And at the same time, the activation indicator on the remote control itself does not light up. This is direct evidence that the battery is completely discharged.
Mazda 3 key disassembly
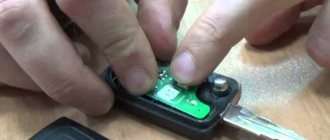
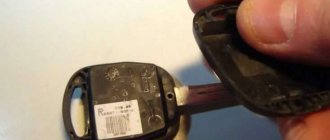
You need to disassemble the key with a small tool. This could be an extra-small screwdriver or an awl. This is necessary in order to reveal the key. The standard key for Mazda opens and is divided into two parts: the key itself and the battery. The battery is always located in the second unit - the battery.
To open the battery, you will need a screwdriver or an awl. The tool must be pressed on the fixing element, which is usually located in the crevice on the side. The locking element is a lever in the form of a very small button that must be pressed.
When pressed, one half - the lid - will separate from the other. When the cover comes off, the inside of the key will be visible. There you can also see a battery and a number of other devices.
Arguments against
1) On
The decree of the Moscow Mayor is missing a signature! Perhaps the most naive objection. This impression can really be formed, because Sobyanin’s decree was signed with an electronic digital signature, which is absolutely legal and, from a legal point of view, equivalent to a “living signature.”
2) Since a state of emergency has not been introduced, any restrictions are illegal!
This statement is simply erroneous and is easily refuted when reading the above quotes from the Constitution of the Russian Federation and federal legislation, some of which were adopted back in the 90s! In addition, similar restrictions are being introduced throughout the world!
3) The state or organizations must provide citizens with personal protective equipment at their own expense in accordance with Resolution No. 417!
Decree of the Government of the Russian Federation dated 04/02/2020 N 417 “On approval of the Rules of Conduct, mandatory for citizens and organizations, when introducing a high alert regime or emergency situation” contains part 6, which reads:
Depending on the current situation in the territory where there is a threat of an emergency situation, or in an emergency zone and (or) on additional measures to protect the population and territories from emergency situations taken by the Government of the Russian Federation, the Government Commission for the Prevention and Elimination of Emergency Situations and ensuring fire safety or officials specified in paragraphs 8 and 9 of Article 4.1 of the Federal Law “On the Protection of the Population and Territories from Natural and Technogenic Emergencies”, organizations provide employees and other citizens
located on their territories, the available means of collective and individual protection and other property intended to protect the population from emergency situations, take other necessary measures to protect workers and other citizens located on their territories from emergency situations.
Replacing the battery in the key remote control
To replace the battery, you need to separate the key from the remote control and disassemble the remote control housing. This can be conveniently done using a thin flat-blade screwdriver. You can use a penknife, an awl or a piece of steel wire. You should purchase a new CR1620 battery in advance.
Step-by-step instruction
- Reveal the key, free the niche it occupies.
- Using a thin screwdriver, press the latch located in the niche slot and separate the key from the remote control.
- In the opened end part of the remote control, insert a screwdriver into the gap between the cover and the case and, using it as a lever or turning it along the axis, separate the upper part of the case from the bottom.
- Remember the position of the battery in the slot relative to “+” if the corresponding mark is missing.
- Press out the plastic tab on the battery holder.
- Loosen the battery using a screwdriver and remove it from the case.
- Inspect the condition of the contacts on the board, if necessary, remove oxides and wipe with a soft cloth.
- Place the new battery in the socket and press it with your finger until the holder latch locks.
- Connect the two halves of the housing and squeeze them to secure the latches around the perimeter.
- Connect the remote control to the key and press firmly to secure the key latch.
- Check the functionality of the remote control.
Attention. The latches and latches, as well as the remote control body, are made of plastic. At low temperatures, plastic becomes brittle. To avoid damage to the latches, the remote control should be warmed up.
How to replace the battery in a regular Qashqai key?
The original key of the Qashqai model has a built-in remote control. Let's look at how to change the battery in a Nissan Qashqai key. To do this, you will need to prepare a new element to replace the dead battery (CR2032 voltage 3V), a plus screwdriver with a thin tip and a utility knife. Subsequently, the following procedure is performed:
- A screw is unscrewed that secures two plastic parts that serve to hold the metal sheet of the ignition system. A screwdriver is used for this;
- The plastic elements of the key fob are separated using a utility knife. It will need to be inserted into the groove that is formed by connecting the two key fob covers. You must act extremely carefully so as not to damage the board or the plastic body of the key fob;
- All that remains is to dismantle the one that has lost its charge and install a new element. It must be installed with the required polarity. It can be seen on the contact part.
How to replace the battery on a Mazda 3 chip key - step-by-step instructions
In order to independently replace the battery in the Mazda 3 chip key, follow the following procedure:
- The battery in the key is of the type CR2025, more or less normal brands like Panasonic, Energizer, Duracell for some reason, all Made in Indonesia. I chose the cheapest Panasonic of these three batteries; as it turned out, the exact same battery was originally inserted inside the key.
- Using a screwdriver, remove the back cover from the device's key fob.
- We take out the old battery and replace it with a new one.
- Closing the back cover
Well, that's basically all the instructions. I think everyone can handle replacing the battery in a Mazda 3 chip key.
Replacing the battery in the Qashqai key
The Nissan Qashqai can use the INTELLIGENT KEY powertrain launch complex. In this case, the immobilizer complex and the Nissan Qashqai ignition key operate on a different principle. Unlocking the car door locks is carried out when approaching it at the minimum permissible distance with the INTELLIGENT KEY. In this case, there is an option with opening the door locks using the buttons of the key fob control panel.
The engine is started without using the classic ignition switch. In its place, a plastic twister is mounted, the rotation of which leads to the start of the power unit. In this case, turning the knob is possible only when the ignition key is in the Nissan Qashqai interior.
If the specified condition is not met, the electronics automatically blocks the rotation of the plastic spinner. The same situation will occur if the battery in the key fob is completely discharged. To get out of this situation you will need:
- open the mechanical part of the key by removing the cover;
- press the key to lay out the metal blade of the ignition complex element and open the car doors.
Using the folded blade, you can safely unlock the car and start it. To start the motor, you need to insert the mechanical part of the blade into the corresponding socket of the plastic twister. This will release the electronic lock. All that remains is to start the power unit by turning the knob.
To replace a dead battery, you will need to do the following:
- Initially, the protective cover is removed by disengaging in the direction of the indicated arrow;
- on the plastic protrusion that appears, you will need to unscrew the screw with a Phillips screwdriver;
- in the future, it is necessary to divide the key fob body into two parts, for this we use a thin plate or a stationery knife, inserting it into a special groove;
- Having gained access to the supply element, it is replaced and reassembled in the reverse order.
How to disassemble the key. – MAZDA 3. BK (2003-2009), BL (2009-2013), BM (2013-present)
2. Using a thin screwdriver, lightly press the button inside the key channel. If you press or pull too hard, you can break the foot.
3. After this, CAREFULLY remove it.
4. The lid with the logo can be attached with a screwdriver or a thick needle. Perhaps a couple of millimeters will chip off, but it is easily painted over and nothing is visible.
5. Be careful with the adhesive layer - we will then put the logo back on it. Unscrew the screw
6. We hook the latch and bend it. Now you can remove the cover
8. The main part of the key: my metal part broke, take it out and install a new one. Also, the pin is our button with a spring. If you remove the key, there will be a return spring and grooves - if it falls off, be careful with the direction of its movement. otherwise the key will bend instead of straightening.
Replacing the battery in the “Advanced Key” card
The Mazda manufacturer recommends changing the card's battery at a service station. However, it also allows for independent replacement. You can use the tools from the previous list.
Step-by-step instruction
- Slide the latch and remove the auxiliary key from the card.
- In the opened part of the end of the card along the edges there are two slots at the junction of the two halves of the case, where you should insert a screwdriver and, turning the screwdriver handle around the axis, disengage the plastic latches.
- Insert a screwdriver into the gap formed around the perimeter of the case and move it along the case on both sides, releasing the remaining latches.
- Remove the top cover, which contains the battery socket.
- By pressing the edge of the battery you can remove it from the socket.
- Insert the new battery “+” down.
- Connect the two halves of the card and squeeze until the latches lock.
- Insert the auxiliary key into place and close the latch.
- Check the functionality of the card.
Note. In the latest modifications of Mazda, the “Advanced Key” card has a different design. The battery is inserted from the end of the card. There is no need to disassemble the case. It is enough to remove the socket plug and pry off the battery with a sharp awl or needle.
Replacing the battery in a Mazda key
To replace the battery we need a battery marked CR2025
, a small flat-head screwdriver and, of course, the ignition key itself.
Then at the inner ends we see a small slot in the key body, insert a screwdriver there and, with a slight effort, turn the screwdriver along its axis, thereby opening the back cover of the Mazda ignition key. Do this operation on both sides as in the picture below
Then carefully remove the back cover and take out the battery, it is closed with a round plug.
Now we change the battery, pay attention to the polarity, the positive side should be on top. Replace the battery plug, being careful not to damage the rubber retaining ring.
We put the back cover of the Mazda ignition key in place and snap it around the entire perimeter.
We insert the key blade into place. That's all.
We would also like to draw your attention to the fact that the battery life can be completely different from several weeks to a year and a half. Therefore, it will not be superfluous if you always have a spare battery with you.
Replacing the battery and reassembling the Mazda 3 key
Replacing the battery in the key is a fairly simple matter.
You need to press on the free edge of the battery, and then it will pop out of the power supply under pressure. However, sometimes there are difficulties even with this. There are users who write that they were unable to simply replace the battery, so they had to apply additional pressure to it using a crochet paperclip. Therefore, we change the battery very carefully and try not to break the additional modules. When replacing, it is necessary that the side with the positive marking (that is, the plus sign) is on the bottom, otherwise the key will not work. In this case, the battery information label will be on top.
Now you need to assemble the key body. This operation is done in the same way as parsing, but in reverse order. Therefore, the first step after installing the battery in place is to assemble the key body. This is done by simply pressing until you hear a click. A click will sound if the locking element is working correctly - in this case it will pick up the cover, and then the case will be intact. After this, you need to fold the two parts of the key - and then it will be assembled.
When the installation of the new battery in the key is complete, the key light on the instrument panel will stop flickering red. This will mean that the installation was successful and the key can be used for work.
Thus, installing a new battery in a Mazda 3 key is not a difficult task, but it is painstaking and requires certain skills. However, following these instructions, any driver of this car can do this easily and quickly. Basically, this type of work takes 10-20 minutes, depending on how the battery is mounted in the case.
We recommend reading:
Automotive giants today produce cars equipped with ECU systems. These electronic control units using sensors...
When choosing a car, the future owner quite reasonably analyzes all the information relating to the vehicle of interest. Today thanks to...
Mazda MPV is a Japanese-made car designed for 7 seats. In some Asian countries, the model...
How to open a car and start the engine with a dead battery
If the battery is not replaced in a timely manner, the remote control will stop working. But you can still use the car. The driver's door is opened and closed with a key. The “Advanced Key” card also has an auxiliary key.
Expert opinionAlexey BartoshSpecialist in repair and maintenance of electrical equipment and industrial electronics.Advice. If the remote control activity indicator lights up when you press the remote control button, it means that the battery still has some remaining charge. Hold the remote control close to the handle and try to open the door.
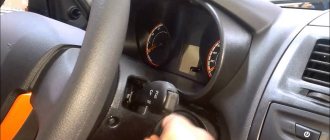
The engine is started with a standard ignition switch in normal mode by turning the key to the “Start” position. In cars with a keyless engine starting system, it is necessary to remove the plug that covers the lock cylinder, which is located as standard on the steering column. This can be conveniently done using an auxiliary key. Next, the key is inserted into the lock, but does not turn. Now you can start the engine using the starter button in the standard way. After starting, the key remains in the lock. Stopping the engine is done in reverse order. By pressing the starter button, the ignition is turned to the “OFF” position, and after stopping the engine, the key is removed.
[Mazda 3 (BK)] Key binding for remote opening - Do it yourself. Mazda 3 manuals
Hi all!
Here I saw instructions for binding the 3rd key. But this is a binding for the immobilizer. If you need to associate a key with buttons for remote opening/closing of the car (CL, i.e., a flip key), then you need to perform the following steps: 1. Sit in the car in the driver's seat =)2. Insert the key, turn it to the ON position (meaning the second position, which is before the engine starts, although it can start).3. Close all doors (just with your hands, you don’t need to press the buttons on the key, the central locking must be open).4. Remove the key from the lock.
Attention!. After the next step, you will only have 24 seconds for all further operations. This is quite enough, but the procedure must be studied in advance.
5. Open the driver's door.6. Insert the key and turn it to the ON position (as in step 2). After a second or two, return it back to the OFF position. Without removing the key, repeat 2 more times (i.e. in total you need to turn the key back and forth 3 times). We do not remove the key even after!7. Close and open the driver's door 3 times (you can simply close it until the light in the cabin begins to go out). The locks should then click back and forth, confirming that you are on the right track.8. Press the UNLOCK button 2 times on the key, which should still be in the lock. The locks should click again.9. On all subsequent keys that need to be linked, then also press UNLOCK 2 times (you don’t need to insert them into the lock, the first key should be there). Ready!
The procedure erases all previously recorded keys from memory, except for newly recorded ones. I had 2 standard keys, I did it with one of them first. After that, the car stopped opening remotely using the second key. Although I opened it manually and started it with no problems. Those. This does not affect the immobilizer settings and bindings. Then I repeated the procedure for both keys and it began to open again with the second one. That is. In this way you can “untie” the keys.
I hope this hasn’t happened before and it will be useful to someone.
Post edited by Free: October 21, 2011 - 13:34
mazdaclub.cc
What kind of battery is needed
From the factory, the immobilizer control system on the Mazda 3 is powered by a Panasonic CR1620 battery. However, such elements are produced by many companies, and in order to replace a failed element, finding one that matches the parameters is not difficult.
The first generation was produced from 2003 to 2008, the second began to be produced in 2009 and finished in 2013. Despite this, their key remained unchanged, so replacing the battery in the remote control is carried out according to the same scheme.
To disassemble the key fob, you need to press a shiny button of a rather impressive size - then the key will take its working position.
Mechanical key in working position
Now you can begin the analysis. To do this, we find in the small niche formed after unfolding the key a button that secures the connection of the two halves of the key fob.
Attention. The latch that connects the two parts of the key fob is quite fragile, and therefore disassembly is best done in a warm place.
Fixation button To divide the key in half, use a screwdriver to press this “timp”.
Disabling commit
Without fixation, the keychain easily separates into two parts. We put the top one with the key aside, and continue to work with the second one.
There are 2 grooves on it, into which you need to carefully insert a screwdriver and make a rotational movement. The bottom cover will come off.
2 parts lower half
Numerous instructions telling you how to change the power element indicate: just press one edge with your finger, and it will pop out like a jack-in-the-box. For some reason it didn’t work out for us, and we had to pry off one edge of the battery with a screwdriver. All that remains is to replace the expired element.
Removing the battery
Now that we have introduced you to all the features of the battery replacement operation, you can easily perform it as needed. Assembly is carried out in reverse order.
Replacing the battery and reassembling the Mazda 3 key
Replacing the battery in the key is a fairly simple matter.
You need to press on the free edge of the battery, and then it will pop out of the power supply under pressure. However, sometimes there are difficulties even with this. There are users who write that they were unable to simply replace the battery, so they had to apply additional pressure to it using a crochet paperclip. Therefore, we change the battery very carefully and try not to break the additional modules. When replacing, it is necessary that the side with the positive marking (that is, the plus sign) is on the bottom, otherwise the key will not work. In this case, the battery information label will be on top.
Now you need to assemble the key body. This operation is done in the same way as parsing, but in reverse order. Therefore, the first step after installing the battery in place is to assemble the key body. This is done by simply pressing until you hear a click. A click will sound if the locking element is working correctly - in this case it will pick up the cover, and then the case will be intact. After this, you need to fold the two parts of the key - and then it will be assembled.
When the installation of the new battery in the key is complete, the key light on the instrument panel will stop flickering red. This will mean that the installation was successful and the key can be used for work.
Thus, installing a new battery in a Mazda 3 key is not a difficult task, but it is painstaking and requires certain skills. However, following these instructions, any driver of this car can do this easily and quickly. Basically, this type of work takes 10-20 minutes, depending on how the battery is mounted in the case.
We recommend reading:
Automotive giants today produce cars equipped with ECU systems. These electronic control units using sensors...
When choosing a car, the future owner quite reasonably analyzes all the information relating to the vehicle of interest. Today thanks to...
Mazda MPV is a Japanese-made car designed for 7 seats. In some Asian countries, the model...
REPLACING VALVE SEALS WITHOUT REMOVING THE HEAD ON A MAZDA 6 GG
Oil burning is familiar to many owners of MAZDA cars, so I encountered this problem. After purchasing my car with a mileage of just over 100,000 km, as most everyone does, the engine oil, automatic transmission, and all fluids were changed. REPLACING VALVE SEALS WITHOUT REMOVING THE HEAD.
After driving a little more than 1000 km, I noticed that the oil level from the top level on the dipstick had dropped to the middle, but at that time the car was not smoking. In general, I drove like this for exactly two years and during this time I drove more than 200,000 km according to the meter, oil consumption over a run of 100,000 km increased from 500 grams to 1 liter of oil per 1000 km. and at rpms above 2000 there is blue smoke. I was in no hurry to do the overhaul, I decided to first decarbonize the piston rings, you can see how it happened HERE.
After decoking, I drove another 30 thousand km, with crazy oil consumption, it was decided to replace the valve seals. Having scoured the Internet, there are detailed instructions, but they are all mega capital, because everyone suggested removing the head and then replacing it. So it is, but if everything was done like this, then I would then change all the gaskets, rings, and possibly the bore, but I didn’t want to spend a lot of money, but just replace the valve seals without removing the head, I’ll describe how I did it below.
REMOVAL OF THE CYLINDER BLOCK AND CAMSHAFT COVER
Before unscrewing all the bolts, I disconnected all the wire plugs and pressed all the wires closer to the radiator for convenience. We pull out and remove the armor caps of the wires, unscrew the spark plugs.
Next, I unscrewed all the M6 bolts on the camshaft cover and removed the cover itself, up to this point everything seemed to be easy and simple.
Remove the camshaft from the intake valve side. We set the first cylinder to dead center, made small notches on the chain, gears and on the camshaft itself with a naphtha.
What kind of batteries are found on Mazda 6
All three generations of the Mazda 6 had cars with both gasoline and diesel power units. Despite the fact that the dimensions of the installation platform on all cars are the same (260x175 mm), and the dimensions of the engine compartment allow it to accommodate a battery up to 225 mm high, it is customary to equip the Mazda 6 with batteries with the following standard sizes:
- For gasoline versions, it is optimal to choose batteries in the standard size 232x173x225 mm.
- For those equipped with diesel power units, batteries in the standard size 260x175x225 mm are used.
The design features of the Mazda 6 require the use of a battery with reverse polarity - that is, the positive electrode, when looking at the front side of the battery, should be located on the right.
Fastening is carried out using the upper pressure plate - that is, you can select for replacement both batteries in the “L” case - with or without a lower side.
Mazda CX-5 Key Fob Battery Replacement Guide - 2012 to 2021 Models
| This vehicle maintenance tutorial was specifically written to assist owners of the first generation (2012, 2013, 2014, 2015 and updated 2022 model year) Mazda CX-5 SUV in replacing the battery with a smart or smart keyless entry keyless entry and push start button engine system. Owners of other Mazda vehicles such as the Mazda2, Mazda3, Mazda5, Mazda6, CX-7, CX-9 and MX-5 Miata may also find these DIY instructions to be useful. Replaceable coin cell (AKA "button" or "clock") battery - part number CR2025 . The battery is available from various manufacturers such as Panasonic, GE, Sony, Maxell, Energizer and Duracell. The only tool required to replace the battery is a small flat head screwdriver used to separate the FOB key. | The first two steps are to remove the key fob from the key ring and any other keys. Then flip the keychain over and there is a small sliding tab. Slide the gray button to the other side of the key fob to release the emergency metal ignition key. Remove the metal ignition key and install it. in a safe place. Insert the blade of a small flat head screwdriver into the void (also known as a "slot" or "gap") where the metal key is used to position and neatly separate the two halves of the key fob. |
Mazda 6 gh throttle training
Before training XX, the following conditions must be met:
battery voltage is more than 12.9V (with the engine not running) coolant temperature should be 70-99 degrees The gearbox is warmed up, if the gearbox is automatic, put the steering wheel in P in the neutral (zero) position, the car is in a position close to horizontal, all electrical consumers are set to OFF
If it doesn’t work, then before repeating it is necessary for the car to drive for at least 10 minutes. It is also recommended (I did) to train the accelerator pedal and throttle before learning XX.
LEARNING the accelerator pedal to the released position is an operation necessary to control the output signal of the accelerator pedal position sensor. This must be performed whenever the accelerator pedal position sensor or ECM cable has been disconnected. Make sure the accelerator pedal is fully released. 1. Turn the ignition key to the “ON” position and wait at least 2 seconds. 2. Turn off the ignition, wait at least 10 seconds. 3. Turn the ignition key to the “ON” position and wait at least 2 seconds. 4. Turn off the ignition, wait at least 10 seconds.
LEARNING the throttle valve closed is an operation necessary to control the output signal of the throttle position sensor. This must be performed whenever the electric throttle actuator or ECM cable has been disconnected. 1.Turn the ignition key to the “ON” position. 2.Turn off the ignition, wait at least 10 seconds. Make sure that the throttle valve closes within the above 10 seconds, confirmed by a specific sound (chirping, buzzing). I had this sound at the beginning. HZ!
Now the training procedure itself. It will require a watch with a stopwatch; all time intervals described below must be performed very accurately! For the first time it's better to do it together. So: 1) turn off the ignition (turn off the engine) after all warm-ups for at least 10 seconds. 2) after making sure that the gas pedal is released, turn on the ignition (the key is in the ON position, do not start the engine and wait 3 seconds. 3) within 5 seconds, quickly press (all the way!) and release the gas pedal 5 times. 4) after 7 seconds, press all the way down and hold the gas pedal until the yellow CHECK ENGINE light starts flashing(
Changing the battery in the Mazda 6 GG key
The modification of the first generation Mazda 6 is equipped with a CR 1620 battery, replacement is carried out according to the following algorithm:
- remove the “sting”, carefully press the latch located behind it so as not to break it;
The latch is fragile, so you need to press on it carefully (shown by the arrow). - Carefully press out a pair of latches on the end of the electronic module;
Release the two latches on the end of the radio module (indicated by arrow) - remove the old battery and install a new one, observing the polarity, otherwise the device will not work at all.
Now you can replace the battery and put everything back together in reverse order.(link)
At the end, the device for the Mazda 6 GG needs to be reassembled in reverse order and checked for correct operation. This usually takes a little time, especially if everything is followed according to the instructions.
Replacing the battery in the unlocking device for a Mazda 6 car is a simple procedure, regardless of the year of manufacture of the car. This requires only a small screwdriver and maximum accuracy. Knowing how to open the key and replace the battery, you can get the job done without calling for service. If the owner does not have the time or desire to change it personally, you can contact a workshop. Employees will open the case and remove the battery in a few minutes, then install a new battery into the Mazda 6.
Mazda 6 key body replacement
Over time, the body of the Mazda 6 flip key becomes unusable. The solution to this problem is to replace the key body. When you contact the dealership, you find out that the dealer does not repair keys; they immediately order new ones. But the new key is programming and sharpening the blade.
We recommend contacting our company; we have special repair kits for keys. Replacing the case will save you a decent amount of money. In our workshop we will not only change the plastic part of the key and the chip, but also make a copy of the mechanical part of the key.
Guide to replacing the battery in a Mazda car key.
Has your Mazda car key died? Can't disarm your car? Or vice versa, after opening the car, you cannot turn on the security system? The most common problem with such signs of malfunction is a dead battery or battery in the car key fob. This manual was written to help replace the battery in the key for owners of second generation Mazda3 cars (2010, 2011, 2012 and 2013). Owners of other Mazda vehicles such as Mazda2, Mazda5, Mazda6, MX-5 Miata, Mazdaspeed3, CX-5, CX-7, CX-9, MPV, Tribute, RX-8, Axela, Demio, Verisa, Premacy, and Atenza Our instructions for replacing car key fob batteries may also help.
Type of battery used in the key fob: CR1620 (lithium)
This type of battery is produced by many companies.
Some of the best quality: Panasonic, Duracell, Energizer, Maxell, Sony and Renata
Tools needed to replace the battery:
To change the battery, you only need a small flathead screwdriver.
Key fob Mazda 3 (2012)
Slide the metal key out of the key fob
Turn the key sideways towards you
Insert a flat head screwdriver into the key fob
Press the lock button inside the key fob that holds the part of the key fob with the metal key
Separate the key fob part from the main body
The first step before replacing the battery is to press the round button to release the metal key from the fob body.
Then turn the key fob sideways towards you with the side from which the key was pulled out of the case.
Insert a flat-head screwdriver into the slot and press the special button, which will unlock the mechanism for fixing the two parts of the key fob.
Attention . Once you press the button inside the key, do not release it. At this point, pull one part of the keychain away from the other to separate the elements.
How to disassemble a switch key? - Do it yourself
Sent 23 August 2012 – 13:56
Comrades! 5 years have passed since the day I bought the car and all this time I have been accompanied by the same key. Unfortunately, lately its battery has begun to lose its position, even to the point that I close the doors manually. I really want to take it apart and reanimate it, but I just can’t. I found this thread on the forum, but it doesn’t work (((Do not suggest options to use the second key from the kit, it’s not interesting, at least))))
Sent 23 August 2012 – 14:30
in the book about the car there are detailed instructions for replacing the button battery in the key somewhere at the end, with pictures
Sent 23 August 2012 – 14:48
There have already been similar topics. Here is a detailed description of how to do this. we change the battery. In addition, I can say that in order to completely disassemble the key you need to carefully tear off the Mazda logo on the front panel of the key and there will be a screw under it.)
Sent 23 August 2012 – 15:55
Thank you, it turns out everything is so simple)))) P.S. Damn, this captcha will kill me when the thread ((((
Sent 23 August 2012 – 15:58
Thank you, it turns out everything is so simple))))
P.S. Damn, this captcha will kill me when the thread ((((
Well, you were afraid)
Replacing the battery in the Mazda 6 GH key
Battery Panasonic 1620, 3V Before you begin installing a new battery, you will need to determine which battery is installed in the Mazda 6 key from the factory. Initially, the device is equipped with a device of the CR 1620 series, the voltage of which is 3 V, and the service life is 1-2 years.
After purchasing a new Mazda 6 GH battery, you can begin replacing it. Sequencing:
- open the device;
- press the latch in the slot, separate the mechanical element from the electronic remote control;
- open the body, dividing it into two parts;
- press out the plastic retainer that holds the battery in the Mazda 6 GH key;
- remove the battery using a needle or screwdriver; if the contacts are oxidized, remove traces with a cloth;
- place a new element, pressing until it clicks, indicating the foot is fixed;
- close the housing and check the device for operation and the ignition of the Mazda 6 is turned on.
Mazda 3 key disassembly
You need to disassemble the key with a small tool. This could be an extra-small screwdriver or an awl. This is necessary in order to reveal the key. The standard key for Mazda opens and is divided into two parts: the key itself and the battery. The battery is always located in the second unit - the battery.
To open the battery, you will need a screwdriver or an awl. The tool must be pressed on the fixing element, which is usually located in the crevice on the side. The locking element is a lever in the form of a very small button that must be pressed.
When pressed, one half - the lid - will separate from the other. When the cover comes off, the inside of the key will be visible. There you can also see a battery and a number of other devices.