I think that many car owners have encountered such a problem when, with excessive force when turning the key, it could remain in the ignition switch, or rather, its blade. In this case, you will have to replace the lock, since it is almost impossible to get the key.
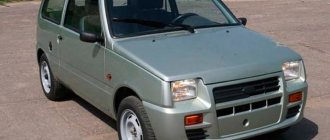
On the Grant, as on other front-wheel drive VAZ cars, the lock is mounted on the steering shaft and secured using breakaway bolts. This was done specifically for security purposes, so to speak, to prevent unauthorized access to your car.
To replace the lock, you will need the following tool:
- Phillips screwdriver
- The chisel is narrow and sharp
- Hammer
- Key for 10
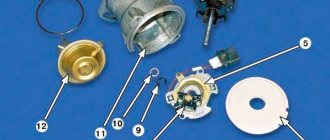
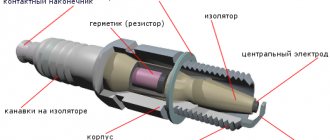
The structure of a car ignition switch
- Locking rod
- Frame
- Roller
- Contact disc
- Contact sleeve
- Block
- Protrusion of the contact part.
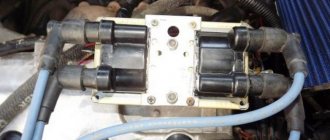
The lock mechanism is connected to many wires. They continue from the battery, connecting all the electrical devices of the car into a single chain. When you turn the ignition key, the electrical circuit is closed from the “-” terminal of the battery to the ignition coil. As a result, the current passes through the wires to the ignition switch, through its contacts it is directed to the induction coil, after which it returns back to the “+” terminal. As electricity passes through the coil, it generates high voltage, which it transmits to the spark plug. Therefore, the key closes the contacts of the ignition circuit, thereby starting the car engine.
Replacing the ignition switch on a Grant
I think that many car owners have encountered such a problem when, with excessive force when turning the key, it could remain in the ignition switch, or rather, its blade. In this case, you will have to replace the lock, since it is almost impossible to get the key.
On the Grant, as on other front-wheel drive VAZ cars, the lock is mounted on the steering shaft and secured using breakaway bolts. This was done specifically for security purposes, so to speak, to prevent unauthorized access to your car.
To replace the lock, you will need the following tool:
- Phillips screwdriver
- The chisel is narrow and sharp
- Hammer
- Key for 10
How to remove the ignition switch on a Grant
In order to get to the ignition switch structure on the Lada Granta, you need to remove the steering column cover. This can be done using a Phillips screwdriver.
After this, using a chisel and a hammer, we tear off the lock fastening bolts, as is clearly demonstrated in the picture below.
When the caps are already loose enough, you can unscrew them using long-nose pliers.
When all the bolts are unscrewed, hold the lock and remove the clamp securing it to the shaft.
And the lock on the back side.
Now you need to disconnect the two plugs with the power wires from the lock, as is clearly shown in the photo.
Installing the ignition switch
It is necessary to tighten until the head of the bolt comes off when a certain torque is reached.
After which you can install the casing in place, having previously connected all the power wires.
Video review of replacing the ignition switch on a Grant
To understand this procedure more clearly, I suggest that you familiarize yourself with the video review of this repair presented below.
Since the design of the fastenings and the lock itself is no different from the tenth family, you should not pay attention to the fact that the review is shown using the example of ten
Timing belt, valves and damper
The gas distribution mechanism often breaks. The belt breaks only when the car is moving. Unfortunately, no one is immune from rupture, and to prevent this from happening to you, you need to pay attention to its rubbing more often and change it in time.
Sometimes the valves come into contact with the pistons and they bend. To solve this problem, you can install pistons with special grooves. Sometimes the engine does not start due to the damper being turned several teeth, in which case the sensor makes a mistake and shows the wrong phase.
Main signs of failure
Drivers need to take into account during operation that breakdowns can occur both due to failure of the mechanical part and due to problems with the electrical system. Popular mechanical problems manifest themselves in the following factors:
- the lock is stuck in one position and there is no way to unlock it without using significant effort;
- the steering column is jammed;
- an attempt was made to gain unauthorized access to the lock using a master key or other object unsuitable for this purpose.
The electrical part may also fail. This can be determined by the following factors:
- the starter does not rotate after turning the key to the desired position;
- The dashboard indicator lights do not light up or go out after a short time;
- the operation of devices activated through the lock positions is unstable or absent.
Other factors that are less common among motorists may also occur. They are resolved according to the identified breakdowns.
Fuel system
It happens that the tank simply runs out of gas, do not forget to monitor its level. You also need to pay attention to its quality. Due to low-quality gasoline, spark plugs often flood, the filter becomes dirty, and moisture forms.
If you have filled in with low-quality fuel, then in this case you need to remove the gas tank and change the coarse and fine filters, you can try to blow out the fuel pipes.
If the injectors are dirty, they can be cleaned using any available method. When there is a lot of water in gasoline, you can add a little alcohol to the tank.
But if there are a lot of impurities and dirt, then only strong cleaning will help. You see that the starter is spinning, but the engine refuses to work and you can’t hear the fuel pump pumping. It may fail, there is no tightness in the power system or the pressure regulator is malfunctioning.
The first thing you need to do is check the pressure in the rail, the normal value is 3.5-4 atmospheres .
Then you need to remove the hatch and measure the voltage in the connector; the light bulb can be inserted into the two terminals in the middle and cranked with the starter. It should light up and if the voltage reaches, but there is no pressure, you can try to hit it. The brushes could simply be stuck. If they are normal, then the coarse mesh may be clogged, it needs to be cleaned or replaced; in winter it may freeze up. If electricity is not supplied, you need to check fuse F21 and relay k12. The relays (power coils) need to be removed, tapped on them a little, or simply warmed thoroughly in the palms of your hands.
Replacing the ignition switch yourself
Unfortunately, the Lada Kalina cannot please you with its reliability and durability; many systems, including the ignition switch, fail within a couple of years, so in order to save on repairs at expensive car repair shops, it is better to find out how to do it yourself. So, having come to the conclusion that the lock needs to be changed, we buy a new lock, which costs around a thousand rubles. In the kit we will receive three cylinders (on the doors and trunk) and 2 keys. You also need to purchase four shear bolts, since the old ones will no longer be suitable after dismantling.
In addition to the product itself, we will need the following tools:
- chisel;
- two screwdrivers, a flat one for removing the clamps and a cross for the bolts;
- 10mm wrench or 10mm ratchet;
- key to 8.
Let's get started
1. First you will need to disconnect the battery cable from the negative.
2. Armed with a cross-head screwdriver, unscrew the fasteners on the steering column. To make it more convenient for you, we immediately warn you: there are two bolts on the right and left sides (3), two at the bottom in the middle (2), and two at the very bottom (1). There is also a self-tapping screw located directly under the steering wheel (4).
3. We take out the clamps holding the steering column switches. We dismantle the switches.
4. Now we need the help of a chisel. It is necessary to apply blows of medium power and unscrew the bolts. Bolts, as a rule, become very sticky after several years of use, so you will have to work hard. As soon as you notice that the bolts begin to move out of place, you can pick up pliers and continue to work only with their help.
5. We need to get to the lock connectors, of which there are only two (main power and immobilizer antenna). The connectors are hidden under the console casing. To gain access to the connectors, you need to slightly pull the wiring harness away from the lock and pull them out.
6. Unplug the connectors, and then remove the ignition system switch.
Now we replace the old lock with a new one and reassemble it in the reverse order. But don’t forget that you need to do a little more magic on the doors and trunk, changing the lock cylinders.
Replacing door cylinders
To remove the old cylinders on the doors and trunk, you need to carry out a simple job consisting of several stages.
1. Take a 8mm wrench (or a 8mm socket with a ratchet) and a Phillips screwdriver. 2. Unscrew the screws from the door trim and remove it.
3. After removing the casing, you need to use a 8mm head to unscrew the iron figured holder (3 bolts).
4. We reach for the rods and, using a screwdriver, remove them.
5. We get to the bolts that secure the handle, the bolt is screwed in from the end, and if you look deep into the door there will be a nut number 8, unscrew that too.
6
Carefully pull out the door handle
7. We take out the larva, having first found the latch and pressed it with something very thin.
The tailgate lock can be removed a little easier:
1. Remove the door trim and see the lock system.
2. Unscrew the two nuts by 8 and tear off the system in which the larva “sits” from the rod.
3. We disassemble it and take out the cylinder (when disassembling it is better to remember where and how everything is attached, there are many small parts.
Replacing the ignition switch generally takes a little over an hour. To perform this work, you do not need fundamental knowledge or special auto mechanic equipment; you just need a little attention, careful study of simple instructions and a basic set of tools, such as a chisel, screwdrivers and a wrench. We hope that with this article we helped you save money on a car repair shop. We wish you good luck and good performance of the new ignition switch!
Reasons for replacement
It is necessary to replace the entire lock or just the contact group, depending on the nature of the breakdown and the situation with your car. Therefore, we will consider options when replacement may still be required.
Reason for replacement
Your actions
There was an attempted theft, as a result of which the integrity of the lock was compromised
In this case, only the contact group and the cylinder can be replaced, since the lock itself is most likely intact. Lower costs and required repair efficiency. Although experts advise purchasing a new lock right away and installing it
The keys were lost and there was no spare
There is no point in trying to find a master who will turn you exactly the same key as before. You will have to purchase a lock and install it on your car
Problems with contacts or contact group
It is not difficult to check whether this is really the problem. Turn off the battery by disconnecting the negative terminal, then remove the cover under the steering column and check the wires for resistance. Switch the key alternately to positions 1,2 and 3, while measuring the resistance. If the ohmmeter shows “zero”, then the lock really has a problem and needs to be replaced.
There was a desire to improve the castle
Often, car owners replace the standard ignition with a more modern one, equipped with lighting. It is not expensive, but it is convenient to use in the dark. No need to fumble for the key slot
When checking the contact group, be sure to disconnect the negative terminal from the battery, otherwise a short circuit will occur, and not only the contactor will have to be replaced.
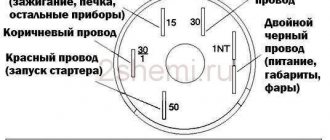
Pinout in photo
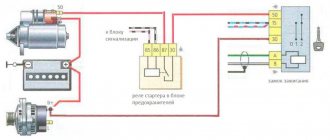
Circuit and pinout
First of all, get acquainted with the lock diagram and wire connection diagram, which will allow you to better understand the features of the 3Z pinout.
As you can see, the pinout includes 8 elements. What does each of them mean and what functions are they responsible for? We'll figure out.
- Power supply for the inserted key sensor microswitch (+12Volt).
- Power supply to ground when doors are opened on the driver's side.
- Power supply that supplies current to the starter (+12Volt, pin 50 on the diagram).
- Source at +12Volt. Activated after turning on the ignition. Power supply for additional equipment, such as video recorders, clocks, etc. (pin 15 in the diagram).
- Source at +12 Volts. Triggers when the key is inserted. Goes to pin 5.
- Power supply +12Volt. The illumination of the 3Z larva is activated.
- +12V source from the battery (pin 30 in the diagram).
- Not active.
Wiring
Troubleshooting Methods
There are two methods for detecting faults:
- Visual;
- Diagnostic.
| Action | The device is working properly | The device is faulty |
| Turn the key to the right position (ignition) | All electrical equipment turns on | All or part of the electrical equipment does not work |
| Turn the key to the second position | The starter is spinning | The starter does not work, the traction relay does not click under the hood |
But diagnostics allows you to get a more detailed answer. In addition, a visual inspection will not give you the opportunity to find all the reasons that could cause the ignition switch to break down.
To work, you will need a mini-tester and a multimeter in ohmmeter mode:
- Disconnect the power supply from the ignition switch. To do this, you need to remove the skin from the steering column;
- Switch your multimeter to an ohmmeter;
- On the block coming from the lock you need to find pins 7 and 4, which correspond to pins 15 and 30;
- Connect the multimeter probes to them;
- Turn the key to the “Ignition” position;
- On the block, find pins 7 and 3, corresponding to 50 and 30. Also connect a multimeter to them;
- Turn the key to the second position - Start the engine;
- If serviceability is present, the device will show zero resistance in both test cases.
Replacing the ignition switch
To solve all these problems, the surest solution is to replace the ignition switch. Many motorists are in no hurry to immediately contact a car service center, but try to repair their beloved child with their own hands. Is it possible to replace the lock yourself without having special abilities and skills? Yes, this is quite possible, and any real man can do it.
Wiring ringing
So, depending on the cause of the malfunction, replacement may be:
- Complete lock replacement
- Replacing the lock cylinder
- Replacing the contact group.
You can check the serviceability of the contact group without removing the ignition switch. To do this, you will need a multimeter, ohmmeter or any other device for testing wires. The contact resistance must be zero, otherwise they are faulty. And then it is necessary to replace the contact group of the ignition switch.
Dismantling the lock
To partially or completely replace the ignition switch, it must be removed. To do this, we may need a minimal set of tools.
The ignition switch on all classic VAZ car models is located below, on the left of the steering column. So, our actions:
Disconnect the battery to de-energize the ignition switch.
Unscrew the screws securing the plastic casing and remove it. Unscrew the pair of screws that secure the ignition switch to the bracket.
Disable the anti-theft device. To do this, insert the key and turn it to position zero. Using an awl, press the latch and remove the lock.
In the “classic” models (2101-2107), the wires are connected to the ignition switch not using a solid chip, but each separately. Therefore, before removing the lock, when disconnecting its contact group, it is advisable to use markings to mark the correspondence of each wire to the number of the contact to which it is connected. Otherwise, you may get them mixed up when you put the lock in place.
Let's disassemble the castle itself
Once you have the lock in your hands, you can replace its faulty part or replace it with another working ignition switch. If you replace the contact part, you will need to find the retaining ring - it is located at the bottom of the lock - and remove it (you can do this with an awl or a thin screwdriver). Then, after installing the working part, return it to its place. Before installing the aftermarket ignition switch, turn the key inserted into it to position “I” so that the latch that blocks the steering shaft is pushed into the lock body.
It is done. Now, using the previously marked markers, we attach the new contact part of the lock in the same way as the previous one was attached.
We tighten the screws securing the lock, fixing it, put the decorative casing in place - and the dismantling is complete! You can now turn on the engine to ensure that all contacts are active and the job is successful.
Later VAZ models
If we consider later VAZ models, then their ignition switch is mounted on the right side of the steering column using a bracket clamped with mounting bolts. The most difficult thing in dismantling a lock is unscrewing the bolts, which are made specifically in such a way as to complicate the task of removing the lock, thereby reducing the likelihood of hacking. To overcome this difficulty, it is recommended to use a chisel and pliers. Using a chisel, carefully loosen the bolts, being careful not to damage their heads.
Then we unscrew them with pliers. When all four bolts are unscrewed, remove the clamp and, accordingly, the lock. The repaired or replaced lock is reattached with four break-away bolts, which are disposable to prevent tampering.
Difficulties may also arise if your immobilizer is activated (an anti-theft device that is equipped with new VAZ cars). This problem is mainly electrical, so to solve it, you may have to use the help of an auto electrician to help you recode the immobilizer. If it is turned off and a regular alarm system is installed on the machine, then no difficulties should arise during the dismantling process.
If, after completing all the steps to replace the lock, you were unable to start the car, or the car started and stalled, it means that an error was made in the process, which you can correct yourself, or seek help from specialists. With a little ingenuity and patience, you can do minor repairs yourself. Good luck.
Crankshaft sensor
If the starter turns normally, the fuel pump works, the spark plugs and the “brains” are normal, you need to check the sensor. You need to look at the tachometer; if there is a failure, the revolutions are not visible.
You need to remove it and connect it to a multi-meter. You need to quickly wave a screwdriver in front of the sensor.
If there are no power surges, then it has “died” and needs to be replaced.
You can check it by testing the resistance; it should be approximately 750 Ohms.
If jumps are still observed and the resistance is normal, you need to look carefully to see if contamination has appeared and, if necessary, cleaning should be done.
Removing and installing the ignition switch Lada Granta
Usually the ignition switch is removed to replace it, as well as to replace the contact group of the switch or the APS coil.
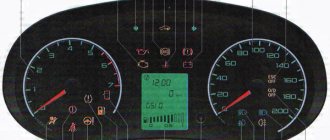
To check the ignition switch, sequentially set the key to the positions at which the circuits indicated in the table should be closed.
When the key is turned to position “III”, the anti-theft device should be activated.
When turning the key from position “III” to position “0”, the anti-theft device should turn off.
This can be checked by turning the steering wheel.
When restarting from position “I” to position “II”, the locking is activated.
The key can only be turned to position “II” from position “0”.
If there are defects, replace the contact group or ignition switch.
You will need: hammer, chisel, flat-blade screwdriver.
First of all, disconnect the negative terminal from the battery.
Remove the steering column switches.
1. Ignition switch mounting bolts with cut heads.
Therefore, we unscrew them with a chisel.
As soon as the bolts are loosened, they can be unscrewed using pliers.
2. Remove the bracket from the steering column
3. Remove the ignition switch
Using a screwdriver, pry up the clamp of the APS coil wire block
4. Disconnect the coil wiring block from the APS block wiring block
5. Press the connector latch and disconnect the ignition switch contact block from the wiring harness block
6. Remove the anti-theft locking rod
Turn the key in the ignition switch
7. Remove the locking rod drive. Remove the rod spring from the drive
8. Remove the stopper with the spring
Push the cylinder out of the switch body
9. Remove the locking ball.
10. Remove the cylinder from the switch body
12. Remove the locking ball spring from the hole in the cylinder
13. Use a screwdriver to pry and disengage the two plastic latches of the wire block cover
14. Open the connector cover.
Mark the wires located in the block
15. Use an awl to bend the locking tendrils of the wire lugs
16. Remove the wires from the connector
17. Remove the insulating tube from the wires
18. Squeeze the three plastic latches with a screwdriver and remove the contact group from the body
19. We bring out the wires through the holes in the housing
Computer malfunction
The unit itself is very reliable and rarely fails without external intervention. But water can get on it, and this is the main reason for malfunction.
There are significant flaws in the body design; the drainage holes near the filter are often clogged with dirt and water gets into the block through them.
To do this, you need to check and clean the drainage more often. Also, water can flood the ECU after installing the alarm, when the plugs are not installed tightly or they are completely forgotten to be installed.
You can try to dry the block, but if this does not help, you will have to replace it. This problem can be partially solved by wrapping the block with film or filling it with sealant, but then this is fraught with the appearance of condensation inside the ECU.
It is not difficult to remove the ECU; it is located opposite the front passenger seat, under the glove compartment, behind the soundproofing upholstery, almost on the floor, near the passenger’s feet.
ECU removal sequence:
- Disconnect the on-board network.
- Remove the screw that secures the upholstery.
- Carefully peel back the upholstery and sound insulation layer.
- Unscrew the three nuts securing the ECU.
- Carefully move the unit to the side and remove the two wire clamps one by one.
After unscrewing the computer, you need to disassemble it and assess the extent of the damage. We remove the board from the case and carefully inspect it. If it is partially burnt out and blackened, then nothing can be done about it; it needs to be replaced.
But if the board has no visible damage or only the output key has burned out, then in this case the key must be replaced, and the board must be washed and dried. First, you need to wipe it with a clean rag, then rinse it with WD-40 and blow it out with a compressor.
After this, rinse with alcohol several times and blow again. Now the most crucial moment is drying. Using a hair dryer set for a maximum of 1.5 hours, we blow through the board on both sides.
Installation and connection of a new lock
Now that the old ignition switch has been removed, you can begin installing the new one. In order to do this, you need:
- Take a new lock, insert the key into it and turn it to position number one. This is necessary so that the latch responsible for locking the steering shaft goes inside and does not interfere with the installation process.
Breakaway bolts to prevent the lock from being stolen
- Reinstall the lock and tighten the release bolts. There is no need to tear off the bolt heads right away, so that if something happens, you won’t have to work with a chisel again. This can be done later.
Do not immediately tear off the bolt heads
- Connect the electrics of the new lock to the mating part of the car; you should be careful when working with electricity.
Ignition switch terminal VAZ 2114
Video
What is a contact group and how does it work?
Repair of contact group on Daewoo Nexia.
Contact group of the ignition switch Volkswagen B5 (Volkswagnen B5).
Replacing the contact group on a VAZ car.
Daewoo Nexia will not start. The reason is in the contact group.
How to replace the ignition switch of a VAZ 2109.
1200 rub. for the photo report
We pay for photo reports on car repairs. Earnings from 10,000 rubles/month.
Write:
The ignition switch, or ignition switch , is the main switching component that controls the flow of power to electrical systems and also prevents the battery from draining when the vehicle is parked and at rest.
How to replace the ignition switch contact group
The work proceeds in this order:
- Set the steering wheel straight. You can check the wheels to make sure the wheels are level.
- Disconnect the battery terminals.
- Remove the horn trim. Depending on what kind of steering wheel it is, it is done differently.
- Disconnect power from the signal.
If the steering wheel has an airbag, then the operating procedure is as follows:
- We set the steering wheel. The wheels are straight.
- Disconnect the battery.
- Wait half an hour.
- Unscrew the 2 steering wheel trim screws.
- Remove the airbag.
- Detach the rear part of the AirBag assembly.
- Disconnect the horn.
Next, the order for both options:
- Remove the rubber gasket.
- Unscrew the steering wheel fastening nut and remove it along with the washer.
- Mark the parts to make assembly easier.
- Remove the steering wheel.
- Unscrew the 3 screws securing the steering switches (turn signals, high and low beams, horn, etc.).
- Carefully remove the electronic control switches.
- Remove the plastic casing.
- Unscrew the bolt at the bottom left of the panel.
- Remove the lock and disconnect the wires.
- Remove the small screw on the ignition switch at the rear.
- Pull out the ignition contact group.
- The new contact group must be lubricated before installation.
- Connect the wires to the new group of contacts.
- Reassemble everything in the reverse order of disassembly.
- Connect the battery terminals.
- Check the serviceability of the repaired lock (with replaced contacts).
Checking the contact group with an ohmmeter
- To check the integrity of the contact group, you need to disconnect the “-” terminal from the battery.
- Next, remove the steering wheel protective cover and disconnect the wire plug underneath it.
- Use a multimeter to determine the resistance or an ohmmeter to determine the resistance. Using crocodile clips or needles of a measuring device, we alternately test the terminals on the plug (chip). That is, we first connected it to the first pair (the contacts must be checked in pairs - upper with lower) to the terminal and turn the ignition key to all modes. If a weak contact is detected, then the core of the lock is most likely broken. The lock core is interchangeable and can be replaced or a completely new lock installed.