Subtleties of repair and replacement of the ignition switch contact group on the Daewoo Nexia
The car of the Korean manufacturer is popular among car enthusiasts. Daewoo Nexia is a convenient and practical vehicle for the city. But, unfortunately, there are no ideal cars; each has its own weak points. In Nexia, this is a group of contacts in the ignition switch. It often breaks down. In the article we will look at why the contact group burns, how to repair and replace, what to do to prevent the part from burning in the future?
What does the ignition switch contact group look like?
This part is located in the ignition switch. When you turn the key, it is responsible for supplying current to the starter and providing power to other elements of the car: the radio, the heater fan. The Daewoo Nexia uses a design solution that, according to experts, can hardly be called successful.
Let's take a closer look at the contact group. Electrical contacts are placed in a plastic case made of two parts; they are switched depending on the position of the key.
The contact group in a Korean car often burns out due to an unsuccessful design decision
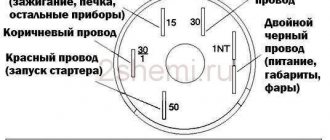
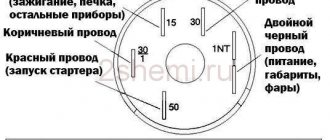
Nexia’s group has 5 conclusions:
- “30”—power is supplied from the battery;
- “15” - ignition circuit;
- “15a” - heater fan circuit;
- “50” — output to the starter;
- “Ka” or “Kb” is the circuit of the original radio.
Causes of burnout and symptoms of breakdown
A strong current passes through the ignition switch. As a result, the wiring becomes very hot and the contacts melt. A large load occurs when the engine starts, the pin marked “30” suffers the most. First of all, it doesn’t hold up; the plastic case near the contact melts.
Due to the high current that passes through the group of contacts in the ignition switch, the contacts become very hot and the plastic housing melts
In most cases, burnout of the contact group manifests itself as follows: after turning the key in the lock, the starter does not turn. When driving, it manifests itself as follows: the engine suddenly stalls, the instrument panel goes dark and the smell of burnt plastic appears in the cabin . The second sign of a breakdown is a non-working standard radio.
It cannot be said that the starter does not spin and the car radio does not work only because of the contact group, but in 90% of cases for the Daewoo Nexia the symptoms are exactly the same.
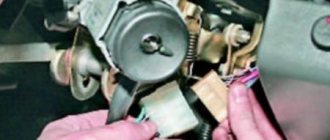
How to check and make repairs
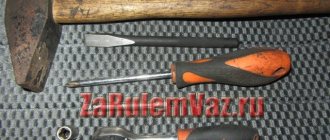
Any car enthusiast can check the serviceability of the group of contacts in the ignition switch. Performance is determined by the appearance of the plastic case and the presence of carbon deposits on the contacts inside the group. To get to the part, it is enough to arm yourself with a Phillips and straight screwdriver.
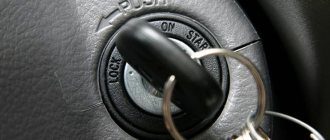
- We remove the plastic under the steering wheel, it is secured with screws.
First you need to remove the protective plastic under the steering wheel.
The connector can be easily removed from the group of contacts with a simple screwdriver
Using a thin flat screwdriver, unscrew the screw that secures the group in the ignition switch housing
If the case is not damaged, be sure to inspect the internal contacts. To do this, carefully disassemble the case. If carbon deposits are found, remove it with a sharp knife or screwdriver. This temporary procedure will help along the way. As soon as possible, contact an electrician at a service station or replace the contact group yourself.
How to replace the ignition switch cylinder?
This process should also not cause any special problems for people who are accustomed to repairing not particularly complex breakdowns of the Daewoo Nexia with their own hands. The work flow diagram is as follows:
- The terminal marked “minus” is removed from the car battery. Here you will need to remove the screws (using a Phillips screwdriver) securing the steering column covers.
- The connectors connected to the contact group with a fixing screw are removed. This operation is carried out with a short and thin screwdriver, since the screw we need is located in a place that is limited for access (namely on the inside of the switch).
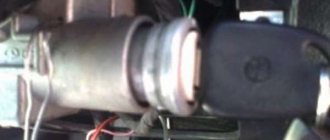
- Through the hole, use a pin or wire with a cross-section of about 2-3 millimeters to press the cylinder lock and at the same time move the switch to position 2. Such actions lead to the fact that the cylinder comes out of the body by about 5 millimeters, and the car enthusiast will only need remove her “from her usual place.”
Now you can install a new larva. But at the same time, you must understand that after such a replacement the ignition switch will have to be opened with one key, and the luggage compartment of the car and its doors with another. Not every driver likes this arrangement. In this case, we can advise you to buy a set of cylinders for the ignition, trunk and doors, and change everything at once. It is clear that such a replacement will take much longer and will require more serious financial costs.
Having solved the above-described dilemma for ourselves, we proceed to install the new cylinder on the Daewoo Nexia: insert it together with the key into the case (do not forget that the switch must be in the second position) and at the same moment press the latch with the pin. If you bought a high-quality larva, the procedure does not cause any problems. The installation becomes more complicated in cases where the driver decided to save money and purchased a Chinese product. Many experienced motorists claim that it may not fit into the body.
Eliminating the cause of burnout
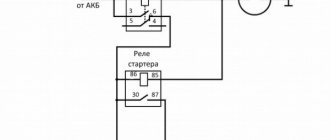
It should be noted that replacing the contact group with a working one helps for a while. For high-quality repairs, it is necessary to eliminate the cause of burnout: reduce the current load on the contacts. You can strengthen the weak point of the Daewoo Nexia by installing additional relays according to the diagram:
When using two relays, the load on a group of contacts is halved
This method will help extend the service life of the contact group by more than 2 times. Anyone can improve the electrical ignition circuit of a Korean car.
Video: Replacing the contact group on the Daewoo Nexia
To fully understand the process of replacing a group of contacts in the Daewoo Nexia, watch the video:
Repairing the contact group on a Daewoo Nexia car yourself will not be particularly difficult. Additional difficulties will arise if the wiring needs to be replaced. The wires going to contacts “30” and “50” often melt. If possible, relieve the contact group. This will protect the car from fire and extend the life of the part.
Loading ..
Replacing the contact group Another common malfunction of the ignition switch is the failure of the contact group. The problem can also be fixed without removing the lock from the car.
Repairing the contact group on a Daewoo Nexia car yourself will not be particularly difficult.
Nexia repair of ignition switch contact group
Additional difficulties will arise if the wiring needs to be replaced. If possible, relieve the contact group. Now you can install a new larva.
But at the same time, you must understand that after such a replacement the ignition switch will have to be opened with one key, and the luggage compartment of the car and its doors with another. Not every driver likes this arrangement.
The first option, the most common, is an ignition lock cylinder with two keys. The second option, a set of cylinders - the ignition lock, front doors and trunk photo The first option is cheaper and faster, but you will have to carry two keys and periodically poke the wrong key into the ignition switch or trunk lock. The second option is labor-intensive and more expensive, but there will be only one key.
True, there is another way to leave one key. And besides, old and dear. True, this method is unlikely to suit owners of Korean Nexias.
But it’s still worth getting acquainted with it and checking whether it’s suitable or not. Remove the upper steering column cover. We gained access to the ignition switch.
It remains to be seen whether the contact group works. To do this, carefully remove it from the lock. You need to take another wire, crimp a terminal onto it and connect it to the relay, 86 connector, and the other end of this wire needs to be screwed on and screwed to the car body.
The resulting relay must be hidden under the panel so that it can be reached if necessary.
The resulting wires need to be wrapped with electrical tape. We wrap the resulting wiring harness with electrical tape. We remove the relay under the panel so that it is accessible and can be reached from below from under the panel. We attach the connector of the ignition switch contact group to the contact group itself.
Replacing the Daewoo Nexia ignition switch with your own hands Replacing the Daewoo Nexia ignition switch with your own hands It is very unpleasant when your favorite car presents unexpected surprises, for example, it refuses to start when the moment is not at all suitable. Such a nuisance can happen to you on the road and be completely unpredictable, i.e.
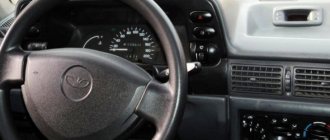
Structural features of the ignition switch of the Daewoo Nexia car The Daewoo manufacturer provides for the installation of an ignition switch or switch on the Nexia model, which is characterized as a mechanical locking device with an electrical contact group. Its location is indicated at the bottom of the column under the steering wheel.
Replacing the ignition lock cylinder on a Daewoo Nexia car
How to replace the Daewoo Nexia ignition switch with your own hands? Disconnect the negative terminal from the battery.
Use a Phillips screwdriver to remove the screws that secure the plastic covers to the steering column and remove the two halves.
Repair of the ignition switch contact group on the Daewoo Nexia
Daewoo cars and Nexia models have one common “feature” and weakness - the ignition switch contact group quickly burns out. Most likely, for the common good of all fans of this Korean car brand, it is necessary to find out what is the reason and how to repair this contact group?
To begin with, it is worth clarifying and identifying the “symptoms” of a burnt contact group of this model. Most likely, the main “symptom” is that when you turn the key in the ignition, the starter does not respond. You can buy a new contact group for the Daewoo Nexia ignition switch for 600 rubles, however, replacement most likely will not help. After some time, the replaced part will begin to heat up and then also burn out.
It is clear that simply replacing the problem will not solve the problem, and here it is necessary to understand the essence of the contact group circuit in order to identify the cause of the constant failure. It is necessary to remove the ignition switch contact group. For the Nexia model, the contact group consists of 5 contacts:
- “30” is power from the battery.
- "15" - ignition.
- “15A” - stove fan.
- "50" - starter
- “Kb” or “Ka” - radio tape recorder.
Sometimes on sale there are contact groups for Daewoo Nexia, consisting of 6 contacts (the 6th contact is “R”).
In the Contact group, at different key positions, different contacts are connected; most likely, there is no point in giving the order of these connections; most car enthusiasts know this quite well. The important question for us is why it (the contact group) burns out...
The answer is logical and simple: When the ignition is turned on, the battery puts a strong load on the ignition (from pin 30 to pin 15), and when the starter starts, the battery increases the load on the starter (from pin 30 to pin 50). As can be seen from this, the main load goes to contact 30; a high-power current overheats and melts the wires of this contact. Contact 15A does not receive a large load, so it controls the operation of only the first three speeds of the stove, and the fourth goes bypassing it, through a separate relay.
It remains to resolve the question of what to do in order to avoid burnout of the ignition switch contact group?
Most likely, the problem will be solved by connecting additional relays for general unloading. Installing such additional relays on groups 30-15 and 30-50 will help each owner never remember that there is a problem in the ignition switch contact group.
To carry out all preventive work, you must purchase in advance:
- A starter relay from a VAZ-2108 car, which is suitable for contact 30A, is even better suited to a relay from a VAZ-2110, for contact 50A. Such a part costs about 50 rubles.
- The next purchase will be a relay socket, which costs about 20 rubles.
- It is also necessary to purchase female terminals, in the amount of 4 pieces, and costing about 4 rubles.
- A pair of wires, each about half a meter long, of different colors (preferably black and red), with a total cost of 20 rubles.
- All that remains is to purchase a screw terminal and a roll of electrical tape, for a total cost of about 26 rubles.
Replacing the ignition lock cylinder
To change the ignition switch on a Daewoo Nexia without the help of others, you need to:
Disconnect the negative terminal from the battery. Use a Phillips screwdriver to remove the screws that secure the plastic covers to the steering column and remove the two halves. Remove the connectors suitable for the contact group. Logan-Club I want to remove the front panel and figure it out, as shown in photo 10. Use a thin short screwdriver to unscrew the fixing screw, which is located on the inside of the ignition switch, please note that its availability is limited. The cause of the malfunction may be a breakage of the shank on the cylinder of the lock itself. Pull out the cylinder, for this you will need a wire or pin with a suitable diameter, about 2-3 mm, bend it at a right angle using a hexagon, and press through the hole onto the latch. On Nexia, the contact group of the ignition switch sometimes fails; below we will look at how you can remove the ignition switch and contact group of the ignition switch from the Nexia. At the same time turn the key to the second position. If everything is done correctly, this will allow the larva to come out of the body by five millimeters on its own; all you have to do is remove it. How to remove the ignition unloading relay lock and on the Nexia car guru. It is not recommended to remove the ignition switch assembly with the cylinder, as this is a very labor-intensive process; you will have to remove the entire steering column to be able to get to its mounting bolts. If you have not taken care of purchasing the necessary components in advance, then at this stage you can easily drive to the nearest automobile store or market and buy spare parts that require replacement. You can turn off the car using a contact group and a screwdriver. As a rule, there are two ways to solve this problem. In the first case, you can buy and replace only the ignition switch cylinder. How to remove the front bumper on a Daewoo Matiz: simple. This option is quite common and is the cheapest and fastest, but it will require you to always carry two keys with you, since the ignition key will be different from the key that opens the doors and trunk. In the second case, you can purchase a set of cylinders, which will include the cylinders of the ignition switch, trunk and front doors. The replacement process in this option will be more labor-intensive and will cost a little more, but you will have one key for everything. Which method to choose is up to you. Assembly is carried out in reverse order. How to remove the heater motor on a VAZ-2109 with your own. Insert the new cylinder inside the ignition switch housing, together with the key in position 2, while simultaneously pressing the lock with wire
The most important thing is not to stumble upon a cheap Chinese counterfeit cylinder, because if you try to install it in the lock body, a problem will arise, you simply cannot do this, it will not fit there. How to Remove the Ignition Switch on a Daewoo Nexia
. The remaining options for larvae manufacturers are of quite high quality and can easily withstand replacement; they are installed the first time, just like factory ones.
Repair of the ignition switch contact group on the Daewoo Nexia
Eliminating the cause of burnout It should be noted that replacing the contact group with a working one helps for a while. For high-quality repairs, it is necessary to eliminate the cause of the burnout: You can strengthen the weak point of the Daewoo Nexia by installing additional relays according to the diagram: When using two relays, the load on the contact group is halved. This method will help extend the service life of the contact group of the Daewoo Nexia. How to relieve the contact group by more than 2 times.
Anyone can improve the electrical ignition circuit of a Korean car. For example, the ignition can be used to power the low and high beam lights, parking lights, turn signals, rear traffic lights, radio or interior lighting. It can be various electronic devices, such as parking sensors, navigator, video recorder, etc.
In the event that a certain contact through which power is transferred to consumers burns out, it will not be possible to start this or that equipment. The author of the video on how to relieve the contact group of the lock cylinder - PRO. When several devices break down, which, as it may seem, are in no way connected with each other, the cause of the breakdown almost always lies in the cylinder or contact group of the ignition switch.
Of course, electrical equipment on Daewoo Nexia and Matiz cars can also be connected to the fuse box, and then in the event of a breakdown, first of all you need to check the fuse itself. Which lead to more frequent trips to the service center.
I hope the essence of my thought is clear.
Correct everything at the root, and you won't have any problems. Well, the video itself: To wire 30 at the terminal inserted into the relay, solder a wire 25 cm long, Daewoo Nexia how to unload the contact group, the second end of this wire, crimp the terminal and insert it into socket 30 of the connector of contact group 3. Another wire 25 cm long with terminals crimped on both sides, insert one end into contact 85 of the relay, the other into socket 15 of the connector of contact group 4.
We crimp a wire, preferably black, on one side with a terminal, which we attach to contact 86 of the relay; we crimp the other end of this wire with a screw terminal and attach it securely to the ground of the car body.
We wrap the resulting wiring harness with electrical tape. We remove the relay under the panel so that it is accessible and can be reached from below from under the panel.
Fixing the problem of burning ignition switch contacts on Daewoo Nexia (N) — DRIVE2
We attach the connector of the ignition switch contact group to the contact group itself. If all connections to the relay are made using the relay block connector, there will be fewer problems during installation and replacement. At the very terminal of contact 30, inserted into the relay, we solder a wire a quarter of a meter long, we also crimp the second end of this wire with a terminal, then we insert this terminal into the contact socket.
We crimp the second piece of wire of the same length on both sides with terminals, connect one end to the contact socket 85, the second to the contact socket. Now we take on the black wire. We crimp one side of the wire with a terminal, connect it to contact 86 of the relay, crimp the other end with a screw terminal, this end should adhere tightly to the ground of the car.
Now this entire wiring harness must be insulated using the Daewoo Nexia to relieve the load on the contact group. The relay must be removed under the panel, where it will not interfere, and at the same time remain accessible at any time.
Features of the ignition switch Nexia and Matiz: theoretical part
Before removing, repairing or changing the ignition switch on a Matiz or Nexia, read the possible list of causes and signs of device failure.
Causes of malfunction
- ZZ overload is one of the most common causes. Overload occurs due to the installation of additional devices and devices that consume high power. The problem manifests itself as a result of the fact that high voltage passes through the contact group, for which it is not suitable. The mechanism can get very hot and eventually it will simply fail.
- Manufacturing defects. If the starter contact ZZ is made poorly, such a device will not work for a long time.
- Moisture getting into the structure. Of course, for this reason the unit cannot become stuck, but, nevertheless, moisture getting inside the device has a detrimental effect on its functionality.
- Short circuit in the electrical component of the car. This problem does not happen often, but if high power current damages the contacts of the mechanism, it will cause it to break.
- Over time, the mechanism may wear out the contact tracks or the group itself. This is normal, since wear and tear is typical for any automotive mechanism. Due to wear, grooves will appear on the metal components of the structure.
- Mechanical damage or broken contacts, as well as other components of the group. It will not be possible to repair such a fault; the only best option would be to replace it.
Signs of failure
Now briefly about the signs:
- Several devices refuse to work at once, which, as it may seem at first glance, are in no way connected with each other. Inside the mechanism, one or more voltage consumers are connected to each contact. For example, these are optics, turning lights, audio system, video recorders, parking sensors, interior lights, etc. If one of the contacts wears out, it will no longer be able to power the equipment connected to it.
- Inoperability of the starter unit. If you try to start the engine with the starter not working, you will not hear the relay click. If there is no click, we can conclude that no voltage is passing through the device cylinder.
- If a piece of equipment does not work, but then suddenly activates if the driver moves the key in the lock (the author of the video about replacing the mechanism yourself is the CarDan Tv channel).
Daewoo Nexia Komyachka › Logbook › unloaded the contact group.
Today I started unloading the CG as I wanted, I did it for about 5 hours, nothing complicated, if you have the hands and the desire, do it, there will be fewer problems with the car. I express my gratitude to maxxx090. On Nexias, the ignition switch contact group burns out quite often. Let's try to find out what is the cause of the burnout and how to repair the contact group. What are the symptoms of a burnt Nexia contact group? Most often, when you turn the key in the ignition switch, the starter does not turn. A new contact group for the ignition switch costs about 600 rubles. (code in exist.ru - 530395, analogue - 93741069), the cost of repair is about 100-200 rubles. (replacing the contact group) But replacing the contact group will not help for long - after a while the new contact group will start to heat up in the same way and will require similar repairs
First, remove the contact group of the ignition switch
There are 5 contacts on the contact group of the Nexia ignition switch:
“30” — power supply from the battery “15” — ignition “15a” — heater fan “50” — starter “Kb” (“Ka”) — radio tape recorder
On sale there is a contact group for Nexia with 6 contacts (in addition to those described above - contact “R”).
Connection of the contact group contacts at different positions of the ignition key: Initial position of the key “I”: “30”+”R” Initial position of the key “I” + the key is recessed into the ignition switch: “30”+”R”+”Ka” Position “II”: “30”+”Ka” Position “III” “30”+”Ka”+”15a”+”15″ Starter position: “30”+”50″+”15″+”Ka”
Why does the contact group burn out on Nexia?
The answer is simple: from contact “30” to contact “15” when the ignition is on, there is a strong load, and when the starter is turned on, from contact “30” to contact “50” an additional powerful load appears. Thus, a high power current flows through contact “30,” which leads to overheating and melting of this contact. Contact “15a” has little effect on the burnout of the contact group, since power goes through it to the first three speeds of the stove, while the 4th speed goes through a separate relay.
Daewoo Nexia ignition relay is heating up
Happy New Year everyone! Good luck to you all this year! I'm posting this topic again. I am posting this because during this time a lot of new cars have appeared on the site, and many do not know what the problem is with overheating of the KG on the Nexia. I Draw YOUR ATTENTION TO THE fact that THIS APPLIES TO OWNERS OF NEXIA N150 (there is no such problem in the N100, it has been checked, everything corresponds to the diagram). But in our car, the Uzbeks wanted to do everything correctly, but everything turned out in one place. The thing is that, looking at the headlight switching diagram, everything looks perfect, but when you get into the wiring, you find a jamb. The diagram does not correspond to what is actually there. But it turns out that contact 30 of this relay must come and be powered from wire 30, which comes from the battery. But in fact, it is powered from wire 15, which comes from the ignition, that is, from the KG. That’s why our CG heats up, since when the headlights are turned on, 13 Amperes appear on the CG, and this is a complete overkill. If anyone thinks that unloading the CG will help (as it is written on FAG), then they are very mistaken. After this unloading, your unloading relay will burn out (again, all this has been checked). There is no need to do this unloading at all, you just have to remove this jamb in the wiring, and you will forget about overheating of the CG. Once the CG burns out, it will bother you for the entire time you own the car. It only takes half an hour, but in the end there is no strain on the wiring, and the headlights shine brighter. In general, to the point, there is a headlight switch relay in the mounting block. From it comes contact 30, which should go to wire 30 (battery), but in fact it comes to wire 15 (ignition, KG). When you turn on the headlights, the KG heats up, at this moment there are 13 Amps on it, a complete overkill. You need to transfer contact 30 of the headlight switch relay from wire 15 to wire 30. 1. Here is a diagram of how it should be:
Analogue or original
The contact group for Daewoo Nexia goes under the code 530395 in the online store Exist.ru. You can also purchase an analogue consisting of 6 contacts (additional - “R”) under code number 93741069. The price is around 600 rubles.
The price of a new ignition switch complete with CG, but without a cylinder, ranges from 1650 to 2000 rubles. It all depends on the build. The larva is purchased separately. There are no analogues specifically for the Daewoo Nexia lock. Original numbers: GM 531318 and 530379, which are suitable for both old and new generation Nexia.
Ignition switch (housing) GM 531318 for Daewoo Nexia
Daewoo Nexia ND18 › Logbook › Wiring, unloading KGZZ, head light.
I investigated a common problem with Nexia - overheating of the ignition switch contact group (IGZZ). The main load on its contacts falls when the headlight is turned on.
Resolved offer several
— unloading relay on KGZZ (the relay is placed directly under the steering wheel) Nexia-FAQ
— installation of 2 relays for low and high beam (both relays are placed under the hood, the power line is taken directly from the battery, and the old wiring is left only for relay control. In one step, the steering column light switch is unloaded and voltage losses on the lamps are minimized, i.e. . for many it should shine brighter) Nexia-Club
Daewoo Nexia Golden Sand › Logbook › Unloading the ignition switch contact group
It all started with the fact that she slowly began to live her life. Once I stop, turn the key, the car should turn off and it works, all the instruments have gone out, everything has gone out, only the charging light comes on and the car works, I turn the key back, everything turns on as it should be, I turn off the same system again, the car works, and after turning the key back and forth five times, it’s still working still stalled. I restart it and everything works fine. And this story was repeated five times at different intervals. Then one fine day I arrived, turned off the car, started to start it, but the starter wouldn’t turn, the ignition would turn on. It was somewhere around 65,000 thousand mileage. I removed the contact group and saw the following.
I bought a new one, bought two relays with unloading blocks for 70 amps for the ignition and 50 amps for the starter, did everything according to this diagram, installed thick wires on all the terminals, crimped them with special tools. Heat-shrink the wires with a tool and solder everything together without any twists.
After that everything looked like this
Next, I will give measurements of the current strength; the multimeter is connected to the ignition switch gap
Finally I got to what I wanted to do for a long time. Last time I installed two unloading relays on the contact group. The group stopped warming up, but because of the relay that began to break it, it almost became red hot, so I drove with it during the day on the dimensions, didn’t turn on the fogs, and completely forgot about the high-range one, it was already scary to turn it on. This time in addition to those relays I redid the wires as Ingener73 advises. (I took the photo from him, I hope he doesn’t mind) I found a relay on the fuse block that is responsible for the headlights, took out contact 30 from it, from contact 86 I bit off a jumper that goes to the adjacent relay and put there the wire that was on 30 contact I took a thicker wire, crimped the terminal, inserted it where contact 30 was and soldered the other end to the permanent positive that comes from the battery in the braid. I insulated everything and assembled it. Yesterday I tried to drive with low beams, the relay that cuts the ignition stopped heating up. But now the relay in the fuse block has become very hot, I can’t say which one exactly; I tried it by touch, most likely one is getting hot and the two adjacent ones are heating up. I just don’t know what else can be done. Who has rebuilt it the same way as you did after the rework?
installing a relay to amplify the headlights
Everyone knows that the headlights on the Nexia leave much to be desired. This is partly due to the disgusting quality of the car's wiring and the ill-conceived relay and contact system. Plus, the KG begins to melt (this is especially felt on new ones, where the far one burns together with the near one). And the steering column switch becomes “eternal”; anyone who has had it melt will understand. video. We look at how much brighter the light becomes (I took it on my phone, don’t scold me too much) I’ve installed this system in more than a dozen cars, people have only positive impressions. I also helped the tubers more than once, for which I have several thanks. That's why I decided to combine the whole process in FAK. and so 1- scheme
https://www.nexia-club.ru/attachments...eta-gorit-.jpg red wires are 2.5 kV, blue and purple - 0.5. fuses 15A. relay from VAZ for 30A 2 - making a braid you need to buy 2 relays, blocks for them, 2 sockets for fuses, wires PV3 0.5 and 2.5 sq.
We start soldering. fuses for blocks
power supply + from battery. (ring internal diameter 6 mm)
to power the relay coils: in the middle - to the car's mains, along the edges to + we will connect to the old wires
onto the second end of the power wire of the block we solder the headlight power wires (60 and 180 cm)
We isolate all adhesions and tourniquet them,
power to battery
- and two + power relay windings
3-installation on the car, we remove the battery for ease of installation.
We attach the relay in a convenient place. this time the relays were without “ears” so I tied wires to the braid https://s5.uploads.ru/t/IX6V5.jpg plus we connect the node nut on the battery terminal
unhook the connector from the headlight https://s4.uploads.ru/t/CAhTP.jpg remove the insulating tape and cut 2 wires white with brown and white with green. https://s4.uploads.ru/t/FPfgi.jpg we connect the power wires coming from the relay to the wires that go into the headlight block https://s5.uploads.ru/t/dSUTW.jpg and the relay control wires to the wires going from the braid
solder, isolate, connect to the headlight https://s5.uploads.ru/t/b2rGT.jpg
we get to the right headlight, or rather, pull out the connector, remove the electrical tape, cut the wires as on the left. We immediately isolate the 2 wires that come from the braid; we no longer need them. https://s4.uploads.ru/t/hLHui.jpg connect the power wires from the relay as on the left headlight https://s4.uploads.ru/t/IAq4k.jpg solder, isolate, connect [COLOR=#333333 ]enjoy the good, bright light
Well, we choose the RIGHT light bulbs
voltage and light brightness plate
I'll update the photo report a little. Here is the assembly process directly on the machine. plus I changed the connection points a little.
1. I connect two relays with blocks with electrical tape
2. I connect the ground on the relay to the ear of the relay
3. I hook the relay to the support pin. she will become a mass
4. We hook the fuse blocks on the side
5. connect to the battery positive
6. solder the wires that will go to the headlights (blue low, green high)
7. here you can see the length of the wires for the left headlight
8. length of wires to the right headlight
9. I solder the control wires (for clarity, the same color)
10. We make the control wires the same length as for the left headlight
11. Harness all 6 wires together to the corner
further we divide. 4 short to the left headlight, 2 long to the right
12. We strip the wires at the left headlight. 2 power ones are 1.5-2 cm longer than control ones
13. Disconnect the connector at the left headlight and remove the electrical tape from the wires. out of 5 wires we need 2 - white with green and brown stripes.
14. cut the wires, as in the photo
15. Solder the power wires to the wires coming from the headlight connector (blue to white with a short stripe; green to white-green)
connect the wires end to end
16. We hook the control wires to the wires coming from the harness, we hook them as in the photo
17. Naturally, we isolate everything
18. We lay 2 long wires along the TV
19. For the right headlight we use only a piece of wire coming from the connector
20. Connect the wires according to the color scheme, as on the left.
I hope that many of the questions asked earlier in this thread have gone away.
Last edited by alex04; 04/19/2018 at 00:46.