Device Description
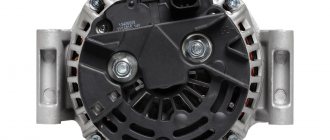
On Niva 21214 cars there is a generator of type 9412.3701, on VAZ 21213 - type 371.3701, on Niva Chevrolet there is a generator 2123. All of them are alternating current electric machines with electromagnetic excitation, having a built-in rectifier unit with silicon diodes and an electronic voltage regulator. The maximum current produced by the generator unit type 9412.3701 is 80 A, voltage - 13.2 - 14.7 V, rotation - right.
Design of unit 21214
The unit covers are attached to the stator using 4 bolts. The covers have bearings installed. They rotate the rotor shaft. In the front bearing, the inner race is clamped with a nut along with a thrust ring and washer. The 2nd bearing is also pressed into the back cover.
The stator has a 3-phase winding, one of the ends of which is connected to a rectifier unit consisting of 6 diodes. Of these, 3 diodes are negative, 3 are positive. According to the polarity, they are pressed into the plates. The entire structure consists of a rectifier unit, which is located on the back cover of the generator unit covered with a protective casing.
The design of the unit also includes contact rings and brushes. On the back side of the back cover there is a brush holder, which is structurally connected to the voltage regulator. The rectifier contains a capacitor that protects the electrical network from power surges.
The “B” terminal of the generator set must be connected to the positive terminal of the battery, and the negative terminal of the battery to the vehicle ground. If the connection is incorrect, this will lead to breakdown of the diodes.
Three-level voltage regulator Niva 21214
Forum post, original.
And we have a generator KZATE 9412.3701 produced by OJSC (form of organization of a public company; joint-stock company) “Plant named after A.M. Tarasov” (OJSC (form of organization of a public company; joint-stock company) “ZiT”) with low (for modern batteries) regulation voltage .
Voltage regulation is carried out through additional diodes specially created for this purpose, while the output voltage and regulation voltage are equal only in the absence of overload. When overload occurs and it grows, the difference between these values increases proportionally.
Since 2004, the AvtoVAZ assembly line began to receive the latest generators for cars 2110, 2123, equipped with a new generation of voltage regulators. Regulators of the latest standard determine the voltage at the power terminal B+ of the generator, as a result of which they have a very clear idea of the voltage on the battery/on board. networks. The regulation voltage is at a level that is rational for modern batteries. In addition, they have a number of other advantages, but this is not particularly important to us. So, we will install such a regulator in our generator.
First, we will need to purchase a voltage regulator for the generator 9402.3701-03 or 9402.3701-04. The 2nd one is the best choice, because its body is compatible with our brush assembly boot. I bought a voltage regulator 941.3702 manufactured by OJSC (form of organization of a public company; joint stock company) “Avtoelektronika”, Kaluga.
Then, instead of the usual terminals on the voltage regulator, you need to install the ones shown in the photo above. Be sure to use terminals with the same hole diameters as I indicated, otherwise this is fraught with a short circuit.
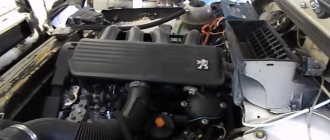
Nuances of moving a generator
The disadvantage of domestic Niva SUVs is the location of the generator unit - at the bottom of the engine compartment. It constantly gets contaminated when driving off-road, and coolant constantly drips. The problem is solved by moving the generator upstairs (the author of the video is SARTANETS).
To transfer, you will need a set of keys, a bracket, mounting bolts, and a V-belt. You can make a generator transfer bracket with your own hands according to the drawing below.
Drawing of a homemade bracket
Sequence of actions during transfer:
- We dismantle the propeller, pump and remove the belt.
- By unscrewing the standard bracket, you can remove the generator.
- We cut off the bead around the side of the cylinder head and on the cylinder block.
- Then you should unscrew the two bolts and two studs.
- Next, the assembly is installed on a new bracket and final assembly is performed.
Thus, moving the generator unit upstairs is not difficult.
A) Belt break.
Carefully examine the presence of a belt on the water pump and generator pulleys. To return it to its destination, you will need socket wrenches 17 or 13, depending on the year of manufacture of the car, as well as a strong flat-head screwdriver.
Disconnect the HF position sensor (for example, at 21213,21214).
Loosen the nuts securing the tension bar and slide it to the side towards the cylinder block.
Put a belt on your professionalism landing place.
After installation is complete, adjust the tension, controlling the deflection when pressing with a huge finger on the clearance of the belt between the generator and pump pulleys - 10-15 mm, pump and crankshaft - 12-17 mm. Failure to comply with this requirement may result in the belt slipping with subsequent damage and rupture.
Guide to removing and connecting the generator
To remove the unit, you need to prepare a set of tools: keys “10” and “19”, ratchets with heads, a hammer and a small extension.
The process consists of the following steps:
- First of all, remove the negative terminal from the battery.
- Next, you need to remove the engine protection and the right mudguard.
- Then, using a hammer, carefully knock out the mounting bolt and remove it.
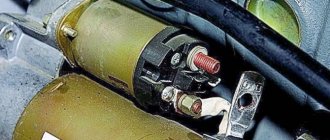
- At the next stage, you need to disconnect all the wires going to the generator: the plug and the wires secured with a nut.
- Then the fastening on which the belt tensioner is located is unscrewed.
- By removing the belt, the assembly can be dismantled through the hole that was formed after removing the protection.
- After replacement or repair, install the unit in reverse order.
The generator is connected according to the diagram.
Price issue
The VAZ 21214 generator has good repairability, which allows you to significantly save money if worn or broken parts are replaced in a timely manner.
Installation of a three-level generator relay-regulator and repair of the Niva generator brush assembly
The content of the article:
Installation of a three-level generator relay regulator for Niva
The generator has stopped working. No charging. Moreover, if 12 V is applied to the excitation winding from the battery, the generator starts, and as soon as you remove the voltage from the excitation winding, it immediately turns off, although it should not. And the contact that comes from the panel didn’t turn on at all, although the charging light was off, the voltage from both the panel and the battery was the same. As a result, I had to remove the generator and examine it for malfunction. It turned out that everything was fine, but the pill with the brush assembly was crooked. The reason for this was the bolt holding the pill, which suddenly broke off.
I couldn’t find such a bolt in any VAZ store, so I bought an ordinary M4x12 from Senny and a self-locking washer.
But this did not free me from the problem! The generator started to malfunction again, again it won’t start from the wire coming from the device panel. I decided to change the relay regulator... it didn’t help. The fastest leakage of current occurs through three small diodes of the excitation winding. But I installed a three-level regulator. I really wanted to try this accessory.
The pill inside is empty. It only has leads and two soldered wires.
This is how the wire comes out
This is the regulator itself with a switch. It needs to be screwed onto the body so that there is mass on the body.
Internal. The board is hermetically sealed with something like epoxy resin.
For now I attached it to the mudguard. I'll take it to the salon later. The advantage is that now the transistor is in gentle conditions. And now, unlike the original one, there is protection against short circuit in the field winding.
{Instructions} from the box. For me, it’s so surprising to somehow increase or decrease the voltage depending on the temperature or battery discharge. But it is written that it seems to extend the life of the battery.
I didn't see any differences in performance. Only the tension smoothes out more smoothly; with the everyday, the tension jumped stronger.
But returning to our sheep. Because I had already tried everything I could, but still couldn’t find the fault, all that was left was the diode bridge, but the fact is that it rings normally! Because, apart from the excitation winding itself, it is no longer responsible for starting it, I decided to change the diodes - in order to save money and not take the diode bridge completely. My father brought home from work 3 Schottky diodes brought from other countries. I cut off the old ones and soldered in the new ones. I placed the generator in the space and... Oh, magic - it started working!
Repair of the brush assembly of the Niva generator
It was necessary to change the front bearing of the generator, and at the same time I inspected the brush assembly. One brush was broken off at the base where the wire was embedded. The brush assembly is not sold separately; everything is sold assembled with a relay regulator for 550 rubles.
In this post I will tell you how to repair the brush assembly. To disassemble the brush assembly, you need to drill out two rivets and unsolder the leads. Judging by a search on the Internet, the brushes exist separately, but the uniqueness is wild, although the part is cheap. In any case, I was unable to find any unique brushes. I bought a wide two-lead brush at the market, which I sawed and made 2.
I received 2 of these brushes.
but their wire thickness is very thick. I loosened the wire and cut off the excess wires with side cutters.
I solder them to the brush holder plates.
With soldered plates
The terminal board was oxidized, I cleaned it with 600 sandpaper and coated the capon with varnish.
One pin going to the ground of the generator on the board does not fit anywhere, so you can safely bite it off, which is what I did.
Excessive contact bit off.
Using a soldering iron, I melted 2 nuts into the lid.
And on the reverse side I screwed in 2 screws.
That's all, actually. Another method is to purchase the cheapest relay-regulator and remove the pill from it.
Installation of snorkel NIVA
LLDPE snorkel for NIVA Installing a snorkel in NIVA Mini snorkel in NIVA
Source: www.spike.su
Video “Step-by-step instructions for replacing the generator on Niva 2121”
The video shows a step-by-step replacement of a generator set on a Niva (video author - Ivan Matieshin).
A week ago the diode bridge on my original gene flooded, I decided not to suffer - buy a new one, but for 80A. I've wanted it for a long time. Now this device is on the car)
What we needed to install generator 21214: Generator mounting bracket 21214-3701650 Compensating bushing for mounting generator 2110 complete with counter-shaped washer 2110-3701638 Generator mounting bolt 2110-3701376 with nut 2110-3701686 Additionally bolt M10×1.2 5×20 tension bar 21214-3701635 Bolt M8×25 with nut 2110-3701686 (like the lower mounting of the generator)
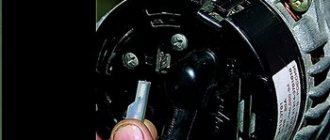
Removing the voltage regulator
The voltage regulator can be removed from the Chevrolet Niva for replacement using a flat-head screwdriver and a 8-mm wrench. The procedure is as follows:
- It is worth doing this if the voltage in the system does not correspond to the norm - less than 13.5 V.
- Disconnect the wire from the negative side of the battery.
- Disconnect the generator block with terminal D+. Turn the rubber boot to the side and unscrew the nut.
- Disconnect the wires from the stud.
- We unscrew the nut securing the generator excitation circuit terminal, and then remove the terminal itself.
- We loosen the 3 screw-shaped fastenings of the plastic casing of the generator set and remove the case.
- Then there are 2 more mounting nuts that secure the voltage regulator.
- We disconnect the screw securing the terminal to the D+ bus from the rectifier, after which you can finally remove the voltage regulator itself.
The generator on the Niva works for a very long time and will remain in operation for a couple of years without any special problems. Over time, its power drops noticeably, and then it is worth replacing several of its parts or the entire assembly. If after replacing the problem with a drop in power could not be eliminated, you should go to a service center for diagnostics.
Source: korchim.ru
Location of fuse and relay blocks Lada 4×4
The main part of the fuses is located in the interior of the Lada 4×4 under the panel to the left of the steering column. Total 4 blocks:
1 — engine control system fuse box; 2 — windshield wiper relay; 3 — fuse blocks; 4 — relay block of the engine control system.
The fourth relay block is located above the gas pedal.
The charging lamp does not light up.
Since the indicator on the instrument panel
is a link in the excitation circuit of the generator; the absence of flashing when the ignition is turned on leads to loss of its functionality.
Whether the lamp is to blame or the reason lies elsewhere (voltage regulator relay, lock contact group), can be understood by disconnecting terminal 61 from the generator with the ignition on, followed by shorting the wire from the instrument panel to the car body. If it catches fire, check the serviceability of the rotor winding, brushes and “chocolate”. If the circumstances are otherwise, examine the performance of fuse No. 2 (8A) and the light bulb by replacing the ones mentioned with known good ones.