The thermostat is an integral element of the cooling system of the VAZ-2110, requiring careful care, performance monitoring and timely replacement.
In this article we will consider the following questions:
- What is a thermostat, and what are the features of its operation?
- What engines are installed on various modifications of the VAZ-2110?
- How to recognize a device malfunction?
- How to replace on injection and carburetor cars?
- How to check performance, and what pitfalls are possible?
- Should you do the work yourself or trust the professionals?
The information provided is sufficient to promptly identify the malfunction, decide on further actions and replace the failed device.
Why is a thermostat needed?
Its basis is a heat-sensitive element that is immersed in coolant. Under the influence of temperature, deformation of the bimetallic plate occurs. As a result, the valve opens and the fluid flow in the system changes direction. In fact, a VAZ-2110 thermostat is needed for one purpose - supplying hot liquid to the cooling radiator.
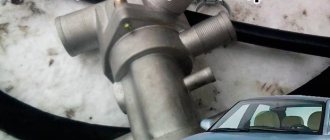
On older cars, the thermostat was connected to the engine block using a short rubber pipe. In newer versions, the device is secured using two studs. Between the engine block and the thermostat there is only a paronite gasket, which can be treated with silicone sealant. But this procedure is not always necessary. The outputs are connected to the pipes going to the stove, expansion tank and radiator.
How does a thermostat work? VAZ-2110
If we consider all types of devices, we can distinguish two main components - a sealed housing and a valve on a temperature-sensitive element. But there is a slight difference. With a carburetor power system, a non-separable thermostat (VAZ-2110) is used. The injector allows you to disassemble the structure and replace only the failed elements.
Of course, the second option is much better, since the cost of individual elements is much less. But in some cases, the VAZ-2110 thermostat valve (for injection engines) can also have a high cost - everything directly depends on the manufacturer. Preference should be given to companies that supply AvtoVAZ conveyors. Remember one thing: AvtoVAZ produces cars, not spare parts. Therefore, when you see a product on which an automaker is listed as the manufacturer, think about the quality of the product. It's hardly worthy.
What are the features of the classic and alternative connection options?
In the first case:
- The main thermostat valve is flushed with coolant from the main radiator and engine;
- The thermostat opens for additional cooling - in this case, there is control not only over the entire coolant temperature in the system, but also over the temperature of the coolant leaving directly from the engine, and this, as is known, is the hottest place in the cooling system.
The standard connection diagram for a six-hole thermostat will look like this.
Connection example.
In the second case:
- The thermostat is additionally washed with coolant from the heater and bypass.
- The device controls the temperature, which is lower than the motor temperature (from the thermostat output or from the bypass). It turns out that in winter such a thermostat will work later than according to the classic connection scheme. The functioning of the stove also improves, which works more actively the lower the temperature outside.
The alternative connection diagram has two options.
As for the speed of warming up the engine, it remains unchanged, because the path of coolant flow until it reaches 82 degrees Celsius has not changed, as has the heat capacity of the system.
How to remove an old-style thermostat?
In this case, everything is simple, the main thing is to let the engine cool. You will have to drain the liquid from the system, and it is at a very high temperature, so it can cause severe burns. When the temperature drops to 40-50 degrees, you can begin to drain the liquid. For this purpose, there are two holes - in the lower part of the radiator and in the cooling jacket of the internal combustion engine.
There is a plug in the first hole; it must be unscrewed by hand. If that doesn't work, you can use pliers. A bronze plug is screwed into the engine block. It is most convenient to unscrew it with a 13mm socket wrench. After draining the liquid (do not forget to unscrew the cap on the tank), you can remove the thermostat on the VAZ-2110. It is enough to loosen all the clamps that secure the pipes to it.
How to replace a temperature maintenance device
There is nothing difficult about replacing. Even a person who has little knowledge of cars can do the job after familiarizing himself with the basic steps. If you follow all the recommendations, you can replace the device in a few minutes. For work you will need.
- Silicone sealant.
- Clamps.
- Pipes (if the old ones have become unusable and cracked).
- Antifreeze.
- Container for draining coolant.
- Set of keys and screwdrivers.
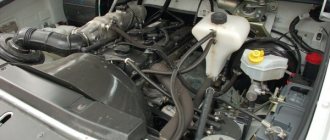
Place the car on a level surface and remove the engine protection. When draining the liquid, it will interfere and you will lose a lot of antifreeze. Remember the main rule: do not carry out repairs on a hot engine. The temperature of the antifreeze sometimes reaches 100-120 °C, which can cause burns and serious damage to the skin.
Now place a container under the drain hole on the radiator. Open the stove tap just in case. You don't need to drain all the fluid, just make the level lower than the thermostat position. The second drain hole is located on the engine block and is unscrewed with a 13mm wrench. Replacing an old-style thermostat involves loosening all the clamps on it and removing them.
When installing a new device, it is advisable to lubricate the outer part, which will fit onto the pipes, with sealant. Just first you need to degrease the surface of both the body and the internal cavity of the tubes. Replacing the new thermostat is a little more complicated: there are slightly more pipes, you will have to unscrew two nuts from the engine block. Most often, the breakdown consists of a jammed thermal valve: it is either constantly open or closed.
Deposits and scale inside the housing directly indicate that it is time to clean the system. If it is such a “mess,” then the engine jacket is even worse. To get the job done, water with vinegar will come to your aid. If you do not want to use such a solution, you can purchase a special liquid in the store, the composition of which is less aggressive.
Source
Removing a new sample element
If we draw an analogy with the previous guide, then you will need to perform almost the same steps. Drain all the liquid from the cooling system; for this purpose there are similar plugs in the block and radiator. The only difference is that not only will you have to remove the pipes, but you will also have to unscrew the two nuts that secure the thermostat (VAZ-2110 is the model in question) to the engine block. Just try not to damage the gasket. But if it is still torn (and this happens in almost 90% of cases), then be sure to install a new one during assembly.
Its cost is very low. And if you wish, you can even cut it out from paronite yourself (if you have one). To improve sealing, clean all adjacent surfaces. After this, degrease the metal and apply a thin layer of sealant to the gasket on both sides. When installing, it is necessary not to tighten the nuts to the end; give the sealant a little time to settle, then the connection will be more reliable. After 20-30 minutes you can tighten the nuts. It is recommended to fill the system with liquid after 1-2 hours.
Signs of a bad thermostat
If the thermostat on a VAZ-2110 is faulty, an increase in engine temperature will be observed. Unfortunately, if the sensing element breaks down, the valve switches to a position that corresponds to a small cooling circle. Consequently, liquid from the engine jacket does not enter the radiator. What to do in this case? Open the stove tap and turn on the fan at the highest speed. Even if it’s hot outside, this method should not be avoided - it will help save the engine from overheating.
Stories from our readers
“Fucking basin. "
Hi all! My name is Mikhail, now I’ll tell you a story about how I managed to exchange my two-wheeler for a 2010 Camry. It all started with the fact that I began to be wildly irritated by the breakdowns of the two-wheeler, it seemed like nothing serious was broken, but damn it, there were so many little things that really started to irritate me. This is where the idea arose that it was time to change the car to a foreign car. The choice fell on the melting Camry of the tenth years.
Yes, I had matured morally, but financially I just couldn’t handle it. I’ll say right away that I am against loans and taking a car, especially not a new one, on credit is unreasonable. My salary is 24k a month, so collecting 600-700 thousand is almost impossible for me. I started looking for different ways to make money on the Internet. You can’t imagine how many scams there are, what I haven’t tried: sports betting, network marketing, and even the volcano casino, where I successfully lost about 10 thousand ((The only direction in which it seemed to me that I could make money was currency trading on the stock exchange, they call it Forex. But when I started delving into it, I realized that it was very difficult for me. I continued to dig further and came across binary options. The essence is the same as in Forex, but it’s much easier to understand. I started reading forums, studying trading strategies. I tried it on a demo account, then opened a real account. To be honest, I didn’t manage to start earning money right away, until I understood all the mechanics of options, I lost about 3,000 rubles, but as it turned out, it was a precious experience. Now I earn 5-7 thousand rubles a day. I managed to get the car buy after half a year, but in my opinion this is a good result, and it’s not about the car, my life has changed, I naturally quit my job, I have more free time for myself and my family. You’ll laugh, but I work directly on the phone)) If If you want to change your life like me, then here’s what I advise you to do right now: 1. Register on the site 2. Practice on a Demo account (it’s free). 3. As soon as you get something on the Demo account, top up your REAL ACCOUNT and go to REAL MONEY! I also advise you to download the application to your phone, it’s much more convenient to work from your phone. Download here.
They are warmer not because a sixth fitting has appeared there, but because the bypass channel has been reduced. And the new fitting serves to get rid of the constantly leaking stove return tee.
| Comparison of bypass channels of a 6-hole thermostat - 11mm (left) and 5-hole - 16mm (right) |
What does bypass affect? Through the bypass channel, the coolant circulates in a small circle. And the smaller the diameter of the bypass channel, the more coolant flows through the heater. Because additional resistance is created when coolant flows in a small circle, bypassing the stove. That is, by reducing the diameter of the bypass you increase the flow through the stove, that is, the car interior will be warmer.
Reducing the bypass channel for a 5-hole thermostat:
I would like to note right away that when the bypass channel in a 5-hole thermostat (TC) is narrowed, problems may arise: Problems associated with washing the thermoelement . That is, if in a 6-hole thermocouple the bypass coolant and coolant of the outlet (cold) pipe of the stove are washed, then in a 5-hole thermocouple only the bypass coolant is washed.
In order to reduce the bypass to the required value, you can cut a plate out of an aluminum plate . The plate should fit exactly inside, as shown in the figure. Next, the plate needs to be secured ; for this you can use cold welding or rivets. Make sure that the rivets do not interfere with the closure of the small circle. Then we drill a new hole in the plate .
Narrowing of the bypass channel
If you decide that it is the bypass channel on the VAZ 2110 that needs to be adjusted, then the 6-hole thermostat should not have any problems. But with a 5-hole one, malfunctions may occur due to the fact that the cold pipe of the stove (outlet) will not be washed. Therefore, think about whether you need such a modification; maybe it’s better to immediately install a Granta thermostat or a six-hole one.
To reduce the bypass, you need to do the following:
- Cut a plate out of sheet aluminum so that it fits exactly inside the vehicle;
- Secure the plate with a rivet or cold welding, but so that the fastening does not interfere with the flow of coolant in a small circle;
- In this plate you need to drill a new hole of 5 or 6 mm (instead of the standard 8 mm);
- In addition to the steps described above, on a 6-hole heater, the stove return is connected to a thermostat.
Standard bypass channel in the thermostat Aluminum plate to reduce the bypass channel Installed plate with a reduced bypass channel Self-tapping screws are made flush
After this modification, you will notice that the interior will warm up better and faster, but warming up of the engine will slow down somewhat.
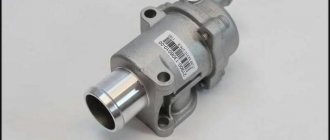
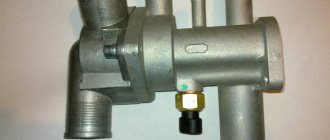
Thermostat design
Structurally, the “tens” thermostat consists of an aluminum housing with pipes for connecting hoses and a working mechanism (thermoelement) located inside. The latter is a brass or copper cylinder filled with wax with a built-in pusher - a pin, at the end of which there is a valve.
When the coolant is heated to a certain temperature (80-82 o C), the wax melts and expands, pushing this pin, which, in turn, moves the valve, opening it. As the wax cools, it hardens and shrinks in size, and the valve spring forces it back into the closed position.
Signs of a faulty thermostat
If your car's engine takes more than seven minutes to warm up to operating temperature, this is a sure sign that the thermostat valve is stuck open. In this case, the coolant will constantly move in a large circle. With such a malfunction in winter, the engine may not warm up even to 80 degrees.
If, on the contrary, the engine heats up very quickly and there is constant overheating, which can be determined by the readings of the temperature sensor and the frequent turning on of the radiator fan, this is a sure sign that the valve does not open and does not allow coolant into the radiator for cooling.
Installation
In addition to the thermostat, you need to purchase a new pipe through which the coolant can return to the pump. Among motorists it is called a “saxophone”. You can find it by number: 2110-1303055-10. The following tools and materials should also be on hand:
- Clamps 15-28 mm (it is better to take about 7 pieces).
- New gasket.
- Replacement hoses.
- Screwdriver Set.
- Special hose puller (needed for old-style cars).
- Rags.
- Antifreeze.
There are two installation options: standard and alternative. In the first case, the 6-hole thermostat opens for additional cooling. In other words, it monitors the temperature coming out of the engine, not the temperature of the already cooled antifreeze. An alternative option is to check the temperature lower than the motor reading. The installation proceeds according to the following scheme:
- Part of the coolant must be drained; to do this, you need to unscrew the plug from the drain hole;
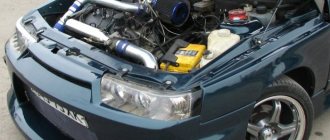
Along with the drop in temperature due to the gradual arrival of winter, it began to get colder in the car. It began to take more time to warm up the engine, then wait for the coolant temperature to rise to 60 degrees to turn on the heater and warm up. In this regard, I remembered the modification of the cooling system of the VAZ 2109, when instead of the standard thermostat, a 6-hole thermostat from the VAZ 2110 is installed. It is improved in comparison with the standard one and has the following advantages:
— the thermostat has been modified to ensure a more stable coolant temperature; — fewer connections on clamps. The standard thermostat is attached to the outlet pipe through a rubber connecting tube; — the thermostat is made collapsible for the possibility of replacing the thermoelement separately from the body; — the new thermostat is 5 cm shorter than the standard one — there is more space.
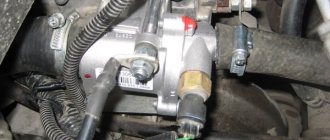
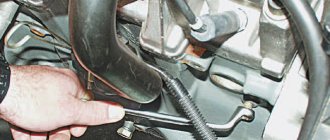
To remove the thermostat and not spill antifreeze, you must first release the pipe on the throttle assembly and drain what spills out through it. All you have to do is be careful and not spill antifreeze when disconnecting the return pipe from the heater radiator.
We connect a new thermostat with 6 holes according to the following diagram:
Connecting a 6-hole thermostat according to the standard diagram
It will be necessary to install a new pipe through which the antifreeze is sent back to the pump, the so-called “saxophone” (2110-1303055-10), it is shorter than the standard one from the VAZ-2109. However, newer cars already have this pipe installed from the factory. You may also need hoses, clamps, and a gasket for a new thermostat. It is advisable to try on the thermostat and determine locally whether the hoses will need to be replaced.
Above is a standard connection diagram for a 6-hole thermostat. However, it is recommended to connect such a thermostat using a different, modernized circuit.
Modified thermostat connection diagram for VAZ 2109, VAZ 2108 “injector”
Modified thermostat connection diagram for VAZ 2109, VAZ 2108 “carburetor”
Connecting a 6-hole thermostat
The meaning of this connection is that the coolant, which has given off heat in the heater radiator, is directed back to the temperature-sensitive element of the thermostat (rather than drained into the receiving pipe to the pump), and cools it a little, preventing the large circle from opening until the temperature of the antifreeze coming from the heater won't rise. It turns out that now the thermostat also takes into account the temperature of the coolant from the heater radiator, which makes the engine temperature more stable, and the car will be warmer in winter. To connect you will need a special tee.
With such a system for connecting a 6-hole thermostat, there is no need to install cardboard boxes so familiar to all owners of domestic cars in front of the radiator. In summer, there are no differences in the operation of all types of thermostats.
For comparison and understanding of the nuances of operation, below are the standard cooling systems of the VAZ 2109, VAZ-2108.
If the thermostat fails, the engine will take a very long time to heat up to the required operating temperature, and while driving, the engine temperature will drop sharply. This is especially felt in winter due to a poorly heating stove.
Appearance of the device
How to identify a malfunction
You can determine whether the VAZ-2110 thermostat needs to be replaced on your own.
To do this, start and warm up the car engine to operating temperature at idle speed. Next, in the engine compartment, find the radiator pipes. Touch them. If the device is working, they should both be hot. This is evidence that the coolant circulates freely in the system.
If one of them turns out to be cold, it means that the valve did not open and the thermostat did not work. But this does not mean that it needs to be changed immediately. For the VAZ-2110, replacement of the thermostat will be required only if its entire structure turns out to be unsuitable for further operation. In other cases, you can get by with repairing it.
Types of thermostats and rules for their selection
Having decided to replace the thermostatic device, many drivers are wondering whether to install an imported or domestic thermostat on a VAZ 2114, which one is better and which company to give preference to.
In this case, it is unlikely that it will be possible to give an absolutely accurate answer, because everyone chooses the appropriate spare parts themselves, based on the issue of availability, price and other factors.
Thermostat PEKAR
Let's say that we can distinguish the following 3 groups of thermostats that are suitable for the 14th and which can be found in regular car stores:
- Domestic. Original thermostats for 2114 are very easy to find on sale, but it is worth remembering that their quality leaves much to be desired - they either fail ahead of schedule (25,000 km) or often jam, which can lead to overheating of the engine on the road. That is why it is not recommended to purchase them as a replacement.
- Chinese. They may have an attractive appearance and a shiny body, but their overall quality is noticeably worse than domestic options. That is why you can purchase Chinese thermostats only if there is nothing else left.
- Foreign. Despite the slightly higher cost, they have much better quality of workmanship, which is why preference should be given to them.
Thermostat LUZAR
But what to do if you couldn’t find branded parts, but the choice of thermostats themselves is quite wide and the prices are about the same? In such a situation, you should pay attention to the material of the case. You should only purchase products made from stainless steel or high-quality brass, which can be distinguished by weight by holding them in your hands.
WEEN thermostat (Poland)
You should absolutely not purchase products made from zinc alloys, which can imitate brass or steel, but are also very light. The housings of such thermostats are extremely unreliable and can leak not only from impact, but also from frequent temperature changes (especially in winter).
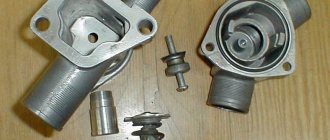
Removing the thermostat
To remove the device, you need to completely or partially drain the coolant. After this, it is necessary to dismantle the air filter housing and disconnect the hoses from the thermostat pipes. Next, you should unscrew the three bolts that secure the device body to the cylinder head.
When the unit is dismantled, unscrew the screws securing the thermostat cover and remove the thermocouple.
Checking the thermoelement
To check, we need a container of clean water, a liquid thermometer and a gas (electric) stove or boiler. To test the thermocouple for functionality, place it in a container of cold water and start heating it. When the liquid is heated to 80.5-82 o C for a working device, the pusher should move forward. If this does not happen, then replacing the thermostat for your VAZ-2110 is a necessity.
Additionally, inspect the device body and its pipes. If everything is in order with them, you can only get by by purchasing a thermoelement.
Check and replacement
If the thermostat fails, it should be replaced immediately. It is impossible to say that the device has failed only on the basis of an initial check.
If the engine overheats during operation or does not warm up to operating temperatures quickly enough, the condition of the unit is checked. Based on the results obtained, replacement or repair is carried out.
The most effective way to check the thermostat is to remove it. The procedure is performed as follows:
- Unscrew the crankcase protection mounting bolts, after which the protection must be removed and placed aside for a while.
- Remove the cap from the expansion tank where the coolant is located.
- Place a clean container under the drain hole (if you plan to pour the same coolant back into the system), unscrew the drain plug from the cylinder block and remove all coolant from the cylinder block.
- Place a container under the drain hole of the cooling radiator, unscrew the plug and drain the antifreeze or antifreeze.
- Loosen the clamps holding the hoses.
- Disconnect the three hoses that are connected to your thermostat housing.
- Loosen the tension on the clamps and remove the thermostat along with the hose. The short hose is disconnected from the thermostat.
- Place the dismantled device in a container of water, which must be preheated to 78-80 degrees Celsius.
- Start heating the water, stirring the liquid occasionally. The water needs to be heated to approximately 87 degrees Celsius.
- If the thermostat is working properly, when the temperature reaches 87 degrees with an error of plus or minus 2 degrees, the main valve should open. If this does not happen, the device is faulty and requires replacement.
Replacement process To replace the thermostat, it is enough to remove the old one in accordance with the specified dismantling instructions, and reassemble the unit with an already working device in the reverse order.
What to choose?
Many owners of a VAZ 2109 with a carburetor complain that the factory thermostat is insufficiently efficient. Because of this, especially in winter, you have to suffer from slow heating, when it is difficult to achieve even 60 degrees.
To solve this problem, it is recommended to install a thermostat from an injection VAZ 2110 with 8 valves for the winter and for the entire period of operation of the nine. This is an improved element that has obvious advantages compared to the original thermostat for the carburetor VAZ 2109.
- You should install an injection thermostat starting from tens, taking into account the fact that we are not talking about the first versions of the VAZ 2110, but later, modernized ones.
- On 8-valve engines, dozens of thermostats have become dismountable, unlike the 16-valve VAZ 2110 and those devices that were initially installed from the factory on the VAZ 2109. This allows, in the event of a unit breakdown, to disassemble it and partially repair it without completely replacing the device.
- To repair a new thermostat, borrowed from a VAZ 2110 with an injector and 8 valves, it is often enough to disassemble the device and replace the thermoelement there.
- The new unit turned out to be 50 millimeters shorter, which allows for more free space.
- The new element has lost many of the clamps that are relevant for thermostats from the VAZ 2109.
- The component has undergone quite a serious modification, which allows it to effectively maintain a stable temperature inside the engine cooling system.
Device from tens When replacing the thermostat on a VAZ 21099, make sure that you choose the device from the 8-valve “tens”. Cars with 16 valve engines use different devices in which the circulation system does not work the same way. Therefore, the elements will simply be incompatible.
VAZ-2110: replacing the thermostat
After purchasing a new element, do not forget to check its serviceability using the method described above. Once you are sure it is working, install it in the housing and screw on the cover. The thermostat assembly can now be reinstalled.
To do this, secure it with three bolts to the cylinder head. Connect the cooling system pipes and fill the reservoir with antifreeze or antifreeze to the required level.
Start the engine and warm it up. Check the operation of the thermostat by touching the radiator pipes. If they are both hot, the device is working normally, and our work was not in vain.