Removing and installing the instrument panel on VAZ 2110, 2111 and 2112
Before you begin this repair, you must do the following:
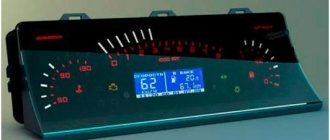
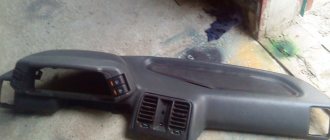
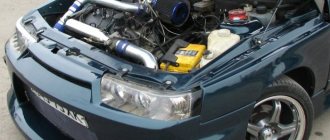
After this, you can proceed to further actions. We immediately remove and remove all the elements of the panel, such as: the standard clock, the heater control unit, the display unit, as well as the central deflector, and do not forget about the buttons with the radio. As a result, we get approximately the following picture:
Next, using a screwdriver, pry up and remove the plugs at the upper corners of the instrument panel mounting. In reality it looks like this.
On the other side, we do the same, after which, using a socket and an extension, we unscrew the nuts securing the instrument panel in the upper part.
Now let's move on to the remaining attachment points. At the bottom, in the left and right parts of the panel - in the corners, there is also one screw that needs to be unscrewed. The first one is shown below.
The second one is located on the right side of the panel in the same place - at the bottom in the corner. Also, immediately unscrew the self-tapping screw that secures the diagnostic block:
Now we move on to the side fastening points of the frame, which are located in the center on each side - the photo below shows the left side:
On the right everything will be the same. Next we move on to the internal frame fastenings, which are located in the following places. The first one is under the fuse mounting block, to get there we open the cover and look inside the panel:
The second one on the right is visible when the glove compartment lid is open:
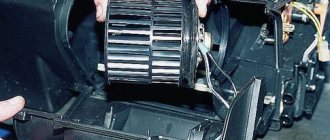
Of course, the mounting block will also have to be removed so that it remains intact with the sub-panel wiring.
We thread it inside with the instrument panel pulled back; you will also have to cut off some of the wiring fastening clamps, for example, in this place, which is shown in the photo:
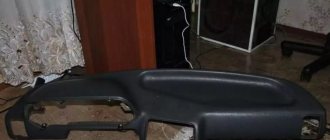
Now we are trying to remove the VAZ 2110 panel, moving it to the side on both sides, evenly, without much effort or sudden movements.
In the photo above you can see that the headlight hydraulic corrector tubes were cut off, since in my case they were simply not needed. If you need to save them, do everything carefully and remove them by pulling the control unit out of the instrument panel. Next, we finally remove the panel, of course, after first disconnecting all the wires that will interfere with this.
Installation occurs in the reverse order, connecting all wires and connectors to their places, blocks and switches, as well as other elements that were removed as a result of this procedure.
Reasons for disassembly
So, we have already almost indicated the first reason - I don’t like it. This may also be necessary in the following cases:
- For tuning. That is, when we try with all possible forces to correct the “face” of the car, which everyone sitting in the cabin is staring at, that is, the torpedo. To improve comfort and overall aesthetic appearance, you can install new linings, of which there are quite a few types today. The following linings are perfect for the VAZ 2110: • Euro 1, also known as Caprice. It looks nice, but it doesn't have a shelf on the passenger side;
Panel trim VAZ 2110 Euro-1• Euro 2 – similar to the previous one, but with a passenger shelf;
Panel trim VAZ 2110 Euro-2• There are trims that are installed directly on top of the instrument panel. Installing them yourself is not at all difficult. Among these, one of the most popular is Chestnut;
Panel trim VAZ 2110 Kashtan
Panel trim VAZ 2110 Kashtan
Panel trim VAZ 2110 Kashtan• In addition, you can order an exclusive trim that makes the interior similar to that of the Nissan Primera, with the instrument panel in the center.
Trim Chestnut panel VAZ 2110 (dashboard according to class=”aligncenter” width=”600″ height=”416″[/img] Trim Chestnut panel VAZ 2110 (dashboard in the center) - In order to get to the wiring, change some wire in it, or maybe a complete replacement of the entire wiring harness is necessary;
- To install a new stereo or video system, as well as supply other equipment that is necessary, but not provided for by the designers;
- Replace, fix or clean air ducts;
- When you need wind and noise insulation, since the standard one on the VAZ 2110 leaves much to be desired. Let’s not argue that tens of them are always making noise and rattling, and I really want to get rid of it.
Interior sizing Bimast Bomb
Interior sizing Bimast Bomb
Interior sizing Bimast Bomb
Sizing with Splen on top of Bimast
Sizing with Splen on top of Bimast
Sizing with Splen on top of Bimast
Sizing with Splen on top of Bimast
Perhaps car owners will also find other reasons to replace the dashboard.
Installation of Europanel instead of the usual one on VAZ 2110, 2111 and 2112
Many owners who have owned a VAZ 2110 for a long time would like to change the boring panel to a more modern one. In this case, you can install a new type of panel from cars manufactured after 2006, or from the “Bogdan” versions, which are analogues of the tenth family, except that they were assembled in Ukraine.
With such alterations, basically you won’t have to change anything, but it’s worth considering that in this case you need to buy a complete Europanel:
- instrument panel frame assembly with trim
- instrument panel (combination)
- buttons and switches
- heater deflectors
- New heater control unit
- sub-panel wiring
- steering wheel, cover and switches
Only in this case everything becomes without any problems with minimal labor costs.
How to create a new design for the VAZ 2110 dashboard
The entire process of updating your dashboard yourself will not take much time. All that needs to be done is dismantling the outdated “part” and installing a modernized model. You can find out how to remove the VAZ panel here and in the car repair and operation manual. But the main steps should be recalled:
- First you need to disconnect the battery terminals. The steering wheel should be lowered to the lowest position.
- It is necessary to unscrew the screws that secure the panel trim.
- Next, we disconnect the connector on the left, in this situation we are talking about a machine switch for external refreshment. Then, using pliers, you should straighten the mountings of the instrument cluster.
- Next, remove it. Some models are attached using M5 screws. Finally, you need to disconnect the connectors.
After this, you can install the new panel in the reverse order. Such tuning of a VAZ 2110 with your own hands will always cause admiration among passengers and a sense of pride.
Installation of an instrument panel from Priora on a VAZ 2110-2112
There is another method of modifying and tuning the instrument panel, which consists of replacing the dashboard from the Priora - VAZ 2170. Of course, the appearance will be much more interesting than even the Europanel, but connection and installation require a lot of investments, both financial and physical. The main problem with this modification is that the connectors for the under-panel wiring of the Priora and the under-hood of the VAZ 2110, which of course need to be connected, are different, and the connectors simply do not fit together.
In this case, there are two ways:
- Completely take all the wiring from the Priora, including the engine compartment harness, interior harness, power window control unit, comfort unit, etc.
- Join completely two different types of wiring manually, cutting off the connectors and insulating almost every wire.
Panel From Priora V VAZ 2110
Salon from Priora in VAZ 2110
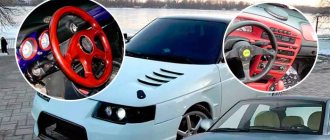
You can diversify the interior of your car in various ways, and one of them is to install an interior from Lada Priora. It is not necessary to install the entire Priora interior in a VAZ 2110. You can also focus on its individual elements (ceiling, plastic, etc.).
The old interior of the VAZ 2110 is already quite boring, I want to somehow refresh the interior. Of course, you can install various interior parts from a foreign car (for example, seats, armrest, sunroof, etc.), but this requires a lot of time and desire to tinker, tinker, and adjust. I want to change dozens of interiors without effort. just take and install new plastic, seats, tunnel, ceiling or panel..
Then you should pay attention to the interior from Priora. Almost all interior parts of the Priora fit the VAZ 2110-12 without significant modifications (except for wiring).
Let's take a closer look at each detail of the interior:
Dismantling algorithm
- We remove and remove the front seats from the interior so that they do not interfere with the disassembly;
- Disconnect power from the battery;
- We lower the steering wheel of the VAZ 2110 to the lower position;
- Unscrew the screws that secure the panel covers. These are two screws on both sides of the tunnel. Now you can remove the shield;
- We remove the plug on the tunnel in the center by prying it off with a screwdriver;
- We unscrew the screws of the central tunnel to remove it. Before doing this, disconnect the wires from the cigarette lighter;
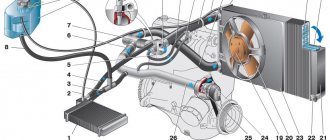
- We remove the air duct for heating the interior of the VAZ 2110. To do this, having disconnected the cover from the gearbox, you need to pry off the latches with a screwdriver, then remove the air duct;
- We remove the central panel by unscrewing it from the floor;
- Now it is possible to disassemble the torpedo. First, unscrew the mount that holds the glove compartment, disconnect it from the backlight, and take it out;
- In the hole where the glove compartment was located, we remove the screws on both sides, as well as directly behind the glove compartment;
- We unscrew the VAZ 2110 torpedo mount with a key and a screwdriver;
- Near the left pillar we pull out the air duct by prying it with a screwdriver;
- With special care you need to remove the torpedo, supporting it with your hands while unscrewing the nut with a spanner. Then, lifting it up, remove it from the pins;
- Now you need to remove all the wires, marking them with a marker as you go so that you don’t get confused when reinstalling them;
- It became possible to replace the lining and carry out noise insulation work.
Priora wiring in VAZ 2110
The biggest problem is that the wiring on the Priora is multiplex, it is not at all similar to the wiring on the VAZ 2110, and the same on the Euro. Only the plugs are different!
Because All connectors on the Priora differ from the connectors on the VAZ 2110. Then you can:
Change the wiring of the VAZ 2110 to wiring from the Priora. Leave the VAZ 2110 wiring and change only the pads from the Priora. In the first case, you will need all the Priora wiring (under the hood, inside the cabin).
In this case, the most difficult moment is to merge the rear old part of the wiring with the wiring from the Priora.
Thus, the process is complicated by replacing all the wiring, but is made easier by the fact that all the pads do not need to be soldered.
In any case, you will have to study literature from Priora and VAZ 2110 for a long time.
The only connector that will fit is the connector connecting the interior wiring and the injection wiring (only for VAZ 2110 with 1.6 internal combustion engine)
The mounting block will also have to be replaced with the Priorovsky one, because it doesn't look like a decimal at all.
Because In the Priora, air flow control is automatic, then if necessary, you need to install an electric drive in the heater.
The Priors now have an electrical package control unit (2170-3763040). It is responsible for all electrics (ESP, central locking, interior light, built-in alarm, turn relay, etc.) and combines the functions of an anti-theft system, immobilizer and hazard warning lights.
Installing it in the top ten will require additional investment and time, so it is usually not installed in the VAZ 2110.
The price of the electrical package control unit is about 3000 rubles.
Some of the Priora's wiring comes with the panel, and some must be purchased separately.
The price of wiring the Priora separately is about 1500 rubles.
VAZ-2112 and Priora hatchback: characteristic features
First, let's define what Priora is. This is a VAZ-2112, which has been restyled. Thus, in fact we are talking about one car model. It is not possible to purchase a new VAZ today, since it is not produced. It follows from this that this vehicle will be used. If you want to get a new car, then, of course, the choice will fall on Priora.
Let's talk about what is typical for these cars, which have such a common part as a body (can be of several types: hatchback, station wagon and sedan). Everyone chooses it at their own discretion. And do this in both models. But body parameters can differ, for example, length and height. Their difference is small, but still there, which also needs to be taken into account.
One of the most important parts of a car is the engine. Let's compare these devices in these models. So, the volume, type of fuel, number of cylinders and their location are the same. But the engine power is different. This figure for Priora is higher and equal to 98 l/s. But the VAZ doesn’t have much, but less – 89 l/s.
As for the transmission, it is the same. Only the suspension is different. It is different in these models. If we talk about which one is better, then, of course, Priora.
Since this is a modern version of the part. It is spring-loaded, so it is much stronger and more reliable.
Priora panel in VAZ 2110
The simple “pick and install” option won’t work here.