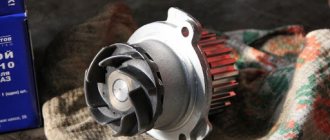
The pump (coolant pump) is one of the main elements of the cooling system of an internal combustion engine.
It serves to pump coolant into the system, thereby ensuring its circulation and cooling of the entire engine. The pump structure consists of a housing, an impeller, a bearing and a drive gear.
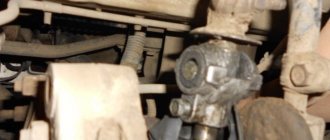
In VAZ 2110 cars (8 valves), the pump is located on the right side of the engine cylinder block (in the direction of travel) under the timing belt cover.
It is driven directly by the timing belt, which, while moving, rotates the drive gear.
Purpose and functions of the water pump
The pump is a centrifugal type pump that provides forced circulation of antifreeze through the engine cooling circuit. Due to this, excess heat is removed from the engine. Structurally, the pump is quite simple. An impeller is located in a cast iron or aluminum casing, which is driven through a shaft. The tightness of the structure is ensured by the oil seal and gasket between the pump housing and the cylinder block.
Coolant is supplied through the central channel. When it hits the impeller, due to the centrifugal force, the coolant is thrown towards the walls of the housing. Through the distribution channel, the liquid flows to the pipes and then into the engine cooling jacket. When the temperature reaches a certain value, the thermostat opens, which leads to cooling of the liquid in the radiator. The coolant then returns to the centrifugal pump. This ensures the circulation of antifreeze.
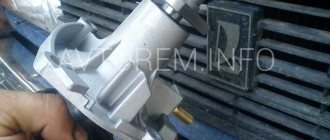
The pump is the main element of the engine cooling system
Why is a second pump needed in a car's design?
On some modern car models, a second pump is already installed from the factory. This equipment allows for the most reliable engine cooling under any load.
An additional pump on the car is required to create better cooling. If we talk about the owners of the tenth family of VAZs, then most often a second pump is installed to optimize the operation of the stove in winter.
In this case, the pump body is screwed to the motor body with a special bracket
Checking the functionality of the water pump
Self-diagnosis of the pump is quite simple and will take no more than 10 minutes. The verification procedure is as follows:
- The engine warms up to operating temperature (91˚C for VAZ 2110).
- For safety reasons, a thick glove is worn on the right hand.
- The coolant supply from the radiator is cut off. To do this, squeeze the pipe by hand. If the pump is working properly, you will feel the antifreeze pressure inside the hose. If the pipe compresses easily, then the pump is faulty.
All actions should be carried out with extreme caution, since the coolant gets very hot, and you can get burns from the surface of the motor or pipes.
To identify problems with the pump, it is enough to pinch the coolant supply pipe
Diagnosis of pump faults on VAZ 2110/11/12
A pump malfunction can be identified by the following signs:
- While driving, extraneous noise appears from the timing belt.
- The pump loses its seal and begins to leak.
- The timing belt breaks.
The most capricious element of the VAZ 2110/11/12 pump is the bearing. If it is severely worn or if the timing belt tension is incorrect, the pump cannot be repaired.
One of the symptoms of a pump malfunction is the appearance of a leak.
Consequences of using a faulty pump
Operating a car with a faulty pump can lead to the following serious consequences:
- damage or breakage of the timing belt, often leading to a major engine overhaul;
- When the engine overheats, the rubber elements of the cooling system, valve covers and cylinder head gaskets are destroyed.
The pump is changed along with the tension roller and timing belt every 50 thousand kilometers. If signs of wear appear, these components are replaced before the time specified by the manufacturer.
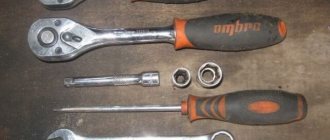
Tools you will need for your work
To replace the VAZ 2110, 2111 and 2112 pumps and repair parts yourself, you will need a small set of tools that can be found in any garage:
- knob;
- wrench 17, open-end;
- a set of car keys;
- extension element;
- head.
Do-it-yourself repairs are quite advisable, since the price of work in a car service center as of January 17, 2022 is on average 1 thousand rubles. This amount is better spent on purchasing the pump itself.
Repair of pump VAZ 2110/11/12
If the failed water pump is relatively new and its service life has not yet expired, you can try to repair it. This will require special tools, new parts, seals, etc.
To repair a faulty pump, you will need to purchase the necessary parts.
Disassembling the pump
The pump is disassembled in the following sequence:
- The removed pump is wiped with a dry cloth.
- Using a special puller, the pulley is removed.
- The bearings are knocked off the shaft with a hammer.
- The shaft is removed from the pump housing.
- The impeller is removed.
- The oil seal or what is left of it is removed.
- The insides are thoroughly washed and cleaned.
If the pump is leaking, the seal must be replaced. The cause of a whistle at high speeds is usually a strong shaft wear.
Video: disassembling the pump
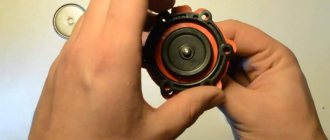
Replacing the oil seal
The oil seal is a rubber seal consisting of a metal rim, a spring and rubber. In any case, when disassembling the pump, the oil seal should be replaced, since the rubber wears out quickly. The procedure for replacing the oil seal is as follows:
- The old seal is removed from the shaft.
- The seat is cleaned of dirt.
- A new seal is installed.
Pump leaks are usually caused by worn out seal.
Replacement of shaft and bearings
Often, due to high production, bearings have to be replaced. They can only be knocked out using special tools (a puller or a hydraulic vice). Therefore, a new shaft with bearings already mounted on it is usually installed in the pump.
The pump shaft is replaced along with the bearings
Replacing the pump pipe
Changes in pressure in the cooling system often lead to deformation of the coolant inlet and outlet hoses. These hoses are replaced as follows:
- Use a screwdriver to loosen the clamp on the pump side.
- The fastener is removed along with the hose.
- The clamp is loosened and removed from the other side.
- The pipe is removed and pulled out from under the hood.
Pump lubrication
Periodically replacing the water pump lubricant will significantly increase its service life. Some pump designs have special holes for lubrication. If there is no such hole, the water pump will need to be disassembled.
Some water pumps have special holes for lubrication.
Replacement
Having purchased a new coolant pump, you can begin the replacement procedure.
The VAZ 2110 works in conjunction with 8 valve and 16 valve power units. Despite there being a certain difference between them, the pump replacement procedure is identical.
Dismantling works
The instructions below are relevant for dozens with two types of motors.
- Place the car on a level area above a hole or on an overpass.
- Lift the hood, remove the negative terminal from the battery, which will turn off the power to the car.
- Unscrew the cap of the coolant expansion tank. This will relieve excess pressure in the system.
- Now get down under the car.
- Place a clean container with a volume of at least 5 liters under the cylinder block.
- Unscrew the coolant drain plug using a 13mm wrench, which will allow you to drain the coolant. Be careful, unlike oil, you need to drain the coolant when the engine is cool.
- When all the coolant is out, screw the plug back into place.
- Using a 10mm wrench, unscrew the three mounting bolts that hold the timing case in place.
- Remove the casing.
- Place the crankshaft at TDC of the first cylinder - top dead center. To do this, you need to turn off the gear and turn the special bolt that holds the generator pulley to 19 with a key. Turn until the marks on the camshaft gear align with the mark on the rear timing case.
- Make sure that the marks on the flywheel and clutch housing match. To do this, you will have to remove the plug on the crankcase. It is made of rubber and is located to the right of the cylinder block.
- Lock the crankshaft in this position. You can use a simple slotted screwdriver that fits into the teeth of the flywheel.
- Slightly loosen the tension roller locking nut using a 17mm wrench.
- Turn the roller using a special wrench in a counterclockwise direction. This way you can loosen the tension level of the timing belt.
- Now you can quite easily dismantle the tension roller and belt.
- The next step is to remove the five mounting bolts that hold the lower timing case in place. These include 3 bolts that hold the pump. You will need a socket wrench or a 10mm socket.
- The casing can then be removed.
- The VAZ 2110 provides for installation of a pump using three hexagon bolts. Once you unscrew them, you can simply carefully remove the pump by tapping on the body.
- If that doesn't work, then use a flathead screwdriver to pry up the coolant pump housing, which will allow you to remove the pump.
- Remove traces of the old gasket that should remain on the surfaces of the seats.
Changing the gasket
- The gasket is lubricated on both sides using a special automotive sealant. The prepared and processed new gasket is placed on the body of the new pump.
- The new pump is installed in its rightful place, taking the baton from the old coolant supercharger.
Before installing a new coolant pump, make sure that it rotates normally and does not jam anywhere.
Reassembly nuances
- Reinstall the new coolant pump;
- Replace the casing;
- Fix the camshaft pulleys;
- Return the timing belt to its rightful place;
- The belt must be put on, focusing on the marks on the camshaft and crankshaft;
- Pull the belt using the tension roller and eccentric to the desired level;
- Turn the engine over several times to check that the marks match;
- Adjust the position and tension of the belt in accordance with the standards;
- Install the outer casing of the device;
- Replace the terminal from the adsorber;
- Add coolant to the required level.
Replacing the pump is an excellent reason to change the coolant at the same time. If you plan to do this in advance, you don’t have to pay special attention to the cleanliness of the container for draining the coolant.
If the pump fails some time after the coolant was changed, it is better to fill it back after the repair is completed. Still, buying a new coolant is not the cheapest thing. Learn to save wisely on repairs.
By properly organizing the replacement of the pump on your VAZ 2110, you can save a decent amount of money, plus improve your skills. On average, the work takes about 3 hours. If you follow the instructions, no pitfalls should arise during the repair process.
Installation of an additional pump on a VAZ 2110/11/12
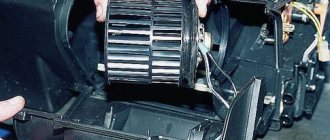
The interior heating system in VAZ 2110/11/12 cars often fails to cope with its responsibilities in the cold season. This problem can be solved by installing an additional pump in the cooling system.
To heat the interior of the VAZ 2110/11/12, an additional electric pump from GAZelle is installed
The VAZ 2110/11/12 stove functions normally only at speeds of at least 2 thousand rpm. At idle, slightly warm air enters the cabin. The fact is that to increase the air temperature, the coolant must circulate faster. The problem is solved by installing an additional pump and accelerating the circulation of antifreeze through the stove. As a result, the temperature in the cabin ceases to depend on engine speed. For these purposes, an electric pump from a GAZelle is installed.
Installation of an additional pump
To install an additional pump, you need to do the following:
- Coolant is drained from the cooling system.
- A part of the outlet pipe of the stove is cut out, equal to the length of the pump without taking into account the fittings.
- The fittings are coated with sealant, the hoses are put on and secured with clamps.
- To attach the pump to the body, use a special bracket that wraps around the pump and is attached to the body with two self-tapping screws. You can make such fasteners yourself or purchase them in a store. The bracket can also be attached to suitable studs on vehicle components.
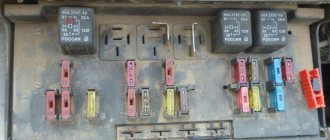
- To control the pump, a button is installed in the cabin that supplies power from the positive terminal of the battery. In this case, it is advisable to supply voltage through a relay.
The additional pump fits into the return pipe of the stove and is secured using a special bracket
After installing the additional pump, antifreeze is poured into the system. After starting the engine, check the pump and pipes for leaks and test the operation of the new device.
Fluid leaking from the drain hole or from under the seating surface
There may be various symptoms of pump failure for VAZ-2109, 2107, 2114 and other car models. So if the coolant was of poor quality, there may be a leak in the drain hole area. In this case, leakage occurs, the formation of drops after the car is broken in. This can be determined by looking at the surface of the drain hole. Please note that a small leak in a new pump is normal. This happens during the first 10 minutes of engine operation. This is because the mechanical seal moves to the correct position.
If a new pump has a break-in period. If the pump is not operating properly but fluid continues to flow from the drain port, the pump is damaged. It is necessary to thoroughly flush the cooling system and install a new pump. Then you need to fill in the required amount of new antifreeze of acceptable quality.
If there is leakage from under the seating surface, this also indicates a malfunction. In this case, a sign of failure of the VAZ-2107, 2110, 2109 or other models is humidity, the appearance of drops, drops on the body or around a certain area. The cause of such a breakdown is incorrect installation of the pump or incorrect use of sealants and gaskets.
If the pump is new, remove it and check that it is installed correctly. It is especially important to pay attention to the tightening torques. If the pump is already old, it needs to be replaced.
Order of Operations
A complete replacement of the coolant is not required for this type of repair if its service life has not expired. It is better to install the machine on an overpass or inspection hole. Further work is performed in the following sequence:
- Disconnect the battery by removing the negative terminal.
- First, the cover of the expansion barrel is opened, and a container with a volume of at least 5 liters is placed under the cylinders. The coolant is drained into it; after draining, the cover must be replaced.
- Then you need to remove the casing; to do this, unscrew the mounting bolts.
- Now you need to fix the crankshaft at the dead top point of the 1st cylinder. To do this, the gear is engaged and the pulley mounting bolt is turned. The correct position is determined in this way: the mark on the timing case coincides with the mark on the shaft gear.
- To statically fix the crankshaft, you need to insert a screwdriver between its teeth.
- Now you need to loosen the tension on the timing belt; to do this, slightly unscrew the nut holding the roller. This is done with a special key, the direction of movement is counterclockwise.
- After this operation, the roller and belt can be removed.
- Now you can completely remove the casing. To do this, unscrew the five mounting bolts.
- The water pump is now available. You need to pry it off with a screwdriver and remove it. The seat should be cleaned.
- Now the VAZ 2110 8-valve injector pump is being directly replaced. But first you need to take a new gasket, coat it on both sides with autosealant, and install it on the pump.
- The pump is installed in place.
- Subsequent work is performed in the reverse order to that described above. It is advisable, along with replacing the VAZ 2110 8 pump, to change the roller and timing belt. This way you can accurately calculate the service life of these elements.
- After installing the belt in place, you need to check its tension. To do this, take one of its fields with your fingers and unfold it in a horizontal plane. If you cannot turn the belt more than 90 degrees, the tension is normal.
- After completing the work, add old or new coolant to the required level.
Only after positive test results of the pump can you hit the road by car. For the procedure for replacing the VAZ 2110 8 valve pump, see this video.