For several years now, daytime running lights have become mandatory for installation on cars in the Russian Federation. The market is overflowing with Chinese crafts that do not meet technical requirements and GOST standards. Car enthusiasts were not at a loss and began to actively make DRLs with their own hands.
To make the right LED DRLs, you need to know what requirements apply to them:
- Luminous intensity – from 400 to 800 candelas;
- luminous angle vertically 25 degrees and 55 horizontally;
- The area that emits light must be at least 40 cm2.
LED strip running lights
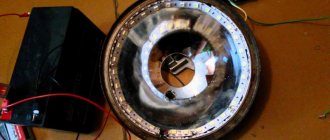
To implement such technical requirements in practice, we will assemble DRLs from LEDs with our own hands, using a 5050 type tape with a density of 60 pieces/meter. To get this brightness, you need to cut about 24 LEDs, that's 8 sections.
You can glue the tape around the perimeter of the headlight onto the existing adhesive coating. A more reliable option is to use a cable channel and secure it with epoxy glue, this will be more reliable. As a result, you will get a structure like this:
Do-it-yourself flexible DRLs are made using the same principle.
To ensure that the tape lasts as long as possible, stabilize the voltage at 12 volts. When the engine is running, the voltage in the on-board network can reach values of more than 14 volts. The easiest way is to use a linear stabilizer ROLL or L7812.
Lighting LED
These LEDs are used for indoor and street lighting as part of lanterns, car headlights, LED strips, etc. In this regard, they have high power, high radiation intensity, and are produced only in white color in surface-mount housings.
Typically two varieties are produced, differing in color temperature: cool white and warm white.
Since crystals emitting white light do not exist in nature, in the production of lighting LEDs they resort to various technologies for mixing three basic colors (RGB). The color temperature of the resulting white light depends on the way they are added.
One way to obtain a white glow is to coat the emitting crystal with three layers of phosphor, with each layer responsible for its own base color. Another method is to apply two layers of phosphor to a blue crystal.
Lighting SMD LED
Most lighting LEDs are also available in SMD packages. Unlike indicator lamps, they are characterized by greater power and are produced only in white color.
The main areas of application of SMD are LED strips and lamps, portable lights, and vehicle headlights. At the same time, they produce fairly directional radiation (about 100⁰-130⁰), so when lighting large areas it is necessary to use a large number of these LEDs to uniformly illuminate the area.
Structurally, lighting SMDs are a phosphor-coated emitting crystal on a heat-removing substrate, usually copper or aluminum. There are both varieties with and without a lens.
COB LEDs
LEDs of the COB (Chip On Board) type have become widespread. Essentially, this is the integration of a large number (usually several dozen) of SMD crystals in one package, which are then coated with a phosphor.
The picture above shows for comparison a Cree SMD 5050 (left) and a COB matrix of 36 chips (right).
COBs are used for lighting only. Their luminous flux is an order of magnitude greater than that of single SMDs. However, it should be noted that these LEDs are not suitable for creating highly targeted radiation due to the large scattering angle of the light flux. At the same time, it will also not be possible to create completely non-directional radiation - the scattering angle of the LEDs is less than 180⁰.
Filament LED
This type of LED is also currently used only for lighting. They are widely used as decorative lighting for rooms. The emission spectrum, unlike SMD and COB, is much more pleasant to the human eye and resembles the light of an incandescent lamp. At the same time, all the inherent advantages of LED are preserved: low power consumption and long service life.
This video shows a comparison between a 40 W incandescent decorative lamp and a 4 W Filament lamp:
Here you can see that with a power 10 times less, the luminous flux emitted by the Filament lamp is 3-4 times greater.
At the same time, the efficiency of Filament is even higher than that of the same SMDs - with the same power, the former allow you to obtain greater illumination. This is achieved through COG (Chip On Glass) technology, in which light-emitting crystals are mounted on a glass substrate and then coated with a phosphor.
The substrate itself has a cylindrical shape, which makes it possible to obtain a light flux scattering angle of 360⁰. That is, such LEDs are very good at creating non-directional radiation.
Separate 5050 or 5730 LEDs for DRLs
To make homemade running lights from custom-shaped LEDs or use fog light housings for this purpose, the tape may be inconvenient, so you need to make a printed circuit board.
You can use a ready-made breadboard, but this may not be such a convenient solution, although it is simpler. The development board is not as reliable.
To make a drawing of a printed circuit board, use a program like spring layout, then you need to transfer it to the textolite. To do this, you need to print a MIRROR image of the printed circuit board on thin glossy paper. This is used in magazines for pages, the cover is too thick.
You need to print on a laser printer, then take an iron and iron the glossy paper onto the foil PCB. When it cools down, we soak the paper under running water; a pattern of future paths will remain on the textolite.
Now all that’s left to do is etch the board in ferric chloride or any other suitable reagent. Detailed information about laser-iron technology for manufacturing printed circuit boards can be found here.
After making the printed circuit board, you need to make the base for the DRL. To do this, we will place the LEDs on the printed circuit board in accordance with its layout. To limit the current flowing through the LEDs you need to add 1 50 ohm resistor. Next, assemble a 12-volt stabilizer using the L7812 chip or its analogues.
To provide the required brightness, you need about 24 LEDs, which need to be assembled into a single structure and placed in the housing. We printed narrow boards with 9 LEDs each.
Then there are two options: install them on top of each other and get a wide and short lamp, or collect several strips in one row so that they go around the bumper.
If you take an acrylic tube and place the resulting boards in it, then you will get the following LED DRLs (see below). They can be shaped by heating them with a hair dryer and bending them around the bumper.
If you want to make wide DRLs, you need to connect the boards on top of each other, or separate and etch the board like this.
By the way, more powerful 5730 LEDs are used here. You can use old fog lights as a housing or use a furniture profile for lighting with a plastic cover.
Degradation
Example, new on the left, old on the right (2 years of operation)
As it is used, the LED is exposed to influences that negatively affect its characteristics.
Main factors:
- clouding of the optical part made of silicone;
- burnout of the phosphor under the influence of temperatures;
- deformation of the housing due to heating and stress of the housing;
- crystal degradation.
During crystal degradation, defects appear in which a section of the crystal stops shining, but continues to heat up. At the same time, the leakage current begins to increase, that is, the current passes without emitting light. The worst catalysts for degradation are current higher than rated and elevated temperature. Therefore, you need to be careful when buying dubious specimens, because our Chinese brothers in wisdom can “overclock” LEDs by supplying a current higher than the rated one.
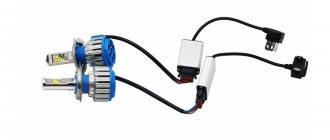
Use of high-power LEDs 1-3 W
When making running lights with your own hands, in addition to the LED strip, you can use heavy-duty LEDs.
Previous solutions have one significant drawback - the inability to adjust the direction and angle of the light flux. For high-power LEDs of 1-3W, there are many optical solutions on the market from 10 to 120 degrees.
To make LED DRLs with your own hands on powerful crystals you will need:
- LEDs 1W from 3 to 5 pcs (to provide the required light intensity);
- lenses collecting at an angle of 30 degrees;
- driver for LEDs with characteristics: input voltage 12V, output current 300mA, up to 5W;
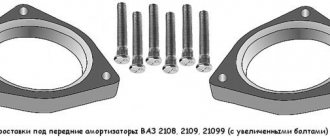
- substrate for attaching to the radiator;
- radiator with an area of about 100 cm2.
The driver is needed to provide stabilized current to the LEDs. You can also use a circuit with a quenching resistor as in previous homemade products, but the power of the resistor in this case will be too large and such a solution is not reliable.
To mount LEDs on a radiator, you need either heat-conducting glue or a special substrate for mounting and thermal paste. The LED is soldered to this substrate, and it is screwed onto the radiator.
You can also find ready-made sites for installation; in some cases this is a more convenient option. Some stores have such substrates with LEDs mounted on them.
Thermal paste or thermal pad is needed to ensure better heat transfer, as well as fill the unevenness of the substrate and radiator to improve heat transfer.
When making DRLs with your own hands from LEDs using such a kit, you will need a housing; you can make it yourself from scrap materials, or use old fog lights or something similar.
Connection via a 4-pin relay from a generator or oil sensor
The following two methods have a common basis and imply the operation of daytime running lights only after the engine is started. The circuit for switching on DRL from the generator is based on switching a four-contact relay and a reed switch.
The DRL relay contacts are connected as follows:
- 30 – to the positive terminals of LED modules;
- 85 – to the positive wire to the dimensions;
- 86 – to any reed switch output;
- 87 and the second terminal of the reed switch - to the “+” of the battery.
After checking the reliability of all contacts, proceed to setup. To do this, start the engine and, by moving the reed switch near the generator, achieve its activation and a stable glow of the DRL. Then the reed switch is hidden in a thermal tube and fixed in the found place using nylon ties.
At the moment of starting the engine, and then the generator, the contacts of the reed switch and relay close, supplying power to the LED running lights. In this case, the side lamps remain turned off, since the current through the relay coil is small to light them.
In the absence of a reed switch, you can power the DRL from the oil pressure sensor. In this case, pin 86 is connected to the oil pressure lamp. The rest of the circuitry is duplicated.
Both schemes have a common drawback. They cannot be used if LEDs are installed in the dimensions.
The main mistakes when making DRLs with your own hands
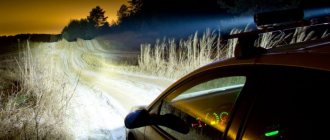
First of all, you need to figure out what kind of device it is. Daytime running lights are not dimensions! They need to be tested not at night, but during the day.
The lights must be visible from a great distance. Contrary to popular belief, when assembling DRLs from an LED strip with your own hands, you need to use the most powerful strip available. With such dimensions as the average running lights, it is quite difficult to exceed the permissible brightness using an LED strip.
Don't forget about cooling, but don't install too large radiators. Do not forget that the flow of incoming air when the car is moving practically replaces active cooling. Therefore, the radiator area can be half as large as under normal conditions for passive cooling of luminaires.
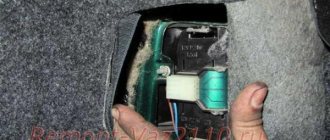
The relay arrived from China a month later
Here is his photo
I had already purchased the running lights, so I immediately started installing them, estimated the length of the wires for the running lights and the relay; I would have to increase them, since the Chinese save as much as they can.
For reliability, I took a heat gun and filled the connection of the wires with plastic, additionally installing heat-shrinkable tubes
I stretched the wires from the chassis to the relay, and pulled the chassis themselves into the holes in the bumper.
I wiped the surface of the bumper with vodka to glue the DRLs with double-sided tape.
Pasted
I also connected the relay to the running gear using a heat-shrink tube, having previously filled the connection with a heat gun
I took the power to the relay directly from the battery terminal; I have not yet connected the yellow control wire; it is responsible for turning off the running lights if the lights are on.
Now the operating mode of the running lights is as follows: they turn on a few seconds after the engine is started, the DRLs turn off after turning off the engine after 15-20 seconds, like a tracking light, very convenient. They shine very brightly
As a result, no connections to the wiring were needed, just apply a constant positive to the relay, it will turn on the drive trains when the engine is started, and turn it off after it stops.
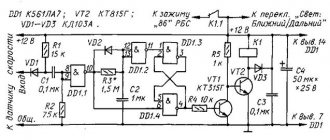
How to properly connect DRL to a car?
In addition to installing and assembling the structure itself, you need to correctly connect everything to the electrical circuit of the car. The picture shows the simplest and most reliable DRL connection diagram. Let's take a closer look at it.
K1 is a relay with five contacts, one of the power contacts is normally closed, that is, it is closed when no current flows through the relay winding, and the other is normally open, it closes when current flows through the relay winding. This is one of the standard relays and is sold at any auto store.
Automotive relay, 12V
When you turn on the ignition, power is supplied to the DRL through the normally closed contacts, and when you turn on the low beam, the DRL relay is turned on from the power positive that goes to the lamps and the contacts open.
Making high-quality LED running lights for cars with your own hands is quite simple. They will surpass cheap Chinese crafts in quality and performance, and will work much longer.
Homemade DRLs will be cheaper than branded ones, and the experience gained is priceless.
Please rate the article. We tried our best:)
Did you like the article? Tell us about her! You will help us a lot :)
Legal situation in Ukraine and Russia
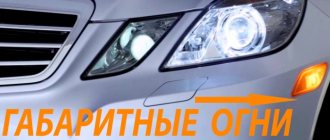
In 2010, Road Traffic Rules (TRAF) were updated with amendments, according to which all cars must travel at any time with low beam headlights, or DRLs, or fog lights on.
This change allows the car to be more visible on the road and improves orientation in bad weather conditions. The amendments outlined the very explanation of DRLs and stipulate the regulatory requirements for DRLs and their installation.
On the territory of Ukraine , changes to traffic rules regarding daylight came into force on April 15, 2014. They require all vehicles to comply with this requirement between October 1st and May 1st.
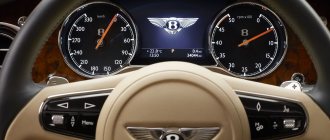
Sirius NS-4207 LED parameters
For DRLs, super-bright Sirius NS-4207 LEDs are suitable; they have good sensitivity. They are perceived very softly by the eyes. The trigger in this case is of the wave type. According to experts, the conductivity parameter is very high. The phase noise protection system is of high quality. The output voltage of the LEDs is 12 V. The model is not afraid of elevated temperatures.
The permissible humidity level for LEDs is 60%. The maximum luminous efficiency is 450 lm. According to expert reviews, the device does an excellent job of reducing sensitivity. The current overload of LEDs reaches 3.6 A.