The power unit is, of course, the most important component of any car. But do not forget that the main condition for its uninterrupted operation is high-quality cooling. Therefore, the cooling system plays an important role in the operation of any machine. In this case, it is worth paying considerable attention to the water pump (that is, the pump), which ensures the circulation of antifreeze in the system. Drivers often independently repair or replace the pump on a VAZ classic, since these procedures cannot be called complex and time-consuming.
Purpose and location of the water pump
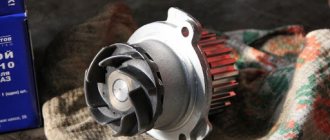
The water pump (pump) is designed to circulate antifreeze in the engine cooling system in forced mode. In this way, the hottest parts of the engine are cooled - the cylinders, pistons and combustion chambers. Hot antifreeze enters the radiator, where it is cooled by the oncoming air flow.
Without a water pump, coolant cannot circulate in the channels and lines. Therefore, when operating a car with a damaged pump, the engine quickly overheats and fails, and therefore requires expensive repairs.
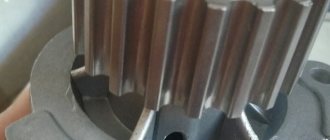
The design of the water pump is quite simple. The shaft, built into a housing with an integral flange, houses the impeller on one side and the drive pulley hub on the other. The rotation of the shaft is ensured by a pair of bearings, and the housing is sealed by an internal oil seal.
Some manufacturers additionally equip the pump with a grease nipple - a nozzle for pumping lubricant into the bearing.
In classic VAZ models, the water pump is installed on the front of the engine and is screwed not directly to the cylinder block, but to a separate housing.
The pump shaft and impeller are driven by a crescent-shaped belt running from the crankshaft pulley to the generator. The design and operating principle of this unit are the same for carburetor engines of classic VAZ models and for engines with fuel injection.
Pump for VAZ 2106: repair or replacement?
The pump is one of the elements of the cooling system of the VAZ 2106 car, located in the water pump. Its purpose is to force coolant to move throughout the engine cooling system. This part is considered very important, since if it stops working, the cylinder block stops cooling and may jam.
Malfunctions
Any pump can last quite a long time. Its service life directly depends on its operating conditions. Sometimes the damage is minor and can be repaired. For example, you can replace a faulty oil seal or bearing.
However, there are situations when a part cannot be repaired and needs to be replaced. Moreover, replacing the pump on a VAZ 2106 car must be urgent, since if this breakdown is ignored, the engine may overheat and ultimately jam.
As you can already understand, one of the first signs of a pump malfunction is engine overheating. If you feel heat in your legs while driving, you should stop and open the hood. Visually inspect the pump. When the seals wear out, significant coolant leaks will be noticeable on this part.
In such cases, you should immediately go for repairs, stopping periodically and adding water to the radiator. The remaining signs are visual streaks. There can be no more signs of pump failure than current.
Repair
If on your VAZ 2106 this element is subject to repair, then you need to perform the following steps:
- Drain the coolant from the system.
- Dismantle the pump by unscrewing the nuts securing it to the housing.
- Next, you should remove the pump itself.
- After this part is removed, it will need to be disassembled and the seals removed.
- Inspect the seals for defects, and if there are any, replace the element with a new one.
- After this, remove the bearing and inspect it as well. If this too becomes damaged, it must be replaced.
After the replacement, assemble the pump and install it, along with the pump, in its place. Start the engine and warm it up to operating temperature. If, at crankshaft speeds of 2000 - 2500 rpm, obvious leaks are observed on the pump, it must be replaced entirely. If there are no more drips and the VAZ 2106 engine does not heat up, then the work was done correctly.
Conclusion
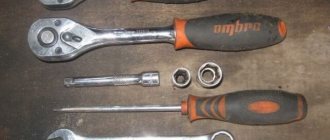
The procedure for repairing and replacing a pump is quite simple and can be done very easily with your own hands, using a screwdriver and a set of wrenches. So, if you discover such a malfunction, do not rush to pay money to specialists, but try to fix it yourself.
Loading …
Source: https://vashalada.ru/mashiny/vaz-2106/pompa-na-vaz-2106.html
Troubleshooting
The following breakdowns are typical for water pumps on classic VAZ models:
- bearing wear and resulting shaft play;
- Mercury leakage through the seal;
- The shaft is skewed and jammed.
Almost all pump failures are due to bearing wear. The pump operates normally with minor wear and shaft play. As the clearance in the bearing baskets increases, the seal begins to leak antifreeze, and unnatural noises - noises or cracklings - can be heard from the pump installation site when the engine is running. As a result, the shaft tilts. There are three possible scenarios for further development.
- The bearing seizes and the belt slips off the pulleys. The engine continues to run, but the red low battery indicator on the instrument panel illuminates and the coolant temperature quickly rises to maximum.
- When a bearing seizes, the shaft splits into two parts. As in the first case, the battery discharge lamp lights up when the engine is running and the coolant temperature is at maximum.
- Due to the misalignment of the shaft, the rotating impeller punches a hole in the wall of the pump housing, through which all the coolant escapes in seconds, and the engine immediately overheats. In this case, it will be necessary to replace not only the pump, but also the housing in which the impeller has broken through the wall.
Unlike front-wheel drive VAZ models, where the pump is hidden under the timing cover, in the “classic” it is visible. This allows you to avoid unpleasant consequences. It is only necessary to periodically check the pump as follows.
- We start the engine, open the hood and listen. If you hear suspicious noises from the front of the engine, press the accelerator pedal manually and increase the speed until a hum is clearly audible.
- Carefully inspect the front of the engine for coolant leaks.
- If you find an antifreeze leak, grab the pump pulley with your hand and move it along the shaft axis to detect any play.
- If you feel a slight play or doubt the tension of the belt, unscrew the generator mounting nut on the adjusting bracket and loosen the belt. Then pump the pump pulley again.
Due to their age, the plant no longer produces original spare parts for these cars. Commercially available spare parts rarely last more than 50,000 km. Remember this number when servicing your vehicle in order to detect a malfunction in time.
If you find slight play, do not start replacing the water pump right away. He will still “live” on 3-5 thousand. km mileage However, you will have to constantly monitor its condition and order a new pump in advance.
If there are leaks to the ground, there is noticeable play in the shaft, and you hear rattling sounds during operation, the pump should be replaced immediately with a new one.
Replacing the pump on a VAZ with your own hands | VAZ lovers club
The main feature of domestic Zhiguli cars is that their cooling system consists of water pumps and pumps. The pumps of these machines have always been very reliable and durable, but still, over time, they were expected to break down. But the water pump failed only in two cases.
Water pump breakdowns
The first case is a leaking pump. This malfunction is immediately noticeable. Water or coolant leaks appear on the housing, which indicate a problem. The main thing is not to hesitate in solving it and to replace the pump as quickly as possible.
Otherwise, a few drops of coolant on the body can turn into a small trickle within an hour, and in a few minutes the system can lose the entire coolant. Under such conditions, not only can the pump burn out, but real problems can also begin with other parts of the motor due to significant overheating.
Therefore, replacement must be carried out immediately at the first sign of a leak.
The second problem is related to the appearance of unpleasant noise. This hum indicates that it is time to change your water pump bearings.
When it appears, you can drive for a while, but until the bearings are completely worn out, after which the pump will completely fail and leak due to excess pressure.
It is impossible to say for sure how long it will take for the noise to appear; it will depend on the general condition of the cooling system, the model and durability of the pump. It can last for just a few minutes and continue to work for several months; it is quite difficult to give an accurate forecast.
But you should not delay and conduct experiments, checking how much it will be enough, because this can lead to failure of the entire system and, according to the law of meanness, this will happen at the most inopportune moment.
The pump will definitely become unusable and replacing it cannot be avoided, so don’t hesitate.
A breakdown of the pump or cooling system will require you to shell out a lot of money, but if the engine overheats, these costs will increase several times, so it is better to take care of repairs in a timely manner.
This is a good enough reason not to put the problem off for a long time, but to immediately resolve this issue on your own or by contacting a car service, before one minor breakdown leads to the failure of more important systems, the repair of which will cost much more. But how to choose a high-quality pump and replace the water pump without turning to specialists for help.
Replacing the pump on a VAZ
In order not to make a mistake in choosing, you need to purchase a native VAZ pump. This will be the most ideal option not only in terms of costs, but also in terms of the reliability and durability of such a pump. If you couldn’t find a suitable option, you can listen to the advice of professionals or rely on your taste and choose the most optimal pump, since many options are suitable for a car of this brand.
To make your choice easier, you can rely on financial capabilities or recommendations from friends or acquaintances. They can recommend a good store with competent salespeople who can help you choose quality products. It is important that the kit includes more than one pump, as well as a tube of sealant and gaskets. But it happens that you have to buy sealant separately.
When changing the pump, you need to remember about replacing the cooler. There should always be enough of it. When installing a new pump, it is better to use new coolant and not skimp on its quantity.
Its durability will depend on this.
The quality of the antifreeze is of great importance, and if it was replaced a long time ago, then it is better to spend the money and buy a new cooler, completely replacing it in the system.
In order to replace the pump on VAZ 2101-2107 models, you will need several required tools. Open-end, box and socket wrenches for 8,10, 13 and 17 millimeters.
For used coolant that will need to be drained, prepare bottles or a bowl to avoid spilling this environmentally harmful solution on the ground.
If you replace a regular plug with a sensor that detects the inclusion of a fan at the radiator outlet, you will need a 27-30 wrench.
When all the tools are ready, you can begin directly replacing the pump. In this process, the order of actions is important, so do not rush.
Pump replacement steps
First of all, you need to unscrew the drain plug located on the engine block. All old coolant is drained into a pre-prepared container. If the cooler needs to be replaced completely, you first need to find the drain plug, on the sensor of which there is a button that turns on the cooling fan. Once the drain has been found, you can empty it of liquid.
Next, the battery is disconnected from the terminals and pulled out. In order to disconnect the fan from the battery, you need to unscrew the bolts that hold the fan to the casing and remove it.
After this, you should loosen the generator belt. Using a 17mm wrench, loosen the nut holding the generator shaft slightly and disconnect the belt from the generator shaft. To do this, it is not necessary to unscrew the nut completely.
Using the same 17 key, unscrew the bracket adjacent to the pump, which is connected by a bolt. After this, the bracket is moved to the side and the three fastening bolts are unscrewed, holding the pump pulley with a screwdriver.
- Next, unscrew the pulley itself.
- In order to remove the pump from the engine, you need to unscrew the four nuts located on top and disconnect the parts.
- The place of the old pump is cleaned of traces of the previous gasket so that the new part is installed in a clean place.
- After preparing the surface, a new gasket is installed, pre-coated with sealant.
- When everything is ready to install the new pump, all that remains is to secure it by performing all the above steps in reverse order.
After completing the installation, coolant must be poured into the system. Regardless of whether an old or new cooler is used for this, the tap must be open to effectively fill the system.
In order for air to escape from the system, it is necessary to disconnect the hose from the intake manifold, remembering to return it to its initial position upon completion of the process.
Since the liquid expands when heated, make sure that there is free space in the expansion tank.
By following these rules, replacing the pump will not cause any problems and you will not have to spend money on car service services.
Source: https://ourvaz.ru/instrukcii/zamena-pompyi-na-vaz-svoimi-rukami.html
Replacing the water pump
The work of assembling a new pump on a classic VAZ model consists of several stages.
- Selection and purchase of a new part.
- Preparation of tools and workplace.
- Dismantling the old pump and determining whether it can be repaired.
- Installing a new pump and checking its operation.
Buying a new pump only makes sense if you are sure that the old pump is faulty or is reaching the end of its service life. If there is a car shop nearby, you can buy a pump during disassembly.
Purpose of the timing belt
An internal combustion engine is a complex system that consists of hundreds of parts and several more or less independent mechanisms. And the engine will only function normally if its mechanisms, assemblies and systems work in harmony. This quality - consistency of operation - is of decisive importance for the engine. For example, a certain position of the pistons corresponds to a strictly defined position of the valves, and if this condition is not met, the engine simply will not work.
Therefore, in internal combustion engines there is an urgent task of synchronizing and coordinating the operation of several systems. In modern engines, this problem is solved using several drives - a gas distribution mechanism drive, a generator, a water pump, an ignition distributor, a fuel pump, etc. But the most important thing is the timing drive, which is necessarily present in all types of engines.
- 1,050 rub.
- 350 rub.
- RUB 3,785
- RUB 1,190
- 415 rub.
- 300 rub.
- RUB 2,070
- RUB 3,350
- RUB 1,135
The engines of VAZ passenger cars initially used a timing drive, implemented using a metal chain that connected the crankshaft gear to the timing shaft gear and some other units. However, later VAZ designers abandoned the use of a chain, preferring a simpler, more reliable and modern solution - a rubber timing belt.
The timing belt in VAZ engines solves several problems at once:
- Transmission of torque from the engine crankshaft to the shaft (or shafts, if there are two) of the gas distribution mechanism;
- Transmission of torque to auxiliary units, primarily to the water pump of the engine cooling system;
- Ensuring synchronous operation of the crankshaft and timing gear;
- Preventing mismatch between the operation of the crankshaft and timing gear in all engine operating modes.
It should be noted that in VAZ cars the timing belt serves to drive the camshafts and water pump. This belt could, in principle, rotate the generator and other mechanisms, but VAZ designers abandoned this idea. Why? Because in this case, a broken belt or jamming of any of the units would immediately disable the entire engine, so it is more reliable and safer to make a separate drive for some units. And a breakdown of the water pump will not stop the engine immediately, so combining the drive of this unit with the timing drive does not pose a potential danger.
VAZ cars use several types of timing belts, which differ in characteristics and design.
Choosing a new pump
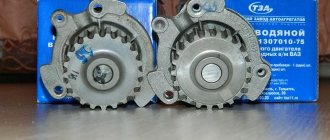
Pumps with the symbol 2101, installed on classic VAZ models of the first series, are currently not produced. Fits pumps (part numbers 2107-1307011-75 and 2123-1307011-75) with larger impeller and reinforced construction. First of all, they were produced for Niva. These pumps are a little more expensive than regular ones. So there should be no problems with the correct selection of a new pump.
On VAZ 2101-07 power units equipped with an injector or carburetor, pumps of the same design and size are used.
The most popular pumps among car owners are the following manufacturers:
- luzar;
- Hepu;
- TZA;
- "Phoenox".
Commercially available pumps have impellers made of plastic, cast iron and steel. Pumps with plastic impellers equipped with elongated and extruded blades have proven themselves to be flawless. Cast iron parts are less efficient at pumping liquids, while steel parts are susceptible to corrosion and are more likely to be counterfeits.
Water pumps are sold as a set of housings or individually. Your choice depends on the integrity of the housing - if it is damaged or corroded from the inside by an old rotor, purchase the entire product. When the body is intact, you only need to buy the transmission part.
Ozone
This sample originates from the sixth Lada model. About 30 years ago, designers stated that it would be a sales leader in domestic car markets. Such prospects were explained by its design features.
Unlike the Solex and DAAZ samples, this prototype had a vacuum drive for the damper, which is responsible for the flow of fuel into the second chamber. Its drive did not depend on the float, but was driven by a rod located on the diaphragm. Such a device was supposed to provide fuel savings.
His design had nothing special: 2 chambers (primary and secondary), four jets, 2 throttle valves, etc. But still, it occupied a leading position in the market.
In addition to the standard carburetor 2107, there was a modification “Ozone” 1107010. Its difference is that it was installed exclusively on the “Zhiguli” 2103 and 06 engines, which were installed on the Lada 2105 and 07. Since this mechanism had a vacuum damper drive, the modification 1107010, was subdivided into 1107010 - 20. The number “20” meant that this device was installed only on the latest Lada 2107 models with a “Six engine.
Preparation of tools and workplace
To replace the water pump on a classic VAZ model, you will need a flat, illuminated area or a warm garage (in the cold season). Since all work is carried out from under the hood, a surveillance channel is not needed.
You will need the following tools:
- set of socket wrenches and heads;
- flat screwdriver; crowbar;
- Gloves made of material and rags.
- In addition, high temperature sealant and 1 liter of coolant are required for refilling. To seal the coolant, prepare a 10-liter container with a wide neck (a plastic container or cut from the side of a canister) and a stretch meter for a regular hose.
To avoid burns, all work must be done on a cold engine.
To remove the pump on classic VAZ models, you don't need to rotate the crankshaft, align the toe markers, or disassemble the gear drive like you do in the housing on front-wheel drive vehicles. Simply park your car on a level platform and immobilize it with the handbrake.
How to adjust the gap between the valve and the cylinder block?
- We use a probe with a thickness of 0.15 (mm). It should fit under the valve with a slight tension (neither strong nor weak). If the dipstick falls into the gap or, on the contrary, does not fit, then from this moment the adjustment of the valves on the VAZ 2105 begins.
- We loosen the lower lock nut with one key, and with the second key we turn the valve stroke screw (up or down, depending on the result of checking with the feeler gauge).
- Tighten the locknut without much fanaticism.
- We do a control check with a feeler gauge at 0.15 (mm).
I hope the instructions are clear and understandable.
Related material: Replacing engine oil and oil filter on Lada Priora. Which oil to choose and how often to change
Additional Information
After adjustment, we assemble all the engine elements into place (valve covers, timing belt cover, air filter housing).
We make a test drive and listen to the sound. At this point, independent maintenance of timing valves can be considered successfully completed.
Please note that the VAZ 2105 is a classic of the bygone Soviet automobile industry. The classic line also includes VAZ 2101, VAZ 2102, VAZ 2103, VAZ 2104 and VAZ 2106
Starting with the VAZ 2107, cars use an injection system for preparing the combustible mixture. That is, seven is no longer a classic. The procedure for adjusting valves 2105, as well as 2101, 2102, 2103, 2104 and 2106, is completely the same. That is, the classics are configured according to the same principle.
Starting from the VAZ 2107, you need to configure the timing in a different way. Valve adjustment on the VAZ 2107 is carried out at a more subtle level. Only a properly qualified car mechanic can handle this work. Without solid experience in handling vehicles, it’s better not to go into the timing belt of VAZs, starting with the seven. It’s easier to take the car to the nearest service station.
I hope the article on how to adjust valves on a VAZ 2105 was useful. Have smooth roads and fewer breakdowns.
- Necessary tool
- Signs of poor valve clearance
- Procedure for checking valve clearance
- Adjusting valve clearance
- Video on the topic: Do-it-yourself valve adjustment on a Zhiguli
A feature of VAZ cars belonging to the “Classic” category, namely the VAZ-2101-2107 model, is the use of power plants that are structurally very similar. The engines of these models differ mainly in some technical characteristics. Thanks to this, many perform maintenance and repair work themselves.
For stable operation of the power unit of these cars, periodic adjustment of the valves is required. It is worth noting that this operation for VAZ “Classic” engines is performed by adjusting the gap between the valve drive lever and the camshaft cam. Since this operation is performed in the same way for different models on the Classic, let’s consider the sequence of work using the example of one model - VAZ-2105
The adjustment can be carried out both on a cold engine and on a warm one; for this, a 0.15 or 0.20 mm probe is used, respectively.
But for more precise adjustment of the valves, work must be carried out on a cold engine.
Dismantling the pump
Drain unused fluids in the following order:
Open the mask and side of the drain plug. Place a container of uninterruptible fluid under the vehicle. The inner screw is located on the left side of the cylinder block (in the direction of travel) under the third spark plug. The drain screw is located next to the oil pressure indicator.
- Unscrew the screw with a nut using a 13mm key and place one end of the hose in the container. Remove the screw completely by hand and detach it to the side, immediately place the hose on the hole.
- The other hand slowly opens the upper radiator plug. During fluid disassembly depletion, open the radiator plug to allow air.
- When disassembling the fluid begins to release a thin line on the side of the block, screw the plug screw in and tighten it with a wrench.
There is no need to drain all the coolant when dismantling the pump. You just need to reduce your level below the pump installation location. However, it is not recommended to cut a heavy flow, because in this case a lot of hot water is lost.
To fill the freshly brought fluid with fresh air and channel, disconnect the thin manifold heating branches (in the carburetor version of the engine). In an engine with fuel injectors, the cable is connected to the throttle body.
The generator disk is necessary for further work. To do this, use a flat wrench 17 to unscrew the tensioner mounting nut (located in the upper part of the total mounting bracket) and push the generator housing towards the crankshaft using the shaft. For easier access to the nut, you can disconnect and remove the battery.
The generator disk is necessary for further work. To do this, unscrew the fastening nut with wrench 17 (located in the upper part of the mounting bracket) and move the generator housing towards the crankshaft using the shaft. You can disconnect and remove the battery to gain easy access to the nut.
Once the belt is free, remove it from the pulleys and continue disassembly.
- With a heavy screwdriver on the pump shaft, loosen and remove the three screws that secure the pulley using a 10-point screwdriver. Remove the pulley and set aside. The water pump pulley is a screwdriver, unscrewed and removed.
- Unscrew the nut that protects the generator adjustment bracket using a screwdriver up to 17.
- Using a 13mm key, unscrew the four nuts that secure the pump flange to the housing.
- Carefully open the pump flange with a screwdriver and remove it.
- Clean the old gasket and sealant residue from the surface of the pump housing and remove any liquid residue. Use a small mirror to check the condition of the case from the inside.
- Assess the condition of the remote pump. If the Desalina leaks and the roller is a little loose, you can fix it.
Do-it-yourself VAZ 2101 pump repair
Home › Cars › VAZ ›
In general, as a result of the above, we try not to delay replacing the pump, and carefully read the article further and decide whether to carry out the replacement ourselves or whether it is better to contact a mechanic...
Now we move on to the next stage - choosing-purchasing a pump and compiling a list of tools that will be needed for the job.
I think that I won’t surprise anyone if I advise you to buy only a VAZ pump!? As always this is the best choice. If, however, it is not possible to buy a VAZ one, then it is difficult to advise anything specific, since at the moment there are quite a few manufacturers of pumps for Zhiguli.
Here it’s up to your taste, pocket and seller’s recommendations.
The only other thing I can add is to check that the gasket is included in the kit, buy a small tube of sealant and do not mess with Fenox (maybe I was unlucky, but the pumps from this manufacturer were often not pleased with their quality).
What else... Yes! Replacing the pump is an excellent reason to replace the coolant in your car. It is worth checking in advance what condition (color, density) the antifreeze or antifreeze is in your car. Remember the last time it was replaced.
Now for the instrument.
To replace the water pump (pump) on cars VAZ-2101, VAZ-2102, VAZ-2104, VAZ-2105, VAZ-2106, VAZ-2107 you will need: open-end wrenches (the presence of socket wrenches is also welcome) wrenches 8, 10, 13, 17, container for draining coolant, screwdriver, wrench 27-30 (in case, instead of the drain plug on the radiator, you have to unscrew the fan switch sensor).
And finally, about the main thing - a description of replacing the pump (water pump) on VAZ-2101, VAZ-2102, VAZ-2104, VAZ-2105, VAZ-2106, VAZ-2107, Classic, Zhiguli cars:
- We unscrew the drain plug on the engine block (photo 1) and drain the liquid into a previously prepared container. If you are planning to replace the coolant, then look for the drain plug (or, as in my case, the fan on sensor on the radiator, see photo 2) on the cooling radiator, unscrew it and drain the liquid.
Drain antifreeze or antifreeze from the cylinder block
Draining the coolant from the VAZ-2106 cooling radiator
- We remove the battery. Disconnect the electric fan block (photo 3). We unscrew the three bolts securing the fan casing (photo 4) to the radiator and pull it out.
Removing the electric fan from a VAZ car
Cooling fan casing VAZ-2105
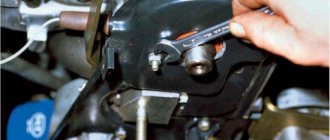
- Using a 17 wrench, loosen (you don’t have to completely unscrew) the generator belt tension nut (photo 5), loosen the tension and remove the belt. After this, use a 17mm wrench to unscrew the nut securing the bracket to the pump (photo 6) and move the bracket to the side.
VAZ generator belt tension nut
VAZ generator belt tensioning bracket
- Holding the pump pulley with a screwdriver, unscrew the three mounting bolts (photo 7). We remove the pulley.
Unscrew the VAZ pump pulley
- Now all that remains is to unscrew the four nuts securing the pump to the engine (photo
 and remove the pump. After this, clean the place where the pump fits from traces of the old gasket and dirt, install a new gasket (after having lubricated it with sealant) and install the new pump on the car.
Removing the water pump on a VAZ Lada Classic car
We carry out the rest of the assembly in reverse order. When pouring coolant, we forget to put the heating radiator valve control lever in the open position and to “bleed” the system, disconnect the hose (photo 9) from the intake manifold.
Source: https://www.vazzz.ru/remont-pompy-vaz-2101-svoimi-rukami/
Pump installation
Before installing the new pump, check how it fits with the old housing. To do this, insert the pump with the gasket into the slot until it stops and turn the end of the shaft. If the rotor rubs against the housing wall, you probably have a fake.
Reverse the procedure for assembling a new pump.
- Apply housing flanges and gaskets.
- Install the pump in the correct position - the bolts that protect the generator bracket should be on the left side.
- Tighten all mounting bolts in reverse order. Secure the pulley.
- Install the alternator drive belt and tighten it by pressing a crowbar against the electrical box housing. Tighten the clamp nut. The alternator belt is installed and tensioned at the final stage of assembly.
Before pouring, it is better to filter the old liquid through a fine brass mesh. Pour the liquid carefully so that no sediment forms at the bottom of the container.
First, fill the system with fresh antifreeze through the radiator filler neck. Slowly add antifreeze, observing the tube removed from the manifold heating block (in an injection engine - the throttle valve). As soon as the liquid flows from the tube, immediately put the cap on the connector and secure it with a clamp. Carefully pour the remaining coolant into the expansion tank to the required level (between the Min and Max marks).
When finished, close the radiator and reservoir caps and start the engine. After warming up to 80-90 ° C, check the front of the engine for leaks and wait for the cooling fan to turn on. This means there are no air pockets in the hoses, which means the cooling system is working properly.
Engine lubrication
To ensure the required oil pressure in the line and compensate for its consumption during engine wear, the oil pump has increased performance.
When using a car, parts of any device gradually wear out. If it is noticed that the pump has begun to perform its functions incorrectly, the pressure differs from the nominal one: either increased or decreased at idle speed, it is necessary to replace the oil pump on the VAZ 2107.
Removing the oil pump
To work you will need:
Advice: It is better when replacing the oil pump on a VAZ 2107 is done on an inspection pit or a lift.
Dismantling procedure:
Tip: To improve oil drainage, the engine must be warmed up well to operating temperature.
Replacing the VAZ 2107 oil pump is carried out in the reverse order of its removal.
Tip: you need to pay attention that the bolts for fixing the VAZ 2107 oil pump are of different lengths. When installing them, you need to make sure that they fall into place. Oil pump fixing bolts
Oil pump fixing bolts
Water pump repair
If the old pump housing is intact, it can be repaired by replacing the shaft with commercially available bearings and seal. To do this, use a special puller to squeeze out the impeller and then pull out the shaft. This operation can save up to 60% of the cost of a new pump and can be done independently.
Replacing the pump in the cooling system of classic VAZ models yourself is not that difficult. Using a standard set of tools and carefully following the instructions, you can do this without outside help.
Signs of a malfunction of the VAZ 2107 crankshaft position sensor
- The first thing that may indicate the imminent death of the crankshaft sensor is an arbitrary decrease or increase in engine idle speed.
- Severe reduction in engine power
- Unable to start the engine
Removing the crankshaft position sensor
- Disconnect the contact chip from the sensor by first releasing the latch
- Using a Phillips screwdriver, unscrew the sensor mounting screw.
- After removing the crankshaft position sensor, check its operation using a multimeter
Checking the crankshaft position sensor VAZ 2107
Sources
- https://avtozam.com/vaz/2107/snyatie-shkiva-kolenvala/
- https://remont-vaz2106.ru/vaz-2105-snyatie-kolenchatogo-vala
- https://remontauto-vaz.ru/page/diagnostika-i-zamena-datchika-polozhenija-kolenvala-vaz-2107
Changing the oil pump
If the key is not securely secured in the shaft groove, remove it. Unfasten the engine oil sump. Unscrew the bolts securing the oil receiver and remove it. Clean the oil receiver mesh from dirt and wash it with white spirit. If it is damaged, change it. Replace the old oil pickup O-ring.
https://youtube.com/watch?v=-u9mvj90Z08
Sources
- https://masteravaza.ru/sistema-ohlazhdeniya-dvigatelya/nasos-ohlazhdayushhej-zhitkosti/zamena-pompy-vaz-2110-436
- https://expertvaz.ru/2110/zamena-pompyi-svoimi-rukami.html
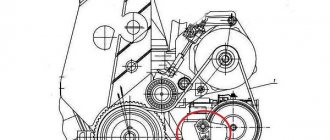
Leak between coolant drain pipe and pump
Anything that does not fit into any section of the auto repair shop
Alexey_from_MGN Beginner classicist Messages: 190 Registered: Thu Dec 30, 2010 19:56:17 Car model: LADA 210740, 2010 onwards, color White cloud, BC State 07X1 Engine type: Injection From: Magnitogorsk Thanks to: 1 time Thanked: 6 times
Leak between coolant drain pipe and pump
Unread message Alexey_from_MGN » Tue Sep 11, 2022 16:58:06
Good day! The third day I can’t overcome the leak between the coolant drain pipe and the pump. The problem started after replacing the original gasket with a paronite gasket, because... In the winter, my dear one let the generator through quite a bit when it was cold and soaked it. As a result, the diode bridge burned out, which was replaced last winter. In order not to drain the coolant several times, it was decided to replace the gasket along with the radiator, which also died for a long time. Well, in the end, after replacing the gasket, a serious leak formed, which I don’t know how to overcome. Maybe someone has encountered something similar and can suggest something. And yes, I applied sealant. It also tightened well.
Alexey_from_MGN
Violent General of the Automotive Troops semerka.info Messages: 40652 Registered: Thu Dec 11, 2008 17:11:37 Car model: Priora station wagon. There was a whole range of “classics”. Engine type: Injection From: Krasnodar region, Khadyzhensk Thanked: 2250 times Thanked: 4630 times
Re: Leak between coolant drain pipe and pump
Unread message Buiny » Tue Sep 11, 2018 17:59:15 Alexey_from_MGN
, is the tube flange not bent? Could there be a leak not from under the flange, but from the place where the flange is welded to the tube? There is no need to pull too hard, by the way. The sealant needs to be tightened only after it has pre-cured, and not immediately.
Alexey_from_MGN wrote: In order not to drain the coolant several times, it was decided to replace the gasket along with the radiator
Here I don’t see the connection - where is the heater radiator and where is the pump?
. Are we talking about this flange?
Attachments
Violent
Alexey_from_MGN Beginner classicist Messages: 190 Registered: Thu Dec 30, 2010 19:56:17 Car model: LADA 210740, 2010 onwards, color White cloud, BC State 07X1 Engine type: Injection From: Magnitogorsk Thanks to: 1 time Thanked: 6 times
Re: Leak between coolant drain pipe and pump
Unread message Alexey_from_MGN » Tue Sep 11, 2022 19:03:10
Buiny wrote: Alexey_from_MGN
Here I don’t see the connection - where is the heater radiator and where is the pump?. Are we talking about this flange?
I wrote about this one, but about the radiator just to complete the picture. The main radiator was changed.
I also suspected the tube flange. Oh, and it will be inconvenient to take it off. The air manifold is in the way.
I'll try to examine it with a mirror.
The injector is still a hassle.
Alexey_from_MGN
Misha Pirate chatterbox Messages: 11878 Registered: Sun Mar 04, 2012 19:01:13 Car model: VAZ 2107 1.8i Engine type: Injection From: Country of Heroes and Thieves Thanked: 391 times Thanked: 848 times
Re: Leak between coolant drain pipe and pump
Unread message Misha » Wed Sep 12, 2018 13:27:35
yes, I always had a rubber one there, from the stove. there were no problems... but this flange... is crap, to put it mildly. like this whole pipe
Before you judge the mistakes of others, pay attention to yourself. One who throws dirt cannot have clean hands.
Yozhyk wrote: If someone's opinion does not coincide with yours, this is not a reason to call a person a moron.
Misha
Alexey_from_MGN Beginner classicist Messages: 190 Registered: Thu Dec 30, 2010 19:56:17 Car model: LADA 210740, 2010 onwards, color White cloud, BC State 07X1 Engine type: Injection From: Magnitogorsk Thanks to: 1 time Thanked: 6 times
Re: Leak between coolant drain pipe and pump
Unread message Alexey_from_MGN » Wed Sep 12, 2022 19:00:47
Misha wrote:
yes, I always had a rubber one there, from the stove. there were no problems... but this flange... is crap, to put it mildly. like this whole pipe
From the stove tap or something?
Has anyone managed to remove the tube without removing other attachments from an injection engine?
I personally suffered for an hour today, and I couldn’t get it out, even those band clamps (damn them). In short, hello to AvtoVAZ!
Alexey_from_MGN
Misha Pirate chatterbox Messages: 11878 Registered: Sun Mar 04, 2012 19:01:13 Car model: VAZ 2107 1.8i Engine type: Injection From: Country of Heroes and Thieves Thanked: 391 times Thanked: 848 times
Re: Leak between coolant drain pipe and pump
Unread message Misha » Thu Sep 13, 2018 11:36:51
Alexey_from_MGN wrote: Misha wrote:
yes, I always had a rubber one there, from the stove. there were no problems... but this flange... is crap, to put it mildly. like this whole pipe
From the stove tap or something?
Has anyone managed to remove the tube without removing other attachments from an injection engine?
I personally suffered for an hour today, and I couldn’t get it out, even those band clamps (damn them). In short, hello to AvtoVAZ!
everything is removed. the main thing is to unscrew it from the manifold.
Before you judge the mistakes of others, pay attention to yourself. One who throws dirt cannot have clean hands.
Yozhyk wrote: If someone's opinion does not coincide with yours, this is not a reason to call a person a moron.
Misha
Alexey_from_MGN Beginner classicist Messages: 190 Registered: Thu Dec 30, 2010 19:56:17 Car model: LADA 210740, 2010 onwards, color White cloud, BC State 07X1 Engine type: Injection From: Magnitogorsk Thanks to: 1 time Thanked: 6 times
Re: Leak between coolant drain pipe and pump
Unread message Alexey_from_MGN » Thu Sep 13, 2022 6:56:42 pm
I changed the tube today, having first removed all the hoses from it and placed a cardboard gasket on a thin layer of sealant. I applied the sealant, waited 20 minutes as stated in the instructions, then pulled the flanges together without overdoing it. I left it to dry as per instructions for 4 hours. Tomorrow I will fill the system. Today I worked with an assistant who shined a flashlight in the right places, it turned out much faster.
Alexey_from_MGN
VladiZlav Administrator Messages: 17354 Registered: Sat Jun 07, 2008 21:11:19 Car model: VAZ 2111, red, ESP and all that