The wiring harnesses of the front panel, engine compartment and rear harness of the “seven” are connected through fuse box VAZ 2107. In addition to connecting electrical wiring branches, it performs the important function of protecting against overload and short circuit. Let's figure out what a fuse box is, where it is located and what each of its elements is responsible for.
Fuse box location
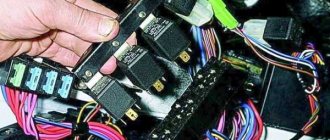
Most of the fuses that protect the electrical wiring of the “seven” are located in a single block located under the hood of the car. In addition to fuses, the block contains a group of relays that are responsible for turning on electrical appliances, for example, heated rear windows or headlights.
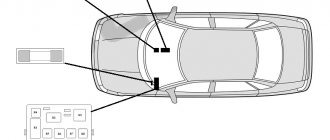
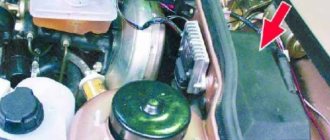
The VAZ 2107 mounting block is located under the hood near the windshield, opposite the passenger seat. Depending on the year of manufacture, the “sevens” were equipped with two types of fuse blocks: “old” and “new”. The designs of both types of blocks have slight differences, so their features and electrical circuits should be considered separately.
Important: regardless of the type of fuel supply (carburetor or injector), the circuits of one (old or new) type of “seven” fuse box are the same. Both types of blocks can be installed on injection and carburetor models.
Video
The video from user Konstantin Kalinnikov shows the process of removing an old-style fuse box.
| Relay circuits (its winding) for turning on the rear window defogger, reverse lamps, heater fan. |
| 2 (8A) |
| Electric motors for windshield wipers, headlights, windshield washer pumps and headlights. |
| 3 |
| Reserve. |
| 4 |
| Reserve. |
| 5 (16A) |
| Rear window heating element. |
| 6 (8A) |
| Cigarette lighter fuse, portable lamp socket, clock on the instrument panel. |
| 7 (16A) |
| Engine cooling fan electric motor, sound signal. |
| 8 (8A) |
| Direction indicators in hazard warning mode. |
| 9 (8A) |
| Generator excitation circuit. |
| 10 (8A) |
| Control devices and their signal lamps, standard turn signal lamps. |
| 11 (8A) |
| Brake signal lamps, interior lighting. |
| 12 (8A) |
| High beam of the right headlight. |
| 13 (8A) |
| High beam of the left headlight, indicator lamp for turning on the high beam. |
| 14 (8A) |
| Parking lamps for the left front and rear right lights, engine compartment lighting, license plate lighting. |
| 15 (8A) |
| Side lighting for the right front and left rear lights, instrument panel lighting. |
| 16 (8A) |
| Low beam lamp on the right side of the car. |
| 17 (8A) |
| Low beam lamp on the left side of the car. |
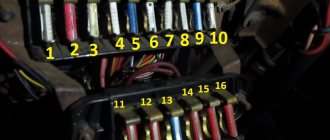
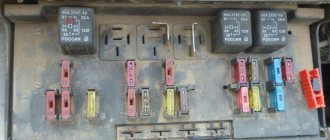
Old model VAZ 2107 fuse diagram
The “old” fuse box has 17 fuses. Each of them protects one or more electrical circuits. Purpose of fuses:
| Fuse number (rated current)* | Purpose of VAZ 2107 fuses |
| F1 (8A/10A) | Rear lights (reversing light). Reverse safety device. Heater electric motor. Heater fuse. Warning lamp and heated rear window relay (winding). Electric motor for rear window cleaner and washer (VAZ-21047) |
| F2 (8/10A) | Electric motors for wipers, windshield washers and headlights. Relay for wipers, windshield washers and headlights (contacts). Wiper fuse VAZ 2107 |
| F3/4 (8A/10A) | Reserve |
| F5 (16A/20A) | Rear window defroster heating element and its relay (contacts) |
| F6 (8A/10A) | Cigarette lighter fuse for VAZ 2107. Socket for portable lamp |
| F7 (16A/20A) | Sound signal. Radiator cooling fan electric motor. Fan fuse for VAZ 2107. |
| F8 (8A/10A) | Direction indicators in hazard warning mode. Switch and relay interrupter for direction indicators and hazard warning lights (in hazard warning mode) |
| F9 (8A/10A) | Fog lights. Generator voltage regulator G-222 (for car parts) |
| F10 (8A/10A) | Instrument cluster. Instrument panel fuse. Indicator lamp and battery charge relay. Direction indicators and corresponding warning lamps. Indicator lamps for fuel reserve, oil pressure, parking brake and brake fluid level. Voltmeter. Instruments of the carburetor electro-pneumatic valve control system. Parking brake warning light relay |
| F11 (8A/10A) | Brake light bulbs. Lamps for interior body lighting. Brake light fuse. |
| F12 (8A/10A) | High beam (right headlight). Headlight wiper relay activation coil |
| F13 (8A/10A) | High beam (left headlight) and high beam indicator lamp |
| F14 (8A/10A) | Side light (left headlight and right rear light). Indicator lamp for turning on the side light. License plate lights. Engine compartment lamp |
| F15 (8A/10A) | Side light (right headlight and left rear light). Instrument lighting lamp. Cigarette lighter lamp. Glove compartment lamp |
| F16 (8A/10A) | Low beam (right headlight). Headlight cleaner relay switching coil |
| F17 (8A/10A) | Low beam (left headlight) |
| * In the denominator for pin type fuses | |
Device
When installing this engine, a large number of additional electrical circuits appeared, which became a prerequisite for installing the mounting block. Also, this could not but affect the fuse box.
Let's look at it one by one: “what is a mounting block, and why is it installed on an injector-type engine?” This device is used to store electrical control elements of the VAZ 2107 engine and protect them using internal fuses.
The location of this block is located on the partition, between the engine compartment and the car interior. Its diagram provides for the presence of relays for controlling individual elements of the system, connectors for connecting the elements themselves, and fuses of a standard type, which have different colors, which help determine the maximum permissible voltage on it. Thanks to this method, replacing fuses becomes easier and faster.
The mounting block includes 6 control systems, which are united by one circuit:
- The first system is heated rear window;
- The second is the electric motors for the headlight and windshield cleaner;
- The third is the control of sound signals (the block diagram of the VAZ 2107 car, instead of this relay, has a special plug);
- The fourth system is a fan responsible for cooling the radiator;
- Fifth - low beam;
- Sixth – high beam.
The factory version of the unit has special tweezers. With its help, you can easily remove any relay from its contacts and remove the necessary fuses. The mounting block of a VAZ 2107 car, with an injector engine type, has more modern fuses that do not stop working, even with a loose contact.
On the cover of the modern block, a diagram of the connection of all elements is drawn. This way, it will be impossible to make a mistake.
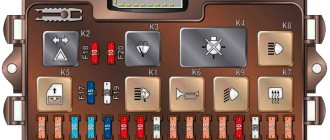
New VAZ 2107 fuse block diagram
On newer “sevens” a block with 17 fuses and 6 relays is installed. VAZ 2107 fuses on the “new” unit protect the following electrical circuits and devices:
- Reversing lamps, heater fan, rear window defroster warning lamp and relay, rear wiper motor and rear washer pump.
- Electric motor for front wipers.
- Reserve socket.
- Reserve socket.
- Power supply for heated rear window.
- Clock, cigarette lighter, power socket “carrying”.
- Signal and radiator fan.
- Turn signal lamps in emergency mode.
- “Fog lights” and a relay that regulates the voltage of the on-board network.
- Instrument panel lamps.
- Brake light bulbs.
- Right high beam headlight.
- Left high beam headlight, high beam warning lamp.
- Side lights (rear right, front left), license plate and engine compartment lighting.
- Side lights (rear left, front right), glove compartment and cigarette lighter lamps.
- Low beam (right lamp).
- Low beam (left lamp).
The relays of the new block perform the following functions:
- Heated rear window relay.
- Headlight cleaner and washer relay.
- Signal relay.
- Cooling system electric fan relay.
- High beam relay.
- Low beam relay.
Description
Fire alarms in private, wooden houses are a complex of interconnected devices, sensors and fire protection equipment. Systems are available for installation with automatic activation upon receipt of a signal from a sensor (smoke or fire), or those activated manually by pressing an alarm button.
Modules for automatic notification of emergency services, control of the “smart home” system, etc. can be added to various modifications of fire alarm systems for a private home.
How does a fire alarm work in a home?
The principle of operation of a fire alarm in a residential building is completely the same as for systems installed in offices and factories. The sensor, which is in standby mode, detects a fire by detecting a change in temperature or transparency of the surrounding air. After that, a signal is sent to the control panel, and from there the automation starts the fire extinguishing process.
A key feature of alarm systems specifically for a private home is the inability to install powder and gas fire extinguishing systems. This is due to the fact that they require sealing of the room, as well as the absence of people at the time of operation. The only premises where the operation of such systems is justified are barns, outbuildings and attics/basements.
What is fire safety
Fire safety concept
Fire safety at home consists of all elements and structures involved in detecting and extinguishing a fire. The basic layout of each system must include the following elements:
- A network of fire detection sensors based on the presence of smoke or an abnormal increase in temperature.
- Control panel for receiving signals from sensors about a detected threat.
- Light and sound warning devices for fire alarms for the home.
- Power supply system of the fire-fighting complex (from the mains or replaceable batteries).
Proper design and installation of the system guarantees fire safety.
What does APS consist of?
The automatic fire alarm system includes: fire detection sensors, annunciators (sound or light), a cable connecting all elements of the system, and a control panel where all information about the operation of the fire alarm system is accumulated.
Above are the minimum required components of the APS. Modern fire alarms simultaneously use light and sound alarms to notify the alarm.
Replacing fuses
Before replacing fuses there are two things you need to do:
- turn off the ignition;
- disconnect the ground from the battery.
Otherwise, a short circuit may occur during operation.
The procedure is as follows:
- remove the fuse box cover by releasing the fasteners;
- inspect the fuses and determine those in need of replacement (this can be seen by a broken fusible thread or black traces of its combustion);
- remove the fuse using pliers or special tweezers;
- insert a new fuse rated for the same current;
- close the lid.
Skoda Kodiak forum
- SKODA-KODIAQ.RUFORUMOperationElectrics and light
How to remove the fuse box in the passenger compartment
How to remove the fuse box in the passenger compartment
Post by Rustik88 » Mar 07, 2022, 10:59 pm
How to remove the fuse box in the passenger compartment
Post by shav68 » Mar 08, 2022, 10:48 am
How to remove the fuse box in the passenger compartment
Post by Rustik88 » Mar 08, 2022, 07:37 pm
How to remove the fuse box in the passenger compartment
Post by Rustik88 » 09 Mar 2022, 20:38
How to remove the fuse box in the passenger compartment
Post by shav68 » Mar 10, 2022, 00:47
How to remove the fuse box in the passenger compartment
Post by Rustik88 » Mar 10, 2022, 06:47
How to remove the fuse box in the passenger compartment
Post by Liskoff » Mar 10, 2022, 11:00 am
How to remove the fuse box in the passenger compartment
Post by Serg118 » Oct 18, 2022, 11:22 pm
- about Skoda Kodiaq
- ↳ Selecting and purchasing a new Skoda Kodiaq
- ↳ Buying a used (used) Kodiak
- ↳ Test drives and reviews in the media
- ↳ Skoda Kodiaq vs Competitors
- ↳ Dealers and service
- ↳ Insurance, lending
- ↳ Insurance from Insurance Team
- Exploitation
- ↳ Operation of Skoda Kodiaq (general questions)
- ↳ Maintenance
- ↳ Selection of oil. Change of oil
- ↳ Engines
- ↳ petrol 1.4 TSI (125 hp)
- ↳ petrol 1.4 TSI (150 hp)
- ↳ petrol 2.0 TSI (180 hp)
- ↳ diesel 2.0 TDI (150 hp)
- ↳ Suspension and steering
- ↳ Brake system
- ↳Transmission
- ↳ Electrics and light
- ↳ Outdoor lighting
- ↳ Electronic driver assistance systems
- ↳ Alarm, security systems
- ↳ Wheels and tires
- ↳ Body
- ↳ LCP
- ↳ Salon
- ↳ Heating, ventilation, air conditioning
- ↳Seats
- ↳ Multimedia, navigation, car audio
- ↳ Tuning
- ↳ Engine chip tuning and DSG
- ↳ Activation of hidden functions, adaptations, OBD adapters
- ↳ Do it yourself
- ↳ Documentation
- Skoda Kodiaq Club
- ↳ Club partners
- ↳ Let's get acquainted
- ↳ Club life
- ↳ Regions and meetings
- ↳ Moscow
- ↳ St. Petersburg
- ↳ Central Federal District
- ↳ Northwestern Federal District
- ↳ Privolzhsky Federal District
- ↳ Ural Federal District
- ↳ Siberian Federal District
- ↳ Far Eastern Federal District
- ↳ Southern Federal District
- ↳ North Caucasus Federal District
- ↳ Belarus
- ↳ Ukraine
- ↳ Baltic
- ↳ Club symbols
- ↳ Help for teammates
- ↳ Owner reviews / Logbooks
- ↳ Work of the forum / website / VK group
- Miscellaneous
- ↳ Other Skoda car brands and models
- ↳ Flea market
- ↳ Cars
- ↳ Wheels and tires
- ↳ Spare parts and accessories
- ↳ Other products
- ↳ Archived announcements
- ↳ Joint procurement
- ↳ Gazebo
- ↳ Congratulations
- ↳ Sports club
- ↳ Women's club
- ↳ Recreation and hobbies
- ↳ House and cottage
- ↳ Positive
- ↳ Legal issues, communication with the traffic police
- ↳ Travel
Who's at the conference now?
Currently browsing this forum: no registered users and 0 guests
Replacing the fog light fuse
If the fog lights stop lighting, you should check the fuse installed in the passenger compartment. To replace it you need a screwdriver. The replacement procedure is as follows:
- remove two switches from the console (the place where the radio is installed) using a flat-head screwdriver;
- use a screwdriver to press out the two latches and pull out the plastic insert from the console;
- pull out the fog light fuse housing;
- open the case and replace the fuse;
- Replace the insert and switches.
Some useful tips
To ensure that the fuses in your VAZ-2115 last longer, and the failure of any of them does not take you by surprise, use the following tips:
- At least once a quarter, check the condition of the mounting block, its board and the protection elements installed in it. Do not allow moisture or dirt to get inside. If necessary, take care of its additional protection.
- When undergoing maintenance, ask an auto electrician to check the performance of the vehicle’s on-board network. If they deviate from the norm, take care of repairing the machine.
- Do not overload the vehicle's on-board network. Do not use electrical appliances that consume high current.
- Under no circumstances use homemade bugs instead of fuses. This can cause not only a short circuit, but also a fire in the machine.
- Carry a spare set of fuses with you. It costs 150-200 rubles, takes up virtually no space, and can help out at the right time.
What is it like to be a virgin at 30? I wonder what it’s like for women who didn’t have sex until almost middle age.
Surprise: Husbands Want Their Wives to Do These 17 Things More Often If you want your relationship to be happier, you should do the things on this simple list more often.
Never do this in church! If you are not sure whether you are behaving correctly in church or not, then you are probably not acting as you should. Here's a list of terrible ones.
13 signs that you have the best husband Husbands are truly great people. What a pity that good spouses don't grow on trees. If your significant other does these 13 things, then you can s.
11 Weird Signs That You're Good in Bed Do you also want to believe that you please your romantic partner in bed? At least you don't want to blush and apologize.
20 photos of cats taken at the right moment Cats are amazing creatures, and perhaps everyone knows this. They are also incredibly photogenic and always know how to be in the right place at the right time.
Replacing the fuse box on a VAZ 2107
VAZ 2107 fuses (injector and carburetor) are installed in standard interchangeable blocks, so replacing them is not difficult. The power supply unit can only be replaced with a unit of a similar type (old or new). This is done like this:
- disconnect the ground from the battery;
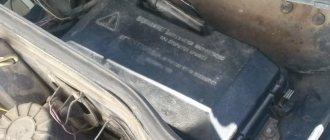
- remove the air filter housing;
- unplug the wiring harness connected to the fuse box, which is located at the bottom of the power supply unit;
- dismantle the shelf located in the cabin under the “torpedo”;
- remove the glove compartment housing;
- disconnect the second wiring harness from the power supply unit;
- unscrew the power supply bolts (the right bolt is hidden, it is not immediately visible);
- remove the fuse box;
- install a new fuse box;
- tighten the fastening bolts;
- connect the harness coming from the passenger compartment;
- install the “glove compartment” housing and the shelf under the “dashboard”;
- connect the wiring harness under the hood to the power supply unit;
- install the air filter housing;
- connect ground to the battery.
What to do if charging is lost?
If the vehicle is equipped with a G-222 generator device and the generator has lost charging, it is necessary to diagnose the connections in the fuse box. The test is performed using a tester. Below is a list of connections that are subject to diagnostics:
- Sh4-1 - Sh11-4;
- Ш1-6 - safety device number 9 - Ш11-3, most often the reason lies in the rupture of this connection;
- Ш1-4 - Ш10-1;
- Sh5-3 - Sh10-7;
- Ш1-6 - safety element number 10 - Ш4-1.
If the machine is equipped with a 37.3701 generator device, then only the last three circuits are diagnosed:
- Ш1 — brown connector, located on the power supply unit on the interior side;
- Ш4 - blue connector, also located in the cabin;
- Ш5 — yellow connector, in the passenger compartment;
- Ш10 — brown connector, located in the engine compartment;
- Ш11 - yellow connector in the engine compartment.
Checking and replacing the VAZ 2107 relay
Like fuses, it is better to change the relay with the ground disconnected from the battery. It is worth checking the serviceability of the relay after checking the corresponding fuses.
The relays are easily removed from their seats. To start checking the functionality of the relay, you should inspect the “legs” (contacts). If they are oxidized, you need to clean them with sandpaper or a knife.
There are two ways to check whether the relay is working. The simplest is to replace it with a new one that is known to work. If after this the operation of the electrical appliance is restored, the old relay was faulty. No - we must continue to search for the cause.
You can also apply power to the relay coil and use a continuity tester or ohmmeter to check whether the necessary contacts are closed (opened). A non-working relay must be replaced. Repair of the relay is not structurally provided.
Work principles
The variety of turn relays is quite large, but they are all divided into two main types:
- classical electromagnetic-thermal relays;
- electronic relays.
Electromagnetic-thermal relays are considered obsolete and can now only be found on very old cars, for example, classic Zhiguli cars. This type of relay consists of a core with a copper winding. There are two contact groups in the upper part of the core, and metal anchors in the sides. The structure is placed in a metal case, in the lower part of which contacts for connecting to the network are output.
When the turn switch is turned on, the network is closed - the lamp does not light. Then one of the anchors, under the influence of the nichrome string in the core, straightens and closes the contacts. After this, the current begins to flow in a bypass circuit, and the lamp lights up at full power. The click of the turn signals is ensured by the impact of a metal armature on the contacts.
An electronic relay consists of two main parts: a classic electromagnetic relay and an electronic key that ensures the frequency of operation of the relay. In a relay of this type, the operating principle of the nichrome string, which ensures the closure of the contacts, is assigned to a separate circuit board (key). Otherwise, the operation scheme is similar: the flowing current closes the contacts, after which the indicator lamps and the light on the dashboard light up. Interruption of the current leads to lowering of the armature and opening of the contacts - the indicator lamps go out. A characteristic click is also provided by the impact of the armature on the contacts.
Components and principle of operation of a car alarm
Car alarm components
The car security system consists of an immobilizer, which is the brain of the alarm system, various sensors, locks, interlocks and warning systems. The immobilizer itself consists of a control unit and an electromagnetic relay, which breaks the circuits. In modern signaling systems, these elements are not connected by additional wires, which makes them less noticeable.
The principle of operation of the alarm is simple - when you press the remote control button, data (codes) are exchanged, if the codes are accepted, the car is unlocked. The same principle as a key/lock, but a little more technologically advanced.
Other possible causes of washer malfunction
After the car owner determines which fuse is responsible for the VAZ 2114 windshield washer, it is necessary to check its functionality. If other circuits protected by the fuse operate without changes, this means that the fuse element has not failed. There are a number of other reasons why your windshield washer may not work.
Electrical damage
- The connection between the contact pads of the fuse and the mounting block is broken. A malfunction may occur as a result of violation of the rules for installing a fusible element or the appearance of oxidation. To eliminate the malfunction, it is necessary to restore contact.
- The mounting block installed in the engine compartment has failed. You should replace the unit with a known working one or resolder the contact tracks.
- Broken steering column switch. A malfunction results in the inability to close the circuit and turn on the electric motor. If a breakdown is detected, it is necessary to replace the steering column switch with a known working part.
- Broken wiring. Damage to the wires going to the electric motor in some cases causes the washer to not work. To identify the malfunction, you will need to check the integrity of the wires using a multimeter. The damaged element should be replaced with a new one.
- Relay K3 does not work. The malfunction may be due to a poor connection between the relay contact pads and the fuse box or a broken relay. Parts are replaced by known workers. If necessary, contact pads are cleaned of oxidation.
Mechanical breakdowns
Incorrect operation of the washer may be due to mechanical problems. The most common ones that fail are:
- Pump. The use of low quality fluid leads to rapid wear of pump parts. You can check the performance of the VAZ 2114 windshield washer motor yourself, without the use of specialized equipment. To carry out diagnostics, the pump is removed from the car and connected directly to the battery. If a breakdown is detected, the part should be replaced with a new one.
- Hose. Under the influence of negative environmental factors, microcracks appear on the outer surface of the washer hose. The size of the hole in the nozzle is much smaller than the diameter of the hose. As a result, pressure builds up in the hose while the washer is operating. Together with microcracks, this leads to its rupture. A sign of a malfunction is the normal operation of the pump and the lack of water supply from the nozzles with a simultaneous decrease in the liquid level in the tank. To eliminate the damage, you need to replace the hose with a new one.
- Nozzle. A small hole in the sprayer is provided to supply liquid under pressure to the windshield. Using a low-quality washer leads to clogged nozzles. Troubleshooting involves replacing parts or cleaning them. To ensure proper spraying of the liquid after repairing the injectors, they will need to be adjusted.
A malfunction of the windshield washer most often occurs during the winter period of vehicle operation. At the same time, a non-functioning washer system during heavy traffic on a frozen, polluted road can lead to a complete loss of visibility of the road situation.
Therefore, when going on a winter trip, it is necessary to check the functionality of the washer and the degree of filling of the reservoir with washer fluid.