- December 23, 2015 LadaOnline 464 458
Modern AvtoVAZ SUVs use injection power units. If a malfunction is detected in the electrical equipment of the car, you should first check the serviceability of the fuses and relays. Next, we will show where the mounting block is located (fuse box or black box), as well as the location of the elements inside it.
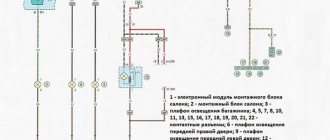
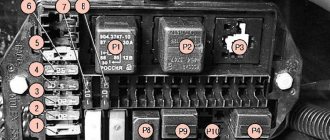
Main and additional fuse blocks Niva 4x4
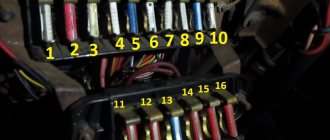
Explanation of fuses
| Fuse designation (rated current, A) | Protected Circuits |
| F1 (16) | Heater Blower Motor Switch, Tailgate Defroster Switch, Tailgate Wiper Motor, Tailgate Wiper/Washer Switch (Windshield Washer Pump) |
| F2(8) | Steering column switch, windshield wiper motor, hazard warning switch, breaker relay (in turn signal mode), reverse light switch, instrument cluster (coolant temperature gauge, fuel level gauge, tachometer, indicator lamps: turn indicators, differential locks, parking brake, emergency condition of the service brake system, insufficient oil pressure, fuel reserve, battery charge) |
| F3(8) | Left headlight (high beam), high beam indicator lamp |
| F4(8) | Right headlight (high beam) |
| F5(8) | Left headlight (low beam) |
| F6(8) | Right headlight (low beam) |
| F7(8) | Side light lamps in the left front and left rear lights, license plate lights, side light indicator lamp |
| F8(8) | Side light lamps in the right front and right rear lamps, backlight lamps for the instrument cluster, cigarette lighter, switches, heating and ventilation control unit |
| F9 (16) | Hazard switch, breaker relay (in hazard mode), heated tailgate glass relay contacts |
| F10(16) | Sound signal, interior lamps, brake lamps in the rear lights |
| F11 (8) | Reserve |
| F12(8) | Reserve |
| F13(8) | Fog light relay contacts in rear lights |
| F14(16) | Cigarette lighter fuse |
| F15(16) | Reserve |
| F16(8) | Reserve |
Additional block:
| F11 (8A) | Turn signal lamps and relay-breaker for turn signals and hazard warning lights (in hazard warning mode) |
| F12 (8A) | Daytime running light relay, daytime running light bulbs |
| F13 (8A) | Rear Fog Lamps and Relays |
| F14 (16A) | Cigarette lighter |
| F15 (16A) | Spare |
| F16 (8A) | Spare |
Additional fuse circuits in the Urban package:
| Fuse number and rating | Protected circuit |
| Main unit | |
| 1 (16A)* | Electric windows for front doors Electric side mirrors |
| 2 (16A)** | Air conditioning fan, air conditioning compressor |
| 9 (16A)* | Side mirror heaters |
| 10 (16A)* | Central interior lamp |
| Additional block | |
| 15 (16A)* | Air conditioning fan, air conditioning compressor |
Description of the camshaft sensor on Niva Chevrolet
On engines with a carburetor fuel system, the role of the DPRV is played by the distributor. The design of the injector is different, the system was parallelized, injection and ignition were done in pairs.
During systematic operation, the household equipment wears out and becomes unusable. The process of self-replacement is not at all difficult. The task is feasible for a car enthusiast without technical equipment maintenance skills.
To determine which cylinder is on stroke, the electronic engine control unit controls the position of the camshaft using DPRV (SMR)
Data from the sensor is extremely important for setting and dosing fuel, sparks in the combustion chamber, and injectors. The camshaft sensor directly affects fuel consumption, acceleration dynamics, and the amount of emissions in the exhaust gases.
In cars, including Niva Chevrolet, magnetic and Hall effect sensors are preinstalled. Both types are designed to read and transmit data to the electronic engine control unit.
The latter, based on the analysis of indicators, adjusts the fuel supply, ignition timing, and spark frequency.
- The magnetic controller produces its own alternating current. The design has two contacts;
- The Hall effect controller has one contact, powered from a third-party source.
Signs of DPRV malfunction:
- Unstable engine operation at idle speed;
- After stopping, the engine starts again;
- Increased fuel consumption;
- Power reduction;
- Passive acceleration dynamics;
- On the dashboard there are system error indicators (see photo);
- The gearbox can be locked in one position until it comes to a complete stop and the ignition is turned off. Single or cyclic action;
- The car moves jerkily;
- The maximum speed of the car is limited to 65 – 85 km/h;
- Periodically the engine stalls;
- Misfires when turning on the ignition;
- Inability to restart the engine.
Frequent causes of premature wear of the controller:
- Natural factor due to long-term use;
- Mechanical damage to the controller housing;
- Open circuit;
- Short circuit of contacts;
- Sensor breakage due to impact, accident;
- Malfunctions of the electronic engine control unit.
| Name / catalog article | Price in rubles |
| Automega 150097810 | From 800 |
| JP group 1191400200 | From 800 |
| EPS 1953071 | From 800 |
| Delphi SS10814 | From 800 |
| Meyle 3148000038 | From 800 |
Preparatory stage:
- Key to "10";
- New controller;
- Rags;
- Phillips screwdriver;
- Additional lighting is optional.
Step by step guide:
- Open the hood;
- We release the metal clamp - the tie from the rubber pipe of the air duct. We extract it;
- At the top of the block we find the controller, remove the terminals, unscrew the bolt to “10”;
- We remove the sensor and replace it with a new one;
- We put on the terminals and install the air duct pipe.
Lada Niva engine management system fuses
| F1 (30A) | Right electric fan relay contacts |
| F2 (30A) | Left electric fan relay contacts |
| F3 (15A) | Relay windings of the right and left electric fans, controller, injectors, ignition coil |
| F4 (15A) | Heating elements for control and diagnostic oxygen concentration sensors, phase sensor, mass air flow sensor, canister purge valve |
LADA 4×4 3D Stepnaya Nicht Fahrbereit 2005 on DRIVE2
So the problem of fuel pump failure turned out to be annoyingly simple))
The very first thing I checked was all the fuses in the car - they were all working.
then, under the rug at the driver's threshold, I found a gray wire with a male-female connector, disconnected them and gave a plus to the wire and heard the hum of the pump... therefore it is normal. Then it became clearer that the problem was in the relay, or in the wiring, i.e. . supply power to this relay.
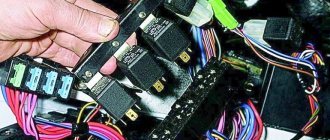
I found out where the relay block is in this video
then somehow getting to this block and unscrewing it, I found the necessary relay (a gray wire also goes to it), pulled out the relay, rang the wires. there is a permanent plus there. and the gray wire from the relay to the fuel pump also rang... there was no break.
put it back, turned on the ignition and the car started
Maybe this story will be useful to someone... I don’t know, everything seems to be elementary, but the electrics of the Niva are always somehow difficult for me.
I also used this video, there are a dozen, but the diagnostics for problems with the electric fuel pump are applicable to all vases...
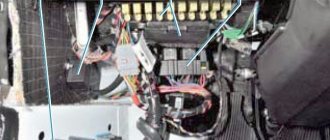
Relay blocks
The location of these blocks should be clarified according to the vehicle documentation. Also, some car enthusiasts sometimes tolerate them. Therefore, when buying a used car, it is better to check about possible changes. Engine control system unit from left to right:
- Ignition.
- Engine starting system.
- Right radiator fan.
- Similar left fan.
- Fuel pump operation.
- PR power supply for the fuel pump (15A).
The last key relay block, located above the gas pedal, is responsible for the lighting and heated rear window.
Relay block for engine control system VAZ 2121, 21213, 21214
| №1 | Ignition relay |
| №2 | Main relay |
| №3 | Right cooling fan relay |
| №4 | Left cooling fan relay |
| №5 | Fuel pump relay (fuel) |
| №6 | Fuel pump fuse F5, 15A |
In some vehicle configurations, under the additional unit next to the ignition relay there is a starter relay.
Tuning options
The choice of options for tuning is not particularly large:
- Install a device from another car. In this case, you will need the services of a qualified electrician, since the connectors will have to be redone. You can also install a digital version of the tidy - it will be more than original.
- As a tuning option, you can install LED bulbs instead of regular ones. Many car owners choose this option because it is less expensive and the easiest to implement.
- Another tuning method is to install original instrument scales on the speedometer, tachometer and other sensors. Moreover, you can buy such scales either ready-made or make them yourself in accordance with your preferences.
1. Tidy with LED lighting
2. Digital control panel
3. Tidying with the so-called. wells
Video “Changing the block correctly”
This video shows how to properly replace an old pad with a new one.
Car owners are well aware that the VAZ 21214, 21213 (Niva) fuse box is a critical detail that requires detailed study. Knowledge of the electrical circuit allows you to avoid many problems and carry out timely diagnosis of breakdowns. Since the family has existed for many decades, it has managed to go through a number of radical changes - the transition from carburetor to injection engines, for example. This did not entail a radical change in the location and content of the mounting blocks, of which there are two in the cabin and one under the hood.
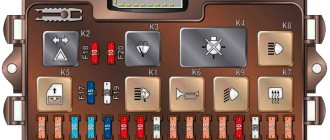
Mounting blocks for Lada 4×4 2018
The main and additional units are located in the cabin to the left of the steering wheel under the dashboard. The blocks contain cylinder, ten and six fuses, respectively. Fuse ratings and assignments are shown in Table 4, Fused Circuit:
Standard size fuse box. The device is located on the left under the upholstery and contains fuses designed to protect engine control system devices. Fuse ratings and designations are shown in Table 5:
The fuse and relay box is located on the left side of the steering column under the instrument panel. The device contains two “Standard” type fuses, which are designed to protect electric fan circuits, electric windows and electric mirrors. Fuse ratings and designations are shown in Table 6:
The fuse and relay box is located on the right side of the steering column under the instrument panel. The unit contains one Maxi size fuse and two standard size fuses that are designed to protect the ABS hydraulic circuits. The ratings and assignments of fuses are shown in Table 7:
Attention!
The relay and fuse layout may vary depending on the equipment and date of manufacture of the vehicle. The current circuit diagrams of the mounting block are given in the operating manual for the date of vehicle release (download from the site for 3d or 5dv.).
Why is the fuse or light relay constantly on or any other? Before replacing it with a similar one, you must first find and eliminate the cause of its burnout. It could be a short circuit, incorrect current rating, etc. Use the wiring diagrams to troubleshoot. Questions on this topic can be asked on the forum.
Removal and replacement process
In order to replace a blown electrical fuse, special knowledge and skills are not required. Everything is very simple.
Required Tools
To work, we will need the most common tools that any driver always has at hand, namely:
- a set of new electrical fuses;
- a set of keys;
- screwdriver.
A set of keys that every car enthusiast should have
Stages
- Before starting replacement work, you need to disconnect the negative battery cable.
- Next, using a screwdriver, unscrew the screws that secure the casing and remove it.
- We look at the diagram to see where the blown fuse is located.
- We find it in the block and remove it.
- We take the same one at face value and install it in place of the extracted one.
- Attention! On the back of the block there is an electric fan fuse with a rating of 30 A, its body is painted green. The other elements are rated 15A and are blue.
- If we do not plan to change the block, then the work is finished and all we have to do is install the casing in place and secure it with screws.
- But if you decide to put the system with fuses in order and replace the old block with a new one, then we need to use an 8-mm socket to unscrew a couple of nuts that secure the block.
- Now we remove the block itself.
- Disconnect the block with wires.
- We change the block.
- We install fuses in it.
- We secure it with nuts.
- We return the casing to its place and tighten the screws.
- This completes the work with electrical fuses on the VAZ 2121 Niva.
Attention! If the fuse blows again, then it is necessary to look at the entire circuit, and specifically at the consumer for which this fuse element is responsible.
Never use homemade jumpers or a fuse of a different rating instead of a blown one.
This video uses the example of a VAZ six to show some reasons for replacing the block. As you can see, during operation the body was deformed and melting was noticeable.
Like the video, everything is very simple in terms of time; such work will take no more than half an hour, instead of two or three hours of standing at a service station and spending extra money.