This arrangement is similar to the models VAZ 21102, VAZ 21103 and VAZ 2112. The location of all fuse blocks in the car body Main unit
was placed in the most convenient place for the driver - on the left side of the steering wheel. It opens easily via a button under the headlight control.
Other two blocks
— located in the center console of the dashboard. One of the fuses is located separately from all the others (in a niche behind the main mounting block).
Let's look at each block separately and study it.
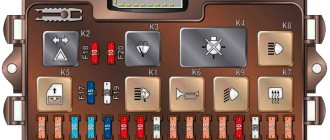
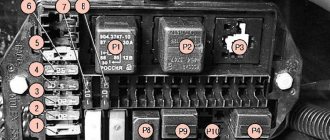
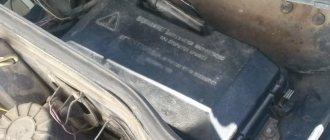
Main mounting block with fuses and relays
Diagram of the main mounting block of fuses and relays
Designations of fuses and relays of the mounting block
Open cover of the mounting block Location of the mounting block in the machine
Relay
| Relay no. | vendor code | Purpose |
| K1 | lamp health monitoring relay | |
| K2 | windshield wiper relay | |
| K3 | relay-interrupter for direction indicators and hazard warning lights | |
| K4 | low beam headlight relay | |
| K5 | headlight high beam relay | |
| K6 | additional relay | |
| K7 | rear window heating relay | |
| K8 | backup relay (not installed on VAZ-2110 family vehicles) |
Circuit breakers
| No. prev. | Ampere | Purpose |
| F1 | 5 A | Lighting lamps: license plates, instruments, dimensions on the dashboard, left dimensions, trunk lighting |
| F2 | 7.5 A | Low beam in the left headlight |
| F3 | 10 A | High beam in the left headlight |
| F4 | 10 A | Right front fog lamp |
| F5 | 30 A | Door windows |
| F6 | 15 A | Portable lamp, cigarette lighter |
| F7 | 20 A | Radiator fan, horn |
| F8 | 20 A | Heated rear window |
| F9 | 20 A | Windshield washer and cleaner |
| F10 | 20 A | Reserve |
| F11 | 5 A | Dimension on the right side |
| F12 | 7.5 A | Low beam in the right headlight |
| F13 | 10 A | High beam in the right headlight |
| F14 | 10 A | Fog lamp, left |
| F15 | 20 A | Seat heating |
| F16 | 10 A | Hazard signal, turn signals |
| F17 | 7.5 A | Brake light, ignition switch illumination, interior lighting |
| F18 | 25 A | Cigarette lighter, glove compartment light, interior heater |
| F19 | 10 A | Reversing lamp, brake light monitoring |
| F20 | 7.5 A | Rear fog lights |
Rear fog light fuse
Additional fuse diagram
Location of additional fuse in the mounting block
Why doesn't the cigarette lighter work?
On the VAZ-2115 the device stops working due to the following reasons:
- Fuses blown. The cigarette lighter in domestically produced cars often shorts out, and the protective parts have to be changed regularly. This is considered a design flaw that is difficult to eliminate.
- Connecting too powerful devices to the socket. Burnout is caused by the insertion of a plug into a car vacuum cleaner or compressor.
- Changing the state of the nest. With frequent use, it becomes loose, the block dangles, which provokes a short circuit. In this case, the fusible protective elements quickly burn out. The absence of a beep helps determine the malfunction (the fuse-link is loaded with sound devices).
- Fan motor short circuit. Standard devices are unreliable and quickly break down. In this case, the cigarette lighter does not work on the VAZ-2115.
- Burnout of the track in the installation block due to a short circuit. When the pads are exposed to moisture, the contacts become covered with an oxide film. The fuse box is the weak point of a domestic car.
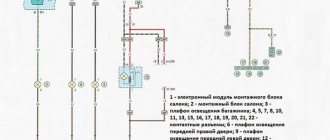
Relay and fuse box in the center console
Diagram of the relay and fuse box in the central instrument panel
Designation and numbering in the block
Location of the relay and fuse box in the console
Circuit breakers
| No. prev. | Ampere | Purpose |
| 1 | 15 A | ignition module, controller |
| 2 | 15 A | canister purge valve, vehicle speed sensor, oxygen sensor (heating) and air flow sensor |
| 3 | 15 A | fuel pump, injectors |
Relay
| Relay no. | vendor code | Purpose |
| 4 | electric fan | |
| 5 | electric fuel pump | |
| 6 | ignition |
Replacement example
Since all fuses are located in a common block, the replacement principle is the same for all. Therefore, we can consider an example of only one element that needs replacement. Let this be the cigarette lighter. It is designated F6 and F18 (see table).
The first priority before replacing a fuse is to check its functionality. Many people immediately change the element without even considering whether the problem of the unit failure really lies in it.
Remove with tweezers
To check the fuse, you should perform several step-by-step operations:
- Start the car by turning the key in the ignition;
- Make sure that the cigarette lighter is inside its socket, where it should be;
- Wait about 20 seconds;
- Take out the cigarette lighter and check if it is warm. If the temperature remains the same, that is, the element is cold, then the fuse needs to be changed.
How to do it? Pretty easy.
- Get to the panel on which the board with the relays and cigarette lighters is located. The mounting block is located, as you remember, to the left of the steering wheel, at the bottom of the dashboard.
- By pressing the special latches, the cover will move away from its seat. Be careful not to break the latches.
- The mounting block has now opened in front of you.
- If you look at it carefully, you will see special tweezers on the edge. It is provided by the factory in order to carefully remove fuses and insert new elements in their place.
- Remove the affected fuse. In this particular situation, we are talking about the cigarette lighter fuse, so you need an element designated F6 or F18.
- This component burns out due to the fact that modern motorists need additional electrical equipment, such as vacuum cleaners and electric pumps. All this is connected to the fuse and overloads it. Hence the frequent breakdowns.
- Using the same tweezers, insert a new fuse with the same parameters indicated on the mounting block.
If for some reason you don't have tweezers inside your black box, small pliers can serve as an alternative to this tool. Never try to remove the elements with your fingers. The nests are quite fragile, and with your hands you can only loosen it and damage it.
Replacing relays and fuses is a simple and inexpensive repair. But if you damage the block itself, then you will have to spend more, and you will definitely have to work hard.
Are fuses repairable? No. These are fusible elements that simply become deformed when burned. Therefore, repair is possible only in one option - replacing blown fuses.
There are times when, for no apparent reason, the windshield wipers stop functioning, the rear and front turn lights do not turn on, the fuel pump does not turn on, or the cigarette lighter coil simply does not heat up. In this case, do not rush to run to the store to buy a brush motor or spend money on light bulbs or other devices. Most likely, it's all about blown fuses or relays. You need to carefully study the fuse block diagram of the VAZ 2110 and then you can easily fix this problem.
All electrical consumers in a car are protected by small and very simple devices - fuses. In particular, thanks to these simple devices, in the event of an increase in voltage, the wiring will not burn out, but the circuit will simply break. Each electrical fuse or relay is designed for a specific amperage and has an individual purpose. In some cases, one fuse controls several devices, for example, a cigarette lighter and other equipment.
Relay box in the center console
Diagram of an additional relay block on the left side of the center console
Designation and numbering of relays and control units in the center console
Location of the relay box in the car
Designations
| Element no. | vendor code | Purpose |
| 1 | Central locking control unit | |
| 2 | Immobilizer block | |
| 3 | Rear fog lamp relay |
Component functions
- Each element of the block is responsible for its own electronic unit. A blown fuse or damaged element can lead to malfunction of the vehicle's lighting system, power system and other volatile devices.
- Each electronic device in a car unit plays a very important role. If you suspect a malfunction, it is necessary to change it as soon as possible, so that on the road the car does not present you with a surprise in the form of a malfunction.
- If the car does not have an injector, but a carburetor, then the car will be able to work with a damaged or inoperative fuse block, but there will be no idle speed and other components may not function fully.
- When the unit burns out, the central locking and alarm system stop working, so the car must be parked in a safe place during this time.
Location
The relay and fuse mounting block is located on the left side of the steering column in the instrument panel.
Types of mounting blocks
Block 2110-3722010
Block 2110-3722010-01
Block 2110-3722010-08
Introduction.
Have you checked the fuses? Isn’t this the phrase we hear most often from our comrades and repair advisors? Indeed, the VAZ 2110 fuse box protects each of the key elements of the electrical circuit and it is very worth checking them. But when is it really useful, and when can it be considered just a waste of time?
Fuse box VAZ 2110
It doesn’t matter which element of the car has failed: it could well be a broken starter, dead wipers or headlights, for example. Checking the protection circuit is the fastest and most effective way to start repairs.
But if the fuses in your car “like” to blow out often, are they really needed? Is it possible to refuse unwanted “protectors”?
In the inquisitive mind of a motorist, many specific questions arise regarding the maintenance and repair of his iron horse. Quite tricky in some places, very interesting in others. Even about the usual VAZ-2110 safety block you can write a lot of useful information. Perhaps you didn’t know something or were embarrassed to ask. We tried to answer various useful questions in this thematic article.
Circuit breakers
F1 (5A)
- License plate lights
- Indicator lamp for turning on side lighting
- Trunk light
- Instrument lighting lamps
- Left side marker lamps
F2 (7.5A)
- Left headlight (low beam)
F3 (10A)
- Left headlight (high beam)
F4 (10A)
- Right fog lamp
F5 (30A)
- Door window motors
F6 (15A)
- Socket for portable lamp
F7 (20A)
- Engine Cooling Fan Motor / Horn
F8 (20A)
- Rear window heating element and heating switch contacts)
F9 (20A)
- Recirculation valve
- Window washer motor
- Rear window wiper motor
- Windshield wiper motor
- Headlight cleaner motor
F10 (20A)
- Spare
F11 (5A)
- Starboard side marker lamps
F12 (7.5A)
- Right headlight (low beam)
F13 (10A)
- Right headlight (high beam)
- Indicator lamp for high beam headlights
F14 (10A)
- Left fog lamp
F15 (20A)
- Electric seat heating
- Trunk lock lock
F16 (10A)
- Relay-breaker for direction indicators and hazard warning lights (in hazard warning mode)
- Hazard warning lamp
F17 (7.5A)
- Tail lights (brake lights)
- Body interior light
- Individual backlight lamp
- Ignition switch illumination lamp
- Clock (trip computer)
F18 (25A)
- Glove compartment lamp
- Heater controller
- Cigarette lighter
F19 (10A)
- Door locking
- Rear lights (reversing lights)
- Relay for monitoring the health of brake light and side light lamps
- Direction indicators with warning lamps
- Generator field winding
- On-board control system display unit
- Instrument cluster
- Clock (trip computer)
F20 (7.5A)
- Rear fog lamps
F21
- Spare
F22
- Spare
F23
- Spare
Recommendations for use
- In order not to cause harm to the elements of the electrical circuit, never insert wire or other bugs in place of a burnt-out element.
- Before replacement work, de-energize the system by turning off the ignition, and in some cases, disconnecting the negative terminal of the battery.
- Replace elements using plastic tweezers, which should be included in the kit.
- When replacing, be sure to look at the rating of the fuse you are replacing; if it was 16 amps, then change it exclusively to 16 amps. Otherwise problems may arise. If you put it with a rating below 16 A, it may burn out immediately. And if it is higher, then it will not be able to protect the corresponding consumer during a power surge.
Relay
K1
- Lamp integrity monitoring relay (4412.3747 / 2110-3747410)
K2
- Windshield wiper relay breaker (524.3747 / 2110-3747710)
K3
- Relay-breaker for direction indicators and hazard warning lights (492.3747 / 2108-3747010-02)
K4
- Relay for low beam headlights (113.3747 / 2105-3747210-10)
K5
- Headlight high beam relay (113.3747 / 2105-3747210-10)
K6
- Additional relay (71.3747-01 / 2110-3747310-01)
K7
- Relay for turning on the heated rear window (113.3747 / 2105-3747210-10)
K8
- Rear fog lamp relay (113.3747 / 2105-3747210-10)
Additional fuses and relays
Location
Additional fuses and relays are installed behind the side trim of the console, secured with two screws, on the right side of the instrument panel.
Circuit breakers
1 (15A)
- Ignition module
- Controller
2 (15A)
- Canister purge valve
- Vehicle speed sensor
- Oxygen sensor (heating)
- Air flow sensor
3 (15A)
- Fuel pump relay
- Fuel pump
- Injectors.
Relay
K4
- Electric fan relay
K5
- Electric fuel pump relay
K6
- Main relay (ignition relay)
Causes of failure
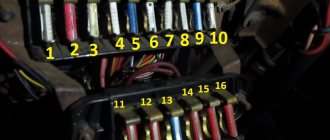
Fuse and relay block VAZ 2110
There are also not many reasons for breakdowns. There are only two of them:
- Defect due to production. Quality companies do not allow their products to have any flaws. Therefore, defective goods are sorted and thrown away. However, Chinese firms neglect this.
Note: Without wanting to install a low-quality unit on your car, you should pay attention to it at the time of purchase.
- In addition, the unit may fail due to the fact that a short circuit has formed in the system. But it happens because the fuses are not in order. However, choosing high quality fuses (see VAZ 2110: how to replace fuses) for your car is not as easy as it seems at first glance. Recently, you can increasingly find fuses from “left-wing” sellers. You should avoid them.
Fuse box for VAZ 2110
Installing Blade Fuses
Such fuses are much better than conventional ones, as they have many positive properties. They have better contact with the socket into which they are inserted. Due to this, they retain their positive qualities for a long time, so they are not in danger of melting or heating. To install them you need to have:
- A screwdriver that can be used to remove the terminals.
- Key for 8
- Heat shrink
- Female connectors
- Block
- Wire to make jumpers
The installation itself is carried out as follows:
- Disconnect the negative terminal of the battery so that a short circuit does not occur in the system.
- A size 8 wrench will allow you to easily unscrew the fasteners from the block.
Note: It is very important that the wires do not fall off the terminals.
- When the block is unscrewed, it must be weighed down until it stops. But you need to act carefully so that the wires do not break.
- Make jumpers.
- Install blade guards.
- Return everything to its place.
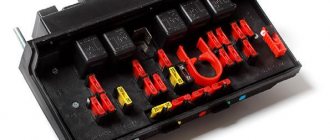
Mounting block for VAZ 2110: fuse diagram
The mounting block is presented in the form of a black box. Unlike airplanes, you can gain access to a car “black box” at any time the car owner needs. This unit is of great importance because it combines all the electrical components of your VAZ 2110.
In simple terms, the mounting block is a console with a board inside. It contains fusible links - fuses. Plus there are relays there.
Standard mounting block
The design is designed in such a way that the driver has the opportunity to independently replace a failed component. To do this, remove the broken fuse and insert a new one in its place. They cost pennies, but can seriously affect the performance of the equipment.
Since the release of the VAZ 2108, the domestic manufacturer has significantly improved the unit, making it resistant to vibrations and shaking.
To figure out how, if necessary, replace fuse F6 or any other of the 20 pieces that are provided on the VAZ 2110, you need to determine the location of the mounting and additional blocks, and also understand the diagrams.
More about this in our material today.
Component functions
- Each element of the block is responsible for its own electronic unit. A blown fuse or damaged element can lead to malfunction of the vehicle's lighting system, power system and other volatile devices.
- Each electronic device in a car unit plays a very important role. If you suspect a malfunction, it is necessary to change it as soon as possible, so that on the road the car does not present you with a surprise in the form of a malfunction.
- If the car does not have an injector, but a carburetor, then the car will be able to work with a damaged or inoperative fuse block, but there will be no idle speed and other components may not function fully.
- When the unit burns out, the central locking and alarm system stop working, so the car must be parked in a safe place during this time.
Location
Since AvtoVAZ engineers tried to do everything so that car owners would not have problems replacing relays and fuses, it would be stupid to come up with a clever arrangement. Therefore, finding them is not difficult.
- The main unit is located to the left of the steering wheel;
- You will find the first additional block in the dashboard inside the niche, directly behind the main mounting block;
- The second additional block is located in the same place, only on the opposite side.
We will get acquainted with each block separately so that you do not have any confusion when searching for one or another fuse.
On injection engines with 16 and 8 valves, the location of the MB is identical, so the instructions are equally relevant for owners of both versions of the dozen.
Main MB
Relays and fuses are located here. Let's look at their descriptions in more detail and separately.
Found the main MB
Let's start with the relay.
| Designation | What is he responsible for? |
| K1 | Car lamp operation |
| K2 | Electric windshield wipers |
| K3 | Special relay that interrupts the turning lights when the hazard warning lights are activated |
| K4 | Turning on the low beam |
| K5 | Turning on the high beam |
| K6 | Area for installation of additional device |
| K7 | Rear window heating operation |
Fuse diagram
Next comes the fuses. They are located in the same place, but are designated by the letters F.
Each fuse is indicated with a current rating and designation. This allows you to use a new fuse with parameters that meet the requirements of the equipment connected to it.
| Designation | Rated current | What is he responsible for? |
| F1 | 5A | Lamps for license plate illumination, instrument panel illumination, indicator lights on the instrument panel, left side position lights, luggage compartment illumination |
| F2 | 7.5A | Low beam left headlight |
| F3 | 10A | Left high beam |
| F4 | 10A | Right front fog lamp |
| F5 | 30A | Electric door windows |
| F6 | 15A | Carrying lamp, cigarette lighter |
| F7 | 20A | Radiator fan, horn (horn) |
| F8 | 20A | Heated rear window |
| F9 | 20A | Windshield wipers and washer |
| F10 | 20A | Backup fuse |
| F11 | 5A | Right dimensions |
| F12 | 7.5A | Low beams in the right headlight |
| F13 | 10A | High beams in the right headlight |
| F14 | 10A | Left fog lamp |
| F15 | 20A | Heated seats in the cabin |
| F16 | 10A | Hazard signal, turn signals |
| F17 | 7.5A | Stop signal, ignition switch illumination, interior lighting |
| F18 | 25A | Interior heater, glove compartment light, cigarette lighter |
| F19 | 10A | Reversing light, brake light monitoring |
| F20 | 7.5A | Rear fog lights |
First additional block
Inside the central panel there is the first of two additional blocks provided for the VAZ 2110. You can find it at the bottom left on the front passenger side.
This block provides three fuses. Each of them has the same power rating - 15A.
- The first fuse is responsible for your vehicle's ignition and controller module.
- The second protects the mass air flow sensor, heating sensor, speed sensor and purge valve.
- The third is necessary to ensure protection of the injectors, as well as the fuel pump. So if problems arise with the fuel pump, the first thing we recommend is to check the condition of the fuse responsible for it.
Additional block location
Plus, the same block includes three relays:
- Relay number 4 is responsible for the electric fan;
- Relay number five is the electric fuel pump;
- The third relay is part of the ignition protection group on your VAZ 2110.
Second additional block
The second additional block should be looked for already in the driver’s feet, on the right. Behind the protective cover on the console you will find the required board.
There are three more components on it. They are responsible for:
- Immobilizer operation;
- Additional optics (mostly fog lights);
- For the operation of the car's central locking control.
Fuel system.
If the starter in the car is spinning at full strength and a good spark is observed in the ignition system, then possible problems with starting the engine may be associated with the fuel system.
If your car is equipped with electronic fuel injection, then several of its subsystems may specifically cause the power unit to fail to start.
True, it should be noted here that in most of these cases you simply will not be able to independently diagnose all kinds of electronic systems and subsystems, which may actually be the reason for the failure to start the engine. The point is this: this check requires special diagnostic equipment, which is only available in car service centers or car service dealerships.
True, there are some moments when you can check certain subsystems yourself in a garage. And all this thanks to certain and specific methods of such checking. Although you will not find the specific cause of the breakdown, in any case you will significantly narrow the scope of the search for this malfunction, which will save you a lot of money when you go to a car service for electronic diagnostics of the car.
— Electrical connections: There are many electrical connections in the fuel injection system. Each fuel injector has its own connector on top. There are electrical connectors in the air system of the car, as well as on the cylinder head. You should check all the electrical connectors that are under the hood of the car. This is quite difficult, we understand, but nevertheless, you will save a lot of money on this, which you can then give to a car repair shop without regret.
— Fuel pump and relay: To check the fuel pump you will need special equipment that diagnoses the vehicle's fuel system (pressure). Since most of us motorists do not have this kind of equipment, all we can do ourselves is to completely check all electrical connections.
For example, check the flow of electrical current on the positive wire that powers the fuel pump itself. To do this you need an electrical tester. Before checking, make sure the ignition key is in the “On” position. If the tester shows that current is flowing to the pump, then proceed to the next troubleshooting step. If there is no current and does not flow, then you need to check the fuse. If the fuse is in good condition, then the problem with starting the engine is in the fuel pump relay itself. Replace this relay with a new one.
— Fuel filter: If the fuel pump is working correctly, this does not mean that fuel is getting into the engine in the normal sufficient quantity. For example, due to this fuel filter, fuel may not flow into the combustion chamber in sufficient quantities, which may cause the power unit to fail to start. In order to avoid such problems, you need to change the fuel filter in your car every 20 thousand kilometers, which can be heavily contaminated with enzyme-forming substances present in the fuel itself.
You can easily check all these elements in the car yourself and, if necessary, replace them yourself, specifically using everyday auto tools. Unfortunately, there are many other fuel electronic systems that simply cannot be checked without the use of special equipment. Therefore, remember, our dear motorists, to do electronic diagnostics of a car, it is best to trust specifically to professionals and contact a car service center.