Replacing front brake pads in Lada Kalina
The choice of front brake pads should be treated carefully, since the spare parts market is saturated with low-quality and counterfeit goods. Thus, it is necessary to check the presence of holograms and branded packaging. Inside the box there is always an instruction manual that states who made it and the composition of the friction part.
So, let's look at what front pads are best to use on the Lada Kalina.
Original spare parts
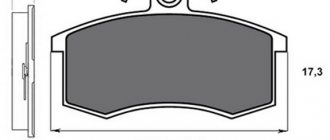
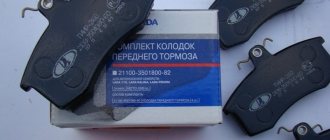
Let's start with the original part from AvtoVAZ. The catalog number of the part by which the search is performed looks like this - 2110-3501080. These are the same pads that are installed on the VAZ 2110 and Priora. The factory decided not to change the structure of the front brakes. Their cost is 400 rubles per set.
Analogs
Now, let's look at possible analogues that can be installed instead of the original brake pads on the Lada Kalina.
Based on the experience of motorists and the recommendations of experts, there are several manufacturers that deserve special attention. They make high-quality pads, and their service life, as practice shows, is 30,000 km.
Tuning kits
It is worth considering an alternative option for choosing pads - tuning. Only a few manufacturers produce spare parts for Kalina, which do not require alteration of the chassis. The most famous are: Brembo, Delphi and Feredo. The pads are mounted on standard seats.
For lovers of complete tuning, it offers a complete set of brake systems, which includes: brake discs, calipers and pads. Of course, for full efficiency, it is worth installing everything in one set.
One of the first things that it is advisable to do after purchasing a Lada Kalina is replacing the front brake pads. And the sooner the better, since standard ones installed at the factory wear out the brake disc a lot.
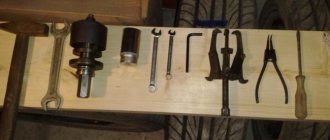
To work we need the following tool:
- Jack;
- Balloon wrench;
- Flat head screwdriver;
- Pliers;
- Open-end wrench 17;
- Socket or open-end wrench 13;
- A pipe clamp or barb (preferably, but not required);
- A couple of bricks)).
Time to complete all operations for replacing pads: from 30 minutes.
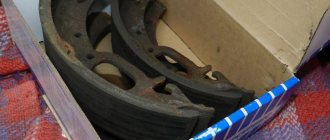
At the plant, “TIIR” pads are installed on Lada Kalina.
I chose Lucas TRW pads as they have proven themselves among car enthusiasts.
Let's start replacing the pads on the left wheel.
While the wheel is on the ground, loosen the four bolts, otherwise in a suspended state, when you try to unscrew the bolts, the wheel will rotate.
DETAILS: How to clean the stove radiator without removing it? Cleaning, washing
Do not press the brake pedal while performing work!
Considering that new pads are thicker than worn ones, when replacing the brake system, fluid will be forced out of the brake system into the storage tank, therefore, if the brake fluid level is at the MAX mark and if the old pads are pretty worn out, it is necessary to temporarily remove some of the fluid using syringe.
Before lifting the left front wheel with a jack, you need to place two bricks under the rear right wheel in order to prevent the machine from rolling away during work and subsequent tipping over from the jack.
The jack must be rested on a special platform “1″ (see photo) or “2″. Pressing in other places may cause damage to the vehicle body.
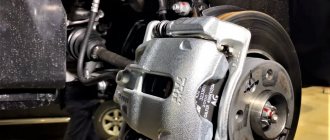
The photo shows that the disc, even after a short run, has grooves. Rust on the disc is normal.
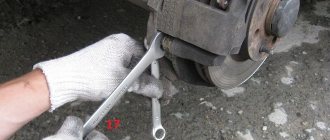
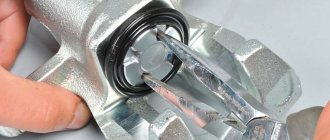
To raise the caliper, you need to unscrew the bolt “1” with a 13 wrench. Bend the locking plate with a screwdriver and pliers and hold the nut “2” (with a 17 open-end wrench) from turning. Since the pads being removed are a little worn, you need to recess the brake piston (indicated in the photo by a red rectangle).
The hand force may not be enough to press the piston. To do this, you can use a clamp or pipe wrench.
Another option: leave one block on the inside, and insert a large flat-head screwdriver into the place indicated by the red arrow in the photo. We rest the blade of the screwdriver against the non-working part of the brake disc (closer to the axis) and, acting with the screwdriver as a lever, pull the screwdriver handle towards ourselves, thereby moving the caliper towards us relative to the disc and, accordingly, pressing the brake piston.
We install new pads in place of the old ones, lower the caliper, tighten the bolt and bend the safety plate to prevent the bolt from unscrewing spontaneously.
We adjust the steering wheel straight, install the wheel on the guide pins, and fasten the four bolts without tightening them. Lower the jack and tighten the bolts thoroughly.
We repeat the same for the other wheel.
If you drained the brake fluid, fill it back into the reservoir to the “MAX” level.
Brake pads must be changed simultaneously on the left and right sides to prevent uneven braking force on the wheels, which can lead to the car pulling to the side or skidding when braking.
Immediately after installing new pads, before they rub against the disc. braking efficiency decreases sharply, this must be kept in mind while driving!
After installing new brake pads, you need to grind them in during the first 200 km, i.e. If possible, avoid pressing the brake pedal intensively by reducing speed in advance. This is especially important in the first kilometers after replacement.
Step-by-step instruction
Repairs are best done in a pit or on a lifting mechanism . This will be the most convenient way to work. As a last resort, you can use a jack, but the car must be installed on the handbrake and additionally secured with wheel stands.
Tools
- key to 7;
- flat screwdriver;
- hammer;
- pliers;
- knob with 30mm head;
- mounting blades.
Description of procedures with photos
To gain access to the disk, jack up the car and remove the wheel.
- Unscrew the guide pins.
Use a wrench to unscrew the spacers on the brake disc.
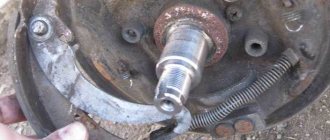
- We knock the drum off the hub using a hammer with a wooden backing.
Tap the disc with a hammer to remove it from the hub
- Using a flat-head screwdriver, remove the upper and lower springs from their engagement.
Use a screwdriver to pry the hook of the spring and disengage it.
- Remove the clamping mechanism and pull out the block.
After removing the clamping mechanism, the brake pad can be easily removed
- Remove the spacer bar.
We take out the spacer bar
- To dismantle the second part, disconnect the pressure spring and disengage the lever.
Pull the spring towards you and remove the lever from engagement
- We take out the cotter pin with pliers and remove the washer.
Using pliers, pull out the brake pad cotter pin.
- We pull out the “finger”.
Remove the rear brake pad pin
Before installing new parts, the brake disc must be thoroughly wiped. Assembly is carried out in reverse order. To tighten the springs, use a regular screwdriver. Make sure the hooks on the edges are fully seated in the holes.
Tip: After completing the repair, press the brake pedal several times so that the pads come close to the disc.
Which brake pads to choose
About a month ago I wrote a topic in which I shared the problem I had with the front brake pads. The essence of this malfunction was as follows: when braking, even not sharply, a terrible creaking began to appear. Since I changed the linings quite recently, I thought that they were either rusty, since my Kalina practically did not drive in winter, or some kind of pebble hit, which was the source of this sound.
DETAILS: How diesel injectors are diagnosed and repaired
But after looking more closely at the pads and discs, it became clear that there was no rust at all, and no foreign bodies either. Meanwhile, the creaking became stronger and stronger. I decided to remove the front wheel and take a closer look at what was wrong.
Ferodo
After reading a lot of reviews about this brand on the Internet, especially on Drive, I was already thinking about purchasing spare parts from this company. Everyone praised them, both the green and the red packaging, but there were also some owners who were very dissatisfied with these details.
Fake production, such as AvtoVAZ
As you probably already guessed, I drove just 8,000 kilometers on these pads, after which they turned into black dust left on the disks of my Kalina. I remember I picked them up at the car market for a price of about 230 rubles. And as the seller assured me, it was exactly the original from AvtoVAZ, which I, of course, later doubted, because my factory ones went about 30,000 km and weren’t even half worn out, but I’ll tell you why I replaced them a little later.
Factory pads produced by AvtoVAZ
As for the service life, I have no complaints here at all, in this they completely suit me. Judge for yourself, they spent 30 thousand and could have served just as long. But there are huge complaints about the quality of braking; to put it mildly, there was none at all.
I remember there were several cases when it was difficult to avoid a collision in city traffic. While I pressed the brake pedal with all my might, the car continued to float without noticeable slowdown. It was after several such cases that I decided to change it, but as it turned out, I ended up with a fake.
https://www.youtube.com/watch?v=62U49DZ3tw0
DETAILS: Car antenna for car radio, radio
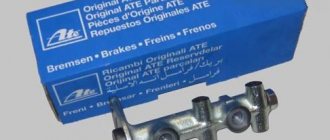
When the above options disappeared for reasons already known to you, I decided to wander through the forums of foreign car owners, and since I am a fan of the Volvo brand, I went to their club and read what kind of pads were on these cars from the factory. And according to many owners, their front and rear brake pads came from the factory from ATE.
Well, I decided that if the safest cars in the world have such brakes, then they would also be an ideal option for Kalina. And now a few words about the impressions after installation. The first few kilometers, of course, there were no special changes, since they were still new and had not gotten used to it, but then everything became just super.
Now, just before the speed bump, I brake and the car stops dead in its tracks, there are no sounds even close. As for efficiency, everything is just perfect here; I have not yet seen better brakes. But I can’t say anything about their service life yet, since I’ve only driven them a little over a thousand kilometers.
And one more plus after installing them - the discs again became perfectly smooth, like new, otherwise they were corrugated from old defective parts, all in grooves. As soon as I drive the first 10,000 km on the ATE, I will definitely write about the results, subscribe and follow the blog updates. Thank you for your attention!
Replacement timing
In the Lada Kalina model, many car enthusiasts note that the brake pads are too hard. It is recommended that immediately after purchasing a new car, you replace factory parts with products from other manufacturers . Such pads will not scratch the brake disc and will ensure reliable operation of the entire system. During operation, it is also necessary to periodically inspect parts. If the thickness of the rear pad is below 2 mm, it needs to be changed.
On average, parts of normal quality last for 2 years or 10-12 thousand kilometers. But with frequent movement in the city, they wear out faster. It is best to check the condition of these parts before and after the winter months, as well as if squeaking occurs during braking.
When to change the rear pads of LADA “Kalina”
The peculiarity of the LADA Kalina braking system is that when braking, the load is distributed unevenly and most of the kinetic energy is absorbed by the front brakes. Therefore, replacing the rear Kalina pads is done 2-3 times less often than the front ones. To find out when it’s time to change the pads, it’s useless to rely on the Kalina’s odometer readings. The number of kilometers a car travels between pad replacements can vary by half. The rate of their wear is influenced by many factors, some of which cannot be controlled and taken into account:
- driving style (during aggressive driving with frequent sharp acceleration and braking, the pads can wear out several times faster than during calm, smooth driving);
- quality of friction linings (counterfeits or pads from cheap brands last much less); the condition of the rear brake drums (if they have uneven wear or ellipticity, the wear rate of the pads increases greatly);
- exposure to external factors (chemicals that are sprinkled on the road surface in winter, other active substances that get on the friction linings).
Under normal conditions, the Kalina rear pads are replaced after 50-60 thousand kilometers. But you need to focus not on mileage, but on the thickness of the friction linings. If they are chipped, peeling, or become thinner than one and a half millimeters, they must be immediately replaced with new ones. Otherwise, damage to the brake drum or leakage of brake fluid may occur (if the linings are thin, the pistons may completely come out of the brake cylinders, which will cause depressurization of the circuit).
Fake production, such as AvtoVAZ
As you probably already guessed, I drove just 8,000 kilometers on these pads, after which they turned into black dust left on the disks of my Kalina. I remember I picked them up at the car market for a price of about 230 rubles. And as the seller assured me, it was exactly the original from AvtoVAZ, which I, of course, later doubted, because my factory ones went about 30,000 km and weren’t even half worn out, but I’ll tell you why I replaced them a little later. So I don’t advise anyone to buy cheap ones, especially in the car market, otherwise, in the worst case, you might end up having to replace the brake discs.
Advantages and disadvantages of drum brakes
Drum brakes are indispensable on trucks and buses, as they allow you to achieve the necessary braking force for heavy vehicles. The reasons for using them on the rear axle of passenger cars are somewhat different.
- Drum brakes simplify the design of the parking brake mechanism.
- They are less susceptible to wear due to the larger contact area between the friction linings and drums.
- Finally, they are less critical to road conditions, as they are reliably protected from dust and moisture getting inside.
Disadvantages of drum brakes include their slower response and less stability, which is a result of uneven contact between the friction lining and the drum. Another disadvantage of drum brakes is their more complex design. So how to check the condition of the rear brake pads?