Print this article Font size 16
Before we talk about replacing the device, you should first understand its essence. What is this master brake cylinder?
This is a very important element of the car's braking system. Its main task is to convert the force applied to the brake pedal into pressure within the braking system.
Most often, a malfunction of the gas turbine engine can be determined by several signs:
- Depressurization of the device;
- Breakage of seals;
- Deterioration in braking performance.
How to remove and install the rear brake cylinder on a VAZ 2114, 2113, 2115
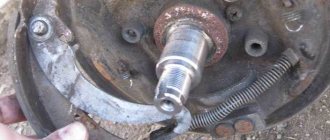
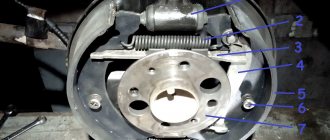
The rear brake cylinder is responsible for effectively braking your car. Therefore, you need to check its operation from time to time. After all, your safety on the road depends on it. It is located under the rear wheel drum. To gain access to it, you need to remove the wheel and pull out the drum.
Selecting a brake cylinder.
Today there are a huge number of manufacturers of spare parts for cars. And it’s easy to get confused when choosing quality spare parts. In order to make a choice, you can read reviews on the Internet. We also read and came to certain conclusions. The most reliable brake cylinder is considered to be the ATE cylinder. The cylinder is also not inferior to it. You can also look at Kraft products.
How to determine a faulty brake cylinder.
The first sign of a problem in the brake system will be a brake fluid leak. You can also evaluate the condition of the cylinders when replacing the rear pads. Usually the rubber bands in the brake cylinders break and the pistons become sour. Of course, they can be repaired, but it is much easier to replace them with new ones, since they are not expensive. In stores you can find cylinders for around 400 rubles.
Reasons why the brakes might fail
Any problems during the braking process reduce its effectiveness, which can lead to dire consequences for everyone - the driver, passengers, and other road users.
Very often, problems arise simply because the driver uses low-quality brake fluid. If your car suddenly loses brakes, this may be due to several reasons, the main thing is not to blame the master cylinder for all the problems.
Below are the reasons why the brakes on a car fail:
- One of the main causes is usually a leaking slave cylinder. Gradually, slowly or quickly, all the contained liquid flows out of it.
- You should also check the level of brake fluid in the reservoir and the condition of the main brake.
- If traces of smudges are noticeable on the main brake, then this is the reason.
- Another possible cause of brake failure could be that the brake line is torn. For example, rubber brake hoses could fray, partially rot in some places, or get punctures.
- The working cylinders may have jammed;
If it is nevertheless noticed that the main brake cylinder is not working:
- it will show where traces of brake fluid leaks appeared;
- it will be impossible to press the brake pedal;
- on the contrary, the brake pedal can move on its own without the driver making any effort to do so.
Master brake cylinder with reservoir: 1 — master cylinder body;
2 low pressure o-ring; 3 — drive piston of the “left front-right rear brake” circuit; 4 - spacer ring; 5 - high pressure sealing ring; 6 — pressure spring of the sealing ring; 7 — spring plate; 8 — piston return spring; 9 — washer; 10 — locking screw; 11 — drive piston of the “right front-left rear brake” circuit; 12 — connecting sleeve; 13 - tank; 14 - emergency brake fluid level sensor; A - gap.
Therefore, it is possible to repair the VAZ 2110 brake cylinder, but not always. Most often, if it leaks, a repair kit will help fix the problem and restore the cylinder’s functionality. If the internal mirror in the cylinder is damaged, then, unfortunately, nothing can be corrected, since grinding is prohibited. If everything is not so scary and repairs are possible, you can do it yourself, because the price of the repair kit is quite reasonable, and almost every motorist can afford it.
Replacing the rear brake cylinder.
- The first step is to remove the brake drum.
- Raise the handbrake all the way.
- Remove the cap from the bleeder fitting and use a size 8 wrench to completely unscrew it.
- Lubricate the fitting with grease.
- Loosen the brake pipe fitting.
- We finally unscrew the fitting.
- Unscrew the 2 bolts securing the working cylinder.
- Place the fitting cap on the tube to prevent brake fluid from leaking out.
- Remove the brake cylinder from the shield.
- Before installation, we clean everything from rust and dirt and degrease the working surfaces.
- Reinstall the brake cylinder in reverse order.
- Reinstall the brake drum.
We bleed the brake system and check everything for leaks.
Features of replacing the rear brake cylinder 2114
It is well known that the serviceability of the brake system in a car is of great importance, since it is directly related to road safety. Therefore, if any problems occur in this system, it is necessary to urgently repair and replace parts that are problematic.
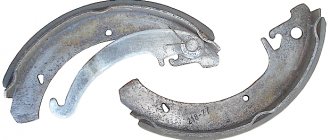
Rear brake cylinder
BRAKE SYSTEM
All modern cars have a hydraulic brake system, and discs or drums are used as braking elements. Discs are considered more efficient in their action, but drums do not wear out longer. The brake system of the VAZ 2114 contains the following parts:
- Brake master cylinder;
- Front caliper (right and left, they are not interchangeable with each other);
- Rear brake service cylinder (one for each rear wheel);
- Vacuum booster;
- Tubes;
- Hoses;
- Disks (on the front wheels, identical to each other);
- Drums (on the rear wheels, interchangeable with each other).
From the cabin, the system is controlled using a pedal, the free play is regulated by a rod.
How to adjust and repair brakes on UAZ cars: we look at them from all sides
As I wrote earlier here, the brake pedal went to the floor. There were no leaks in the brake system, so most likely it was necessary to separate the brake pads.
It is known that during the operation of a UAZ, the brake pads wear out, so it is necessary to periodically remove them or, in technical terms, adjust them.
Let's look at the main stages of adjusting UAZ brake pads
- Theory of Brake Adjustment of UAZ 3303
- Detailed description of adjusting the rear brakes of the UAZ 3303 with photographs
- Detailed description of adjusting the front brakes of the UAZ 3303 with photographs
Theory of brake adjustment UAZ 3303
Here's what the instructions say:
In short, it’s written so ornately that without half a liter you can’t figure it out :-)
UAZ-469 – brakes – Adjusting the service brake
Details Category: Control systems UAZ-469
Adjusting the service brake of UAZ-469
Perform routine brake adjustments in the following sequence: 1. Jack up the vehicle on the side of the wheel whose brake needs to be adjusted. 2. Rotate the wheel gradually and turn the adjusting eccentric until the wheel brakes. 3. Release the eccentric gradually, turning the wheel until it turns freely, without the drum touching the pads. 4. Adjust the gaps between the pads and drums of the remaining brakes in the same way. When adjusting the front brake pads (Fig. 98), as well as the front brake pads of the rear brakes (Fig. 99), rotate the wheel forward.
Rice. 98. Adjusting the gaps between the pads and the brake drum of the front wheel of the UAZ-469B car.
When adjusting the rear brake pads, rotate the wheel backwards. To reduce the gaps, turn the eccentrics in the direction of rotation of the wheel, and to increase them, on the contrary, against the rotation.
Rice. 99. Adjusting the gaps between the pads and the brake drum of the rear wheel of the UAZ-469B car
5. Check that the brake drums do not heat up and that the brakes operate evenly when braking while the vehicle is moving. During the current adjustment, do not use the support pins under any circumstances, as this will disrupt the factory settings of the pads. When replacing friction linings or pads, adjust the pads in the following sequence: 1. Raise the car with a jack on the side of the wheel whose brake you are adjusting. 2. Loosen the support pin nuts and set the support pins to the initial position (the marks on the ends of the support pins should be located as shown in Fig. 94, 95). 3. Pressing the brake pedal with a force of 12... 16 kgf-m, turn the support pins and move the ends of the shoes from the pin side until they stop against the drum (Fig. 100). Then tighten the support pin nuts in this position without allowing them to rotate. 4. Turn the adjusting eccentrics until they touch the brake pads. 5. Stop pressing the pedal and turn the adjusting eccentrics in the opposite direction until the wheels rotate freely. When installing new pads, when the friction linings have not yet been run in to the surface of the drums, the brake drums may heat up somewhat after the indicated adjustment. If the heating is small (the hand is comfortable when touching the drum rim), then after several braking the pads will break in and the heating will stop. When the brake drums become very hot, use the adjusting eccentrics to slightly move the heated brake pads away from the brake drum.
Rice. 100. Adjusting the rear wheel brake pads using support pins.
Detailed description of adjusting the front brakes of the UAZ 3303 with photographs
1) Place the car on a level area.
2) Do not tighten the handbrake, having previously installed the wheel chocks (for example, a chock floor :-))
3) jack up the rear wheel
4) Turn the bolt indicated by the arrow in the direction indicated by the dotted arrow, at the same time turn the wheel by hand until it slows down. When the wheel begins to slow down, slowly turn the bolt in the opposite direction until the wheel is released (in short, we are looking for the “limit” position). The photo shows the left rear wheel. The arrow marks the adjusting bolt of the rear wheel pad.
The adjusting bolt of the front brake pad of the rear wheel rotates in the opposite direction. (Not visible in the photo.)
Rear wheel diagram and rear wheel adjustment principle.
Parking brake system of UAZ vehicles
The drum-type parking brake is mounted on the transfer case and acts on the rear driveshaft of the vehicle.
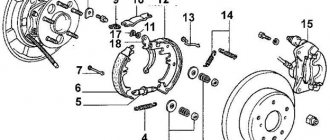
Parking brake mechanism : 1 – adjusting fork; 2 – lock nut; 3 – drive rod; 4 – expansion cracker; 5 – plug; 6 – drive lever; 7 – adjusting screw; 8 – block support; 9 – pusher of the expansion mechanism; 10 – ball body; 11 – housing of the expansion mechanism; 12 – brake drum; 13.18 – pads; 14 – tension spring of pads; 15 – cap; 16 – release mechanism ball; 17 – bolt; 19 – brake shield; 20 – housing of the adjusting mechanism; 21 – rod; 22 – spring; 23 – spring cup; a – view with brake drum; b – view without brake drum
REAR BRAKE CYLINDER
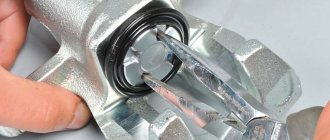
The working rear brake cylinder on a VAZ is a device in which two pistons, under pressure created by the liquid, push the rear pads apart. The pads are pressed against the drums and braking occurs.
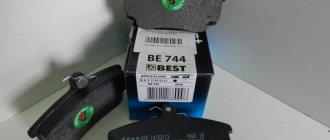
The rear brake cylinder for 2114 (ZTC) can be of different manufactures. In Russia there are quite a lot of enterprises specializing in the production of spare parts for cars. The original parts are produced by AvtoVAZ; many spare parts for VAZ cars are produced in Samara. But there are also products from other companies (including foreign ones):
ZTC Kraft
Among all the listed companies, according to customer reviews, the products of ATE have proven themselves the best. Among Russian brands you can about
Depending on the manufacturer and region of sale, the price of a cylinder on average ranges from 250 to 700 rubles (as of 2105). There is no difference between the VAZ 2114 and VAZ 2115 models; the parts are completely interchangeable with each other.
FAULTS
- The brake fluid leaves the reservoir;
- The rear drum is wet, fluid leakage is noticeable;
- The braking efficiency has disappeared, the pedal “takes” at the very end of the stroke, sometimes not from the first stroke.
- Natural wear and tear;
- The cuffs are corroded due to mixing different types of brake fluid;
- Poor quality of the part;
- The pistons were squeezed out due to severe wear on the pads.
It happens that the pistons inside the housing become jammed. If this happens with the pistons spread apart, the car begins to constantly slow down and the drum overheats. You cannot drive with such a defect; the car must be urgently repaired.
There is one nuance that is worth focusing on. Often, when bleeding the brakes, technicians try to unscrew the bleeder fitting on the cylinder and break off. Even WD-40 doesn't help. This happens due to the fact that over time, the “pumping” begins to boil in the ZTC body. Therefore, before bleeding the brakes, you should have a supply of new replacement parts.
There is also a tricky way that will help you avoid breaking off the fitting. Before unscrewing, you must carefully (do not break the fitting with a hammer!), but thoroughly tap the housing around the bleeder fitting and try to move it out of place.
After this, without using much effort, we try to weaken the “pumping”. Doesn't work? Then tap again. Most likely, patience will be rewarded, and problems associated with unscheduled cylinder replacement will not arise.
How to adjust the rear brakes on a classic
The brake mechanism of the rear wheel of the VAZ-2105 car is drum type, with self-aligning pads.
Brake pads 8 (Figure 2) with linings, wheel cylinder 1 and other parts are mounted on the brake shield 4, which is attached to the flange of the rear axle beam of the vehicle. Adjustment of the gap between the shoes and the drum is ensured automatically using a device located in the wheel cylinder 4. Its main element is a split thrust ring 9 (Figure 3), installed on the piston 4 between the shoulder of the thrust screw 10 and two cotters 8 with a gap of 1.25- 1.65 mm. The thrust rings are installed in the cylinder with an interference fit that provides a shear force of the rings along the cylinder mirror of at least 35 kgf, which exceeds the force on the piston from the tension springs of the brake pads.
With an optimal gap between the pads and the drum, when braking, the pads move apart until a gap of 1.25-1.65 mm is selected between the screw shoulder and the thrust ring shoulder. The specified gap allows the pads to move to create maximum braking torque.
When the linings wear, the gap of 1.25-1.65 mm is completely eliminated, the shoulder on the thrust screw 10 is pressed against the shoulder of the ring 9, as a result of which the thrust ring moves along with the piston by the amount of wear. With the cessation of braking, the force of the tension springs moves the pistons until the crackers stop against the shoulder of the thrust rings. This maintains optimal clearance in the brake mechanism.
Removal and disassembly
To remove it, you need to lift and secure the rear of the car.
Take measures to prevent brake fluid from leaking from the reservoir.
Remove the brake drum by unscrewing the mounting bolts 1 (Figure 1). Insert these bolts into technological holes 2 and tighten them until the drum separates.
Disconnect the end of the cable from lever 18 (Figure 2) of the manual shoe drive, remove the cotter pin, press pin 21 and remove the lever.
Use pliers to disconnect the lower 7 and upper 2 tension springs.
Having turned the cups of the support struts 17, remove them together with the struts, springs and lower cups. Remove pads 16 and 8 and spacer bar 20.
Disconnect the brake fluid supply tube from the wheel cylinder and plug the inlet holes of the cylinder and tube.
Remove the wheel cylinder.
If replacing the brake shield, remove the axle shaft as indicated in the “Rear Axle” chapter and disconnect the parking brake cable by unscrewing the two bolts securing it to the brake shield.
Assembly and installation
Install and secure the wheel cylinder to the brake shield, attach the brake fluid supply pipe to it and tighten the fitting nut until it stops.
Attach lever 18 (Figure 2) for manual drive of the shoes to the block and install brake pads with spacer bar 20. After this, install racks 17 with springs and lower cups, place the upper cups and fix them on the racks by turning in one direction or the other. Make sure that the ends of the pads are correctly positioned in the stop sockets on the wheel cylinder pistons and on the shield. Attach the tip 15 of the rear cable to the lever 18.
Install the brake drum, be sure to first lubricate the seating belt of the axle shaft with graphite grease or LSTs-15 grease, and tighten the drum mounting bolts to full.
If the wheel cylinder was removed during disassembly, be sure to thoroughly remove air from the rear brake drive circuit.
Disassembly and assembly of wheel cylinders
Remove the protective caps 2 (Figure 3) and then press the pistons 4 assembled with the parts of the device for automatically adjusting the gap between the brake pads and the drum out of the cylinder body.
Install the piston assembly with the automatic device on a special device so that the protrusions of the device cover the head of the thrust screw 3 (Figure 4). Using a special screwdriver, turning piston 9, unscrew the stop screw 3 from the piston. Remove seal 8 with support cup 7 and crackers 5 from the screw. Separate thrust ring 4 and thrust screw 3.
Assembling the automatic device for adjusting the gap between the shoes and the drum and the wheel cylinder itself must be done in the reverse order, taking into account the following:
- tighten the piston thrust screws to a torque of 3.9-6.86 Nm (0.4-0.7 kgfm);
- the slot “A” (Figure 3) on the thrust pins should be directed vertically upward. Deviation from the vertical is allowed no more than 30°. This arrangement of the slot ensures more complete removal of air from the wheel brake drive when bleeding the brake;
- To pre-compress the thrust rings, press the pistons into the cylinder body using a special device in the shape of a cylinder with a conical internal hole;
- the force of pressing the piston into the cylinder must be at least 343 N (35 kgf); if the force is less than 343 N (35 kgf), it is necessary to replace the thrust ring;
- when pressing the piston into the cylinder, it is necessary to maintain dimensions of 4.5-4.8 mm and 67 mm (maximum) for a free fit of the brake drum;
- Before installing the parts into the cylinder body, be sure to lubricate them generously with brake fluid.
After assembly is complete, check the movement of each piston in the cylinder body. They should move easily within 1.25-1.65 mm. Replace the protective caps 2 last.
Checking parts
Wheel cylinders. Check the cleanliness of the working surfaces of the cylinder, pistons and thrust rings. Surfaces must be completely smooth, without roughness. This is a guarantee that there will be no fluid leakage and premature wear of seals and pistons. Eliminate defects on the cylinder surface by lapping or grinding. However, increasing the internal diameter of the cylinder is not allowed.
REPLACEMENT
the rear brake cylinders in pairs at once, even if only one of them is leaking . To replace, you will need the following tools:
- Car jack;
- Wheel key;
- Wheel stops;
- Keys for 10 and 12;
- Hammer;
- A wooden block (or better yet, a brass or bronze drift);
- Brake bleeding wrench.
Replacing the rear brake cylinder on a VAZ 2114 occurs as follows (if there is no car lift):
- We loosen the bolts on the rear wheel, lift the car with a jack, and remove the wheel;
- We unscrew the two bolts on the drum (they also serve as guides for the wheel) with a 12mm wrench;
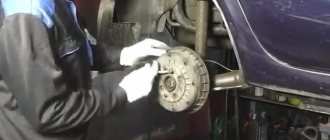
- We remove the drum. If it does not come off, tap it with a hammer through a drift or wooden block. Important! You cannot put the car on the handbrake; the handbrake lever must be fully released;
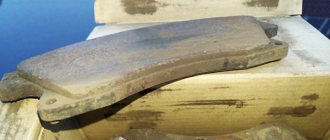
- Removes the pads;
- Unscrew the brake pipe with a 10mm wrench;
- Unscrew the two cylinder mounting bolts (also a 10mm wrench).
That's it, rear brake cylinder 2114 has been removed. One more small nuance. When we disconnected the tube from it, liquid began to flow.
It’s better to plug the pipe with a wooden tip - less fluid will have to be filled, and it will be easier to bleed the brakes.
Installing the rear brake cylinder is done in the reverse order.
That's all, we've figured out how to replace the rear brake cylinder. You should also remove air from the system by bleeding the brakes. After all work has been completed, the functionality of the new part should be checked. Check:
- Is there any fluid leakage after the replacement?
- Are the brake pads spread on the wheel where the brake caliper was changed?
The functionality of the new part can be checked before installing the wheel in place, but this check must be done by two people. However, you won’t be able to pump the brakes alone. We do the check as follows:
- One of the participants gets behind the wheel, presses the brake pedal and holds it down;
- The second participant tries to spin the drum and looks for any liquid leaks.
If everything is in order, install the wheel in place. If the drum spins or fluid leaks, the cylinder will have to be replaced.
Malfunctions and ways to check them
It is possible that you may need to replace the vacuum booster on your VAZ 2110. The cause may be various malfunctions, the characteristic symptoms of which are as follows:
- When you press the brake pedal, a hissing noise occurs, and at the same time, the engine speed often increases;
- The car starts to shake;
- Spark plugs stop working efficiently;
- Fuel consumption increases noticeably.
You yourself understand perfectly well that if the vacuum brake booster hisses on a VAZ 2110, there is nothing good about it. Therefore, it is necessary to take appropriate action. This applies to all malfunctions that may occur.
Before replacing the vacuum booster on a VAZ 2110, it should be checked.
This procedure is performed as follows:
- As with normal bleeding of brakes, with the engine not running, press the gas pedal several times;
- After 5 or 6 presses, keep the pedal in the down position, resting it on the floor, and start the engine;
- After starting, the pedal itself will move forward a little.
This situation is typical only for a working vacuum amplifier. Therefore, if a vacuum has not formed, check the connections and the hose for leaks, plus examine the condition of the check valve. Often the reason lies in the destruction or deformation of rubber components, which can be easily replaced.
There is also a high probability of damage to the diaphragm, on which a hole is formed over time. You can purchase the diaphragm with a repair kit, the cost of which is no more than 500 rubles.
Replacement
To replace an element, you need to understand the main issue - how to remove the vacuum booster from a VAZ 2110. Directly replacing the old element with a new one will not be difficult, just like the reassembly process.
Therefore, we will tell you about the main thing - dismantling the amplifier. Let's start with the fact that the procedure is not complicated, but it requires accuracy and sequence of steps. If you follow the recommendations, the work will take little time and will not take much effort.
- Disconnect the block with wires, which includes brake fluid level sensors in its design.
- Hold the booster check valve with one hand and carefully disconnect the hose with the other. It is advisable to disconnect the hose with a strong hand, since this will require a lot of force.
- Remove the two bolts connecting the booster and master cylinder.
- Carefully remove the cylinder from the amplifier.
- There is no point in disconnecting the brake lines.
- Give access to the dashboard, which will allow you to unscrew the nuts holding the brake pedal bracket. There should be 4 of them.
- It is recommended to dismantle the bracket and amplifier through the engine compartment, since there is enough free space for such manipulations.
- Remove the pin lock plate. To do this, pry the finger with a screwdriver and squeeze it out.
- Now you can easily disable the brake pedal and booster.
- To disconnect the amplifier and bracket, you will have to unscrew the two nuts on the mount.
- A new one is installed in place of the dismantled old vacuum amplifier, and the reassembly procedure is performed in strict sequence of the dismantling process.
Replacing the rear brake cylinder on a VAZ 2114
Rear brake cylinder VAZ 2114
It’s not uncommon for many car enthusiasts, including the domestic auto industry, to have a problem with their brakes. This type of car malfunction is the most dangerous and there are many reasons for this.
According to their principle of operation, brakes can be:
- foot hydraulic;
- manual, mechanical locking.
VAZ 2114 cars are equipped with drum brakes in the wheels in which the rear brake cylinders are installed. But, in other respects, as on all manufactured cars. The only differences can be in the type of blocking element: disk and drum. But also according to the manufacturing technology of the brake cylinders themselves.
Where is the brake cylinder located? The rear cylinder is located at the rear on the inside of the metal casing. In order to find it, just look under the car and above the bridge you will immediately see tubes through which it is simply difficult not to find it.
Location of the rear brake cylinder on a VAZ 2114
Car brake system repair
When repairing the brake system, replacing the rear or front brake cylinder, connecting pipes, front cylinder or hoses. Everything requires subsequent pumping of the entire system. Therefore, it is necessary to provide access to all wheels at the same time. To do this, lift the car evenly and place it on supports; for greater convenience, you can remove all the wheels, and not just the one on which you need to directly replace the cylinder. When carrying out such actions, always remember the precautions that you need to take for your own safety.
Replacing the brake cylinder itself does not seem difficult, but there are quite a lot of additional manipulations that must be performed. In order to do this, you can refer to the technical instructions for the car for maintenance and repair, or you can do without it, because there is nothing supernatural in this.
Examination
You should make sure that the master cylinder is the culprit for the malfunction of the brake system. This is easy to do; you don’t even have to go to a service center and spend money on it.
Unit location
- Press the brake pedal with the power unit off.
- Start the engine without taking your foot off the gas pedal.
- During normal operation, the gas turbine engine fails under the influence of vacuum.
- If the pedal does not fail, you will need to conduct more thorough diagnostics and restore the device to functionality.
Most likely, you will need to restore the tightness of the return regulator connection. It is located on the intake manifold amplifier housing.
Repair kit or new GTZ?
Many car owners face a question when the brake master cylinder fails: how exactly to repair the brake master cylinder. After all, there are two main options:
- Purchase a new GTZ;
- Use repair kit.
First, let's take a look at the price tags.
New GTZ entry-level quality
New high quality GTZ
Purchasing a repair kit and using it to restore the functionality of the brake cylinder entails uneven wear of old and new elements, breakage of rings and a number of other problems. In this regard, we advise you to eliminate the breakdown by completely replacing the gas turbine engine, and not by using a repair kit.
Required Tools
In order to replace the brake cylinder you will need the following tools:
- wheel wrench;
- jack;
- WD-40;
- socket wrench 10;
- a device for unscrewing fittings if necessary;
- metal brush;
- rags;
- pliers;
- a screwdriver or pin for tensioning the springs.
Before starting all types of work, be sure to provide a place for laying out all spare parts; when removing them, it is advisable to remember the sequence and methods of removing them. This will make the reverse process much easier. In addition, before such a procedure, it is advisable to stock up on a set of brake pads, because they still need to be changed every year depending on the intensity of driving. And besides, they don't cost that much. So, having everything listed in our arsenal, let's get to work.