Repair / From Vladimir
- Signs that replacement is needed
- Required Tools
- Replacing the rear brake pads of a VAZ 2109
Tips for working on video
- How experienced car owners do it (video)
The braking system is your safety on the road. If the engine breaks down, then you simply won’t go any further, but if the brakes break down, on the contrary, you won’t be able to stop and the consequences can be different (hardly good). The cost of the pads is low and anyone can replace them, so you should not save on the vital “organs” of the car when replacing pads on a VAZ 2109 and other similar car models.
When and why to change
Why, of course, is a rhetorical question. No motorist wants to be left without brakes. Possible complications will only lead to higher repair costs:
- one of the wheels will jam while driving;
- due to extreme wear, brake fluid will leak;
- the caliper will break.
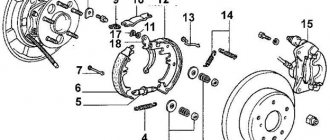
Rear wheel brake mechanism: 1 - brake shield, 2 - wheel cylinder, 3 - upper tension spring of the pads, 4 - brake pad, 5 - pad lining, 6 - brake drum, 7 - dowel pin, 8 - guide spring, 9 - lower tension spring
The question of “when” is directly affected by driving style and the quality of the pads. There are average indicators: for the front axle - 15-20 thousand km, for the rear axle (drum) - up to 100 thousand km. But this does not exempt you from regular checks.
Front wheel brake mechanism: 1 - brake disc, 2 - pad guide, 3 - caliper, 4 - brake pads, 5 - cylinder, 6 - piston, 7 - pad wear indicator (inspection window), 8 - o-ring, 9 - protective guide pin cover, 10 - guide pin, 11 - protective cover
Features of replacing rear brake pads on VAZ 2108, 2109, 21099 cars
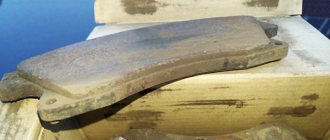
The service life of rear brake pads on VAZ 2108, 2109, 21099 vehicles and their modifications is 60-70 thousand km.
Depending on driving style, serviceability of the brake system and operating conditions, this period may vary up or down. Therefore, the frequency of checking the condition of the brake pads is 60,000 km. The minimum permissible thickness of brake pads is 1.5 mm. In this case, the brake pads must be replaced. They must be replaced in pairs (on the right and left rear wheels at the same time).
Necessary tools, accessories and spare parts
— Set of rear brake pads for VAZ 2108, 2109, 21099 cars and their modifications
— Medium slotted screwdriver
— Pliers with thin jaws
Preparatory work
— Remove the rear wheel
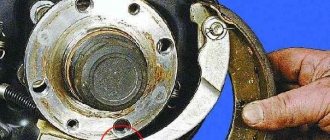
- Remove the brake drum
— Clean the rear brake mechanism from dirt
The procedure for replacing brake pads on VAZ 2108, 2109, 21099 cars
First remove the front brake pad, then the rear. Before removal, we bring the pads together as much as possible, pushing the pistons of the brake cylinder inward. This can be done using two mounting blades if their ends are placed behind the shoulder of the supporting brake shield and compress the pads with them.
— Disconnect the upper tension spring of the brake pads
We lean the slotted screwdriver on the brake cylinder and using it as a lever, use its blade to pry up the edge of the upper tension spring and disengage it from the front block. We take out the spring.
Disconnect the upper tension spring
— Disconnect the front pad guide spring
Use a screwdriver or pliers to pry up its edge and remove it from engagement with the block.
Remove the front brake pad guide spring
- Remove the front brake pad
We lower it down along with the lower tension spring. Disconnect the spring and remove it by hand.
Removing the front brake pad
— Remove the expansion bar
It is not secured by anything and is simply removed.
Removing the expansion bar
— Disconnect the guide spring from the rear brake pad
We pry it off with a screwdriver or pliers.
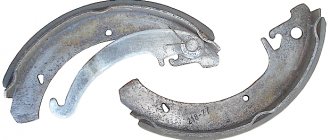
- Remove the rear brake pad
In this case, it is necessary to remove the tip of the parking brake cable from engagement with the manual drive lever (the lever is secured to the rear block).
Removing the rear brake pad
— Separate the manual drive lever from the rear block
To do this, you need to unsplit the lever axis using pliers and remove the lever from it.
That's it, the brake pads are removed.
Features of installing new brake pads in the rear wheel brakes
— First install the rear brake pad, then the front in the reverse order of removal
— Attach the manual drive lever to the rear brake pad
At the same time, we put the lever on the axle, install the spacer washer, install the lever, and secure it with a cotter pin.
— Tension the tension springs using pliers or a screwdriver
— After installing the brake pads and drum, press the brake pedal several times to self-adjust the gap between the pads and the drum
We carry out a similar procedure for removing the old brake pads and installing new ones for the other rear wheel.
Notes and additions
— When replacing rear brake pads, it is necessary to evaluate the condition of the brake drums, since the efficiency of the rear brake mechanisms of the braking system of VAZ 2108, 2109, 21099 cars is based on the interaction: pads - drum. And if the drum is worn out and the pads are new, normal braking will not be achieved.
— Also, if necessary, replace the guide springs of both pads.
— You should pay attention to the brake cylinders of the rear brake mechanisms. Leakage of brake fluid through their seals is unacceptable. It is also unacceptable to operate cylinders with damaged anthers.
Twokarburators VK - More information on the topic in our VKontakte group, on Facebook Twokarburators FS and on Odnoklassniki - Twokarburators OK
More articles on the braking system of VAZ 2108, 2109, 21099 cars
— Vibration and beating when braking
— Checking the brake system of VAZ 2108, 2109, 21099 cars
— “Bleeding” brakes on VAZ 2108, 2109, 21099 cars
— Brake mechanism of the front wheel (caliper) of VAZ 2108, 2109, 21099 cars
— Replacement of front brake pads in brake mechanisms (calipers) of VAZ 2108, 2109, 21099 cars
Required Tools
You will need radically different tool sets for the front and rear axles. Let's start with something simple. To replace the front disc brake pads you will need:
- flat screwdriver;
- open-end wrenches for 13 and 17;
- metal brush.
If you don't have WD-40, you can use kerosene.
Spray it from a disposable spray bottle The following list for replacing the rear linings of a VAZ 2109 (21099) may not be all you need, but you need to be prepared for difficulties. Full recommended list:
- hammer (preferably a larger one);
- pliers;
- flat screwdriver and metal brush;
- WD-40 lubricant;
- wooden block or board;
- two open-end wrenches for 13;
- 13mm head with extensions.
We put on gloves and get to work.
What rear pads are installed on the VAZ 2109
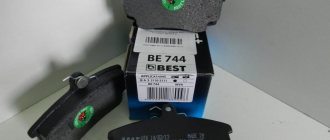
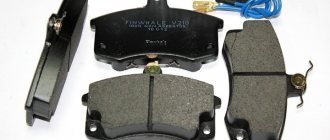
The most common rear pads that car owners install are original VAZINTERSERVICE (VIS-Auto) brake pads. Article - 21080-3502090-55. The average price is 730 rubles. Such pads are good because they ideally match the model in size, composition and service life.
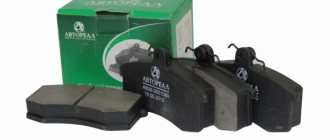
Among analogues, the most reliable manufacturers are:
- ATE - Germany (03013702312);
- TRW - USA (GS8210);
- FERODO - UK (FSB240);
- STS - Russia (11524-STS);
- EzATI - Russia (2108-3502090).
Brands ATE, TRW and FERODO offer a reliable composition of materials that does not damage the inner surface of the drum. The cost of such pads ranges from 800-1500 rubles. per set. Domestic manufacturers STS and EzATI produce overheat-resistant pads. They are worse in composition, but the price is more affordable - about 600 rubles. per set.
How to change the front ones yourself
Compared to the previous procedure, replacing the front pads will seem very easy. The wheel, of course, will also have to be removed. After which you can verify the need for repairs through a special “window”. The thickness of the friction material should not be less than 2 mm, otherwise you risk being left without brakes at any time.
Measure the thickness with a ruler; it’s better not to do such calculations by eye.
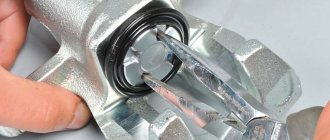
- There is a single bolt at the top of the caliper, held in place by a lock washer. It is necessary to straighten it using a flat screwdriver.
Use a long, thin, flat-blade screwdriver. If there is resistance, use a hammer. The bolt should be unscrewed while holding the guide with another wrench.
Secure the mechanism with the second anti-rotation key - The brake hose must be released from its mounting.
Remove the Brake Hose You can now “open” the caliper by moving it to the side. Remove the old pads.
Remove worn pads - To ensure that the new linings fit neatly into place, it is better to thoroughly clean all points of contact.
This is where a metal brush comes in handy. - Naturally, the new clutches are thicker than the old ones and it will not be possible to put the caliper back. Therefore, it is necessary to depress the brake cylinder. To do this you will need a large screwdriver. Close the brake mechanism without pads and press the screwdriver, like a lever, against the cylinder. It will take some effort, so be careful not to let the screwdriver come off. Then install new linings, close the caliper and tighten the mounting bolt.
Step 3
Step 2
Step 1 - Reassembly will be quick. Tighten the bolt, holding the guide with a second wrench, and bend the washer stopper into place. Don't forget to secure the brake hose and you can screw the wheel into place.
Complete the installation by snapping the washer stop and securing the brake hose.
How experienced car owners do it (video)
Additional recommendations
- If you cannot depress the brake cylinders, open the cap of the brake fluid reservoir to reduce the pressure.
- If the pads wear unevenly, pay attention to the caliper. Most likely it will need repairs.
- When replacing the rear pads, change all the springs as well. They are inexpensive, but they will protect you from possible failures until the next replacement.
- The front caliper guides can be lubricated with graphite grease for smoother operation.
Replacing the pads on the front axle will not cause problems even for “dummies” of automotive repair. But from the back it’s not so simple. Assess your strengths and capabilities in advance: can you reach the handbrake cable and cope with a stuck brake drum? If yes, then everything will definitely work out.
Replacing the VAZ 2114 heater tap with your own hands
Do-it-yourself repair and replacement of the gas tank cap
Globally about types, applicable to brake pads
Let's start with the fact that all automobile spare parts are divided into several types, which mainly determines the cost of the spare part. The market for spare parts for servicing VAZ cars is quite extensive. It is important to understand here that the difference in price for brake pads for the same car can vary significantly due to the category of spare parts. Among the product offerings there are the following types of brake pads:
- Spare parts supplied to the conveyor (OE). As a rule, these are the most expensive spare parts, since they are manufactured in strict accordance with the requirements of the car manufacturer. For example, 90% of products from ATE, the leader in this segment, are supplied to complete vehicles at the manufacturing plant, and the remaining 10% go on sale.
- Spare parts intended for the automotive aftermarket (AfterMarket). This category is represented by the widest range. The price range is also wide. The price of the same brake pads for VAZ of the ninth family varies: 30% -70% of the price of the original spare part. This is explained by minor deviations from the nominal composition of the friction mixture and the country of origin of the part. The leaders in this segment are pad manufacturers Textar, Bosch, TRW and many other manufacturers.
- Spare parts supplied to markets in developing countries. The cost of such spare parts is 20-30% of the price of the part going on the assembly line (OE). When producing spare parts, the standards in force in the countries importing such products are used. Naturally, there is no need to talk about the high quality of such products. Manufacturers, when labeling products in this category, add a special alphabetic code to the catalog number, which serves as a guide for purchase.
Brake pads with ceramic inclusions in the braking layer. So-called ceramic brakes
– a separate category of products that can be installed on front-wheel drive VAZs. The friction mixture contains a certain amount of ceramic components, which serve to increase the braking properties of the pad. The use of such brake pads on the ninth family of VAZ cars is permissible only with special preparation of the car for sports competitions, since for effective braking, the ceramics need good heating, which is unattainable in city conditions, much less on the highway.