The Kia Rio maintenance regulations do not limit the service life of the rear wheel brake pads, but replacement of the pads is carried out in case of maximum permissible wear of their linings or when replacing the rear wheel brake disc.
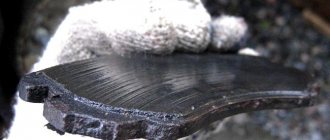
The pads must be replaced if the linings are oily or if they have deep grooves, cracks and chips, as well as if the linings are detached from the base of the pads. Attention! The brake pads of the rear wheels must be replaced only as a set - all four brake pads. Replacing the pads of only one brake mechanism can lead to the car pulling to the side when braking.
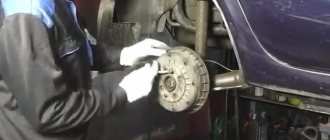
We install the car on a factory-made stand.
We show how to replace the pads on the left rear wheel of a Kia Rio.
Remove the rear wheel.
2272-6-12-04-12
We clean the brake mechanism parts from dirt and corrosion, especially the brake pad guide seats.
If the protective covers of the guide pins are torn, replace them with new ones.
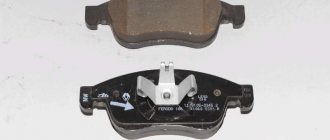
We install new brake pads and fasten the caliper.
Similarly, we replace the brake pads on the right rear wheel.
After replacing the pads on both rear wheels, press the brake pedal several times to set the gaps between the pads and discs.
[We save up to 5,000 rubles on Kia Rio maintenance] [Kia Rio maintenance for 15 thousand km] [Kia Rio maintenance for 45 thousand km] [Kia Rio maintenance for 60 thousand km] [Do it yourself Maintenance - general recommendations] [Safety rules for carrying out vehicle maintenance yourself] [ Tools required for carrying out maintenance of the Kia Rio]
Replacing brake pads for the rear wheels of Kia Rio
Causes of pad wear
Several things affect the lifespan of a part. Among them:
- Environmental conditions - climate, road quality. Any abrasive materials damage the pads. Both large ones, for example, crushed stones, stones, glass, and small ones - sand, dust or dirt.
- Part material.
- Driving style. They deteriorate faster for drivers who like to brake or accelerate sharply.
- Breakdown of the brake system. The replacement of the “shoes” is brought about by deformed brake discs, permanent wedge of guides or brake pistons, blockages in the pipes, low-quality brake fluid or air bubbles in it, etc.
Therefore, it is recommended to constantly inspect the brakes of your car.
What tools are needed to replace pads?
The minimum set of necessary tools includes:
- Jack and shoes (wheel chocks);
- Wheelbrace for removing wheels;
- Pear or enema;
- Carob, or better yet, cap on 14, 17, 19 or 21;
- A slotted screwdriver, you may also need an awl;
- Round nose pliers;
- Wire brush;
- Fabric gloves and a piece of thick fabric.
Instead of keys, it is convenient to use the appropriate sockets and ratchet. To tighten (press in) the brake cylinders, sometimes round nose pliers are useless and a special wrench is required to press in the brake calipers.
Is it possible to drive on worn brake pads?
Driving on already worn out pads is equivalent to driving without brakes. The likelihood that the driver will lose control and have an accident increases many times over. But even if an accident does not happen, constant movement with such “shoes” deforms the brake discs. And replacing them costs much more.
You can change the rear brake pads in the Kia Rio 3 yourself. Due to the popularity of cars, spare parts are always available in stores. And if the car has all disc brakes, then even for a beginner this operation will not take more than 3-4 hours. Experienced drivers can replace all the pads in 1-1.5 hours.
How to change the rear pads on a Kia Rio with your own hands
Knowing how to correctly change the rear pads on a Kia Rio, the driver can avoid overpaying money at the service station.
What tools will you need?
The list includes:
- jack, “shoes”;
- a set of ring or open-end wrenches (instead, special heads and a ratchet are sometimes used);
- round-nose pliers (in especially difficult cases they turn out to be useless, and in order to sink the calipers, you have to take a special wrench);
- enema or pear;
- soft cloth, newspaper or paper;
- metal brush;
- slotted screwdriver (in some cases an awl may be needed).
It is recommended to carry out work wearing mittens or gloves.
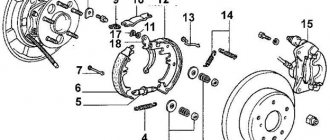
Replacement on disc brakes
Lucky are those drivers who have all 4 disc brakes: the job is easier. Replacing rear brake pads on Kia Rio 3 disc brakes in stages:
- Drive onto the site (any flat surface), shift the engine to 1st gear. Be sure to install wedges under the front wheels. Don't take the handbrake off!
- Pump out excess brake fluid from the reservoir.
- Loosen the wheel nuts, but do not remove them completely.
- Raise the car with a jack and remove the wheel.
- Use a brush and cloth to remove all dirt from the caliper. This must be done carefully so as not to damage the soft rubber seals.
- Remove the caliper. First, unscrew the 2 bolts that hold it in place. Remove the nut with a wrench and remove the caliper itself.
- Change the brake shoes.
- Remove the caliper guides, clean, lubricate, and put back.
- Be sure to inspect the gaskets on the guides, as well as the brake cylinder. Change if necessary.
- Press the piston into the cylinder. This is done with pliers or a grinder key (or a bicycle key). The cylinder must not be hit; it may break.
- Screw the caliper and wheel into place.
Lower the car. Check that the wheel bolts are well tightened.
Replacement on drum brakes
The process of replacing rear brake pads on a Korean Kia Rio looks a little more complicated if the rear has drum brakes.
You need to add hub nuts to the list of tools. This is a consumable, they are replaced after any unscrewing. You also need a hammer, a cube of wood measuring 2x2 cm. No keys needed.
Stages of replacing the rear brake pads of the Kia Rio 3:
- Drive onto level ground, turn off the engine, and then shift into 1st gear. Be sure to put chocks under the front wheels. Don't take the handbrake off!
- Remove the wheel.
- Remove dirt from the drum and protective shield.
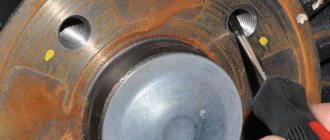
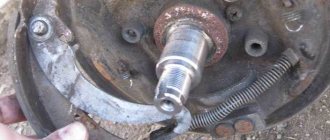
- Remove the protective cap from the axle. To do this you will need a screwdriver and a piece of clean paper or cloth. First, use a screwdriver to pry the cap several times around the perimeter, after which it easily slides off the axis. Because It is completely filled with lubricant and must be placed on a clean surface. A piece of paper is useful for this.
- Using the same screwdriver or awl, you need to unlock the collar of the nut, and then use a 21 wrench to remove it.
- Place the cube on the drum and knock. Knock so the whole drum.
- Remove the drum, supporting the outer washer with a wrench.
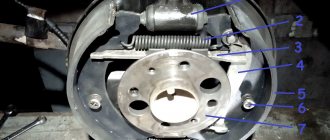
- The rear pads of the Kia Rio 3 are attached to the shield using 2 types of fastenings - brackets and pins. The first ones need to be rotated 90º, and then unfastened from the pin. Then remove the pins from the side of the protective shield.
- Remove the pads, as well as the bar and springs. Before disassembling, just in case, take a photograph of the position of the parts.
- Unhook the handbrake cable.
- Attach the rear “shoe” to the cable lever and put it in place. And then secure it to the pin using a bracket.
- Insert strip.
- Install the front shoe.
- Connect everything with springs.
- Place the drum.
- Tighten the hub nut. After a correctly performed operation, the drum rotates easily and does not play. This is done in 2 stages. First, tighten the nut completely, so that the drum slows down a little. Then the nut needs to be loosened by 15º.
- Lock the nut. To do this, just place a screwdriver against the collar and tap it a little with a hammer.
- Return the wheel to its place.
- Lower the car. Tighten the wheel bolts.
Adjust the brake fluid level and then screw on the reservoir cap.
When all the front and rear brake pads on the Kia Rio 3 have been replaced with new ones, it is necessary to bleed the brakes. To do this, press the brake pedal 3-4 times.
During the first 100-150 km, the pads wear in, so it is not recommended to brake sharply at this time.
Rear pad service life
On average, rear brake pads last from 30 to 50 thousand km. However, their service life depends primarily on the driving style and the quality of the pads themselves. It is clear that cheaper ones will wear out faster. That is why you should not buy too cheap analogues.
I recommend periodically - once every 15-20 thousand km. mileage to carry out diagnostics of the brake system. Check the brake fluid level and the condition of the pads themselves. If the thickness of the working surface of the pad is 2 mm or less, they should be replaced. The pads are replaced in pairs. That is, 4 pieces at once - on the front or rear wheels.
Repair manuals for Kia Rio: replacing the brake pads of the rear wheel brake mechanism
Pay attention to the brake pad markings. Buy new pads with the same markings. HANKOOK FRIXA rear drum pads for Kia Rio are marked FLK18.
HANKOOK FRIXA disc-type rear pads for Kia Rio are marked FPK01NR.
Rear disc pads HANKOOK FRIXA of the S1 tuning series for Kia Rio are marked S1H25R.
You
will need : a wrench for wheel nuts , pliers , flat - blade screwdriver , a medical syringe .
The minimum permissible thickness of the friction linings of brake pads is 1 mm.
Replace the pads in the following cases:
— the thickness of the friction linings is less than permissible
— the surface of the linings is oily
— the friction lining is not firmly connected to the base
- linings with deep grooves and chips
1. Loosen the left rear wheel nuts and place wheel chocks (“chocks”) under the front wheels. Shift into gear. Using a jack, lift the rear of the car and place it on secure supports.
2. Check that the parking brake lever is lowered all the way down (the car is released).
3. Remove the rear wheel.
4. If the brake fluid level in the master cylinder reservoir is at or close to the “MAX” mark, pump out some of the fluid from the reservoir. Otherwise, when replacing the pads, it may splash out.
5. Remove the brake drum (see “Removing and installing the brake drum”).
When should you change the pads?
The part consists of 2 parts: a metal base and a friction lining. The latter is always made of materials with a high coefficient of friction.
You can figure out whether the rear brake pads of the Kia Rio 3 need replacing. They have built-in wear sensors - small metal plates. They are located deep in the friction lining. When the part is almost worn out, the plate comes into contact with the brake disc while driving. This is accompanied by a characteristic squeak.
Also, the wear of any pads can not only be heard, but also seen. The overlay should be at least 1-1.2 mm thick.
If the friction layer is worn unevenly, then it will have to be repaired along with the pad or even a new caliper installed.
Which pads to choose
The decision to save on service sometimes plays a cruel joke on motorists. Changing it yourself is the right decision. But buying cheap pads will most likely be wrong. Of course, they look the same. Significant difference in the composition and quality of the material. The original ones are made with high quality and adapted to a specific car. The main advantages of good pads are:
- Fast braking;
- Long service life;
- Minimal impact on brake discs and drums.
In simpler terms, we can say that high-quality pads brake well, are replaced less often and do not damage the surface of drums or discs.
Therefore, the best choice for disc and drum brakes are pads from the Kia and Sangsin brands.
An economical option for purchasing pads is from TRW, TSN, NiBK, Japan Parts, NK, Mando, Asin and Kashiyama.
Apart from the two best, the quality of the rest should be assessed by cost. The lower, the worse.
Recommendations for choosing brake pads
Before installing new brakes, you need to study the sizes and shapes of the parts to avoid mismatches.
Selection rules:
- it is necessary to focus on the conditions and driving style (for moderate driving around the city, pads that can withstand temperatures of 300-400⁰C, with a friction coefficient of 0.25-0.35, are sufficient);
- pads and brake discs must be of the same brand;
- parts must have certification markings (R90);
- The higher the operating temperature, the more effectively the car will brake.
The quality of the pads affects the service life, so it is better to avoid the most budget parts.