The brake system of a car must always be in good technical condition, and this primarily concerns the brake pads. On the VAZ “Seven” they rarely have to be changed and the main reason for this is wear of the friction lining. The emergence of problems with the brake mechanisms is indicated by corresponding signs that indicate the need for inspection and repair or replacement of the brake elements.
- What are they used for?
- What are there
Front
- Rear
- Brake pad problems
Extraneous sounds
- Skid
Video: why the car pulls to the side when braking
- Dismantling
Video: replacing front brake pads on classic Zhiguli cars
Signs you need to replace your brake pads
Replacing brake pads on a VAZ 2107 is necessary in the following cases:
- the thickness of the lining is less than 2 mm (for front pads) or 1.5 mm (for rear pads);
- the linings are oily;
- The linings have chips and cracks.
To determine the condition of the front pads, simply remove the wheel. To get to the rear ones, you also need to remove the brake drum, which requires some effort and a lot of time. Therefore, problems with pads can be determined by other methods.
- creaking (grinding) when you press the brakes;
- pulling the car away from the trajectory when braking.
These signs indicate that it is necessary to check the condition of the pads.
We install new ones
Before installing new pads, it is necessary to release the parking brake cable, as it may not allow the drum to fit onto the new pads. Assembly occurs in reverse order. The springs can cause difficulties, but if you act slowly, everything should work out. This is where the file mentioned earlier comes in very handy. Thanks to the pointed shank, you can easily hook the spring loops into the mounting holes.
During the assembly process, it may turn out that, despite the parking brake cable being completely released and the working brake cylinder being fully compressed, it is not possible to put the drum on the newly installed pads. The reason for this phenomenon may be the thickness of the linings, which often slightly exceeds the permissible limit. In this case, it is recommended to change them one at a time - first replace the more worn one with a new one, after a while we replace the second one.
Installation
Installation is always carried out in the reverse order of dismantling. But in order not to get confused in this work, we will discuss this issue in more detail.
- To begin with, we need to push the piston of the brake system cylinder all the way inside.
- It is necessary to attach the handbrake rod to the new rear block. This must be done in exactly the same way as was the case with the old node, and in no other way.
- We put the cotter pin in place.
- How much we suffered before we pulled out the guide spring. Now it's time to bring her back. We attach it to the block.
- The cable is connected to the handbrake rod.
- The previously removed upper spring is now attached to the pads at one end and the other.
- Now get ready to perform the most important stage of the work: we place the block on the brake cylinder, in the place where it should be. We tighten it a little from below so that the spring stretches and makes it possible to place a spacer bar in the niche. We insert the bar. After this, we put the second block in place, but only so that it does not fit into the hole of the strip.
- Armed with pliers, we engage another spring with the assembly. But here, keep in mind one important nuance: the cable should under no circumstances touch the parts of the drum that are in motion , otherwise it can lead to serious consequences.
- We are approaching the end of the work process. We install the drum in place, fasten it with bolts, and install the wheel.
Brake pad problems
The parts of the braking system in question have to be changed not only when they wear out, but also when malfunctions occur that are associated with the use of low-quality consumables or too active driving. The following characteristic signs indicate problems with the pads:
- creaking, grinding and other extraneous sounds when braking;
- car skidding when pressing the brake pedal;
- to operate the pedal you have to exert more or less force than usual;
- beating of the pedal when braking;
- after releasing the pedal, it does not return to its original position;
- the presence of black dust on the rims.
Extraneous sounds
Modern brake pads are equipped with special indicators that indicate wear of these car parts. The indicator is a metal strip that is attached below the friction lining. When most of the material is worn out, but the pad is still able to decelerate, a characteristic grinding or whistling sound appears when the brake pedal is applied. If the pads are not equipped with such indicators, the presence of extraneous sounds indicates obvious wear of the elements in the brake mechanism and the need to replace them.
Pad wear can manifest itself in different ways, and one of the signs is extraneous sounds when braking.
Skid
If the car skids to one side when braking, then the likely cause is wear on one of the pads. The car can skid until it turns around, even on a dry surface. In addition to the pads, skidding can occur due to scuffing or deformation of the brake discs.
Video: why the car pulls to the side when braking
Some time ago I was faced with a situation where the car began to pull to the side when braking. It didn't take long to find the reason for this behavior. After a quick inspection of the car's underside, it was discovered that one of the rear brake wheel cylinders was leaking. This caused brake fluid to get on the working surface of the pad and drum, as a result of which the mechanism was unable to perform its function. The problem was resolved by replacing the cylinder and bleeding the brakes. If you encounter a similar situation, I recommend replacing the entire cylinder rather than installing a repair kit, since the quality of rubber products today leaves much to be desired.
Increase or decrease pedal effort
If the pedal has to be pressed unusually hard or lightly, the problem may be caused by worn or dirty pads. If everything is in order with them, then you should check the integrity of the entire brake system for fluid leaks.
Vibration
If there is vibration when you press the brake pedal, then a possible reason is that dirt has gotten between the brake disc and the pads, or a crack or chips have appeared on the latter. As a result, parts are subject to premature wear. However, you should be aware that a similar phenomenon is also possible due to problems with the hub or hydraulic cylinders of the brake system.
The pedal goes down
Sometimes it happens that the brake pedal does not move back after being pressed. This indicates that the pads are “stuck” to the disc. This phenomenon can be observed at sub-zero temperatures when moisture gets on the pads. In addition, air may enter the braking system, which requires inspection and subsequent repair or bleeding of the brakes.
Plaque on discs
Plaque on wheel rims is black dust, which indicates wear on the pads. If the dust contains metal particles, then not only the pads are erased, but also the brake disc itself. If such a situation arises, you should not delay inspecting the brake mechanism, as well as replacing failed parts. The appearance of black deposits on wheels can be caused by active driving or natural wear of the pads.
One day I noticed that the front wheel rims were covered with black dust, and it was not road dust. It is no longer known what brake pads were installed at that time, but after replacing them with factory ones from AvtoVAZ, the situation remained unchanged. Therefore, I came to the conclusion that the appearance of black dust is a normal phenomenon, indicating natural wear of the pads.
Typical malfunctions of the VAZ 2106 brake system
Since the VAZ 2106 is a very old car, the vast majority of problems with its brakes are well known to motorists. Let's list the most common ones.
Brake pedal too soft
At some point, the driver discovers that in order to press the brakes, he needs practically no effort: the pedal literally sinks into the floor of the cabin itself.
The photo shows that the brake pedal is almost on the floor of the cabin.
Here is a list of reasons why this happens:
- Air has entered the brake system. It can get there in different ways, but usually this happens due to a damaged brake hose or because one of the brake cylinders has lost its seal. The solution is obvious: first you need to find the damaged hose, replace it, and then remove excess air from the brake system by bleeding it;
- The brake master cylinder has failed. This is the second reason why the brake pedal sinks to the floor. Identifying a problem with the master cylinder is quite simple: if the brake fluid level in the system is normal and there are no leaks on the hoses or near the working cylinders, then the problem is likely in the master cylinder. It will have to be replaced.
Reduced brake fluid level
Bleeding the brakes may also be necessary when the level of brake fluid in the VAZ 2106 system has dropped seriously. This is why this happens:
- The car owner does not pay enough attention to checking the brakes of his car. The fact is that fluid can gradually leave the reservoir, even if the brake system seems sealed. It's simple: there are no completely sealed brake systems. Hoses and cylinders tend to wear out over time and begin to leak. These leaks may be completely unnoticeable, but they slowly but surely reduce your overall fluid supply. And if the car owner does not add fresh fluid to the reservoir in time, the effectiveness of the brakes will seriously decrease;
Over time, small cracks appear on the brake hoses, which are not so easy to notice.
- decrease in fluid level due to a large leak. In addition to hidden leaks, obvious leaks can always occur: one of the brake hoses can suddenly break due to both enormous internal pressure and external mechanical damage. Or the gasket in one of the working cylinders will become unusable, and the liquid will begin to escape through the resulting hole. This problem has only one advantage: it is easy to notice. If the driver, approaching the car, sees a puddle under one of the wheels, then it’s time to call a tow truck: you can’t drive such a car anywhere.
If there is a large brake fluid leak, you should not drive the car.
One wheel does not brake
Another typical problem with the VAZ 2106 brakes is when one of the wheels refuses to brake along with the others. Here are the reasons for this phenomenon:
- If one of the front wheels does not brake, then the reason is most likely in the working cylinders of this wheel. It is likely that they are stuck in the closed position. So they cannot move apart and press the pads against the brake disc. The cause of cylinder jamming can be either dirt or ordinary rust. The problem can be solved by cleaning or completely replacing the device;
- The lack of braking on one of the front wheels may also be due to complete wear of the brake pads. This option is most likely when the driver uses fake pads, the protective coating of which does not contain soft metal. Manufacturers of counterfeits usually save on copper and other soft metals, and use ordinary iron filings as a filler in the pads. The protective coating of the pad, made on the basis of such sawdust, quickly collapses. Along the way, it also destroys the surface of the brake disc, covering it with potholes and scratches. Sooner or later there comes a time when the wheel simply stops braking;
Uneven wear of brake pads leads to a severe decrease in braking efficiency
- lack of braking on one of the rear wheels. This is usually the result of a failure of the cylinder that spreads the C-shaped shoes in contact with the inner surface of the brake drum. This may also be due to a break in the spring that returns the pads to their original position. This may seem paradoxical, but it is a fact: if the pads do not return to the cylinder after the brakes are applied, they begin to dangle and constantly touch the inner wall of the brake drum. This leads to the destruction of their protective surface. If they wear out completely, then at the most critical moment the wheel may not brake, or the braking will be very unreliable.
Disassembly and assembly of the front brake
- Disconnect tube 5 and remove dust caps 2 from the cylinders.
- Then, pumping a stream of compressed air through the brake fluid inlet, push the pistons 1 out of the cylinders on the caliper 4 and remove the O-rings 3 from the cylinders.
Assemble the front brake in the reverse order of disassembly. Lubricate the sealing rings, pistons and cylinder mirror with brake fluid during assembly.
After installation, restore the brake fluid level and bleed the hydraulic drive system.
How to check the condition of the fluid?
Diagnosis of TG is performed in the following ways:
- Visual. Unscrew the cap of the expansion tank and carefully examine the contents. The color should correspond to the type of liquid poured (transparent yellow or reddish). If you notice cloudy sediment or floating black particles, the material should be changed.
- Using special test strips.
- Electronic device - tester. It is not advisable for an ordinary car enthusiast to buy such a device; such a check is carried out by masters of service stations.
Litmus test strips of the BG9100 type are sold freely and allow you to evaluate the age and degree of contamination of the working environment by the content of tiny copper particles that penetrate into the fluid from contact with system parts. Diagnostics is carried out according to the instructions:
- Remove the indicator strip from the packaging, unscrew and remove the cap of the expansion tank.
- Immerse the litmus in the container and close the stopper.
- After 30–60 seconds, remove the strip and compare it with the samples drawn on the packaging. After reading the description for the colored marker, it’s easy to figure out when it’s time to change the brake fluid.
How to replace the front brake pads on a VAZ 2107 yourself
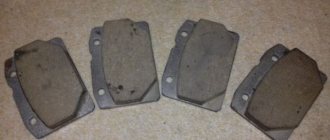
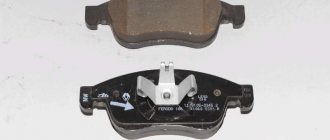
Domestic cars with rear-wheel drive (including the VAZ 2107) are equipped with a disc brake system in the front and a drum brake in the rear. Thus, the design of brake pads differs significantly in manufacturing design.
If you look at the car's passport, you can determine that there are 4 pads in front with the code 2101-3501089. Four pads with the code 2101-3502090-01 are also responsible for braking the rear wheels. Therefore, the process of replacing these components is significantly different, as is the principle of operation of the mechanisms on the Zhiguli 2107.
How often should the pads be changed?
The need to replace this part on a VAZ 2107 depends on a large number of factors, including:
- regularity of maintenance;
- general condition of the brake mechanisms and the system as a whole;
- driving style;
- manufacturer, etc.
These criteria are quite sufficient. In addition to this, you can find out about the need to replace the pads by the behavior of the brake system. For example, if during a stop, extraneous sounds are observed - grinding, creaking, and so on. Does it require significant force to slow down? It's time to worry about buying new pads.
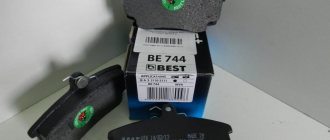
If the machine is equipped with low-quality parts, wear will be quite rapid. Pads from Ferodo, Nippon, ATE - recognized quality and durability.
Using reliable products, replacement of this part will be required once every 25 thousand km.
It is important to note that installing the right or left block separately is strictly prohibited. These works are performed in pairs on each axis.
What tools will be needed to carry out the work?
To perform the replacement you will need:
- A jack and handy stops to prevent the car from rolling.
- 2 sets of new pads.
- Grease, WD-40 or any other rust softener.
- Ruler.
- Phillips and flat head screwdriver.
- Hammer with drift.
- Pliers.
- Needle nose pliers.
- Keys for removing wheels.
- Rags.
Step-by-step process for replacing brake pads on a VAZ 2107
After preparing all the tools, first measure the fluid level in the corresponding reservoir. The engine must be turned off. If the indicator is exceeded from the maximum, select some of the fluid so that nothing subsequently gets on the brake disc.
Raise the handbrake and place chocks under the wheels to prevent the car from rolling. Only now can you lift the car using a jack. Remove one wheel and clean the entire mechanism responsible for braking using a rag. If rust is visible, apply WD-40 for easy removal of the guides.
Unsplit the guides with thin-nose pliers. Place a drift in a convenient position and carefully knock out the guides (not completely) to the extent that the brake pads are freed.
Remove the pressure springs from the pads. Now take pliers and use them to press the pistons into the cylinders. Once completed, you can remove the brake pad from the mechanism.
After dismantling the part, carry out an analytical inspection - determine the degree of production; if everything is normal, replacing it is a waste of time. The part can still continue to work out its service life, and the malfunction itself lies in a completely different functional unit of the car. If you determine the presence of wear, prepare a new pad for installation.
Take some grease and apply it to the guides. Be especially careful - the product should not come into contact with other functional components of the brake system.
To successfully install a new brake pad, all steps are performed in reverse order:
- Install the block.
- Install the springs.
- Reinstall the guides to secure the pad.
- Use thin-nose pliers to tighten the guides.
- Check that all mechanisms are secure, after which you can install the wheel.
- Lower the jack and remove the supports.
Once the procedure is complete, repeat the same with the other front wheel.
Once the pads are installed, start bleeding the brakes. To do this, simply press the corresponding pedal sharply several times. Then check the brake fluid level in the reservoir. If the level is lower than required, add the missing amount.
As you learned from this article, in order to replace the front brake pads on a domestic car, you do not need to have any special knowledge. Having the necessary tools, as well as some care, will allow you to complete this type of repair work quickly and efficiently. If you do not want to frequently replace this part, select high-quality products (Ferodo, Nippon, ATE). The service life of such pads is noticeably higher than that of cheap analogues with a service life of up to 10 thousand km or less.
If you feel that you do not have enough experience to perform this work, contact a private workshop where a specialist will complete the work in a short time.
What tools will be needed to carry out the work?
To perform the replacement you will need:
- A jack and handy stops to prevent the car from rolling.
- 2 sets of new pads.
- Grease, WD-40 or any other rust softener.
- Ruler.
- Phillips and flat head screwdriver.
- Hammer with drift.
- Pliers.
- Needle nose pliers.
- Keys for removing wheels.
- Rags.
Replacement of rear pads on VAZ 2101-2107 (CLASSICS) (Lada).
in the video I make the replacement
rear
pads for VAZ 2107
. By analogy, it changes to VAZ 2101,2102,2103,2104,2105,2106.
How to replace the front brake pads of a VAZ.
Replacement
front
brake pads
VAZ
cars , nuances when
replacing
.... VKontakte groups for remo...
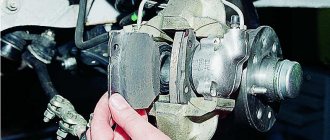
Front brake device for VAZ 2107
1 — fitting for bleeding the front brake drive; 2 — connecting tube of working cylinders; 3 — brake pad wear indicator wire; 4 — wheel cylinder piston; 5 — wheel cylinder clamp; 6 — brake pad lining; 7 - sealing ring; 8 — dust cap; 9 — pins for securing the pads; 10 — bolt securing the caliper to the bracket; 11 — steering knuckle; 12 — caliper mounting bracket; 13 — caliper; 14 — protective casing; 15 — cotter pin; 16 — pad pressure spring; 17 — brake pads; 18 — wheel cylinder; 19 — brake disc.
- Having disconnected the wires of the 3 front pad wear indicators from the plug connections of the wires, remove the cotter pins 15, and then the pins 9 with the springs, remove the springs 16 and the brake pads 17. Mark the pads so that during reassembly you can install them in their original places.
- Having straightened the locking plates, unscrew the two bolts 10 that secure the caliper to the bracket, and remove the caliper.
NOTE! It is possible to remove the front brake (without brake disc) complete with brake pads. In this case, it is enough to disconnect the plug connections of the brake pad wear indicator wires, disconnect the caliper hose and unscrew the caliper mounting bolts 10.
Installing front brakes
Installation of the front brake caliper is carried out in the reverse order of removal.
After installation, restore the brake fluid level in the reservoir and bleed the system to remove air.
Braking system VAZ 2107. Description
“Seven” has two brake systems: service and parking. The first is designed to reduce the speed of movement and stop, the second is to hold the car while parking (stopping).
The peculiarity of the VAZ 2107 brake system is simplicity and reliability. Complex electronic components (anti-lock braking system, stabilization and brake force redistribution systems are absent), which simplifies independent repair and maintenance of the brake system.
The VAZ 2107 brake system diagram consists of two elements:
- A brake mechanism that directly implements the braking function.
- Brake actuator that controls the brake mechanism.
The VAZ 2107 uses compression disk (front) and expansion drum (rear) brake mechanisms based on friction force.
The hydraulic drive of the VAZ 2107 brake mechanism is based on the transmission of force from the brake pedal to the brake mechanisms through brake fluid. Drive includes:
- The brake pedal controls the brake system.
- Vacuum booster that creates additional force when pressing the pedal.
- The master brake cylinder provides brake fluid pressure in the system.
- Expansion tank for brake fluid.
- Working cylinders that transmit force to the brake mechanisms.
- Fluid pressure regulator in the rear brake circuit, changing the force in accordance with the vehicle load.
- Hoses and lines that carry brake fluid throughout the system.
To increase the reliability of the system, it includes two independent brake drive circuits - rear and front. If one circuit breaks down, the other can perform its functions.
What is needed to replace brake pads
To change the brake pads of a VAZ 2107, you will need the following tools and accessories:
- jack;
- wheel wrench;
- set of wrenches;
- hammer;
- bit or thin screwdriver;
- metal brush;
- rag (rags);
- a powerful flat-head screwdriver or pry bar;
- pliers;
- screwdriver;
- WD-40;
- new pads.
Important: VAZ 2107 pads must be changed only as a set: both left and right at the same time.
The front brakes of the “seven” are disc type, the rear brakes are drum. Accordingly, the design of the pads and the procedure for replacing them are different.
When should you change rear pads?
As mentioned above, if you hear a squeaking sound from the rear of the car when braking, then it’s time to check the rear brakes. This is the first sign that the pads need to be replaced. In addition, their resource does not exceed 40-50 thousand km, knowing the quality of spare parts, it is even less.
After opening the drum and visual inspection, if the thickness of the friction lining is less than 2-1.5 mm, we change the pads. It may be that the thickness is still sufficient, but chips are found on the working surface or the material has delaminated. There were times when it simply fell into the drum and there was nothing to slow it down. At the same time, a strong metallic grinding sound was transmitted into the cabin when the brake was pressed.
Rear brake pads and their types
Brake pads are the most important element of the braking system, ensuring the process of slowing down and stopping a vehicle. Pads are divided into two types:
- on the front wheels (disc)
- on the rear wheels (braking occurs using linings adjacent to the drum)
It is the latter type that we are talking about today.
The principle of operation of the pads is that when the driver presses the brake pedal, the impulse from it is transmitted to the brake system, to the pads.
Fitting tightly to the drum (this is the case with the rear units, and the disc, if we talk about the front units), the pads act as a barrier that prevents the wheel from spinning, as a result of which the car stops. If the pads fail, this has the most negative impact on the operation of the braking system, which can lead to serious consequences, such as loss of control of the car while on the road and an accident. That is why it is so important to keep under control the condition of the vehicle’s brake system components, as one of the most important systems responsible for traffic safety.
You can determine that the components are out of order by a characteristic squeaking noise, which intensifies as the car accelerates.
There are two ways to solve this problem:
- Contact a mechanic
- Fix the node defect yourself.
But contacting a specialist can cost a pretty penny, because, to hide it, our country has now taken the path of market relations, where man is a wolf to man, which is not good, and sometimes in auto repair shops they also increase the price for the simplest work.
Doing this work yourself will not be so difficult, it is only important to be patient, have the necessary equipment, read the instructions in detail, and also purchase new rear pads.
There is a large selection of these parts on the car market. But most often motorists give their preference to three options:
- Pilenga, of high quality and good service life, the price per part is 580-600 rubles.
- Allied Nippo, cost about 1000 rubles.
- Tornado - sold at a price of 950-1000 rubles.
The pads have been purchased and a free day has been carved out for work. Here we go?
How much brake fluid do you need to change?
Maintaining the required level of brake fluid is necessary for the proper operation of the vehicle's braking system. How much is needed can always be found in the service book, but often car owners are not used to looking into it, but act empirically or look for the answer on the Internet. It is these users that we will try to help figure out the question of how much brake fluid is needed for replacement and which one should be poured.
Brake fluid is the working fluid of the brake system, with its help the force created in the master cylinder is transmitted to the wheel pairs.
If the brake fluid level is below the minimum mark (by the way, this will be indicated by the corresponding icon on the instrument panel - a red circle with waves inside), then you need to top it up. It also doesn’t hurt to check the brake system, since a decrease in the brake fluid level may indicate a malfunction or wear of the master cylinder gaskets. As a rule, the brake system of a passenger car contains from 0.55 to 1.0 liters of brake fluid. And its specification can very often be indicated on the body of the expansion tank or its cover.
When checking, do not forget to pay attention to the color of the liquid. The new TZh is transparent with a yellowish tint
During operation, it changes its color and becomes dark, this is mainly due to the accumulation of various impurities. If the fluid has darkened, this may mean that a complete replacement is necessary and simple topping up is not enough. Experts recommend replacing brake fluid approximately every 2-3 years; this is the optimal interval in accordance with hygroscopicity and exposure to temperature loads. For the brake mechanisms to function properly, the fluid must have a number of properties and also meet a certain standard.
Old and new brake fluid
General job description and tools
You will need:
- repair pit (can be done on a flat area, driving the front wheel onto a hill. But this greatly complicates the work)
- jack,
- balloon wrench (balloon),
- garage tools: pry bar, wrenches, screwdrivers, etc.
General procedure:
- We hang the front of the car with a jack.
- We remove the wheel.
- We turn the steering wheel all the way so that it is convenient to work.
- We find out the scope of work, check the caliper, brake disc, integrity and connections of hoses and pipelines.
- Remove the brake hose from the mount.
- Use a balloon to press out the brake piston.
- The level of brake fluid in the expansion tank will immediately rise.
- We remove the fasteners from the bracket on the caliper and remove the bracket itself.
- We replace the pads.
- We assemble the entire assembly in reverse order.
We present the entire process of replacing brake pads using the example of a VAZ classic car.
Removing and replacing the front brake pads of a VAZ 2107 with your own hands
Change brake pads at least every 30 thousand km. Otherwise, if there is severe wear, you risk losing brake power. Do not let the pads become too squealing or grinding. In this article, we will look at instructions on how to remove and replace the front brake pads of a VAZ 2107 with your own hands.
You will need: new brake pads, hammer, pliers, penetrating lube, flathead screwdriver, guide tool, jack or lift.
Jack up the front of the car and remove the wheel. Lubricate the guides.
Using pliers, remove the clamps from the guides.
Use a screwdriver to pry up the locking spring behind the pads.
We knock out the guides with a hammer and a punch.
We do the same on the other side.
We take out the old pads.
Use a wrench to press in the brake piston.
We clean the space and install new front brake pads of the VAZ 2107. We assemble in the reverse order and repeat with the other wheel. We change the pads strictly in pairs on the front wheels. Upon completion of work, bleed the brake system and add coolant if necessary.
Bottom line
The work is completed. For the first time, it is better to put detailed instructions in front of your eyes, so as not to get confused and make a mistake, it would be good to also watch video materials on installing brake pads.
The second time, this work will be performed automatically and will take no more than half an hour. The main thing is not to delay replacement: brake pads are a serious matter that cannot be tolerated, because they ensure the safety of the vehicle.
We wish you good luck and good mood!
VAZ2104 Brake pads are among the parts most susceptible to wear. Since they, along with other components of the brake system, are responsible for the safety of the car, it is necessary to pay attention to any signs indicating their wear in order to promptly replace the brake pads on the VAZ 2114 .
With a properly configured brake system, the pads wear evenly on both sides. In this case, their replacement is usually required every 8-12 thousand kilometers. However, these periods can vary significantly in the case of aggressive driving, with sudden changes in air temperature, due to poor quality roads, poor quality of installed pads. Also, the reasons for the rapid failure of these spare parts are the “wedging” of the pads in the caliper, which occurs due to accumulated dirt, corrosion build-up, and oxidation of the caliper guides.
Preparation
The work is best done on a flat, paved area - most typical garages will be a bit cramped. Find a suitable support in advance - hanging a car on a standard jack is dangerous, especially considering the state of the jacking sockets on cars, the youngest of which is almost ten years old. Also for work you will need:
- narrow nose pliers;
- a thin drift (at worst - a piece of 4 mm electrode or a thick nail);
- metal brush;
- powerful flat screwdriver;
- rubber bulb or large syringe.
First, you need to pump out the old brake fluid from the reservoir - when the working pistons are recessed, it can overflow, and replacing it with fresh one would be quite reasonable. It is worth placing stops under the wheels and, having removed the tightened bolts, hang the car, place a support under the threshold and release it down.
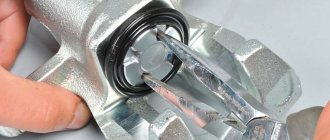
Front brake caliper parts
1 - piston; 2 — dust cap; 3 - sealing ring; 4 — caliper with cylinders; 5 — connecting tube of wheel cylinders; 6 — air release fitting; 7 — pad pressure springs; 8 — brake pad mounting pins; 9 — cotter pins; 10 — springs; 11 — lining wear indicator wire; 12 — brake pads.
How often should the pads be changed?
The need to replace this part on a VAZ 2107 depends on a large number of factors, including:
- regularity of maintenance;
- general condition of the brake mechanisms and the system as a whole;
- driving style;
- manufacturer, etc.
These criteria are quite sufficient. In addition to this, you can find out about the need to replace the pads by the behavior of the brake system. For example, if during a stop, extraneous sounds are observed - grinding, creaking, and so on. Does it require significant force to slow down? It's time to worry about buying new pads.
If the machine is equipped with low-quality parts, wear will be quite rapid. Pads from Ferodo, Nippon, ATE - recognized quality and durability.
Using reliable products, replacement of this part will be required once every 25 thousand km.
It is important to note that installing the right or left block separately is strictly prohibited. These works are performed in pairs on each axis.
What if without an assistant?
You can bleed the brakes on a VAZ-2107 without an assistant, but to do this you will have to slightly modify the design of the expansion tank cap. You need to buy a new cover into which you install the fitting from a regular camera. Now you need to create pressure in the system - this can be done using a camera or tubeless wheel. Inflate using a compressor and do the following:
- Fill the expansion tank with brake fluid.
- Install a cover with a fitting on it.
- Connect the fitting on the cover and the chamber using a tube.
- In this case, there is no need to install spool valves inside - they will be superfluous.
- Carry out repairs following the brake bleeding sequence described above.
Step by step replacement
1. Remove the wheel mounting bolts and place them on a jack.
2. Unscrew the bolts and dismantle the wheel.
3. Remove the stopper pins that guide the pads. We take it out using pliers by pulling it towards ourselves.
4. Remove the 2 brackets that press down on the pads.
5. Use pliers to remove the guide pins. We take it out so that the pads are free, there is no need to remove them completely.
6. Using plumbing pliers, press the brake pistons through the old pads on both sides.
7. Remove the used pads.
8. Install the pads.
9. We install the pins of the pads and secure them with stoppers. If the hole for installing the stopper is missing, use pliers to rotate the pin.
10. We install the brackets that press down the pads. Don't forget the pads are changed on the same axis.
Cost of brake pads for VAZ 2107
The price of high-quality pads for a classic VAZ, of course, depends on the lining materials used, technological features and manufacturer.
| Front pads for VAZ 2107 | |||||
| Brand | TIIR (original) | Allied Nippon | AND THOSE | Ferodo | Finwhale |
| vendor code | 2101-3501090 | ADB 0281 | 13.0460-2966.2 | FDB 96 | V 211 |
| Price | 260 rub. | 340 rub. | 700 rub. | 430 rub. | 370 rub. |
| Rear pads for VAZ 2107 | |||
| Brand | VAZ (original) | TSN | ATE |
| vendor code | 2101-3502090 | TSN 2.3.1 | 03.0137-0232.2 |
| Price | 750 rub. | 500 rub. | 1240 rub. |
It should also be emphasized that there are now a lot of fake brake pads for such a popular car. Therefore, choose only trusted manufacturers and pay attention to the packaging, configuration and labeling on the products. For example, the Ferodo brand uses tape with red or blue stripes to seal a box of pads.
Replacing the front pads of a VAZ 2107
To replace the pads you must perform the following steps:
- Jack up the car and remove the wheel.
- Treat the pad guide pins with WD-40.
- Remove the cotter pins from the fingers using pliers.
- Using a hammer and a bit (or a thin screwdriver), knock out the pins and remove the springs that press the pads.
- Separate the pads using a strong screwdriver or pry bar.
- Remove the old front pads of the VAZ 2107.
- Check the thickness and condition of the brake disc. If it is deformed or less than 9mm thick, replace it.
- Press in the brake cylinder pistons completely. This can be done by inserting the old pads into place and spreading them all the way using a pry bar.
- Insert new front brake pads on the VAZ 2107.
- Insert the pins of the front pads and secure them with cotter pins.
- Install the pad springs.
- Press the brake pedal several times so that the pistons come out of the brake cylinders and compress the pads.
- Install the wheel and lower the jack.
After replacing the VAZ 2107 pads on one wheel, you need to replace them on the second.
At the end of the operation, you should check the brake fluid level and add it if necessary.
How to bleed the clutch master cylinder
If you know how to bleed the brakes of a VAZ 2107, then bleeding the clutch will not be difficult for you either.
We fill the reservoir with brake fluid, put a hose on the fitting located on the clutch slave cylinder and lower it into the bottle, pouring a little liquid into it, so you can clearly see how the air bubbles will come out.
This whole procedure is done by two people, one presses the clutch pedal, the other unscrews and tightens the fitting on command until the release of air stops.
We press the pedal five, six times and keep the pedal pressed, the assistant unscrews the fitting on the working clutch and the liquid with air goes into the bottle, after which he tightens the fitting.
We release the pedal and repeat the process described above several times until all the air has left the system, while not forgetting to add fluid to the tank. That's it, have a good trip and no breakdowns.
Replacing rear brake pads on VAZ 2101-2107 cars
Reasons why you should start replacing the rear brake pads on VAZ-2101, VAZ-2104, VAZ-2105, VAZ-2106, VAZ-2107, Classic cars:
- The thickness of the rear brake pads is less than 2mm
- The lining of one of the pads has come off the metal surface (brake pads are always replaced as a set).
- oil or brake fluid getting on the linings.
List of tools and choice of work location for replacing rear brake pads on VAZ-2101-2107, Classic cars. Everything is simple here. It is better to carry out the work on a viewing hole or a lift, for two reasons - convenient access to the parking brake adjustment mechanism and the ability to quickly remove a stuck rear brake drum. An arsenal of necessary tools: a hammer, pliers, socket wrenches for 12, 13 and 7. Also, a special hook for removing and installing the tension springs of the rear brake pads will be useful. You can make such a device yourself or buy its analogue at the car market. Yes, you can do without it, using a screwdriver or pliers, but it will waste much more nerves.
And now the actual process of replacing the rear brake pads:
- After installing the car on the inspection hole, first unscrew the nut for adjusting the tension of the handbrake cable.
2. Loosen the wheel bolts and jack up the car. Unscrew the bolts and remove the wheel. We tap the guide bolts with a hammer and use a 12 wrench (in some cases a 7) or pliers to unscrew them.
- As a rule, the brake drum does not want to be removed, since it manages to become thoroughly stuck to the axle shaft over a certain period of time. There are two ways to solve the problem of dismantling the drum. The first way is to spray the brake drum with penetrating lubricant and, using two M8 bolts, try to tear the drum off the axle shaft. Often this is a long and ineffective way. The second method is to take a wooden block and a hammer and decisively and quickly knock down the brake drum.
- After removing the drum, the first thing we pay attention to is the position of the parking brake lever. If you have completely unscrewed the handbrake cable adjustment nut, and the lever is not near the block, then the handbrake cable is bitten and must be replaced with a new one. If you leave it as it is, then after installing new pads, it will be problematic to tighten the drum, and the parking brake will not work.
- Next, remove the upper tension spring. We press on the cup of the support post, scroll it until the slot in the cup matches the shank and remove the two cups and springs from the post. After this, all that remains is to remove the tail of the parking brake cable from the lever. We clean the support disk from dirt and rust. We check the condition of the brake cylinder; if there are signs of brake fluid leakage, the cylinder should be replaced with a new one. The same must be done if the pistons of the brake cylinder have become sour and have lost mobility.
How to remove the pads
In order to remove defective rear pads from a VAZ-2110, you need to prepare the following arsenal of a car mechanic:
- a jack is needed to raise the rear of the car
- key 12, it will become the main tool in our business
- pliers are useful for removing parts
- hammer, yes, you will have to make physical efforts to knock out old parts
- a screwdriver, a good helper in removing old pads
- the block is an excellent stand.
Work begins
- The very first thing you need to do is put the car on a jack.
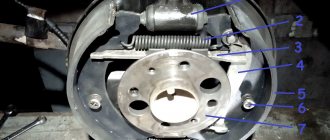
- Remove the rear wheel and disc. We can see the drum ( 6 ), which is attached to the entire structure with two bolts (cotter pins ( 7 )). These need to be removed. Here you will need a 12mm wrench (you can also use a 12mm wrench
 , it is just suitable for working with tens pads.
 - Remove the brake drum ( 6 ). This is probably the most difficult thing in the process of replacing the rear pads, because over the years of the car’s service the drum “sticks” almost tightly, and in order to remove it without damaging it, you will have to work hard. A hammer will help here by tapping the drum, but before doing this, it is important to place a previously prepared block to prevent deformation of the drum, otherwise it won’t take long and break into pieces, which we, of course, don’t need.
- Carefully and slowly remove the spring securing the rear pads of the car. The spring is removed using pliers or a simple screwdriver( 9).
- Now you should disconnect the spring ( 8 ) fixing the block on the shield ( 1 ).
- Loosen the upper spring ( 3 ), which secures the unit. In order to weaken the spring, you need to turn the block a little to the side, about 50-60 degrees .
- To remove the unit, carefully remove the part from the support and brake cylinder ( 2 )). To do this, you need to grab the block ( 4 ), which is not connected to the handbrake (a sorcerer in common parlance). We pull the part as if we are trying to move the pads apart from each other. You will have to loosen the part several times until it is disconnected and pulled out.
- In order to remove the second block, we disconnect the handbrake rod (sorcerer) from the cable. Now the block is easy to pull out
The process of removing the units is completed, now you can begin replacing the old pads with new ones.
Completion
Having installed the wheels, the fastening bolts are pulled by hand or “with a jerk” - spinning the wheel so that it reaches the bolt with its inertia. The final tightening is carried out when the car is released on the wheels, while the normal tightening torque is no more than 120 Newton meters; greater force will not improve the reliability of the fastening, but will only wear out the threads in the hubs more intensively.
When the working pistons are retracted, liquid will again appear in the reservoir of the main brake cylinder. Pump it out again and fill it with fresh water until about 0, then move the pistons to the working position by pressing the brake pedal until its movement returns to normal. Refill the brake fluid to the upper mark, and the car is ready for further use.
The life and health of the driver and passengers depend on the condition of the braking system. Owners of “sevens” often independently monitor the condition and replace the brake pads of the car. This is a simple operation that does not require special tools or high qualifications. It is enough to have basic plumbing skills and know how to change brake pads on a VAZ 2107.
Sources
- https://semerkavaz.ru/tormoznaya-sistema/zamena-kolodok-na-vaz-2107/
- https://FokSevmash.ru/elektronika/tormoznye-kolodki-vaz-2107.html
- https://bumper.guru/klassicheskie-modeli-vaz/tormoza/zamena-perednih-tormoznyh-kolodok-na-vaz-2107.html
- https://drive2.su/pod-kapotom/zamena-perednix-kolodok-vaz-2107
- https://arhexport.ru/obsluzhivanie/zamena-perednih-kolodok-na-vaz-2107-2105-svoimi-rukami.html
- https://ovaze.ru/81-perednie-tormoza.html
- https://DamskyKlub.ru/obsluzhivanie-avto/zamena-perednix-tormoznyx-kolodok-klassika.html
- https://kalina-2.ru/otechestvennie-avto/kak-menjat-tormoznye-kolodki-na-vaz-2107
[collapse]
Replacement
To replace the TJ yourself, you will need a certain set of tools and materials. This set includes:
- Brake fluid - 500 millimeters;
- A set of keys;
- Screwdriver Set;
- Transparent flexible hose;
- Container for draining old fluid;
- Dry rags for cleaning surfaces.
To work, you will definitely need the help of one more person, so when pumping, one should be inside the car, and the other outside.
Let's start the procedure.
- Unscrew the cap on the master cylinder reservoir and place it on a prepared surface. The cover is combined with the float of the fuel oil level sensor, so be careful, because a toxic and dangerous substance will remain on it.
- Unlock the rear brakes using a screwdriver. It is simply inserted between the plate and the piston. Ready.
Inserted a screwdriver
- Clean the right rear brake release valve of any accumulated dirt and dust, then remove the rubber cap that covers the valve.
- Place a flexible transparent hose onto the valve fitting and place its other end in a container to drain the liquid.
- Approximately once every two seconds, press the gas pedal all the way four times in succession. When you press the fifth time, lock the pedal in the clamped position.
- Unscrew the valve at least half a turn. As the brake fluid drains, the pedal will gradually begin to sink.
- As soon as the fluid flow stops, close the valve.
- Simultaneously with the procedure, do not forget to monitor the level of fuel fluid in the tank.
- As you pump out the old substance, add a little new one. This will avoid the formation of air locks inside the system.
- Add fresh fuel fluid into the tank until all the old fluid comes out and new clean substance begins to flow through the hose into the container.
- Having completed the work on the rear right wheel, go to the front left and perform a similar procedure. Due to this movement pattern, you will be able to completely get rid of the old fuel oil in one circuit.
- By analogy, remove the fuel fluid from the second circuit in the same sequence. Having completed draining, close the valves with caps and add new fuel fluid to the required level.
Accuracy comes first After completing the replacement procedure, you should definitely bleed the brakes. It is strictly not recommended to go out on the road without it, since the brakes may simply not work.
Why bleed the brakes?
Bleeding a vehicle is a preventive measure aimed at ensuring stable operation of the brakes. The point is to remove foreign liquid and excess air.
Air and excess liquid can appear in the system for various reasons. Namely:
- The hoses are damaged and their integrity is compromised;
- Low-quality brake substance is used;
- System elements were replaced or brake fluid was updated;
- The seal of the vehicle is broken.
Any braking system, due to its design, can spontaneously accumulate moisture inside itself. Therefore, pumping cannot be ignored under any circumstances.