Serial production of the VAZ 2114 lasted from 2003 to 2013; the car continued the line of VAZ “nines” and became its restyled version. The five-door hatchback received updated front body lines, new headlights, and moldings.
Structurally, the Lada Samara of all years of production was built on the same platform as the VAZ 2109; the model received universal engines, an all-metal body with attachments. Considering that the car has been out of production for almost seven years, replacing VAZ 2114 thresholds is one of the most common types of body repairs today.
Step-by-step instructions for replacing thresholds on a VAZ 2114
Serial production of the VAZ 2114 lasted from 2003 to 2013; the car continued the line of VAZ “nines” and became its restyled version. The five-door hatchback received updated front body lines, new headlights, and moldings.
Structurally, the Lada Samara of all years of production was built on the same platform as the VAZ 2109; the model received universal engines, an all-metal body with attachments. Considering that the car has been out of production for almost seven years, replacing VAZ 2114 thresholds is one of the most common types of body repairs today.
Preparing for replacement
For the entire VAZ family, thresholds are non-removable body elements; in 80% of cases, repairing an element involves completely cutting or cutting out the part. Overcooking requires preparation
- The car is installed on a flat surface.
- The negative terminal is removed from the battery. In some cases, the battery is removed.
- The wiring from the inside of the doors from the electric windows is dismantled, all sensors are removed.
- The seats are removed from the interior, the inner trim of the pillars and the floor covering are removed.
- Doors are dismantled.
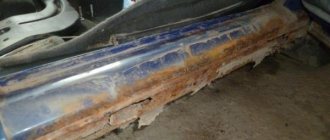
When planning to repair only the threshold, drivers have to partially change the bottom, install new jacks, and strengthen the central pillar. The metal for the body of the VAZ 2114, as well as for other models in the Lada Samara line, did not undergo anti-corrosion galvanizing.
Rolled steel was puttied, primed and painted. The inner part of the bottom and the box were not treated with anticorrosive; the first layers of rust appear on the internal parts of the body in the second year of operation. If the threshold is being repaired for the first time, and the “youngest” VAZ 2114 model is 6 years old, we can confidently say that the owner will find completely rotten metal under the bottom trim.
To prevent the geometry from becoming distorted during repairs and the central pillar from falling, it is recommended to install spacers or weld a channel.
Do-it-yourself replacement of VAZ 2114 thresholds: step-by-step instructions
If you are dismantling the thresholds, as well as replacing the bottom of a VAZ 2114 with your own hands, it is recommended to drive the car into an inspection hole or turn the car on its side before starting work. If only the threshold needs to be replaced, it is enough to place the car on a flat surface. To work you will need the following tools and materials:
- Bulgarian;
- a sharp chisel with a wide blade;
- hammer;
- set of thresholds with amplifier;
- automotive putty;
- primer;
- rubber spatula;
- sandpaper R-80;
- enamel for paintwork.
In car repair shops, welding machines are used for cutting: the metal is not cut, but welded along the old seams. This allows you to keep the old center pillar amplifier intact and does not damage the metal of the underbody. If the force plate under the strut needs to be replaced, the entire assembly is boiled down.
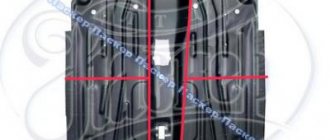
If you need to replace it yourself, the part is often cut off with a grinder or knocked out with a chisel. It is necessary to attach a new part to the old threshold and draw a dimension line in order to see the perimeter of the future cutting. The cutting is carried out from the central pillar to the left and to the right. Dismantling process:
- Remove old paint from the part using a grinder.
- Drill out weld points.
- Cut off the outer part.
- Check the seal and connector: if the metal is rotten, cut it off with a grinder.
- Clean the body from rust and sand it down to bare metal.
- Try on a new element, adjust it, cut off the excess edge.
- Mark the location for spot welding. Clear.
Preparation of the body for welding work has been completed. Before installation, the transport primer is removed from the parts.
Coating the bottom, arches, sills of VAZ 2114 + about fender liners (Anger and suffering post)
Hi all!
Following an already established tradition, I have accumulated a lot of interesting information, which I will now share with you, because I can’t fit everything in this) so as not to clutter up the blog with empty entries, and I think it will be more interesting for you, otherwise you’ll read “replaced the light bulb, nothing else like that, I forgot the photo, so here’s a cat from the internet, but if you subscribe it will be interesting” I’m already tired, there were so many photos (I know you like to look at photos and not read) that I had to cram 3-5 photos into 1 picture, because it didn’t fit the drive limit is “20 photos per entry”, so excuse my mega painting skills, I hope everything will be visible well enough (I didn’t think that I would divide it into 2 entries, that would be enough) and, as always, I will write a lot of text in my repertoire , because I like to describe everything down to the smallest detail, with emotions, I shake hands with those who will master all this and read it)) well, let's go: The Bottom. No DNOOO. There is no better DNISH E, how much I have already planned to anti-corrosion it. I’ve probably been hatching this plan in every detail for a year. Those who follow the BZ (although I don’t think there are any) know that while the car was being repaired after the accident there and they promised to miss the mark, but shush, they could have continued to butt heads, because everyone referred to the lack of material, but a) I didn’t want to adapt to someone and wait miracle b) I don’t really trust these oil-sinks, they’ll smear them from the bullshit and drive to their health c) I really wanted to do something significant with the car myself, to repay it for saving it, well, you know)) In general, I decided to smear it myself . Plus, another thing prompted me to do this, I was dismantling something like a shed at my dacha and found a hefty barrel, I opened it, and there was half a barrel of bitumen mastic, yes, not automobile, but ordinary, which is used to cover roofs, but a freebie (oh and I regretted this freebie), in general, without hesitation, I bought everything necessary for coating (solvent brushes, etc.), and began this procession, borrowed 2 jacks, decided to “halve” the work, first one side, then the other, it’s hot We had a good day, so it was a good time for such work, and it dries better, and you can sunbathe along the way)
I think you can see from the photo that they lifted one side, removed the wheels, of course the fender liners for access to the arches, and the sills too, because I decided to smear them thoroughly, the main thing is to put the screws aside, because this is a VAZ, the left fender liner may not be particularly suitable for the right hehe )) After which I thoroughly wash everything. Karcher is preferable, but I was too lazy to take it out and turn it on, so I washed it the old fashioned way, a cloth, a bucket, a sponge, heh. In general, we wash the arches, sills, it’s better to wash the fender liners themselves, at least on the inside (which contacts the arch), and the sill covers on all sides, in general, so that everything is sterile later))
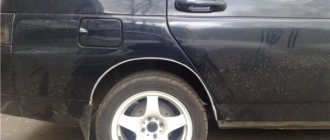
This is the condition my arches are in, about the sills I knew in advance that everything was generally perfect there, but I was really pleased with the arches, almost everywhere there is still factory anticorrosive, there is no rust or rot, even where there are holes for fender liners in the wings, only in one place on I cleaned the front left arch a bit and primed it, for my own peace of mind, and in one place there was no longer any factory anticorrosive, so there were a few small saffron milk caps, not scary, but I’m still paranoid:
Well, who says that Samaras rot almost in the first year? The car is already more than 5 years old, I know for sure that before me it was only lubricated at the factory, plus half the mileage on 1 owner (yes, a woman), who was noticeably damaged in front and it is not known how she looked after the car, but as you can see everything is good, from the moment of purchase as I might have been following this case, maybe you just need to treat the car better and not be stupidly a “rider”? and it will not rot and fail? Although there is still a pattern, the 14 of the old model were all rotten, they don’t matter anymore, there is rust, but there’s not much new, IMHO, I’ve already looked at a lot of people, both here and in person, the theory has never failed me... But I got distracted, in general, we washed everything, let it dry, then we sprayed it with zinc for prevention (1 bottle was enough for me for everything), wait 15-20 minutes, and wash it off again, degrease it with a solvent, then, also rather for myself, I sprayed it with Movil from a spray can ( 1 was also enough for all the arches, but it’s better to take 2) let it dry and began to smear.
Since this is not an automotive mastic, it is sooooo thick, I got tired of diluting it with a solvent, I can’t say the ratio, I did it by eye, the consistency would resemble the paint that you painted the fence of your grandmother at the dacha as a child, I made myself a “trough” from a 5 liter bottle, there and brushed it, coated the arches and sills quickly, took longer to clean/process the surface, i.e. Almost all the time was spent on preparatory work:
As a result, I spent 4 days on everything, on the first day one half (it took 7 hours), then the other and immediately the bottom too (I spent 16 hours in the garage here), the remaining two days I went away myself, let it dry, put everything back together and brought everything back to order). I don’t know, it’s not visible, I even missed the wings along the edge, where usually the saffron caps from the screws begin to appear, one hell of a fender liner will then cover this “fuel oil”, so I wasn’t particularly worried about the appearance. What can I say that I still managed to do it myself, it’s indescribable, but I will never forget day 2, I missed half of the car just as easily, but since this is a dirty business and I wanted to “shoot it off” in 2 days, wash myself off and forget about it too I'm going to smear the bottom, smearing the bottom is a whole separate issue, now there will be a lot of lyrics...
In general, after already 7 hours of coating the other side, hungry, sleepy, tired and well-fried in the sun, at about 8 o’clock on Friday evening I drove the car onto the overpass to coat the very bottom, solvent right next to it, it’s already twilight, I can’t see shit, this damn mastic for the roofs, TsukE began to thicken in a fraction of seconds, the solvent began to disappear in liters, all stinking of tar, dirty, in a semi-fainting state, having smeared half of the bottom, I began to comprehend the zen of existence. I forgot to say that in order to somehow escape from the mastic dripping from above, I put on a cellophane raincoat with a hood (think about how fun it is in a bag in the heat of plus 30 mmmmm) but I don’t know how everything would have happened if it weren’t for him... But I still had to get around to it, especially It’s fun to wash this tar out of your hair\ In general, I wanted to give up everything, the solvent was already flush, half the bottom was not coated, the mastic was oak, I was right on the edge, but still I smeared it, I don’t know how, but then I obviously got a new level) I probably freaked out , or a second wind, or excitement, or only weaklings give up, or maybe all at once, but... I poured the remaining solvent into the trough and let’s smear it, of course there wasn’t enough of it, it’s an ambush - it’s already half past 10 pm, the stores are closed, I I already look like a full-fledged resident of Africa, what should I do? saved by a friend who brought half a liter of solvent, which he miraculously had lying around, and while he was rolling a couple of kilometers behind him on my harness, I was sitting in a plastic bag, comprehending the meaning of life, simultaneously counting how many drops of mastic were dripping on me per minute, and was baked in my own juice. sweat, ahem, okay, I think I just need to talk it out, you’re unlikely to be interested in all this) so I poured 400 ml out of 500 hundred into the mastic, coated the second half of the bottom as best I could, then threw off this bag, crawled to the garage, a friend lowered the car himself from the overpass and drove it to the garage, because I would have ruined everything in the cabin, of course, the last 100 ml of solvent was not enough for me to wipe off, there was another 50 ml of alcohol, which was also not enough (oh how cool it is to rub your face and hands with alcohol and solvent and even in the heat, mmm, how “hot” I was)) And then I remembered a post from VK “non-standard ways to use VD” where there was one point, if there is chewing gum in your hair, then the VD will wipe it off well. And before that, a friend had also smeared his car, got his hair dirty and washed it with solvent, almost burned everything for himself, didn’t want to repeat his exploits, so there was no need, there wasn’t much to lose, plus there was complete despair and resignation... I tried VD, and oh miracle! She washed it all away so easily and naturally. Having brought himself more or less into divine form, he drove the car, took the car home, and at home, literally splashing it all over himself and washing her hair, he wiped everything off, and with such pleasure climbed into the shower... I can’t put into words how amazing it is)))) in general VD is proven safe for skin and hair) it is easily washed off with water too: D and it seems this super product can be called a man’s universal cosmetics for all occasions, Krch VD-40 is your BRO! This is what the bottom of the overpass looked like after lubrication, sorry for the quality, there was no time for that:
The next day, afraid to watch how I badly missed the bottom, I looked and was surprised, in principle everything was not bad, and where I missed it was easy to get from the side, so I took a can of auto mastic (1 kg) for some 130 rubles and at the dacha I smeared everything completely, plus I missed the front end, there is a “telly”, “crabs” and so on. Thus, in 3 very dirty days I completely coated it, along the way it dried out, at the end of the 3rd day and the entire 4th day, I collected dust so that the mastic would “have a crust” otherwise it would fall off quickly (as I was advised) when I collected enough dust and everything more or less dried up, put the fender liners back on, IMHO whoever speaks better without them, screw you! While driving without them, the car was splashed as if I had gone to an off-road in the rain to a military training ground to test the driving performance of armored personnel carriers, tanks, etc., I can imagine what it was like for the cars behind me, I hope they will forgive me and understand, don’t suffer from bullshit, they are real needed! The arguments say they are cooler without them, or because of them you die faster, this is generally nonsense, who the hell will even look if you have fender liners on your pelvis, is that a Lamba, a Merc, a Beemer? Okay, you’ll wash the car yourself if it itches so much, but what have the cars behind you done wrong? IMHO, purely my opinion, and externally, to me, the machine looks “naked” without them. There are benefits from them, they really protect, you can see everything for yourself from the photo, for example, the rear fender liners were not removed from the factory, I know this for sure, in my opinion they did their job with a bang, and so that the screws don’t rot, take stainless screws and dip them to Movil or work, and everything is super, one way or another, any car will rot, so guys, it’s good to suffer with bullshit, I don’t justify VAZ for their appearance and the way they are attached to the body, but they are of greater benefit to both you and other drivers . By the way, as you can see in the photo, where the matches are sticking out, these are places for screws, plug them when you smear, otherwise you will find horseradish later, I forgot a couple, I had to swear quite a bit while I was putting the fender liners back on.
Moral of this story (BOTTOM LINE): Don’t be a jerk and it’s better to take normal car mastic, which is very easy to apply, you don’t need to apply it, and it dries much better, it will make your life SIGNIFICANTLY easier) Stock up on VD, Movil and most importantly solvent, 2 liters or better 3 and go ahead, no one will miss you better than yourself, then you will sleep peacefully for about 2-3 years, knowing what condition your bottom is in and that it is protected, I say goodbye to you with this, I apologize for such a meticulous description and all the emotions, Let me remind you that everything that is written here is my purely personal opinion, which may not coincide with yours, I say goodbye with this, special respect to those who read everything, NOT rotten and oiled bottoms to everyone, and as it is fashionable to say here - “Kroilovo leads to Podalalov” , this is true, verified))
P.S., the next post will be more informative and interesting, info sotka))
Source
How to cook thresholds on a VAZ 2114
If the sills on a VAZ 2114 are rotten, in addition to replacing the main element, you will also have to re-weld the bottom by cutting out the old metal and installing patches. Step by step process:
- The connector or the lower part of the box is welded.
- The amplifier is installed.
- The outer part is welded by arc welding.
- Welding seams are cleaned with a grinder, primed and puttied.
- After 12 hours, anti-corrosion agents are applied to the bottom and outer part, and at the final stage, painting is carried out with auto enamel.
It is not recommended to operate the car for 24 hours until the paint has completely dried.
Square pipe instead of thresholds on a VAZ
To change the thresholds on a VAZ 2114 with your own hands, in half of the cases profile pipes are used. This method has proven itself well when replacing similar parts on classic VAZs. The profile has suitable dimensions of width and height, and the metal thickness reaches 2 mm, which ensures the reliability of the body for at least 7 years. In addition, profile pipes in 40% of cases have an additional zinc coating, which ensures the metal’s resistance to corrosion.
To work you will need:
- profile pipe 60x60x2 mm: 180 cm for one threshold, 70 cm for the cross member that will connect the spar to the part;
- profile with dimensions 40x20x2 mm: 70 cm for an additional cross member, 25 cm for jacks, if you have to reinstall the old ones;
- metal plate 15x5 cm to strengthen the part to the bottom;
- anticorrosive for the bottom - bitumen mastic 500 g;
- Bulgarian;
- electric or gas welding, 3 mm electrodes.
Experienced drivers recommend not using an inspection hole, but putting the car on its side, having first removed the battery, door, seats, and interior trim.
- Remove moldings and panels.
- Using a grinder, cut off the outer part along the top seam and bend the metal.
- Cut off the inside, remove the amplifier.
- Attach the pipe, cut off the excess part, weld plugs at the ends of the profile.
- Tack the profile to the bottom by welding at two points, front and back.
- Boil the outer part of the profile to the body, moving from the central pillar. If the body has a bend in this area, tap the pipe during welding to align the profile.
- Weld the cross members that will connect the threshold and the spar.
- Weld fasteners under the jack, weld plates to the bottom to strengthen the structure.
- Clean the weld seams with a grinder and treat with mastic.
- Paint and install decorative panels.
What may determine the cost of elements?
For the body of the Lada Sputnik, black rolled steel was used, which was not galvanized. When replacing with your own hands or in a car service center, they use factory repair kits, parts from the secondary market, or make them themselves.
With a full replacement, the price of thresholds for a VAZ 2114 will depend on several factors:
- parameters of the steel used;
- is the original amplifier used?
- where repair or replacement is carried out.
Standard parts for VAZ today are produced in the experimental workshop of AvtoVAZ (Tolyatti) and in Naberezhnye Chelny. The steel threshold comes complete with an aluminum trim. When installing on a car, parts must be additionally measured. The cost of the original repair kit is 2,600 rubles.
Repair without welding
If the car owner is not enthusiastic about the idea of overcooking the car, you can use several proven methods for repairing parts from corrosion. However, it should be understood that such repairs are only a cosmetic procedure that is used for minor corrosive wear. It will give the car a fresh look, but after 6-8 months you will need a full replacement of the part.
To repair a threshold without welding, you will need the following materials and tools:
- epoxy resin or glue;
- solvent, rust remover;
- fiberglass or fiberglass;
- aluminum powder or silver;
- sandpaper R-80;
- automotive putty;
- priming;
- paint brush, rubber spatula, roller;
- auto enamel.
Instructions on how to repair a threshold using epoxy resin and fiberglass, step by step:
- Mix epoxy resin and hardener in a glass container, add silver. Aluminum powder plays the role of internal reinforcement of the composition and prevents the glue from cracking after complete hardening.
- Clean the threshold from old paint, remove rust with a corrosion cleaner.
- Clean the surface with sandpaper and degrease.
- Cut patches from fiberglass that are slightly larger than the corrosion dents.
- Coat the surface of the threshold with glue, attach a piece of fiberglass, and smooth with a spatula.
- Depending on the thickness of the corrosion dent, apply as many layers of fiberglass as necessary. If a hole in the threshold is sealed in this way, there cannot be less than 5-6 layers. Impregnate each layer with glue and roll it with a spatula.
- Roll the surface of the threshold with a roller to remove excess air and let the epoxy resin dry.
- Polymerization of epoxy glue lasts up to 12 hours; after drying, treat the surface of the threshold with sandpaper.
- Prime if necessary. If the dent was significant, apply a layer of putty and level the surface.
- After the putty has dried, paint over it with auto enamel.
All repair work using epoxy resin is carried out with gloves, this is convenient if you don’t have a roller and you have to level the surface with your hands.
How much does it cost on average to repair thresholds at a service center?
At a car service center, you can either carry out a complete replacement or limit yourself to cosmetic repair of metal from rust. The average cost of work for a service station in the capital region is given; the price does not include the cost of the material used and the part itself:
- Complete replacement of thresholds - from 8,000 rubles. Customer details.
- Replacement of sills and rear wing - from 23,000 rubles.
- Cosmetic repairs with epoxy glue from RUB 2,000.
At a service station within walking distance you can buy all the necessary parts for replacement; the craftsmen will recommend sets of thresholds, moldings, install additional plastic body kits, and carry out tuning.
Approximate price if you carry out repairs and changes yourself:
- Set of thresholds and amplifiers - from 2000 rubles.
- The cost of one threshold: external part and connector - from 700 rubles.
- Amplifier (1 pc.) - from 300 rub.
As an amplifier, you can use a metal plate of the required length and width. It is necessary to make perforation holes in the part with a drill with a diameter of 0.8 cm at a distance of 8-10 cm around the entire perimeter.
When using profile pipes, the price of work will not exceed 3,000 rubles. The cost of the profile is from 450 rubles. for 1 meter, bitumen mastic will cost from 500 rubles. per kilogram jar.
Threshold repairs on a VAZ are carried out if the part is new, but due to careless driving the body has received a dent from an impact. In other cases, it is recommended to replace the element with a new one.
Important points
- All work on replacing thresholds should be carried out with the machine installed on a level surface, without distortions.
- Before welding the top edge of the new thresholds, you should definitely try hanging the doors on the car yourself. There are often cases when doors after welding either close with difficulty or do not close at all. And this can happen due to one slight misalignment of the thresholds, which is not always possible to notice with the naked eye.
- You should never skimp on anti-corrosion treatment of thresholds. If it is not carried out, all the work done will go down the drain in a few years.
- It is best to clean thresholds from rust and dirt using a solvent. When working with it, you need to follow safety rules: use gloves, wear safety glasses (this is especially important if you have to work on the bottom of the car while standing under an overpass - drops of solvent can easily get into your eyes), and apply the solvent itself only with a paint brush.
- Before welding the thresholds, a series of holes with a diameter of at least 3 mm should be drilled in the areas of metal to which the threshold is planned to be attached. This will greatly facilitate the spot welding process, and the threshold will be held more firmly.
How to replace rotten thresholds with your own hands
The article describes an interesting method for solving the problem with rotten thresholds. Perhaps someone will need it for VAZs.
Cars often have problems with thresholds. This depends on the age of the car, and is also affected by various weather conditions. Water, dirt, and car sills begin to rot. There is a different attitude towards car repair now. Previously, to make a high-quality threshold for several years, it took at least two days, or even more. I want to describe a method of how to quickly repair a car threshold in 5–6 hours. The time also depends on what to do with painting the threshold or not. In this repair, I want to leave the top of the threshold and cut off only the lowest part, the most rotten, and also cut off the lower part of the second repair threshold and put it in place of the rotten one. To begin with, I change the threshold, and in the future I will make sure that the doors coincide with it. Although there may not be any problems since I will only be cutting off the bottom part, one way or another there may be some minor problems because the replacement threshold is not original. My car is M2141 or Moskvich 41.
Why do thresholds wear out?
Thresholds are load-bearing elements that provide the body with additional rigidity. Due to the fact that these parts are located in the lower part of the body, they are constantly exposed to negative factors:
- water;
- dirt;
- sand;
- stones;
- salt;
- chemical substances.
All this significantly reduces the service life of the thresholds. In addition, the mediocre quality of painting and anti-corrosion treatment of body elements from the factory leads to the fact that almost every owner of a “Nine” is faced with the need to replace the thresholds on their car.
Signs of the need to replace thresholds on a VAZ 2109
The appearance of even small areas of corrosion on the thresholds is the first sign that these body elements need to be paid attention to.
At first glance, such areas may seem harmless, but if you examine them in more detail and clean them, it may turn out that under the layer of paint there is a serious source of corrosion or completely rotten metal.
It is important not to miss the moment when replacing the threshold is still possible. It often happens that the threshold rots around the perimeter and there is simply no need to weld a new part. In this case, more serious and labor-intensive body work will be required.
Threshold repair options
Repair of the body elements in question can be performed in two ways:
- welding patches;
- complete replacement of parts.
The first option requires less effort and financial investment. However, this is where its advantages end. If you follow the recommendations of specialists, then repairing the load-bearing part of the body with patches is not the best option. This is due to the fragility of such repairs.
It will not be possible to completely remove corrosion with partial repairs, and its further spread will lead to new rust and holes.
If you do not have the opportunity to completely replace the thresholds or the body element in question has minimal damage, you can partially replace the damaged area. To do this, you need to cut out the rotten place, clean the metal as best as possible from corrosion and weld a patch of body metal of the required thickness or use a repair insert.
After this, the threshold is carefully protected from corrosion in order to maintain its integrity for as long as possible.
Threshold repair process
First, I will have to remove the driver's door, the left wheel, and also the front fender of the car. Next, you need to jack up the car, remove the front wheel, and then the wing. I need to remove the fender to make it easier to remove the car doors. My fender is screwed to the hood with six screws. From inside the hood, you also need to pull the “saber” and lower the bumper to free the lower part of the wing. The wing is also fastened from the inside with two screws and one near the door. I unscrew them. After all the screws are unscrewed, I have 9 of them, the wing is almost free. True, only mastic can hold it. To do this, you need to take a tool like a pry bar and try to slightly move the wing from the inside. Gradually I swing the wing from all sides, and after it moves away a little it can be removed. After the wing is removed, its strut usually needs to be cleaned of rust, dirt, plaque and other foreign bodies. In principle, you don’t have to clean it, but I usually always clean it. I usually clean the wing strut at the end of the job when I install it. Now we need to do the basics and repair the car sills.
065: The sills have rotted and part of the bottom is at risk
Continuing the theme Life is pain!…
In short, the moment came when it was necessary to remove the floor carpet and the factory Shumka in order to go to the body shop and evaluate what and how much to cook)) And of course, wash the carpet))
I couldn’t capture how I was filming everything, I was in a hurry before it got dark) And the plastic covers had already been removed before that.
It’s not difficult to remove)) Now I’m scolding myself that after buying the car I should have immediately removed it and coated the floor, I didn’t think about it then, but now it’s coming out (((
I pulled out the carpet, under it the standard Shumka was all wet, even if I squeezed it out it stank ((
And... Rust(((In those places that are circled in the photo, the thickness of the metal is like paper, you can easily pierce it with your finger! ((
The studs under the driver's seat have rotted and are bending with your fingers ((I suffered quite a bit while installing the seat back.
I threw out all the old wet and smelly noise.
I only put back the driver's seat, now I drive like in a cramp)) True, it's a rotten cramp))
So everything is sad like this((I’m in a lousy mood((A consultation with a body shop is ahead...
P.S. At least I found out what kind of ECU I have.
Replacing Thresholds on a VAZ 2115 Do It Yourself Video
How to change the thresholds of a VAZ-2109 car
Although the body does not affect the movement of the car, the driver will not be happy if its elements begin to fall off in the direction of travel. High humidity, reagents and climatic conditions can greatly affect the underbody and sills of the VAZ-2109. Make yourself a VAZ 2110 threshold: video. How to replace the rear mounts on a VAZ 2114 with your own hands (video). Owners often find themselves having to replace these parts due to rust that has developed during normal operation.
Features of job replacement
Thresholds are the supporting part of the body. Detailed instructions on how to replace the generator on a VAZ 2101, 2102, 2103, 2104, 2105, 2106, 2107 with your own hands (video). They are placed in such a way that they can withstand significant loads on themselves; in the event of their structural destruction, deformation of the body is possible. The vehicle may become unbalanced and partially lose maneuverability.
In case of corrosion, you definitely need to change these body elements and at the same time knock on the bottom. Visually they appear undamaged, but when tapped or even pressed with a finger, the paint can fall off and anything from the center of rust to a through hole will appear underneath.
Experts do not recommend repairing the lower part of the case using patches. Then 100 or replacing the timing belt with your own hands (manually. This is a short-lived method, and in the worst case, the season will become corroded and the car will become completely unusable. Checks of the body part should also be carried out on the interior side.
Determining the cost of replacing thresholds
Prices for this service are determined taking into account many factors. But first of all, the cost of such work depends on the material and method of fastening the spare part. There are two types of thresholds:
- Removable. Most often they are made of plastic and attached to the body with self-tapping screws. Given the easy installation and low-effort installation, these parts are cheap to replace.
- Fixed. Such thresholds are a metal part of the body. They consist of an amplifier, a connector, outer and inner panels, which are connected to each other and to the frame by auto arc welding. Their dismantling is possible with special equipment and tools. Accordingly, the price of replacing a threshold using welding work will be high, since the craftsmen performing it must have the appropriate knowledge and skills.