How to replace generator bearings on Renault Logan 2008-2014 Replacing a generator bearing: catalog of materials
- Signs of failure of Renault Logan generator bearings
- Generator design for cars with and without power steering
- Removing the generator for Logan 2008-2014 with and without power steering
- Disassembling the BOSCH generator and dismantling the bearings
- Installing new bearings and assembling the generator
- Bearings for BOSCH generator - items and prices
- Useful videos on repairing generators from Renault Logan
Replacing generator bearings on Renault Logan is carried out when there are signs of wear or regular preventive maintenance. Servicing may be necessary when there are power failures or extraneous noise during operation.
The bearings of the Renault Logan 1.4-1.6 generator are replaced as a set, since the unit contains a small and a large ball bearing. When choosing spare parts, it is necessary to take into account that new models are equipped with Bosch generators with a power of 98 A; until 2010, cars without power steering were equipped with 75 A (as on some Mitsubish models).
How to change the bearings of a Renault Logan 1.6 generator from Bosch is described in detail in step-by-step instructions. But first, let's start with the necessary diagnostics.
The malfunction can be determined by the extraneous noise that the generator makes. Due to old parts, play, extraneous sounds, and noise appear. New ball bearings with fresh grease will ensure smooth rotation and noise will disappear.
How to replace bearings on a Renault Logan 1.4-1.6 2008-2014 generator (with and without power steering)
- Signs of generator bearing failure on Renault Logan
- The design of the generator and its mounting on a car with and without power steering
- Removing the generator for Renault Logan 2008-2014 With and without power steering
- Disassembling the BOSCH generator and dismantling the bearings
- Installing new ball bearings and assembling the generator
- Bearings for BOSCH generator - items and prices
- Useful videos on repairing generators from Renault Logan
Replacing generator bearings on Renault Logan is carried out when there are signs of wear or regular preventive maintenance. Servicing may be necessary when there are power failures or extraneous noise during operation.
The bearings of the Renault Logan 1.4-1.6 generator are replaced as a set, since the unit contains a small and a large ball bearing. When choosing spare parts, it is necessary to take into account that new models are equipped with Bosch generators with a power of 98 A; until 2010, cars without power steering were equipped with 75 A (as on some Mitsubish models).
How to change the bearings of a Renault Logan 1.6 generator from Bosch is described in detail in step-by-step instructions. But first, let's start with the necessary diagnostics.
The malfunction can be determined by the extraneous noise that the generator makes. Due to old parts, play, extraneous sounds, and noise appear. New ball bearings with fresh grease will ensure smooth rotation and noise will disappear.
This is interesting: Wheel sizes for Renault Logan - what is important to know
Assembly structure and location of parts
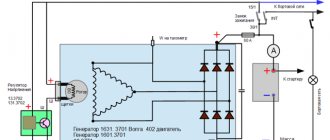
In order to change the bearing on a Renault Logan generator, you need to know its structure. The detail of the unit is presented in two diagrams: the unit in disassembled form, as well as a diagram of the mounted unit.
Please note that Renault Logan, depending on the year of manufacture and the presence of power steering, has different models of generators. Cars without power steering and air conditioning - E0 Mitsubishi. On cars before 2010 with power steering with air conditioning, Bosch is installed. Since 2010, if there is power steering and air conditioning, Bosch has been installed; they can be two-pin or single-pin.
- Catalog numbers - 6001548053, 6001547276, 231007633 respectively.
- To carry out the work you will need the following tool:
- keys at 8, 10, 13, 17, 27;
- Phillips, negative screwdriver;
- pliers;
- vice;
- hammer; WD-40 liquid;
- M10 bit (a cut M10 hexagon will do);
- nut M18 (for removing the pulley).
Replacing brushes
Another reason for generator failure is a breakdown of the brush assembly.
This problem is accompanied by a drop in voltage in the on-board network, the battery charge indicator light comes on, and in winter there are problems with starting.
In this case, repairing the Renault Logan generator will not require removing the part, since, as described above, this procedure is quite complicated and will require significant time and labor.
It is also important not to forget to remove the charging control wire. After this, you can remove the generator cover. To do this, you don’t need to pull it, but tilt it slightly from side to side.
After installing the relay, reassemble the components in the reverse order.
Instructions for removing the unit (with and without power steering)
This section shows how to replace the bearing of a Renault Logan generator with power steering and air conditioning up to 2010. Photos with descriptions of operations are presented.
On Logans after 2010, the removal process is slightly different; in particular, there is no need to unscrew the mounting bolts from below. All fasteners are accessible by simply opening the hood. Also, in a car before 2010 you do not need to remove the air conditioning tube, but after 2010 this can no longer be avoided.
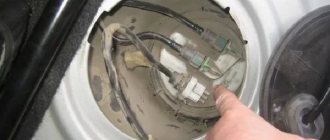
- Work begins by disconnecting the negative terminal of the battery.
- Further, the dismantling process depends on the presence of power steering. We will consider the most difficult dismantling option, when the car has power steering and air conditioning.
- First, jack up the right front wheel and unscrew it.
- Then remove the plastic protection. It is necessary to remove part of the fender liner by unscrewing the clip in the upper right corner and remove the cover.
- You will see the generator pulley, next to the belt tension roller. Use a 13mm wrench to loosen the roller bolt.
- For models up to 2010, remove the plastic protection at the bumper to unscrew the two lower bolts securing the electric generator.
- Under the hood we find three engine mount bolts. They need to be unscrewed to gain access to the power steering.
- To remove the power steering, unscrew three bolts. Two of them are located behind the pulley; unscrew them through the holes.
- The location of the third bolt is marked in the photo; it is on the other side of the pump.
- Now we will dismantle the power steering; here we will need an assistant to move the engine and the air conditioner pipe.
- Access to “Gene” has been obtained. Disconnect the terminal, unscrew the clip nut, then unscrew the upper fastener.
- Next, remove the device. To do this, you will need to move the air conditioner tube.
The process is relatively complex, but at the end of the article, the replacement of the Renault Logan 1.4 generator bearings is shown in a video where the process itself is presented in more detail.
| Share on social networks: |
Source: https://razborov.net/renault/remont-generatora-reno-logan-svoimi-rukami-video.html
Replacing brushes
Another reason for generator failure is a breakdown of the brush assembly. This problem is accompanied by a drop in voltage in the on-board network, the battery charge lamp is on, and in winter there are problems with starting. In this case, repairing the Renault Logan generator does not require removing the part, since, as described above, this procedure is quite complex and will require considerable time and labor.
The brushes can be installed on the generator separately, or the entire assembly can be replaced along with the relay = regulator. This method is the most preferable, since this unit contains all the main components that can fail, so replacing it will save you from problems for a long time. You need to select according to the generator model; for owners of Renault Logan with a Bosch generator, you can select the HUCO 130606 unit
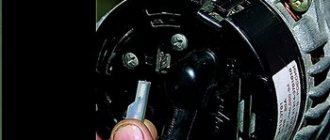
Before starting work, you need to remove the terminal from the battery. Then unscrew the cover from the generator. To do this, unscrew the nut 15 (1), then the nut 13 (2).
Next, unscrew the bolt with a Phillips screwdriver. It is important not to lick the edges, otherwise further work will become problematic.
It is also important to remember to remove the charging tip. After this, you can remove the generator cover. To do this, do not pull it, but slightly tilt it from side to side.
After installing the relay, reassemble the components in reverse order.
Renault Logan generator repair
Over time, you may notice a noise that appears when the engine is running. Sometimes it can be caused by wear on the timing belt pulley. The air conditioning compressor bearing may also fail.
But in some cases, replacing parts does not help. And then you should check the condition of the generator. Often its pulley fails.
It is multi-component and if the belts are installed incorrectly, it can break under the influence of vibration.
Removing the alternator on a Renault Logan is quite problematic, especially on a car with air conditioning. Despite the fact that only 3 bolts are used for fastening.
Test work
The main parameter when checking the drive belt is the tension level. In engines with power steering or with an amplifier and air conditioning, the check is performed in the lower area between the drive pulley and the air conditioner/power steering pulley. When pressing the belt with your thumb, the deviations should not exceed 6-8 millimeters.
Engines with air conditioning use an automatic tensioner. If it breaks, then the entire assembly must be replaced. In motors without automatic equipment, adjustment is carried out:
- Only power steering. The bracket with the roller is secured with 2 screws that need to be loosened. Once the adjustment is complete, they are tightened.
- Without power steering and air conditioning. Tighten the upper fastening screw, and then adjust the tension by loosening the lower one. At the end, the lower fastener is screwed in.
Don't go overboard with the tension level. Too much tension will cause a lot of problems. Firstly, this threatens exposure to high temperatures and heavy loads, which reduces the resource. Secondly, you will have to change the roller more often, which under strong tension will not cope with its task.
Another problem is bearings. They often fail, which makes it difficult to turn the rollers or leads to their complete jamming. Some drivers change the bearings directly for maximum savings. If you can do it, try it. To save time, we recommend simply ordering completely new drive belt rollers.
Renault Logan generator replacement, removal of the generator belt
Renault Logan generator , which may need to be replaced if this unit fails, is a simple operation. But the removal of the Renault Logan generator will have to be carried out in very cramped conditions.
In this case, initially we need to remove the Logan generator belt, and for this we need to determine which of the two drive belt schemes is used on your car.
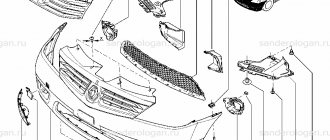
In the simplest version of Renault Logan without air conditioning, the following generator drive belt diagram is used, see photo below.
- 1 - auxiliary drive pulley
- 2 — tension roller with bracket
- 3 - adjusting bolt
- 4 — tension roller bracket mounting bolt
- 5 — generator pulley
- 6 — power steering pump pulley
- 7 - belt
To remove the Logan generator belt in this configuration, simply loosen the bolts securing the tension roller bracket (4) and unscrew the adjusting bolt (4). This will stop the tension roller putting pressure on the belt, it will loosen and you can easily remove it with your hands.
Reinstall the belt in the reverse order and tighten it using the adjusting bolt (3). To check the correct tension of the alternator belt from below the car, use your thumb to press the belt in the middle between the pulleys of the power steering pump and the crankshaft.
With a pressing force of 10 kgf, the belt deflection should be 6 - 8 mm.
If your Renault Logan has an air conditioner, then the drive belt diagram looks like this, as in the photo below.
- 1 - auxiliary drive pulley
- 2 - tension roller
- 3 — power steering pump pulley
- 4 — generator pulley
- 5 - air conditioning compressor pulley
- 6 - support roller
- 7 - belt
Here, to loosen the generator belt and its further removal, it is necessary to loosen the tension roller mounting bolt using a 13mm wrench and turn the roller bracket clockwise, overcoming the force of the tensioner spring, until the hole in the roller bracket aligns with the recess in the device body. Then we fix the roller bracket by inserting a 6 mm hexagon or a rod with a diameter of 6 mm into its hole and the recess in the tensioner body (you can insert a screwdriver, for example). As shown in the photo below.
Then remove the loose alternator belt. And now you can proceed to removing and replacing the Renault Logan generator. To do this, disconnect the wire terminal from the “negative” terminal of the battery.
Disconnect the excitation wire block from the generator connector by pressing the lock with a screwdriver. Then, using a 13mm wrench, unscrew the nut securing the positive terminal B2+ to the generator and remove the wire.
Let's look at the photo.
- Using a 13mm head, unscrew the bolt securing the power steering pressure line pipe bracket to the engine bracket.
We unscrew the bolts securing the power steering pump to the engine bracket and, without disconnecting the tube and hose from the pump, move it to the side. Then, using a spanner wrench or a 13mm socket, unscrew the two bolts of the lower mounting of the generator to the engine bracket and the bolt of the upper mounting.
- All three generator bolts, which hold the unit, are shown in the photo below for clarity.
Now the Renault Logan generator has been removed, you can install a new one or repair the old one. The design of the generator itself is quite simple and replacing the voltage regulator or rectifier unit is usually not difficult. This instruction will also be useful to owners of Renault Sandero.
The official Renault dealer in Tver https://renault.nordavtotver.ru offers the entire model range of the French manufacturer. A large selection of popular cars in stock will allow you to make a purchase without a long wait. Professional warranty, post-warranty service and qualified repairs.
Source: https://myautoblog.net/2016/05/generator-reno-logan-zamena-snyatie-remnya-generatora/
Purpose and location
The Renault Logan generator is a device that converts rotation into electrical energy, which powers the vehicle's on-board network and charges the battery.
The power source is located in the engine compartment near the crankshaft pulley, which is also transmitted to the generator. As a result, mechanical energy is converted into electrical current, which is rectified, regulated and directed to power the machine's electrical receivers and charge the battery.
Removal and repair of the generator for Renault Logan 1.6 with air conditioning
The appearance of an unpleasant hum during operation of a vehicle's power unit can be caused by a variety of reasons. One of them is a malfunction of the car alternator pulley. You can correct this extremely unpleasant situation on your own, although this requires possession of certain skills, tools and dexterity.
This procedure will be shown on the basis of repairing a Renault Logan generator, since this car brand is very common in our country, and the technology for solving the problem of a malfunction is suitable for similar processes with other vehicle options.
Removal and repair
Naturally, in order to remove the generator on Renault Logan, you must first complete the preparatory work:
- Place Renault Logan 1.6 on a flat surface, secure the car;
- Dismantle the front wheel on the right side of the car (you will need a tubular wrench and a jack);
- The final step of this stage is the removal of the special plastic protection.
Diagnostics, signs of malfunction, causes
To do this, you will need to move the air conditioner tube. The process is relatively complex, but at the end of the article the replacement of the bearings of the Renault Logan 1 generator is shown. Disassembling the generator, removing and replacing the bearings After dismantling, disassembling and replacing the bearing of the Renault Logan 1 generator is carried out. Usually this process takes minutes, for experienced drivers minutes.
Unscrew the mounting bolts of the protective plastic cover of the generator, and then the brush holder. Remove the brush holder and regulator relay. During qualified repairs, preventive maintenance and testing of the relay’s functionality are simultaneously carried out. Also inspect the brush holder for malfunctions and the condition of the brushes. To disassemble the body into two parts, three bolts are unscrewed.
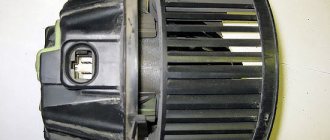
You will need a Phillips screwdriver here. Through the gaps in the fan blades we unscrew the four screws that hold the generator together; sometimes an impact screwdriver is needed here
Carefully separate its halves, if necessary helping yourself with a screwdriver inserted into the gap between the windings and the body
In this case, the stator windings should remain with the rear cover, the armature with the rear bearing mounted on the shaft should remain with the front. Fixing the anchor in a vice options: Sometimes to successfully complete this procedure you need to know the entire depth of the great Russian language, so be careful not to break the lid - it is aluminum!
Noise, axial or radial clearances in the bearings are a sufficient reason for replacement, although when overhauling a generator it is better to change them regardless of the condition. Overhaul implies some guaranteed post-repair life, right?
The slip rings sometimes reach a thickness of mm, and you can try to sharpen them, but you should not reduce their diameter by more than a millimeter: We check the pulley for preservation of external damage and the correct shape of the working surfaces. When the working surfaces are worn out, the belts quickly begin to whistle, an external sign of slipping and have a very short service life. V-belt pulleys stamped from sheet iron are especially susceptible to this. We consider a defect in the integral regulator relay or a separate brush holder in some generators not only to be a violation of the electronics operating algorithm, but also to mechanical wear of the brushes and their guide grooves.
At the same time, we take into account that generator spare parts catalogs are focused primarily on the generator manufacturer and its number. Sometimes they contain drawings or photographs, or geometric dimensions, so samples of the parts needed to be replaced can be useful.
We try to obtain spare parts from reliable sources and from normal manufacturers: On closed-type bearings, in violation of all technologies, you can carefully remove the side boot with an awl or a needle to control and, if necessary, add lubricant
When purchasing pulleys, you should pay attention to the offset of the belt position plane - there are options. Sometimes it is easier to order the manufacture of a pulley from a turner, in this case it is necessary to require not only compliance with the dimensions, but also compliance with the profile of the groove for the belt to the maximum depth; it is better to check with a new belt, ensuring the cleanliness of the working surface of the pulley and lightening the pulley by removing the maximum possible material without compromising strength
The preparations are complete, let's begin the actual renovation. Remove the rear bearing with a puller. Using a hacksaw, we cut off a piece of the old rings at the point where the winding wires are connected, and unsolder the winding wires from the remaining rings.
Using a caliper, measure the seating depth of the slip rings relative to the end of the armature.
Replacing a generator on a car with power steering and without air conditioning
Replacing a generator on a Renault Logan occurs in exceptional cases, and most often it is only necessary when repairing it is impossible. Of course, this happens extremely rarely, but a complete replacement of a part is still common among Logan owners.
This article will discuss the replacement process using the example of a car with an 8-valve engine, as well as with power steering and without air conditioning. Of course, if you have a 16th grade. engine, and also an air conditioner is installed, then this procedure will be slightly different from what you will see below.
Necessary tool
- Ratchet or crank
- 13 open-end or socket wrench
- 13 mm head
The procedure for removing and installing a generator on a Renault Logan with power steering and without air conditioning
In this configuration, removing the generator from the car is not particularly difficult, so it is done quickly and without unnecessary problems. The first step is to loosen the belt and remove it.
Having opened the hood, you need to unscrew the bolt securing it to the bracket from above.
Then two bolts from below, using a spanner wrench, since this will be very inconvenient for others to do.
After this, you can try to remove the generator from under the hood, as is clearly shown in the photo below.
After all this has been done, you can install the new generator in its place. As for the price of this unit, it is at least 6,000 for a non-original one, and from 15,000 rubles for an original one. But there are even cheaper options, and no worse - buy an original generator for Logan at a disassembly facility. Typically, price tags start from 3,500 to 5,000 rubles.
Source: https://remont-logan.ru/zamena-generatora-na-avto-s-gur-i-bez-kondicionera/
Symptoms and malfunctions
Factors that led to generator failure may include the following:
- the appearance of wear marks on the brushes;
- fact of rotor winding closure;
- loss of operating condition of the drive pulley;
- increased noise is evidence of wear of the bearings (or 2) on the rotor shaft;
- The relay regulator has become unusable.
This is a typical list of malfunctions that occur and require repair of the generator and its components in the Renault Logan model. These breakdowns occur very rarely, and after the repair procedure they cannot attract attention. Let's move on to analyzing each malfunction separately.
- The brushes wear out at the same time as the relay regulator. This unit must be replaced only after installation. Repair of these parts is not possible due to their design features. This problem occurs more often on the 1.4-liter Renault Logan than on other modifications.
- If the rotor winding is short-circuited, a voltage drop is observed in the network. In this case, a complete replacement of the generator will be required. After installing a new unit, the relay-regulator and brushes must also be replaced.
- When the destruction touches the generator pulley, a voltage drop occurs at the terminals. The pulley must be replaced when disassembling the assembly itself. Renault Logan has two pulley designs: 5- and 6-channel.
If a certain persistent noise is heard when the Renault Logan engine is running, then among the probable causes of its occurrence may be wear of the bearings located on the rotor shaft. These two elements must be urgently replaced.
Sources
- https://AvtoStandart-m24.ru/avtomobili-drugoe/snyatie-generatora-reno-logan.html
- https://NewLogan.ru/reno-logan-starter-generator.html
- https://TrueScooters.ru/motor-avto/snyatie-generatora-logan.html
- https://auto-rmnt.ru/dvigatel/zamena-generatora-logan.html
- https://MySummerCar.ru/ustrojstvo-motora/kak-snyat-generator-na-reno-logan-2.html
- https://dmsht.ru/kak-vynut-generator-reno-logan/
- https://autonissancar.ru/renault/logan/logan-1/nadezhen-no-tozhe-lomaetsya-generator-reno-logan-1
Generators for Logan 1.4, 1.6 | LoganMachine
How to choose the right Renault Logan generator with 1.4 and 1.6 engines…
Hello Loganovod, reader of the blog AAuhadullin.ru! In this article we will look at how to choose the right generator for Renault Logan 1.4, 1.6, cars equipped with air conditioning, power steering and without these options.
Replacing the generator on a Reno Logan car may be necessary if it is impossible to restore the original one or if it is necessary to install a larger generator after installing additional equipment. For example, a powerful audio system with a subwoofer, additional lighting equipment, etc.
Articles and sizes of bearings
Articles and markings according to GOST/ISO for BOSH 75-125A generators.
Article OEM 7700427476 – large p/w:
- 6303D.2RS - ISO; 6-303 - according to GOST.
Article OEM 7700427476 – small p/w:
- 6202D.2RS - ISO; 180202 - according to GOST (from 100A).
- 6003D.2RS - ISO; 180103 - according to GOST (75A).
- 6201D.2RS - ISO; 180201 – according to GOST (90A).
The car owner is also required to take measurements in advance and check the dimensions of the Renault Logan 1.4-1.6 generator bearings according to the table. Even if you know the parameters, take measurements of the rotor and compare the data from the table. Subsequently, this will help to obtain the catalog number for the generator bearing.
Generator bearing sizes 6-303 and 6-202
| Characteristic | Unit | Values according to GOST (TU) | |||
| 6-180103 | 6-180202 | 6-180303 | 6-180201 | ||
| Inner diameter | mm | 17 | 15 | 17 | 12 |
| External diameter | mm | 35 | 35 | 47 | 32 |
| Height | mm | 10 | 11 | 14 | 10 |
| Static load capacity | N | 2800 | 3550 | 6650 | 3100 |
| Dynamic load capacity | N | 6050 | 7800 | 13500 | 6890 |
| Speed | rpm | 24000 | 24000 | 19000 | 22000 |
| Radial clearance | mm | 0,008-0,022 | |||
| Steel type | — | SHH-15 | |||
| Hardness of rings and balls | H.R.C. | 61-65 | |||
| Lubricant type | — | C17, Litol | |||
| Ring roughness | Ra | 0,32 | |||
| Torque | H*M | — | |||
| Number of rolling elements | PC. | 10 | 8 | 6 | 7 |
| Ball diameter | mm. | 4,763 | 5,953 | 9,525 | 5,556 |
| Weight | G. | 0.040 | 0,045 | 0,115 | 0,037 |
How to Remove the Generator on Renault Logan Video ~ AUTOTEXNIKA.RU
generator change, removing the generator belt
Renault Logan generator, replacement of which may be useful for which the design of the failure of this unit is intended is an easy operation.
However, the removal of the Renault Logan generator will have to be carried out in very cramped conditions.
With all this said, first we need to remove
Logan alternator belt , for this purpose you need to determine which of the two drive belt schemes is used on your car.
In the most common version of Renault Logan without air conditioning, the following diagram of the generator drive belt is used, see the photo below.
- 1 - auxiliary drive pulley
- 2 — tension roller with bracket
- 3 - adjusting bolt
- 4 — tension roller bracket mounting bolt
- 5 — generator pulley
- 6 - power steering pump pulley
- 7 - belt
To remove
For the Logan generator belt in this configuration, simply loosen the bolts securing the tension roller bracket (4) and unscrew the adjusting bolt (4). This way the tension roller will not put pressure on the belt, it will weaken and you can simply remove it with your hands.
In reverse order, install the belt back and tighten it using the adjusting bolt (3). To check the correct tension of the alternator belt from below the car, press the belt with a huge finger in the center between the power steering pump
steering wheel and crankshaft.
With a pressing force of 10 kgf, the belt deflection should be 6 - 8 mm.
If your Renault Logan has air conditioning, then the drive belt diagram is as follows, as in the photo below.
Replacing the Renault Logan Phase 2 generator, 2012! Short and to the point
Dear, respected viewers and subscribers, join the VKontakte group and ask.
Replacing the clutch disc and its service life
Before you get started, you should know some design features.
If this tells you something, and you know the structure of the mechanism and are confident in your abilities, it’s time to get to work.
Required Tools
- The key is “11”, or better if it is a socket head.
- Screwdrivers - flat and Phillips.
- Mandrel for centering the driven disk (the one for front-wheel drive VAZs is suitable)
Removing the clutch
First of all, we drive Logan into the pit; you can also enlist the help of one more person. Replacing a clutch is such a thing that extra hands definitely won't hurt. Before you begin, double-check that you have the necessary tools. If everything is in order, let's get to work:
- The first step is to remove the gearbox (if this is not done, you will not be able to get to the flywheel and the clutch itself).
- Now hold the flywheel with a screwdriver so that it does not spin, and at the same time unscrew the bolts securing the pressure plate. The tension of the bolts should be loosened evenly, moving from one to another.
- After unscrewing the bolts, remove the driven and clutch pressure plates from the flywheel, while holding the driven one. When everything is ready, carefully inspect the parts. Cracks and chips are not allowed. If any other problems are detected during a visual inspection, change the driven and pressure ones without hesitation.
- Before installing new parts, make sure that the driven disk moves easily along the splines of the gearbox input shaft. Problems or jams should be corrected immediately either by adjusting the disc hubs or by replacing defective parts.
- Next, we apply a special refractory lubricant to the driven splines.
- Now we need a mandrel, with its help we install the driven disk in place. The correct position is when the protruding part of the disc hub is directed towards the clutch housing spring.
- Then install the pressure plate on the centering pins and you can immediately screw in the fastening bolts. We tighten them, also moving one by one, from one to another.
- The mandrel can now be removed and the gearbox can be reinstalled. Afterwards all that remains is to connect the cable and adjust its length.
DETAILS: Mitsubishi Pajero Sport brake repair: pad replacement || Replacing rear brake pads on a Mitsubishi Pajero Sport, instructions on how to change the brake pads yourself on a Mitsubishi Pajero Sport
Important nuance
Replacing a clutch is still quite a labor-intensive process, however, it happens that in an attempt to save money, car enthusiasts doom themselves to additional work. The thing is that at first glance it may seem that one of the clutch parts is in good condition and can last for some time.
As a rule, the clutch disc lasts about 150 thousand kilometers, but there have been cases where this part has been maintained for about 200 thousand kilometers.
As a rule, the entire clutch kit is replaced. To find out how much this kit costs, you will need to contact your local dealer. To replace the kit, you must have a special tool with which you can do this work professionally.
- Place your car on a lift and remove the front wheels.
- Remove the battery, and then disconnect the necessary elements that make access to the gearbox difficult.
- Unscrew the cable as much as necessary, then remove it.
- Unscrew the gearbox mounting pad at the top, as well as all the necessary bolts securing this unit to the engine block.
- Raise the car, then disassemble the suspension and remove the drive shafts, after draining the oil from the gearbox.
- Install a support element, such as a stand, and then raise the engine as much as necessary.
- Unscrew the lower gearbox mount and the remaining bolts holding the entire assembly.
- Dismantle the gearbox and put it aside.
This procedure for replacing the kit must be carried out together with a partner, since the weight of the gearbox is about 50 kilograms.
- Unscrew the 6 bolts around the basket, then dismantle the kit.
Prepare a new clutch kit, first center the disc relative to the engine flywheel, and then fasten the 6 bolts holding this kit to the flywheel.
- Replace the release bearing from the kit and lubricate the fork guides.
DETAILS: Do-it-yourself replacement of the VAZ 2121 Niva pump