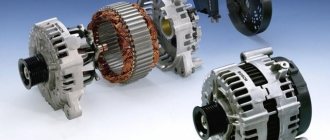
The electrical equipment of the VAZ 2106 consists of two power sources - a generator and a battery. The principle of operation of the six generator is similar to any other similar device. With its help, power is provided to the entire electrical network of the car. And you definitely need to know how to connect the 2106 generator to the on-board electrical network.
But the most important thing is that it charges the battery. The functioning of the internal combustion engine and all additional equipment connected to the electrical network depends on how the generator operates.
General design of the VAZ 2106 generator
Characteristics of the VAZ 2106 generator
Structurally, it is made in the same way as a conventional DC motor. The middle part is the stator on which the windings are located. A rotor rotates inside, on which there is also a number of turns that act as an excitation winding. The latter is powered by graphite brushes and two slip rings.
There are two covers at the front and rear of the generator. Bearings are mounted in them. At the front of the generator there is a pulley and an impeller for blowing through the device body. At the rear there is a rectifier stage consisting of six diodes. The voltage regulator relay is located in the engine compartment.
Generator internals
So, we need to look at the stator in more detail. It consists of windings, there are three in total and their connection is made according to the “star” circuit. As you know, the output of a generator set produces alternating current. But this is nothing, if you look at the design of the stator, you can understand that there are also three phases at the output.
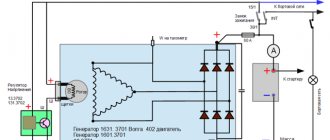
The connection diagram of the windings and the rectifier unit is shown in the figure. There is nothing complicated in it, even a person who does not know how to read an electrical diagram, or does it with difficulty, will very quickly figure out what’s what here.
Voltage stabilization occurs using a regulator relay. It supplies a fixed voltage value to the field winding. If it were not for this device, the voltage surges at the output would be very large.
Depending on the number of revolutions, the output voltage can be in the range of 12..30 V. Using a rectifier, it is possible to convert alternating voltage into direct voltage. The rectifier unit looks like a large horseshoe into which semiconductor elements are pressed.
Removing and replacing the generator
First you need to prepare the car for repairs. Since you are working on electrical equipment, be sure to disconnect the battery. Moreover, it is advisable to disconnect both terminals, and not just the negative one. A thick red wire runs from the battery to the generator. It needs to be disabled. Using a 10mm wrench, unscrew the nut and pull out the wire.
Disconnect the wires that go to the brush mechanism. Unscrew the nut securing the generator to the upper bracket. After loosening the belt tension, it must be removed. Now you need to unscrew the nut from the bottom bolt.
It is advisable to treat it in advance with a penetrating lubricant. On one side, hold the bolt from turning using a key set to “17”. Use the second identical wrench to unscrew the nut.
After this, the VAZ 2106 generator can be removed. Installation of the new one must be done in reverse order. Do not forget that the normal operation of the unit is the correct tension of the belt. If it is over-tightened, this will lead to malfunctions of the front cover bearing.
If the tension is too weak, the battery will be constantly discharged. And if the generator does not charge, then there is a very high risk that the car will not start. This is especially dangerous in cold weather.
What is needed for maintenance
Very often a malfunction occurs such as excessive wear of bearings. As a rule, the one located in the front cover fails. You can even detect a breakdown by hearing.
A loud whistle indicates its failure. The reason that it is in the front cover that the bearing fails is that it is subjected to a very large load.
After all, it is on this side that the belt is located.
The 2106 generator's brushes, made of graphite, are in constant contact with the rotor. Their strength is quite high, but despite this, the effect of friction makes itself felt. Therefore, they need to be replaced with new ones from time to time. If this is not done, the field winding will not work.
No power is supplied to it, and the magnetic field that is necessary to generate electricity is not created. It happens that the excitation winding, or one of the stator windings, begins to “short” to ground. To verify this, it is necessary to completely disassemble the VAZ 2106 generator, and then use a multimeter to test all windings without exception.
You should have at least an idea of how to check the windings for breakdown. Please note that there must be a certain resistance in the stator, depending on the generator model. If there is no resistance, there is a short circuit to the device body.
Choose your own way out of this situation. You can either rewind the stator winding, replace it completely, or install a new power source. The price of a new one, of course, is rather high - about 3000-3500 rubles. You can buy it at a dealership for three times the price, but will it work properly?
Source: https://vaz-remzona.ru/podklyuchenie-generatora-2106/
Voltage regulator
Using a voltage regulator, a certain value is maintained on the excitation winding. Today, most generators are equipped with an integrated relay-regulator. It is worth noting that there can be two designs of relay regulators: a hybrid one, in which radio-electronic components are used, such as zener diodes, resistors, capacitors, and an integral design, in which all the elements included in the relay regulator are made on one semiconductor wafer . This is the main element that makes up the VAZ-2106 generator. The semiconductor connection diagram is given in the article.
Replacing the generator yourself
Typically, the VAZ 2106 generator must be replaced only in the most exceptional cases, and in case of most malfunctions it is simply repaired.
But if this device on your car has completely failed and cannot be repaired, then it is necessary to replace it.
To make this repair procedure as simple as possible, below is a list of necessary tools that will help make this operation easier:
- Keys for 17 and 19
- Heads for 10, 17 and 19
- Ratchet handles and knobs
- Extension with universal joint
The procedure for removing and installing the generator on a VAZ 2106
Before attempting this repair, disconnect the negative battery terminal. Then you need to disconnect all power wires from the generator itself. First you need to unscrew the terminal securing nut:
Now you can pull out all the other wires and plugs, just pull them to the side with a little effort:
Loosen and completely remove the alternator belt.
Then we tear off the upper mount of the generator with an ordinary open-end wrench 17, and after that we throw on the head with an extension and a cardan joint to unscrew this nut quickly and without unnecessary effort:
Next, you need to crawl under the car from below and tear off the nut with a spanner wrench and unscrew it completely using the ratchet handle:
After the nut is completely unscrewed, you need to knock the bolt out. To do this, you can use a wooden block, pointing it at the bolt and hitting it several times with a hammer. The photo shows it without a block, but keep in mind that the backing must be present so as not to damage the thread:
After which the bolt can be pulled out by hand. If it is difficult to move, you can resort to penetrating lubricant, spraying it a little in the right place.
Then you can remove the generator from below, as this is more convenient. If it doesn’t give in right away, you can turn it a little in the right direction so that nothing gets in the way when removing it. This is roughly what it looks like in practice, as shown in the photo below:
The price of a new generator for a VAZ 2106 varies from 2,500 rubles and above, it all depends on your wallet. The replacement process is not complicated and installation occurs in the reverse order of removal.
Source: https://vaz2106-remont.ru/zamena-generatora-svoimi-silami/
Common faults
What malfunctions of the VAZ 2106 generator exist and how to eliminate them?
The first type of breakdown is when the light on the dashboard is always on or lights up from time to time while driving, the reasons are as follows:
- The strap is slipping - its tension needs to be adjusted.
- Open circuit between the center of the star assembly and plug number 85 of the warning light relay.
- The charge indicator relay is damaged.
- Voltage regulator failure.
- Break in the field winding wiring.
- The generator brushes are worn out and the slip rings are oxidized. The problem can be solved by cleaning the rings, as well as replacing the generator brushes.
- There is a short circuit or break in the valve circuit of the mechanism.
- Short circuit in the wiring in the stator winding or open circuit.
If the warning light does not light up when the ignition is turned on, the reasons may be as follows:
- The filament has burned out - the light bulb can simply be replaced.
- Failure of the light bulb relay.
- Broken wiring or shorted valves.
- The stator winding is shorted to ground. Replacing the stator will solve the problem.
- The generator does not charge the battery.
Design and designation of node elements
If the generator unit is functioning normally, but the battery is not charging well, the reason may be:
- Poor belt tension or slipping when driving at high speeds. You can get rid of this problem by adjusting the strap tension.
- The terminals on the battery have oxidized, the wiring has been damaged, or the clamps of the wiring tips on the mechanism have become loose.
- If the battery fails, it must be replaced.
- Problems with the operation of the voltage regulator can be corrected by cleaning the contacts, as well as adjusting or replacing the element.
As for battery overcharging, it is usually caused by poor contact between the body of the regulatory element, as well as the ground. Much less often this is due to failure of the regulator itself, as well as battery failure.
If the generator unit operates very loudly, this is due to:
- By loosening the pulley nut of the unit - you just need to tighten it.
- By bending the fan blade - you just need to rebuild it.
- Incorrect operation of bearing elements.
- Short circuit or broken wiring in the mechanism.
- The brushes of the assembly can contribute to the appearance of noise - you just need to wipe them (the author of the video is Sergey Bakaev).
Replacing the VAZ 2101 – 2106 generator
The need to replace the generator on a VAZ car may occur when its windings burn out, an interturn short circuit occurs, the case breaks, and other reasons. But today, I would like to talk about replacing the VAZ generator in the case when its power is no longer sufficient...
Imagine the situation - you are the owner of a VAZ 2101 - 2106, you bought and installed a powerful amplifier, installed fog lights of 50 W each. A standard generator that produces a maximum current of 42A cannot cope with such a load.
And if all additional equipment is turned on, then there will be nothing left to charge the battery.
After all, judge for yourself, the high beam in the VAZ 2106 has become “heavier” by 100 W, while with a standard generator and on a penny it does not shine with its parameters.
It’s these types of cases of replacing a VAZ generator that I want to talk about. Let's consider which generators can replace our long-suffering G-221.
Generators that replace G - 221
What models of generators are suitable for replacement in a VAZ 2101 - 2106 car?
- The first option is a generator from a VAZ 2105; it produces a maximum current of 55A. Not much, but if you don’t use a lot of additional equipment, then this is an ideal option. This generator replaces the G-221 generator without any modifications to the mounting. There are only minor changes in the connection to the electrical wiring; they are due to the fact that in the connection diagram of the G-221 generator the relay-regulator is placed separately, while in the five-wheel generator the relay regulator is combined with the design of the brushes.
- The next option for installing a chisel generator on a VAZ 2101 - 2106. It produces 55A, which is quite acceptable for a small amount of additional equipment.
- The third option for replacing a standard VAZ generator is a generator from a VAZ 21074, its marking is 372.3701-03. It is capable of delivering about 73A of current, which will be sufficient for the average motorist. The installation is practically no different from the previous one.
- The fourth option is to install a generator from an injection Niva. It produces about 80A, which will satisfy the requirements even if a large number of additional light bulbs and amplifiers are installed. It will not let the light go out at idle. But the installation does not require very big changes.
- The fifth and final option is to replace the standard G - 221 with a generator from a VAZ 2110, which produces 105 - 110A (depending on the specific model).
- There are other options (foreign cars, Chinese, our semi-underground companies), but you can consider them here endlessly.
We have listed the most realistic and easiest ways to replace a generator in a VAZ 2106 car. Next we will look at how to practically implement the installation of a generator from a VAZ 21074.
Installation of a generator from a VAZ 21074i to a VAZ 2106 (2101)
Information found on the six forum. First, it’s worth noting (as far as I understand), there are different models that fit these parameters, they recommend taking 2107-3701010.
If you chose 2107-3701010, then now I will quote the installation on the VAZ 2106. It is also much easier to find spare parts for the first generator.
- Photo from the back:
A little about the relay regulator. I have already read more than one negative review about the K1216EN1 relay regulator. In particular, thermal compensation is poorly implemented in it, that is, the charge voltage does not change depending on the ambient temperature.
So the author almost immediately replaced the standard RR with a 67.3702-01 regulator.
Installing a new generator instead of an old one is not difficult; everything fits into a standard mount. Now let's look at the connection.
The very first thing you need to do is disconnect and insulate the wires from the relay regulator. As for the connection on the generator itself, everything is almost the same as in the old one. Wires with a terminal in the form of a ring - in the old place, a bolt that was also on the old generator. The gray wire is isolated and not connected anywhere, the yellow wire is connected to the terminal.
Dismantling and removal
How to remove a VAZ generator and how to disassemble the device? Which generator is better to install on a VAZ 2106?
To repair a VAZ 2106 generator, follow these steps:
- First you need to disconnect the plug from output 67 on the node.
- After this, the plug is disconnected from the output of the so-called neutral wire.
- Next, you need to move the insulating cover a little, after which, using a 10-mm wrench, you need to unscrew the nut that secures the wiring, in particular, we are talking about the thirtieth pin. The wiring can be disconnected.
- Now you can remove the strap. If you only need to replace it, then buy a good belt - check its condition, there should be damage on the strap. The size of the VAZ 2106 alternator belt must correspond to the nominal one; it is indicated in the service manual.
- Using a 17mm wrench, you need to unscrew the two nuts that secure the adjustment bar; it needs to be removed.
- Then unscrew the nuts of the lower mechanism clamp, remove the bolt, as well as the bushing. The assembly itself will be fixed on the bracket.
- After this, the unit can be dismantled. If necessary, the generator is replaced. Further connection of the generator is carried out in the reverse order of removal.
Sorry, there are no surveys available at this time.
How to install and connect a new generator on a VAZ 2101–2106
The reason for replacing a generator is the combustion of its windings, inter-turn short circuit, aging of the housing, which leads to its breakdown, etc. sometimes the power of the generator is low, and for this reason it needs to be changed.
There are situations when, when upgrading their car, they install powerful amplifiers and additional gadgets that consume energy; in this case, the standard generator is not enough, and it must be replaced with a new and powerful one.
Now let’s take a closer look at what you can replace the standard G-221 generator with:
- To begin with, you can use a generator with a VAZ 2105, which produces a current of 55 Amps, but this is not the most powerful option, it is good in cases where there is not a very large amount of equipment. But the good thing about it is that when installing it, you don’t need to redo the mount on the case; you just need to slightly alter the electrical system to accommodate it.
- The next option is to use a generator from a VAZ-2106, which produces 55 Amperes, which is again sufficient when there is not a lot of additional electronics.
- The third option will be a standard generator, for the VAZ 21074 generator, it is marked 372.3701-03. It can produce approximately 73 Amperes, where there are many more accessories than in the previous two options; the installation does not differ much from the previous version of the generator.
- The fourth option is to install a generator from a car like a Niva, its power is about 80 Amps, and it can satisfy a very large number of electronics, additional amplifiers, and LEDs. Installation requires more changes than in other cases.
- The last option is that the standard generator can be replaced with other models of foreign cars, hybrids, but most often Chinese generators. These five methods are considered the most common.
- Now let's talk more specifically about installing a generator from a VAZ 21074 on a VAZ 2106 (2101). Quite often they choose model 2107-37011010; it is good because you can easily find spare parts for it. Quite a lot of bad things are written about the K1216EH1 relay-regulator; it is bad because the relay does not change the charging voltage depending on the ambient temperature.
Installation and connection of a generator with a VAZ 2107
There is nothing complicated in the installation; it is mounted like a standard generator, but has a different connection. Now let's talk about it.
First you need to disconnect and then insulate the wire under the relay regulator. All connections of the generator itself are the same as in a standard generator.
The gray wire should be insulated and not connected anywhere, and the yellow wire should be connected to the terminal.
For the test lamp, you can use a lamp from a repeater, which has a power of 3 W; to connect it, you need to run two wires to it - double orange, yellow.
Everyone who used this method was satisfied; in this case, charging is maintained at high speeds. And there is enough power for a good amplifier.
Source: https://xenon-kiev.com.ua/kak-zamenit-generator-vaz-2101-2106/
Generator VAZ 2106: connection, replacement, how to check
A generator in any car, even a diesel one, is a real general manager of the engine. Without it, the car won't move. It can be a shame when the engine works well, but the electrical equipment begins to malfunction. If we talk about the six, then most likely it contains the G 221 generator, which was also equipped with the Fiat 124.
If you compare the electrical circuits of the VAZ 2101 and VAZ 2106 cars, it becomes obvious that they are almost the same. The six only has a few additional electrical devices. However, the generator there is the same. That is the problem.
The fact is that initially the G 221 model was not intended to serve such a number of energy consumers. As a result, the relay-regulator receives insufficient current, the battery is undercharged and slowly dies.
The problem gets worse when the car owner installs additional devices, such as:
- Fog lights;
- Good audio system;
- Preheating before starting;
- second stove, refrigerator, TV, etc.
In general, any step that increases energy use can make the battery prone to drain even while you're on the road. If modifications are still necessary, then you will have to install a more stable and powerful generator G 222.
Generator operation diagnostics
All diagnostic procedures can be carried out both on the removed device and directly in the car. Before starting work, be sure to remove the wires from the battery and generator.
To diagnose the rectifier unit, disconnect the regulator wire. If you don't have an ohmmeter, you can use a battery and a test light. On the ohmmeter, the needle should point to “infinity”, and the control light should not light up. This indicates that the valves are working properly.
We carry out general diagnostics of the device . You need to check if the valves are broken. To do this, we attach the “plus” of the device to pin 30, and the “minus” to the body. If the device shows zero, this indicates a short circuit, which is a consequence of a breakdown of the valve.
Clarifying diagnostics. We check the resistance of the negative valves. To do this, we attach the “plus” to one of the mounting bolts, and connect the “minus” to the body of the device. A short circuit or breakdown is indicated by a reduced resistance.
To check the positive valves, you need to attach the “plus” of the ohmmeter to terminal “30”, and the “minus” to one of the mounting bolts. If the resistance is low, you can judge that the valve is broken.
In such cases, the easiest way is to replace the entire rectifier unit. Of course, you can replace individual diodes, but this is a labor-intensive process that includes re-coring. Only a specialist can handle this work.
Rotor winding diagnostics
First remove the brush holder (the procedure is described below).
We find a window on the device cover through which we need to check for a short circuit. We connect one terminal of the device to the ventilation impeller, and the second to the winding.
In a similar way, you need to check whether there is a break in the winding. To do this, we connect the ohmmeter leads to the contact rings.
Belt replacement
To make it more convenient to work, you will have to remove the battery.
- Unscrew the fastening nut. Using a mounting spatula, we move the device closer to the cylinders. If this is difficult to do, then unscrew the lower mounting bolt.
- Now that the generator has been moved to the engine, you can easily remove the old belt and put on a new one instead.
- We move the generator away from the engine, monitoring the belt tension. Having achieved the required tension, tighten the fastening nut to the adjustment bar.
- We adjust the belt tension more accurately. To do this, we measure the deflection in the place between the pulleys and the pump with a force of 10 kgf. It should be from 10 to 15 millimeters. And between the pump and the crankshaft it should be equal to 12 to 17 millimeters.
- Once the correct adjustment has been achieved, tighten the fastening nuts and put the engine mudguard in place.
Regulator replacement
- The regulator is located on the left mudguard. Unscrew the fastening nuts and remove the device.
- Disconnecting the wiring
- We install the new regulator, connect the wiring to it in the same way as they were installed on the previous device. Tighten the fastening nuts.
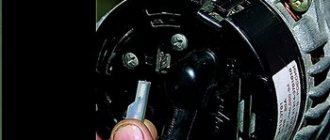
Replacing generator brushes on a VAZ 2106
The generator brushes need to be changed together with the brush holder, and not separately. The operation can be performed both on the removed device and directly in the car.
- Remove the plug from pin 67.
- Unscrew the fixing screw of the brush holder
- We take out the faulty brush holder and put a new one in its place.
- We tighten the fixing screw
- Insert the plug
Brushes and straightener for auto power generating device
The generator brushes are attached to a brush holder fixed on the cover of the unit. The brushes are made of a copper-graphite composition; they are pressed against the slip rings on the rotor using springs. Through the contact brushes, current is supplied to the excitation winding. The negative brush is attached to the ground of the generator by means of a metal plate, and the positive one is connected to the plug of the battery charge control lamp.
The elements that make up the electric rectifier are fixed on the back cover of the unit. An electric rectifier changes alternating electric current to direct current. The design of the electric rectifier is assembled on the basis of a three-phase bridge circuit. This electric generator component consists of six BA20 diodes.
These silicon diodes are semiconductor devices capable of passing electric current in one direction. The diode bridges are located in an aluminum housing. Three diodes from the rectifier block have a “plus” on their housing. These ends are pressed into the housing holder. Three more diodes of the rectifier block on the housing have a “minus” one. These diode bridge elements are connected to the ground terminal.
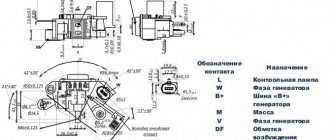
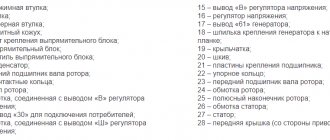
1 – “negative” brush; 2 – brush holder; 3 – “positive” brush; 4 – neutral wire plug block; 5 – insulating bushings of the contact bolt; 6 – rectifier block; 7 – contact bolt; 8 – stator; 9 – rotor; 10 – inner bearing mounting washer; 11 – drive side cover; 12 – fan assembly with pulley; 13 – outer bearing mounting washer; 14 – front rotor bearing; 15 – spacer ring; 16 – coupling bolt; 17 – clamping sleeve; 18 – cover from the side of the slip rings; 19 – buffer sleeve; 20 – bushing.
To ensure high-quality heat removal, the rectifier unit diodes are pressed into original holders made of aluminum. Repair of the rectifier unit is impossible; if any of its elements fail, the entire rectifier is replaced.
The generator is connected by connecting the negative terminal of the unit to the vehicle ground, and the positive terminal is connected to the on-board network. The operation of the electric generator is carried out as follows. When the ignition key is switched to the first position, an electric current is passed through the electrical excitation winding, creating a magnetic field.
As a result, when the rotor rotates, the south and north poles of the rotating part pass alternately under the stator teeth. This reversal of poles produces an electromotive force. The shape of the poles allows you to optimize the operation of the unit.
Replacing the VAZ 2106 Generator with a More Powerful One
Probably wondering which generator is better?
install on VAZ 2106 and 2107. After all, the standard device has some shortcomings that negatively affect the performance.
Standard generators were developed quite a long time ago, and they were not designed for significant volumes of energy consumers. The office one used a couple of light bulbs and a starter.
It is clear that with a larger number of devices, the generator cannot cope with its obligations.
We have to find a suitable replacement for him. For this purpose, it is important to take into account what remains for our client to do about the electronic circuits of the machine. The new device must fit this list one hundred percent.
Which generator is better to install on VAZ 2106 and 2107?
The question is quite difficult. It is necessary to consider it, starting with the development of the most ordinary option. Any manufacturer will say that a specific standard version must be installed on the car. Let's look at the features of the standard version G221.
Here, in the type of relay generators, the regulator is installed separately from the brush assembly. This, within certain limits, simplifies the work to eliminate certain defects.
The advantage is the ease of installation; there is no need to adjust the wiring for connection; our client can only do it according to the standard scheme.
However, such a generator is low-power, it produces a maximum charge of 42, which is not enough for the majority of modern batteries.
Replacing the VAZ 2106 generator with a more powerful one
From all this, they conclude that the standard generator is naturally excellent. However, if you have additional devices, it is not entirely profitable to use it. It is best to choose a more powerful option.
This generator is intended for use on Niva cars. It is capable of delivering 50 A of current, which is enough for real electrical work.
Its difference from a standard “six” generator is the range of built-in regulator relays. Here it is assembled into one unit with brushes. For installation on VAZ 2106
, it is very important to make small improvements.
This electronic machine is installed on 2107 without any special interference or modifications.
VAZ Generator Replacement
If you have set a goal to MAKE EARNING ON YouTube You must: 1. Make your own channel 2.7. Connect it to AIR by filling out .
There are several methods for modifying such a generator. The most common would be to install brushes from generator . They are perfectly installed in the area of the relay assembled with the brush assembly.
No modifications are needed, this allows you to install such a generator, even for people without special abilities.
It is possible to install the G222 with a standard regulator, but for this purpose you will have to redo the generator connection diagram. Otherwise, nothing is possible.
Replacing a VAZ 2106 generator with a VAZ 2107
The myth device is quite often installed on 2106, 2107. This is all due to its greater efficiency; it produces a charging current of 55 A, which is quite enough for the majority of motorists. If your car has more than just equipment, then it is better to choose something more powerful.
These generators are similar in terms of mounting, so there will be no problems with the installation itself. This is if you remember to remove the terminal from the battery. The fun starts when you connect. What remains for our client to do, what exists, that 4 wires are connected to the native device. Only 3 goes to the figure eight.
This is all connected to the integrated voltage relay. To obtain the usual result, you need to insulate the dark wire, and connect the others as usual. While the generator is operating, the light indicating the discharge will glow. This is a common occurrence with this connection.
Accordingly, it should fade away in the absence of charging.
By and large, this is already an option to drive, but if you want to do everything possible, as expected, you will have to make some more modifications. We remove the old relay and replace it with an ordinary power relay. Now the light will glow only when the engine starts, and at low speeds, which is completely acceptable.
To install on a VAZ 2107 you will only need to add a power relay.
Fans of various additional equipment require an even stronger “gene”. Of course, they should be advised to install a device from a VAZ 2107i.
Myth unit produces 80 And this is quite enough to perform the work of all electronic systems added by the owner. In purchasing such a generator
, please note that there are a number of their varieties.
For installation on a VAZ 2106, only model 2107-3701010 is suitable; on carburetor “sevens” there is an option to install any generators of this series.
Replacing the VAZ 2101 generator with a more powerful one
It is better to modify the device for installation on the “six”. For this purpose, the relay regulator is replaced with a similar one from G222. The connection is quite similar to working with a figure-of-eight generator.
Conclusion
. Initially, rather weak generators were installed on the “sixes” and “sevens”.
But, in the process of technology development, their power was no longer enough to provide adequate power to the car. So the question arose, which generator is better to install on the VAZ 2106 and 2107.
Luckily there is plenty to choose from. The next generations of devices are perfect for old Zhiguli cars after a little modification.
Source: https://vivauto.ru/zamena-generatora-vaz-2106-na-bolee-moshhnyj/