Main signs indicating a faulty diode bridge
A normally operating diode conducts current in only one direction. In the event of a breakdown, a current leak appears, which flows from the on-board network to the starter windings. Today, several types of diode bridges are installed on cars:
- diode bridge without additional cooling;
- diode bridge with passive cooling due to special radiators.
In addition, there are different types of connecting windings and connecting bridge platforms: using welding or soldering. The first sign that the generator is operating unstably due to a broken diode bridge is the rapid and frequent discharge of the battery. There are other reasons why you can indirectly determine the combustion of diodes in a rectifier:
Generator malfunctions - signs, diagnostics, causes, testing
Current to power conversion calculator
Convert how many amperes a kW has online. Calculator for converting current amperes to power watts
Malfunctions of vehicle electrical equipment are very common and occupy one of the leading places in the list of breakdowns. They can be roughly divided into faults of power sources (batteries, generators) and faults of consumers (optics, ignition, climate, etc.). The main sources of power for a vehicle are batteries and generators . The malfunction of each of them leads to a general malfunction of the car and its operation in abnormal modes, or even to immobilization of the car.
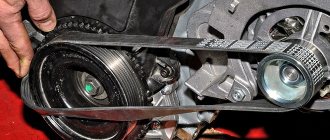
Dismantling
A test with soldering of the diode will be required if one or more elements showed lower or higher resistance parameters or did not show them at all. These elements are disconnected from the general circuit using a soldering iron. Often the diodes are located in holes or recesses in the plate. They are attached to it using conductive glue or simple compression. When dismantling, carefully knock out the diodes.
Next you need to call each element separately. The diodes ring only on one side. It is this side that is open to the passage of voltage.
- The “negative” control probe is connected to the diode body.
- “+” probe is connected to the output.
- The multimeter is set to resistance testing mode.
- With this position of the control probes, the tester should produce a resistance of up to 700 Ohms.
- When changing the connection of the control probes, the tester should show infinity or “1”.
If both sides show no resistance or very little resistance, the element can be considered burnt out. It must be replaced strictly with an analogue identical in parameters. The diode parameters and markings are installed on the “cap” of the radio component.
After replacing the faulty elements, the bridge is again checked for resistance. All its semiconductors should show approximately the same parameters.
Important! If there are no necessary semiconductors for replacement, it is prohibited to install parts from other bridges. VAZ cars, especially older models, have very weak generators. Any load can break through the semiconductor again.
If a malfunction is detected
Diodes are attached to the wafers by pressing into a hole of a smaller diameter, so replacing a faulty semiconductor yourself is a troublesome task that does not guarantee 100% success. Diode bridges for domestic cars are inexpensive, so if a fault is detected, it is replaced with a new one.
Rectifier units of modern foreign cars cost a lot of money, so replacing the diode in such a bridge is economically justified. It is better to entrust this procedure to a specialist.
Faulty diodes are replaced with elements with the same power rating. Power reduction is not acceptable.
The quality of operation of the entire electrical system of the car depends on the condition of the diode bridge. If the previously listed signs of malfunction appear, you must immediately diagnose, repair or replace it.
What causes the need to replace diodes
Someone will say that it is much easier to take and replace the diode bridge completely. However, the cost of a diode bridge for a foreign car varies from 1000 to 4000 rubles, sometimes the price is even higher. Depends on the brand of the car, the type of generator, whether it is an analogue or an original. New diode bridge or under contract. You ordered a diode bridge online, you thought it was new and original, but an unscrupulous storekeeper put a Chinese equivalent in your package. Go figure it out right away.
Many, having replaced the diode bridge on their generator, prefer not to throw away the old one, but to repair it and leave it in their stash.
The question is that not everyone can independently remove a bad diode and press in a new one. It is best to turn to the services of professional craftsmen at a service station. The diode bridge repair process is streamlined and will not take much time.
Generator repair kits
To eliminate these generator malfunctions, you will need to carry out repairs. When you start searching for a generator repair kit on the Internet, you should prepare for disappointment - the kits offered usually contain washers, bolts and nuts. And sometimes the generator can only be restored to functionality by replacing brushes, a diode bridge, a regulator... Therefore, the brave person who decides to repair it makes an individual repair kit from those parts that fit his generator. It looks something like this, as shown in the table below, using the example of a pair of generators for a VAZ 2110 and a Ford Focus 2.
| Generator KZATE 9402.3701-03 | ||
| Detail | Catalog number | Price, rub.) |
| Brushes | 1127014022 | 105 |
| Voltage regulator | 844.3702 | 580 |
| Diode bridge | BVO4-105-01 | 500 |
| Bearings | 6303 and 6203 | 345 |
| Generator Bosch 0 986 041 850 | ||
| Detail | Catalog number | Price, rub.) |
| Brushes | 140371 | 30 |
| Brush holder | 235607 | 245 |
| Voltage regulator | IN6601 | 1020 |
| Diode bridge | INR431 | 1400 |
| Bearings | 140084 and 140093 | 140/200 rubles |
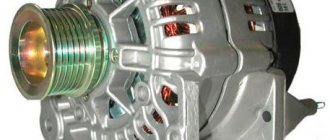
What is a generator diode bridge and what functions does it perform?
The rectifier unit (another name for the device) is an integral part of the generator and serves to modify the alternating current produced by the unit into direct current, necessary for charging the battery and powering all electrical appliances of the car.
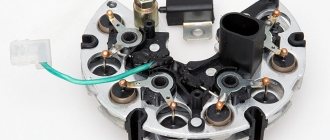
It is located on the frame of the generator and consists of 4, 6, 9 or more diodes placed on two insulated aluminum or steel horseshoe plates that act as cooling radiators.
The main components of the bridge are semiconductor diodes (most often silicon) that conduct current in the required direction. They are the rectifiers that convert alternating current into direct current. The battery acts as a capacitor, softening the inevitable voltage drops.
Instead of diodes, the circuit can use valves of any type - for example, selenium columns, the principle of operation of the circuit will not change.
Repair and troubleshooting
All mechanical problems are eliminated by replacing faulty components and parts (brushes, belt, bearings, etc.) with new or serviceable ones. Older generator models often require grinding of slip rings. Drive belts are replaced due to wear, maximum stretching or expiration of service life. Damaged rotor or stator windings are currently being replaced with new assembled ones. Although rewinding is common among auto repair services, it is becoming less and less common - it is expensive and impractical.
But all electrical problems with the generator need to be solved by checking both other elements of the circuit (in particular the battery), and directly its parts and output voltage. One of the common problems that car owners have to deal with is overcharging , or, conversely, low voltage of the generator . Checking and replacing the voltage regulator or diode bridge will help eliminate the first malfunction, but low voltage output will be a little more difficult to deal with. There may be several reasons why the generator produces low voltage:
- increased load on the on-board network by consumers;
- breakdown of one of the diodes on the diode bridge;
- failure of the voltage regulator;
- slipping of the poly V-belt (due to low tension)
- poor contact of the ground wire on the generator;
- short circuit;
- dead battery.
Source
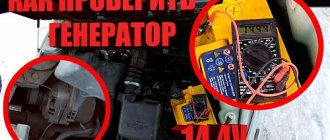
How to check without dismantling
You can diagnose the device on site without disassembling the generator or desoldering the part. To do this, unscrew all the wires on the generator and voltage regulator, set the tester to ohmmeter mode, and connect the lamp to the battery in the manner described above.
This method allows you to check the serviceability of the entire bridge and individual groups.
Short circuit
For this test, the positive electrode is applied to output 30 of the generator (“plus” of the power rectifier), and the negative electrode is applied to the housing. A resistance value of 1 indicates that the bridge is in good condition.
One end of the lamp is connected to the negative terminal of the generator, the other to the positive terminal. A lit lamp indicates a short circuit.
Negative group
The negative electrode of the tester is connected to the frame of the generator, the positive electrode is connected to one of the diode bridge mounting bolts. The negative group is operational if the resistance is infinity.
To check with a lamp, connect its minus to the generator casing, and the plus to the axle mounting bolt. The lamp lights up or flashes when there is a malfunction in the negative group of elements.
Positive
The positive probe of the multimeter is connected to the positive terminal, the negative one to the bridge mounting bolt. With a working group, the resistance is infinite.
The negative of the lamp is connected to the bridge mounting bolt, the plus is applied to the positive terminal. A lit lamp indicates a short circuit in the positive semiconductors.
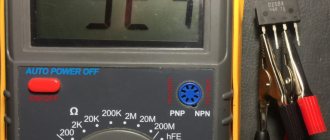
Checking the diode - how to do it right
Based on the fact that a diode is a semiconductor device that passes current only in one direction, let’s begin the test.
· The diode bridge must be removed. Diodes need to be checked individually, disconnected from the general circuit. The test must be performed in the “diode check” position.
· We touch the bottom of the diode with one of the probes, and its terminal with the other. The amount of resistance depends on the power of the semiconductor. The resistance should be in the range of 400 - 800 Ohms, that is, the diode passes current in this direction.
· Swap the probes. A unit on the multimeter screen is evidence that there is no conductivity in this direction. This means the diode is locked and intact.
· Otherwise, if the tester shows the presence of resistance (current flow) in both directions during testing, this indicates a diode malfunction.
Important to remember. When checking diodes located on the same plate, the resistance should not differ. The permissible maximum is 5 Ohms, no more. The presence of a diode with a large difference in readings indicates its poor performance and subsequent charging problems. Therefore, it is advisable to change the diode.
Checking diodes with a tester is very conditional; you can more accurately verify the integrity of the diode only under load, for example, by connecting a lamp to the circuit or on a diagnostic test bench at a service station.
Diagnostics of a diode bridge using a multimeter
Before you understand why the diode bridge may be burning, you first need to dismantle the broken unit. After which a sound indication is installed on the measuring device. If such a function is not provided in the multimeter, then the test takes place in 1 kOhm mode. Individual measurements are carried out for all diodes. In the process of checking with the working contact, you need to touch the ends of the diode several times, while swapping the probes of the device. In one case, the test shows an infinitely high resistance, and in the second, the parameters should fluctuate in the range from 500 to 700 Ohms. If the measurement results turn out to be the same in different directions, this indicates that the diode under test has failed and needs to be replaced.
Why does the gene burn out?
There are many reasons leading to gene (diode) burnout. However, it is customary to highlight the most common:
- dirt or oil has penetrated into the bridge, causing a short circuit;
- on Japanese cars - due to a voltage drop when the generator wears out;
- due to the fault of the voltage regulator, which supplies the rotor, and that, accordingly, to the diode bridge;
- due to a “bad” battery (there are batteries that consume 40A and easily kill the gene);
- the gene was flooded with water;
- the standard fuse responsible for protecting the gene during short circuits has failed;
- The battery terminals were installed incorrectly.
Thus, the generator on the car burns out for various reasons. We are always talking about the combustion of the regulator and diode bridge. Everything is checked quickly based on superficial symptoms. If you need to be 100 percent sure, you have to disassemble the generator.
Forget about fines from cameras! An absolutely legal new product - Traffic Police Camera Jammer, hides your license plates from the cameras that are installed in all cities. More details at the link.
- Absolutely legal (Article 12.2);
- Hides from photo and video recording;
- Suitable for all cars;
- Works through the cigarette lighter connector;
- Does not cause interference to radios and cell phones.
We prepare the diode bridge for self-diagnosis
You can check the functionality of the generator bridge on your own if you understand how the diodes are connected. But before you start diagnosing, you need to carry out preparatory measures. To do this, you need to the generator to gain access to the diodes:
- The fasteners (bolts) holding the front and back covers are unscrewed.
- The next step is to disconnect the housing from the starter winding.
- If the bridge structure is collapsible, then the assembly is unscrewed.
- The positive terminal is disconnected from the generator.
- The method of attaching the minus is checked. If the terminal is independent, it is disconnected.
- After removing the front wall, the bridge is disconnected from the windings. For this purpose, a soldering iron is used to heat the leads until the solder boils, after which they are carefully moved to the side using a screwdriver.
After completing the preparatory work, you need to figure out the question of how to properly check that the diode bridge has burned out ?
Types of generator faults
Due to the fact that any generator is an electromechanical device, there will be two types of faults - mechanical and electrical.
The first includes the destruction of fasteners, housing, malfunction of bearings, pressure springs, belt drive and other failures not related to the electrical part.
Electrical faults include winding breaks, diode bridge faults, brush burnout/wear, turn-to-turn short circuits, breakdowns, rotor beating, and relay-regulator faults.
Often, symptoms that indicate characteristics of a faulty generator can also appear as a result of completely different problems. As an example, poor contact in the fuse socket of the generator field winding circuit will indicate a generator malfunction. Suspicion may also arise due to burnt contacts in the ignition switch housing. Also, the constant lighting of the generator malfunction indicator lamp can be caused by a breakdown of the relay; the blinking of this switching lamp may indicate a generator malfunction.
The main signs of a faulty generator:
- When the engine is running, the battery discharge warning lamp flashes (or stays on continuously).
- Rapid discharge or overcharging (boiling) of the battery.
- Dim car headlights, a rattling or quiet beep when the engine is running.
- Significant change in headlight brightness with increasing speed. This may be acceptable when increasing the speed (re-throttle) from idle, but the headlights, having lit up brightly, should not increase their brightness any further, remaining at the same intensity.
- Extraneous sounds (howling, squeaking) coming from the generator.
It is necessary to regularly monitor the tension and general condition of the drive belt. In case of cracks and delaminations, immediate replacement is necessary.
Is the generator working or not working?
Automakers displayed information about the operating status of the main unit that generates electricity in the car on the driver’s panel. The icon in the form of a battery with terminals should go out after the car is started. This means that the power has switched from the battery to the generator.
When the signal beacon does not fade away, this fact indicates problems in the circuit. Also, a weak battery charge confirms the failure to receive normal current.
How to determine the health of the generator
Information about the operating status of the main unit responsible for generating electrical energy in the car is displayed on the dashboard for the convenience of motorists. The icon on the instrument panel that resembles a battery should go out after starting the vehicle’s power unit. This means that the power to the main electrical components has been switched from the battery to the generator. If the indicator does not go out, this indicates a breakdown in the electrical circuit. Problems may also be indicated by insufficient battery charge due to the lack of normal current rating.
Topic: What goes to the generator exciter wire?
Theme Options
Search by topic
Pointer
Registration 03/25/2011 Address Kaliningrad Messages 92
| Thank you: |
| Received: 0 Sent: 1 |
I measured the blue wire and nothing seemed to be going through it.
Lupo
Registration 06/15/2011 Address Tver Age 36 Messages 230
| Thank you: |
| Received: 5 Sent: 0 |
That's right, the blue wire is needed to excite the generator. When the ignition is turned on, there should be supply voltage. It comes from the dashboard: 12 pin tidy, black 10-pin connector (1 pin) in the ECU box, then to the generator. Look for a cliff.
I confirm
Without this very wire, the gene is excited quite well
But first you need to accelerate.
Pointer
Registration 03/25/2011 Address Kaliningrad Messages 92
| Thank you: |
| Received: 0 Sent: 1 |
Depends on the residual magnetization of the armature and stator.
Well, yes, I agree. I started this recently. And if it stays overnight, he probably won’t get aroused without forced arousal.
Pointer
Registration 03/25/2011 Address Kaliningrad Messages 92
| Thank you: |
| Received: 0 Sent: 1 |
So the problem is in the tidy.
READ How to connect popcorn to computer
Source
VAZ 2110 battery light is on
Photo of the instrument panel of a VAZ 2110 car. The battery lamp is third from the left in the bottom row.
It is possible, for example, a loss of current when the car is turned off, or increased consumption of on-board electronics during a trip. And even under normal discharge conditions, the generator may fail and will not replenish the battery charge due to a malfunction. If, when starting the VAZ 2110, the battery lamp on the dashboard lights up. then the latter option takes place.
But why exactly the generator does not supply voltage is quite difficult to immediately determine. The most obvious scenario is that the belt is loose and the generator simply does not reach the required speed for operation. Then you just need to tighten the belt and monitor the behavior of the light bulb. If even after this the battery does not charge, the voltage regulator may be the culprit.
In operating condition, the generator voltage regulator smoothes the output voltage to a level of 13.2-14.7 V. If in the on-board network the value is much different, then the problem lies precisely in the operation of the regulator. If 14.7 V or higher is detected, then the regulator shorts the “ground” and the “DF” output - you can try to eliminate the short circuit. If the voltage, on the contrary, is low, then the voltage regulator needs to be changed completely. In the considered scenarios involving a faulty regulator, the VAZ 2110 battery light comes on only in the case of low voltage, since the battery begins to “starve”
But the effect of high voltage on the battery is much more detrimental - it is very important to monitor the voltage in the network
Another reason for the blinking light on the “ten” may be the failure of one of the diodes of the rectifier unit. The diode is designed to pass current only in one direction and prevent it from going to the generator.
Photo of the rectifier diodes of the VAZ 2110 generator. 3 - additional diodes, 2 - negative diodes, 1 - positive diodes
Very often, diodes burn when they are incorrectly connected to the cigarette lighter in the cabin. Then the current from the battery can go into the generator winding, which does not bode well. When a diode fails, it can either conduct current in both directions or not pass it at all. Then the generator does not supply current, and the battery runs out. And when the battery light on the panel is on on a VAZ 2110, it is recommended to check the alternator diodes with an ohmmeter.
This is quite simple to do, but to do this you first need to disassemble the generator. First of all, you need to remove the wire from the negative terminal of the battery. Then the excitation wire from the generator itself is disconnected. Use a 10mm wrench to unscrew the nut that secures the remaining wires. Remove the belt, unscrew the adjusting screw and retaining nut. Remove the tension bar, use a 13mm wrench to unscrew the fastening nut from the bottom and the fastening bolt. After this, the generator will move away.
To get to the rectifier block, which contains the diodes, you will need an 8mm and 10mm wrench. A Phillips screwdriver will also come in handy. We connect an ohmmeter to each diode in turn and look at its reaction. If the contacts are connected differently, the ohmmeter should show either infinity or a value of about several hundred ohms. Accordingly, each diode must be tested using two options for connecting the device. And if the picture does not correspond to that described, the diode needs to be replaced, or better yet, a new rectifier unit must be installed. The same reason for replacement can be damage to the valves of the rectifier unit.
Another reason why the VAZ 2110 battery light is on may be the unsoldered terminals of the generator excitation winding, which have lost connection with the slip rings. Then you can simply solder them back, or replace the entire generator rotor. The same effect, namely the complete absence of current supply from the generator, will result in a short circuit or break in the generator excitation winding. It is necessary to disassemble the device and use an ohmmeter to check the stator terminals for short circuits, and by passing current for open circuits. When shorted to ground, the generator begins to whine characteristically, which in itself should seriously alert the car enthusiast. In order not to get wrapped up, it is easier to simply replace the entire stator assembly - however, the cause of the failure still needs to be found out.
Also read other reviews
Replacing starter bushings for VAZ 2109
One of the breakdowns of the starter is the failure of the bushings. In this article we will look at the technology for replacing starter bushings for the VAZ 2109 model.
The VAZ 2109 starter turns poorly or does not turn
A common problem is that the starter seems to work, but it doesn’t seem to work, it turns, but poorly. You will learn what to do in this case from this review.
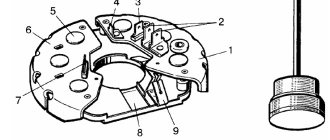
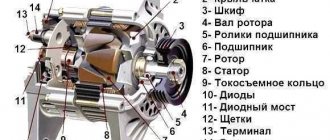
Generator design: its composition
The mere fact that a gene is always under high load a priori includes it in the risk group. He needs an eye and an eye. Experienced and caring motorists know this. Beginners and amateurs don’t pay attention, “ruin” the new device and battery, and then wonder why the car doesn’t drive.
What does a gene consist of? Its components necessarily include a rotor or inductor. Its main function is to create a magnetic field inside the device. The rotor has a shaft on which there is an excitation winding. Due to it, the gene is recharged or self-excited.
Generator structure
On the same shaft there is a contact group consisting of copper rings. They are connected through terminals to a winding or exciter, as it is also called.
Depending on the gene model, fan blades and a drive pulley may be installed on the rotor shaft. One of the bearings is also located here.
Stator – performs the function of providing the device with alternating voltage. The stator consists of a metal core assembled from plates and a winding.
The stator has grooves that are used for laying winding turns. They can be laid in different ways, but there are always several windings connected to each other according to the diagrams.
The generator has a rectifier unit, which is needed to convert the current. That is why it is also called a converter. Thanks to the block, the voltage is converted from sinusoidal to constant, and then goes to the car's on-board network.
A converter is nothing more than plates that dissipate heat well. Modern rectifier units have semiconductor-type power diodes installed (more about them below).
The brush assembly ensures the transmission of voltage to the contacts. The assembly consists of graphite brushes, springs and a holder. In the genes of the latest series, the brush assembly is connected to the voltage regulator, together they create a single unit.
Regulator brush assembly on the gene
The regulator itself or the tablet serves to maintain the voltage of the unit at specific values. In other words, it is the tablet that is responsible for the stable current produced by the gene. As you know, the crank shaft rotates with different amplitudes. Therefore, we need a regulator that will stabilize the frequencies, and thereby influence the winding. The regulator not only controls the frequency of the pulses, but also regulates their duration.
And, of course, the diode bridge is an important part of the generator. It is described in detail below.
Checking with an indicator screwdriver
This is the simplest test option, which will give a general idea of the condition of the diode bridge and the entire circuit as a whole. To operate, you only need an indicator; the entire procedure is performed under voltage, so extreme caution should be used:
Rice. 2. Testing with an indicator screwdriver
- Also touch the positive terminal with a screwdriver - if the light comes on, then the diode bridge normally passes positive half-cycles, respectively, there is potential at this pin. If it does not light, there is damage to the diode bridge.
- Repeat the same procedure with the negative terminal. Be sure to divide the test into both terminals of the rectifier unit, since a fault may be present in any diode and in any branch.
As you can see, in this example an insulated blade screwdriver was used. This is due to the need to perform work under voltage, when you can cover different parts of the electrical installation with a metal part, which will entail extremely unpleasant consequences. A significant disadvantage of the method is its low information content and the limitation on the operating voltage - since the indicator is designed for a nominal value of 220 V, it cannot be used for low-voltage circuits.
Video: Diode bridge. Examination
Selection of diodes for the rectifier bridge
The main thing they look at when choosing a diode is power. It depends on the highest rated current generated by the generator. The higher the generator power, the more powerful the diodes. Diodes for the rectifier bridge are conventionally divided into categories: low power diodes, current 300 mA;
medium power diodes, current 300mA – 10 A;
high power diodes above 10 A.
Diodes are divided according to the type of material used, these are germanium and silicon. Most manufacturers prefer silicon diodes. The main reasons for choosing silicon diodes:
· low reverse current;
· high permissible reverse voltage up to 1500 V;
·operability of silicon diodes from -60 to +150оС
Germanium diodes have a low reverse voltage value of up to 400V. They operate in the temperature range from -60 to +85°C.
For example, to replace diodes for a Bosch generator with a 140A for a Touring Custom car. For such a generator you need 50A diodes, for example, Cargo 50A 138634 and Cargo 138635, for a 140A generator you will need 12 pieces, for an 80A generator 6 pieces.