A short list of typical generator malfunctions
To begin with, we will briefly list the characteristic malfunctions of a car generator without any explanation. This will make it possible to assess in general terms, so to speak, the scale of the disaster. It is quite possible that some of the breakdowns listed are already familiar to you. As a rule, these include those that occur very often, and almost every first-time car enthusiast with little experience has encountered them at least once.
So, here are 10 typical car generator malfunctions:
- Poor contact or damage in the battery charging circuit.
- Slipping or broken drive belt.
- Worn or damaged rotor bearings.
- Worn or stuck brushes.
- Wear of slip rings.
- Incorrect operation or failure of the voltage regulator relay.
- Interturn short circuit or break in the generator windings.
- Breakdown of the rectifier bridge diodes.
- Broken rectifier bridge diodes.
- Insufficient generator power.
We will return to a detailed consideration of each of these breakdowns later. As well as the symptoms by which these malfunctions can be identified.
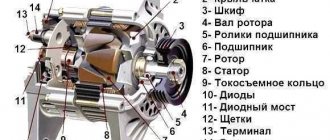
Design and principle of operation of a car generator
First, it would not hurt to at least get acquainted in general terms with the structure of the generator, as well as with the operating principle of this component of the car. Many car enthusiasts, unfortunately, always skip this stage and immediately begin diagnostics and repairs. As a result, due to a misunderstanding (or misunderstanding) of the operating principle, things often reach a dead end, serious mistakes are made, short circuits and more serious breakdowns are provoked than before. It follows from this that the search for and elimination of any malfunctions of a particular component of the car must begin with studying its structure and operating principle.
The car generator is designed and works as follows. Actually, the electricity used to power the on-board network and charge the battery is generated through electromagnetic induction. It is removed from the terminals of the stator windings, inside which the rotor rotates on two bearings. The rotor is driven by the engine crankshaft, to which it is connected by a belt.
The first feature that you need to know about is the uneven rotation speed of the generator rotor. It completely depends on what speed the engine is running at. Accordingly, if the rotor were powered (for excitation) by the same voltage, then at the output of the generator we would receive a jumping voltage, which is unacceptable for the vehicle’s on-board network.
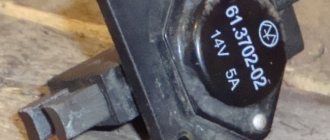
This problem can be solved quite simply. The rotor is not supplied with a stable voltage, but with an adjustable one. A relay-regulator is responsible for this, which “monitors” the voltage at the battery terminals and, depending on the current indicators, adjusts the power supply to the rotor. Roughly speaking, when the voltage at the generator output reaches the upper permissible level (for example, 14.4 volts), the relay-regulator circuit stops powering the rotor. The output voltage drops, the RRN resumes excitation of the rotor, and so on in a cycle with a very high frequency. Due to this, the voltage of the on-board network is constantly maintained at the same level, and does not depend on what speed the car engine is running at.
The second feature of a car generator is that it generates three-phase alternating voltage. And to power the on-board network and charge the battery, it must be constant. To solve this problem, the generator is equipped with a rectifier bridge consisting of diodes. As a rule, the rectifier has six main diodes (two for each phase), as well as three additional ones.
In principle, this knowledge will already be enough to understand the characteristic generator malfunctions described below. Although, for successful self-repair, it doesn’t hurt to delve into the topic using additional sources of information.
The generator is the most actively loaded electrical component
While the car is moving, the generator shaft speed reaches 10-14 thousand revolutions per minute.
This is the highest rotation speed among all car components, 2-3 times higher than the engine speed. The service life of the generator is approximately two times less than that of the engine: approximately 160 thousand kilometers.
There are two types of generators:
- alternator (used in most passenger cars)
- DC generator (used on most commercial vehicles)
Poor contact or damage in the battery charging circuit
In order for the generator unit to operate, it must be securely connected to:
- The positive terminal of the battery.
- Ignition switch.
- "By the mass."
Let's start with the last one. The generator is in contact with ground due to its metal casing, with which it is attached to the car engine. As a rule, in this place the contact is always good, and almost never causes a unit malfunction. However, it should be remembered that the engine itself is connected to the negative terminal of the battery using a wire. And problems very often arise with it.
The most common one is poor contact. In most cars, the ground is connected to the engine somewhere at the bottom. Dirt, moisture, temperature changes, leaking oil and other factors lead to oxidation and corrosion of the connection. This manifests itself in the form of several symptoms.
Firstly, due to poor grounding, voltage drops in the vehicle’s on-board network may occur. The result is a systematic undercharging of the battery. Secondly, significant voltage drops are observed when a serious load is turned on - a stove, air conditioner, subwoofer, headlights, and so on.
Checking the engine ground is very simple. To do this, using a multimeter turned on in ohmmeter mode, measure the resistance between the negative terminal of the battery and any point on the engine. If the device shows more than 0.05 Ohm, the “ground” should be cleaned of dirt and oxides. It may be necessary to replace or even add another wire connected in parallel with the main one. Due to this, the cross-section of the ground wire increases, and very often problems such as voltage drop or undercharging of the battery are solved.
Absolutely the same with the positive power wire of the generator. It goes directly to the battery, and is quite thick. If this wire is damaged or has poor contact at the attachment points, the symptoms described above appear. The malfunction can be eliminated by simply cleaning the contact pads. If the wire is mechanically damaged (as a result of carelessness, corrosion or vibration), then it must be replaced with a new one, respecting the cross-section.
Additionally, the condition of the contacts of the control wire coming to the generator from the ignition switch (thin), as well as the signal wire (on the relay regulator), is checked. Poor contacts at these points also lead to unstable and incorrect operation of the entire battery charging unit.
Drive belt slipping or breaking
Drive belt slippage can be caused by several reasons. Firstly, its insufficient tension. Secondly, water from puddles or motor oil gets on the generator pulley. Thirdly, the belt stretches over time, sags, and also begins to slip periodically. As a rule, at first this malfunction appears only when the generator begins to operate under serious load. This happens because as the load increases, the rotor resistance increases.
Very often, belt slippage is determined by a characteristic squeak that is heard when the engine starts, as well as immediately after turning on the load. Quite often this whistle can be heard in rainy weather, which indicates water has gotten on the generator pulley. If this happens, the belt must either be tightened or replaced with a new one.
A broken alternator belt is a more serious malfunction, which it is highly advisable to notice immediately after its occurrence. The primary symptom is the warning light on the instrument panel coming on, indicating that the battery is not charging. This lamp should only light when the ignition is on and the engine is off. In all other modes it does not light up.
A secondary symptom of a broken alternator belt is low voltage on the on-board network. When everything is working normally, the voltmeter should show at least 13.8-14.5 volts. If while driving the voltage drops to 12 volts, this means that the on-board network is powered only by the battery. Conclusion - the generator is faulty.
Initial check sequence
An initial performance check can be performed without dismantling the generator. To do this, set the multimeter switch to the “constant voltage 20V” mode. Next, connect the black probe to the negative terminal of the battery, the red one to the positive terminal. After this, you need to start the engine and let it reach a stable idle speed. Multimeter readings ranging from 13.5 to 14.5 Volts are considered normal.
If the multimeter shows a value less than 12.8 Volts, the charging process either does not occur at all, or the charging current is extremely small. The generator is operating in abnormal mode. When the voltage is more than 14.8 Volts, the battery is overcharged. This can lead to boiling of the electrolyte, an increase in acid concentration, and destruction of the battery plates.
To check the voltage at the generator output, you need to turn on the car lamp in the open circuit from terminal 30 on the generator (the point of contact with the thick wire leading to the positive terminal of the battery or starter).
Next, connect the multimeter in the “=20V” mode with the red probe to contact 30 of the generator, and the black probe to the stripped contact on the engine or body. Start the engine. The reading on the multimeter should not be more than 15.5 volts whenever the accelerator pedal is pressed. Otherwise, further operation of the generator is dangerous for the electrical equipment of the car.
When checking, you should evaluate the degree of tension of the generator belt. Using a simplified method, this can be done by pressing on the belt with your finger.
Read also: How to determine steel grade by chemical composition
The amount of deflection should be within 0.5 - 1 centimeter. At the same time, check the degree of belt wear. To determine the reasons for abnormal operation of the generator and perform repair work, dismantling the generator is required.
Worn or damaged rotor bearings
When the generator rotor bearings wear out, several problems can arise. Firstly, due to a violation of the axis of rotation of the armature shaft, it begins to touch the stator with its windings. Secondly, due to significant wear, the bearings may even jam and the rotor will stop. The first problem will first lead to voltage drops in the on-board network, and later to an interturn short circuit in the stator. What happens when the bearings jam is already clear. The rotor will stop.
In most cases, wear of the generator bearings can be detected in advance by a characteristic hum coming from under the hood. This sound can change volume and tone depending on what load is currently placed on the vehicle’s on-board network. That is, for example, when the headlights are turned on, the hum can increase significantly, which makes it possible to identify a malfunction in advance.
To avoid the problems described, it is highly advisable to periodically check the bearings for play. To do this, just grab the generator pulley with your hand and shake it from side to side. If the bearings are in good condition, there should be no play.
Self-test of the generator
The easiest way is to check the fuse. If it is in good condition, the generator and its location are inspected. The free rotation of the rotor, the integrity of the belt, wires, and housing are checked. If nothing arouses suspicion, the brushes and slip rings are checked.
There are frequent cases of complete wear or failure of both bearings and stator failure.
The most common mechanical problem with a generator is bearing wear. A sign of this malfunction is a howling or whistling sound when the unit is operating. Of course, the bearings must be replaced immediately, after first inspecting the seats. Loose drive belt tension can also cause poor generator performance. One of the signs may be a high-pitched whistle from under the hood when the car accelerates or accelerates.
To check the rotor field winding for short-circuited turns or breaks, you need to connect a multimeter, switched to resistance measurement mode, to both contact rings of the generator. Normal resistance is from 1.8 to 5 ohms. The readings below indicate the presence of a short circuit in the turns; above – direct winding break.
To check the stator windings for ground fault, they need to be disconnected from the rectifier unit. If the resistance readings given by the multimeter are infinitely large, there is no doubt that there is no contact between the stator windings and the housing (“ground”).
DETAILS: How to get rid of the smell of gasoline in the cabin 9 basic methods
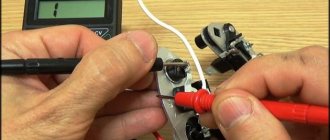
To check the diodes in the rectifier block, use a multimeter (after completely disconnecting it from the stator windings). The test mode is “diode test”. The positive probe is connected to the plus or minus of the rectifier, and the negative probe is connected to the phase terminal. After this, the probes are swapped.
If the values of the multimeter readings differ greatly from the previous ones, the diode is working; if they do not differ, it is faulty. Another sign indicating the imminent “death” of the generator diode bridge is oxidation of the contacts, and the reason for this is overheating of the radiator.
To check the diodes in the rectifier block, use a multimeter (after completely disconnecting it from the stator windings). The test mode is “ diode test”. The positive probe is connected to the plus or minus of the rectifier, and the negative probe is connected to the phase terminal. After this, the probes are swapped.
If the values of the multimeter readings differ greatly from the previous ones, the diode is working; if they do not differ, it is faulty. Another sign indicating the imminent “death” of the generator diode bridge is oxidation of the contacts, and the reason for this is overheating of the radiator.
Worn or stuck brushes
Brushes are needed to supply power to the constantly rotating generator rotor. As a rule, together with the relay-regulator they are one separate part. The brushes are made of conductive graphite and are spring-loaded to ensure reliable contact with the commutator. If the contact between them and the slip rings is poor (or absent), the generator will not be able to work normally (or will not work at all).
The most common problem with brushes is their natural wear. When the graphite wears away, the brushes are simply not long enough to power the rotor. As a rule, at the initial stage, this malfunction manifests itself in the form of abundant sparking inside the generator. Due to wear, the brushes do not always come into close contact with the commutator, and sparking occurs between these parts.
The second characteristic malfunction of the generator is associated with the so-called freezing or sticking of the brushes. This happens due to graphite dust or other dirt getting into the brush guides. The latter become motionless, and therefore can no longer be pressed by springs to the collector. As a result, increased sparking is first observed, and then the generator stops generating electricity altogether.
Along with sparking, critical wear or sticking of brushes can be detected by voltage drops in the on-board network (if there is a voltmeter in the cabin) or by a warning lamp on the instrument panel. It should also be noted that this malfunction can be identified visually without removing the generator from the car. The brush assembly, as a rule, can be easily removed together with the relay regulator, as it is secured with two screws. If the brushes are worn out, then this is only a replacement. Sticking can be eliminated by cleaning the guides of graphite and other dirt.
How to remove brushes from a generator located on a car
If the previous owner installed a brush block with a relay regulator in the generator, then the question of how to change the brushes on the generator without removing it from the car is much easier to solve than replacing individual brushes. If there is sufficient space in the engine compartment, it is also possible to replace the brushes separately without having to remove the generator.
All work on the vehicle's electrical equipment should begin by disconnecting the battery.
- The voltage regulator is removed;
- The production of brushes is measured;
- Old brushes are unsoldered;
- Contacts are cleaned;
- New brushes are soldered;
- The free movement of the generator brushes is checked;
- The regulator is installed in place;
- We connect the battery and start the car.
If everything went without errors, you won’t have to worry about how to check the generator brushes for a long time. Now, knowing perfectly the structure of the generator after disassembling it, it will not be difficult for you to fix other generator malfunctions with your own hands.
Wear of slip rings
The slip rings are located on the generator rotor shaft. They are designed to transmit power from the brushes to the armature winding. The rings are made of copper and therefore are subject to wear and tear over time. The symptoms of this malfunction are absolutely the same as in the case of brushes - sparking, voltage sags, as well as complete generator failure. To clarify the diagnosis and eliminate the breakdown, dismantling and complete disassembly of the unit is required. Fortunately, on many common generators these parts can be changed without problems and are relatively inexpensive.
Incorrect operation or failure of the PRN
The voltage regulator relay “suffers” from several types of breakdowns, which are quite easily diagnosed even without disassembling the generator. The first sign of its malfunction is low voltage on the on-board network. Drawdowns can be observed both without load and with it. This happens due to the fact that the electronic components in the relay-regulator circuit burn out.
The second known sign of a unit malfunction is that the generator does not work at all. This is determined both by the warning lamp on the instrument panel and by the readings of the on-board voltmeter. The latter in such cases begins to show a voltage of around 12 volts. As the battery discharges, the performance decreases noticeably.
It is worth noting that most of the described generator malfunctions manifest themselves in approximately the same way. In particular, low voltage and a lit warning lamp may indicate either a failure of the relay-regulator or other failures. To identify the fault more accurately, there is a fairly simple method for checking the voltage regulator relay. It is performed using an adjustable power supply and a multimeter according to the following algorithm:
- The relay regulator is removed from the generator.
- A multimeter is connected to the brushes in voltage change mode (you can also use a 12-volt test light).
- The negative of the power supply is connected to the ground of the relay regulator.
- The plus is fed to the wire that comes out of the relay regulator.
- The power supply voltage rises to 14.0-14.5 volts.
- When this voltage is reached, a working relay-regulator should operate - the control lamp connected to the brushes goes out.
If the control lamp does not light up at all at any voltage, there is a break in the relay-regulator. If the lamp does not turn off when the control voltage is reached (14.0-14.5 volts), but continues to glow further, this is called a breakdown of the relay regulator. In practice, the first outcome means the battery is undercharged, and in the second, it is overcharged (with boiling, swelling of the case, and even an explosion).
The so-called new type relay regulators (with two wires) are a little more difficult to check, but possible. The difference is that the second wire must be supplied with a simulated alternating voltage during testing. How to do this at home can be found on the Internet.
Main symptom of malfunction
The driver is notified of alternator failure only when the charge level drops below battery voltage. The indicator lamp for lack of battery charging lights up on the dashboard. The danger of the situation is that the vehicle’s on-board network is powered by a battery, which has a limited and, in the event of a generator malfunction, irreplaceable capacity.
Extraneous noise
It is very easy to catch a generator creating extraneous noise when the engine is running - just remove the belt that rotates the generator pulley. If the noise disappears, then the source has been identified correctly. Possible malfunctions and their characteristic symptoms:
- whistling (possibly only when cold) - slipping of the alternator belt. In most cases, squeaking can be eliminated by correct belt tension. Sometimes the cause of the squeak is technical fluids getting on the belt, pulley misalignment, or excessive tension;
- metallic creaking, noise – dry friction of generator bearing parts. Ignoring signs of a worn bearing can lead to it jamming and breaking the service belt. The malfunction is eliminated by installing a new bearing;
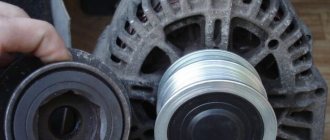
- noise bordering on rattling - a malfunction of the overrunning clutch. The inertia pulley is designed to absorb shock loads and extend the life of the alternator belt. As practice shows, a faulty overrunning clutch very quickly leads to a break in the alternator belt.
Stator winding
There are only 3 possible malfunctions:
- short to ground or to the stator housing;
- break;
- short circuit between turns.
For a quality check, you should use a megger, but since the device has a rather narrow specialization, initial diagnostics can be done with a multimeter in resistance measurement mode. Since quite large currents pass through the winding, the best way to check the unit is to use a 220 V light bulb.
When checking, be sure to follow electrical safety rules!
It is more difficult to check an interturn short circuit, since the resistance of a working winding is very low, which does not allow obtaining reliable results when diagnosing with a conventional multimeter. In the case of an interturn short circuit, the winding resistance will be less compared to a working unit. A short circuit can be identified by calculating the resistance using the formula. To check, you need to use a laboratory power supply to pass current through the winding, measure the voltage and current (the method is shown in the video).
Field winding
The condition of the generator rotor winding is checked in a similar way. When checking for a short to the rotor housing or a break, one of the contacts will be the collector. You can detect a break by applying “-” to one contact ring of the collector, and “+” to the other (if the winding is intact, the lamp will light up). Faults in the stator and rotor windings quite rarely lead to generator breakdown, but in the case of comprehensive diagnostics, checking them should not be neglected.
Diode bridge
Cars are equipped with an alternating current generator, but DC current is needed to power the on-board network. It is the diode bridge that serves to rectify the current. There is only one sign of a malfunction - a drop in charging voltage, but it can manifest itself, for example, only when consumers are turned on. It is noteworthy that the breakdown may be accompanied by a hum that increases with increasing engine speed.
Unfortunately, it is not possible to fully check the diode bridge with a multimeter. Using a universal meter, you can find breakdown of diodes and broken contacts, but floating faults that can affect the operation of the generator can only be found using specialized equipment.
The operating principle of a diode bridge is based on the property of a diode to pass current in only one direction (in the event of a breakdown, the current will flow in both directions). Diagnostics can be done with a multimeter in resistance measurement mode. A simple method for checking a diode bridge is well demonstrated in the video.
Voltage regulator relay
The voltage regulator is one of the parts that most often causes generator malfunction. The unit is designed to maintain the charging voltage within limits that are safe for the battery and on-board network. If the design of the generator did not include a relay-regulator, the charging voltage would increase in proportion to the increase in engine speed. It is precisely this consequence of a breakdown of the voltage regulator that is most detrimental to the battery and control units of the vehicle’s electronic systems.
Characteristic symptoms of failure:
- charging voltage drop. Due to a faulty regulator, the voltage on the brushes turns off at lower voltage, so undercharging occurs;
- recharge. The charging voltage should not exceed 14.5 V. Exceeding this value for a long time can lead to overheating of the battery and boiling off of the electrolyte. Therefore, if you notice liquid leaks on the battery case, be sure to check the charging voltage with a multimeter.
The most convenient way to check the voltage regulator is with a laboratory power supply.
Brush unit
During operation of the generator, the brushes are constantly in contact with the commutator plates, which naturally leads to a decrease in their length (the commutator also wears out, but to a much lesser extent). When wear becomes critical and the spring force is no longer sufficient for good contact, the excitation of the armature winding deteriorates. As a result, brush wear leads to a drop in charging voltage.
It is typical that the decline occurs gradually, so it can manifest itself at the most inopportune moment. Under a certain set of circumstances (a dying battery, severe frosts, a large number of cold starts, short-distance trips with many consumers turned on), the emf of the battery on a frosty morning will not be enough to start the engine. Owners of diesel cars should pay special attention in this regard, since the starter requires more current to start the internal combustion engine of the Diesel cycle.
Breakdown or breakage of the rectifier bridge diodes
Let us recall that the diode bridge serves to rectify the alternating voltage generated by the stator windings of the generator. Since there are three phases in a car generator, the bridge also consists of three branches - two diodes in each. When a breakdown of one of the diodes occurs, a sharp increase in voltage in the vehicle’s on-board network may be observed. A breakdown is when a diode begins to pass current in both directions, but should only pass in one.
A break in the diodes of the rectifier bridge does not threaten anything catastrophic, unlike a breakdown. For example, if one of the diodes breaks, then only two of the three phases continue to work. If there is no heavy load on the on-board network, then this malfunction may not be noticed. However, when the load is turned on, the power of the two phases is no longer enough, and therefore there is a drop in the on-board voltage.
It is clear that if all the diodes break, which does not happen very often, the generator stops functioning completely. This can be seen both in the voltage of the on-board voltmeter and in the warning lamp on the instrument panel. To more accurately check the bridge diodes, you will need to dismantle the generator and partially disassemble it.
Insufficient generator power
A fairly common problem nowadays, which, in fact, is not a malfunction. It lies in the fact that after installing any powerful non-standard equipment on a car, wild voltage drops are observed. These symptoms may well indicate that the power of the existing generator for the load placed on it is not enough.
This is most often observed after installing powerful acoustics, xenon headlights, an inverter that allows you to get 220 volts on board the car, and so on. This “malfunction” can be eliminated very simply - by selecting and installing a more powerful generator. Unfortunately, such a decision is often reached when the standard generator cannot withstand the load and burns out.
How to check the functionality of a generator with a multimeter?
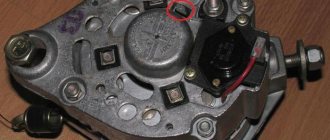
To understand the process, consider the generator device:
Failure of any of the components will lead to disruption of the entire unit. First, the mechanical part is checked. There is no need to remove the generator; just remove the drive belt from the pulley.
Rotate the shaft by hand and make sure that the rotor rotates freely in the bearings. When the brushes are worn critically, a characteristic grinding noise will be heard.
Then check the integrity and fastening of the power and control cables. If visual inspection does not help to find the fault, the generator will need to be checked with a multimeter.
This procedure does not require a professional device with many functions. Three modes are sufficient: “continuity test”, “resistance measurement”, “voltage measurement”.
Brief summary
Most of the typical malfunctions of a car generator are very easy to identify and fix even without relevant experience. If the generator is working, but the problem is reduced only to voltage sags or sparking in the brush assembly, it can be solved by cleaning the contacts or replacing the relay regulator. Extraneous sounds from the generator can be eliminated by tightening or replacing the belt, as well as installing new bearings. Other faults - short circuits in winding turns, breakdowns and breaks of diodes, etc. - are best left to specialists, since their elimination requires not only bare knowledge, but also experience.
Repair and troubleshooting
Vehicle power source – generator
The generator is the source of current in the entire car, so it must always be in good condition. Nevertheless, in the VAZ 2109 car, malfunctions on the generator appear quite often. In addition, they can be of a different nature. In general, faults in electrical equipment in cars occupy a leading position in terms of frequency of occurrence, but they should be addressed immediately, as otherwise a short circuit may occur. On a VAZ 2109, a malfunction in the generator can be easily eliminated on your own.