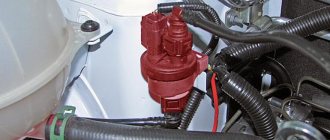
Purpose and principle of operation of the adsorber purge valve
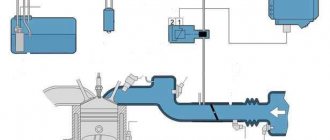
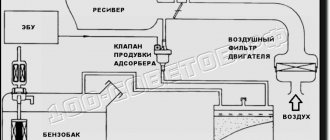
Absorber valve diagram
The EVAP system is installed on gasoline internal combustion engines to prevent fuel vapors from entering the atmosphere. The canister purge solenoid valve is an element of this system. Therefore, to find out what the canister valve is for and how it works, it is important to understand the operating principle of the entire system. The design of the adsorber is a container filled with an adsorbent, most often activated carbon. The device is connected to the fuel tank and the control valve of the vehicle using special tubes.
The canister valve is installed between the intake manifold and the canister and performs the function of ventilation.
Gasoline vapors formed in the fuel tank penetrate the separator, where they condense and are discharged back into the tank. Some of the vapor does not have time to condense in the separator and enters the adsorber through the steam line. In the filter system, they are absorbed by activated carbon, accumulated and then supplied to the intake manifold when the engine starts. The process of absorption of fuel vapors takes place only when the engine is turned off. When the car is running, the electronic control unit opens the canister purge solenoid valve, through which air enters and thus ventilation occurs. In this case, the accumulated condensate along with air is sucked out of the adsorber and again enters the engine, where it is burned out. The canister valve provides ventilation to the entire mechanism and directs fuel condensate back to the engine.
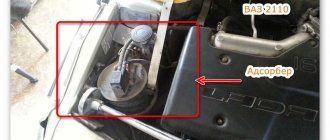
Complete removal of the adsorber from the power system
Gas distribution mechanism (timing): device, purpose and principle of operation
Some VAZ 2114 owners decide to completely remove this part from their car for reasons of savings and to prevent future malfunctions. There are two ways to do this.
Method 1. After completely removing the adsorber from the VAZ-2114, the hose leading to the throttle valve assembly is closed using a plug. A fuel filter from any VAZ carburetor engine is inserted into the hose running from the gas tank to the adsorber.
Method 2. The adsorber is removed along with the support. The hoses previously connected to it are closed using plugs. A small hole (1-2 mm) is drilled in the standard gas tank plug to connect the cavity to the atmosphere. You can also use the cap from a carburetor “eight” or “nine” to depressurize the fuel tank.
After upgrading the power system, it may be necessary to update the firmware of the engine control unit, since it will perceive the absence of an adsorber as a malfunction in the engine and switch to emergency operation. This threatens to significantly reduce the traction qualities of the car.
The adsorber in the VAZ-2114 is an important element in the engine power system, which allows you to slightly reduce fuel consumption and eliminate the smell of gasoline in the cabin.
This adsorber has been bothering me for a long time, not because it got in the way or spoiled the aesthetic appearance. But it simply fell into disrepair, buying a new one in my opinion is a waste of money, especially since there was excess pressure in the tank, which indicates a problem in the gasoline vapor circulation system. Replacing the separator and valves did not lead to a satisfactory effect, although it became a little better. In winter there is no smell at all, only when opening the fuel filler cap there was a splash. In the warm season, the pressure increases and the smell of gasoline appears in the cabin. There is a simple way to solve this problem
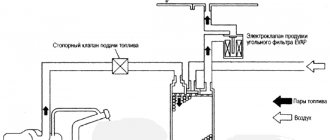
; Drill a hole in the lid to bleed air or do not screw it in completely. But this is all for the lazy, and I went a different route. Let's first figure out how the factory fuel circuit works
The diagram shows how a hose comes out of the tank to the separator (9)
from it to
the safety valve (8)
and
the gravity valve (7)
.
Further through the tube the route goes to the two-way valve (5)
and
the adsorber (4)
. The reason for the smell of gasoline is precisely a malfunction of the 9,8,7 system. Replacing the latter does not always lead to an improvement in the situation. Now we know that if we disconnect the adsorber, the problem with the smell will not go away; for this we need to redo the valve ring around the separator. After the modification, my system will look like this
In my opinion, this is much more correct than simply disconnecting the adsorber and attaching a heated filter from the carburetor fuel system to the hose.
Now to the point, the last photo for memory (when the work began the sun was shining, but this is no longer important)
Adsorber, a term coined from English, denoting a part of a vehicle responsible for absorbing combustion products by liquid (solid) bodies in a special container. The VAZ 2114 adsorber (some call it an absorber) uses activated carbon as an absorbing element, which is what the domestic model is filled with.
The adsorber is a complex mechanical joint, sold and installed on the car, according to the kit, from the following elements:
- the adsorber itself;
- purge valve;
- gravity valve;
- vapor separator;
- tubes: steam line, valve, adsorber;
- fuel drain pipe;
- additional hoses.
Malfunctions of the adsorber valve and their elimination
Almost continuous operation of the fuel vapor absorption system canister can cause damage to the purge valve. A malfunction of the canister valve often leads to damage to the fuel pump. Due to poor ventilation of the adsorber, gasoline accumulates in the intake manifold, the engine loses power, and fuel consumption gradually increases. This may cause the engine to stop completely. The operation of the entire vehicle depends on how the adsorber valve works.
How to check the functionality of the canister purge valve?
Checking the absorber valve
In order to notice and correct problems in time, regular checks of the adsorber valve are necessary. In this case, a breakdown can be identified by certain indirect signs. When the engine is idling or in cold weather, the vapor absorption system makes characteristic sounds, like the canister valve clicking. Some people confuse this sound with a faulty timing belt, rollers or other parts. You can check this by sharply pressing the gas pedal. If the sound has not changed, it means the canister valve is clicking. Experts can explain what to do if the canister valve knocks too loudly. To do this, you need to tighten the adjusting screw, and first it is cleared of epoxy resin.
The absorber valve can be adjusted.
The screw turns approximately half a turn. If you tighten it too much, the controller will generate an error. This adjustment of the adsorber valve will make its operation softer and the knocking noise quieter. However, how to check the adsorber valve for damage? Valve failure can be determined using an error diagnostic system or mechanical testing. Electronic error codes are stored in the controller's memory and indicate electrical damage. To check the valve, it is recommended to pay attention to errors generated by the controller, such as “open circuit of the canister purge valve control circuit.” Signs by which a malfunction of the adsorber valve can be mechanically determined:
- The appearance of dips at idle speed of the engine.
- Very low engine thrust.
- There is no sound of valve operation when the engine is running.
- A hissing sound when the gas tank cap is opened indicates a vacuum in the system. This is a sure sign of a malfunction in the adsorber ventilation.
- The appearance of a fuel smell in the car interior. However, its appearance can also be caused by other reasons.
Do-it-yourself absorber valve replacement
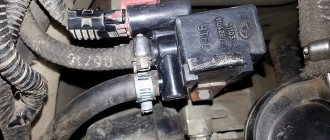
If signs of malfunction are detected, the valve will need to be repaired or replaced. The adsorber valve is inexpensive and easy to replace. To dismantle you need to have a pair of Phillips screwdrivers and know where the canister purge valve is located. Operating procedure:
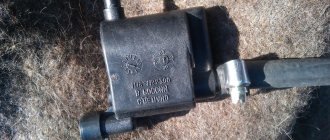
The markings on the old and new valves must match.
- Open the hood and find a cylindrical device - an adsorber.
- Remove the negative terminal from the battery.
- Disconnect the wire block by pressing the latch and pulling it towards you.
- Loosen the valve.
- Remove the fittings under the latch and disconnect the hoses.
- Remove the valve together with the bracket from the adsorber.
- The new valve is installed in the reverse order.
Thus, even such a small element as the adsorber valve performs important functions and its malfunction can seriously disrupt the operation of the entire engine. Therefore, it is important to monitor the condition of your car and carry out diagnostics on time.
1200 rub. for the photo report
We pay for photo reports on car repairs. Earnings from 10,000 rubles/month.
Write:
Many car owners may be interested in the question of how to check the adsorber and its purge valve when the diagnostics showed it to be faulty (an absorber error popped up). It is quite possible to make such a diagnosis in a garage, however, for this it will be necessary to dismantle either the entire adsorber or just its valve. And to carry out such a test, you will need metalworking tools, a multifunctional multimeter (to measure the insulation value and the “continuity” of the wires), a pump, and a 12 V power source (or a similar battery).
Sensor check
In order to make sure that the crankshaft position meter is working properly, it is necessary to check it. On injection VAZ-2107 cars, the crankshaft position sensor is located on the camshaft cover bracket.
There are 3 ways to check.
- The first way to check is to measure the resistance of the inductor. To do this, the sensor must be removed, having previously set marks that determine its correct position. Using a multimeter, you need to measure the resistance at the coil terminals. A resistance of 500 to 700 Ohms indicates the serviceability of the part. Lower resistance is a sign of failure.
- The second method will require measuring the inductance of the coil itself. To do this, you need a multimeter with a similar function. The measurement is carried out similarly to the resistance measurement. The performance of the part will be indicated by a value from 200 to 400 Gn.
- The third method is the most difficult, but also the most reliable. To check you will need an oscilloscope. The oscilloscope can be used either analog or digital. But for digital you will need a computer with accompanying software. The check is carried out while the engine is running. The test contacts of the oscilloscope must be connected in parallel to the coil leads. A straight line on the oscilloscope screen will indicate proper operation. Jumps, interruptions or waves on the screen will indicate a sensor malfunction.
What is an adsorber for?
Before moving on to the question of how to check the operation of the adsorber, let us briefly describe the operation of the gasoline vapor recovery system (in English called Evaporative Emission Control - EVAP). This will give a clearer picture of the functions of both the adsorber and its valve. So, as the name implies, the EVAP system is designed to capture gasoline vapors and prevent them from entering the surrounding air unburned. Vapors are formed in the fuel tank when gasoline is heated (most often during long-term parking under the scorching sun in the warm season) or when atmospheric pressure decreases (very rarely). The task of the fuel vapor recovery system is to return these same vapors to the engine intake manifold and burn them along with the air-fuel mixture. As a rule, such a system is installed on all modern gasoline engines in accordance with the Euro-3 environmental standard (adopted by the European Union in 1999).
The EVAP system consists of the following elements:
- carbon adsorber;
- adsorber purge solenoid valve;
- connecting pipelines.
There are also additional wiring harnesses leading from the electronic engine control unit (ECU) to the said valve. With their help, this device is controlled. As for the adsorber, it has three external connections:
- with the fuel tank (through this connection, the generated gasoline vapors directly enter the adsorber);
- with an intake manifold (it is used to purge the adsorber);
- with atmospheric air through the fuel filter or a separate valve at its inlet (provides the pressure drop necessary to purge the adsorber).
Crankshaft sensor - design and principle of operation
The crankshaft position sensor or DPKV on the VAZ 2107 ensures engine operation (not stable, but overall). With its help, the ECU knows what position the crankshaft is in. From this, the control unit knows the location of the pistons in the cylinders, which directly affects fuel injection through the injectors, and the occurrence of a spark to ignite the fuel assembly.
The device in question has a simple design. The sensors installed on the seven work on the principle of inductance. The part consists of a metal cylindrical base with a wire wound on the surface (coil). The top of the coil is covered with a permanent magnet. The operation of the device is associated with a ring gear, which is attached to the crankshaft. It is with the help of this ring gear that the sensor records signals and transmits them to the computer. The principle of operation of the device is as follows: when the crown tooth is located at a level with the steel core of the DPKV, an electromotive force is induced in the winding. A voltage appears at the ends of the winding, which is detected by the ECU.
The gear wheel consists of 58 teeth. Two teeth on the wheel have been removed to determine the starting position of the crankshaft. If the DPKV fails, which is extremely rare, then starting the engine and its operation is simply impossible. The marking of the sensor, which is installed on the VAZ 2107, is as follows - 2112-3847010-03/04.
External signs of malfunction
Before checking the adsorber purge valve, as well as the adsorber itself, it will certainly be useful to find out what external signs accompany this fact. There are a number of indirect signs, which, however, can be caused by other reasons. However, when identifying them, it makes sense to also check the operation of the EVAP system, as well as its constituent elements.
- Unstable engine operation at idle speed (the speed “floats” to the point where the car starts and stalls, because it runs on a lean air-fuel mixture).
- A slight increase in fuel consumption, especially when the engine is running “hot”, that is, in a warm state and/or in hot summer weather.
- It is difficult to start a car engine when it is hot; it is usually impossible to start it the first time. And at the same time, the starter and other elements associated with starting are in working condition.
- When the engine operates at low speeds, the loss of power is very noticeable. And at higher speeds there is also a decrease in torque.
In some cases, it is noted that if the normal operation of the gasoline vapor recovery system is disrupted, the smell of fuel may enter the cabin. This is especially true when the front windows are open and/or when the car is parked for a long time in a closed box or garage with poor ventilation. Also, poor operation of the system is caused by depressurization of the fuel system, the appearance of small cracks in fuel lines, plugs, and so on.
How to check the adsorber
Now let’s move directly to the algorithm for checking the adsorber (its other name is the fuel vapor accumulator). The main task in this case is to determine how sealed its body is and whether it allows fuel vapors to escape into the atmosphere. So, the check must be performed according to the following algorithm:
- Disconnect the negative terminal from the vehicle battery.
- First, disconnect all hoses and contacts going to it from the adsorber, and then remove the fuel vapor accumulator directly. This procedure will look different for different machines, depending on the location of the assembly, as well as the mounting means with which it was secured.
- It is necessary to plug (seal) the two fittings tightly. The first one goes directly to atmospheric air, the second one goes to the solenoid purge valve.
- After this, use a compressor or pump to apply a slight air pressure to the fitting going to the fuel tank. Don't overdo it with pressure! A working adsorber should not leak from the housing, that is, be sealed. If such leaks are detected, then most likely the unit needs to be replaced, since it is not always possible to repair it. In particular, this is especially true if the adsorber is made of plastic.
It is also necessary to perform a visual inspection of the adsorber. This is especially true for its body, in particular, for rust spots on it. If they occur, then it is advisable to dismantle the adsorber, get rid of the mentioned spots and paint the body. It is imperative to check whether coal from the fuel evaporation accumulator is leaking into the EVAP system pipelines. This can be done by inspecting the condition of the adsorber valve. If it contains the mentioned carbon, then you need to change the foam separator in the adsorber. However, as practice shows, it is still better to replace the adsorber completely than to engage in amateur repairs that do not lead to success in the long term.
Part 3 of 3: Check the car in motion
After you have successfully replaced the evaporative purge valve, you will need to test drive your vehicle. Hopefully you have a good memory of the symptoms that led to the replacement of the component, because the goal of the upcoming test drive is to make sure they disappear. In fact, after such a repair, a short trip is enough, since if the symptoms remain, they will appear when the engine starts or when it is idling.
The notes below are intended to help you perform a test drive or determine whether you have done the right job to replace a faulty part.
- Start the car engine. Let it warm up to the required temperature.
- Check the gauges on the dashboard. Make sure the check engine light is no longer on. If it still lights up, turn off the engine and perform a diagnostic scan. The error code should clear after performing this procedure on most vehicles.
- Turn off the engine. Once the check has shown that no warning lights are illuminated anymore, turn off the engine.
- Remove the fuel tank cap. This is done to check whether a vacuum is created in the tank. If, when removing the tank cap, a large amount of vacuum is detected underneath, then it is necessary to check that the hoses are connected correctly. Perhaps they were switched places.
- Take a test drive, namely 15 km on the road. When you return home, make sure the check engine light and other warning lights are off.
This job is fairly simple to perform, but since it involves the EVAP and fuel systems, it can be a bit tricky. If after reading these instructions you still do not feel confident to make this repair, please have a certified mechanic replace the canister solenoid valve and remove the fuel fumes.
Vote, did you like the article?
How to check the adsorber valve
If after checking it turns out that the adsorber is in more or less working condition, then it makes sense to check its purge solenoid valve. It’s worth mentioning right away that for some machines, due to their design, some actions will differ, some of them will be present or absent, but in general the verification logic will always remain the same. So, to check the adsorber valve, you must perform the following steps:
- Visually check the integrity of the rubber hoses included in the fuel vapor recovery system, in particular those directly approaching the valve. They must be intact and ensure the tightness of the system.
- Disconnect the negative terminal from the battery. This is done to prevent false alarms of the system diagnostics and to enter information about the corresponding errors into the electronic control unit.
- Remove the absorber (usually it is located on the right side of the engine, in the area where the air system elements are installed, in particular the air filter).
- Turn off the electrical power to the valve itself. This is done by removing the electrical connector (the so-called “chip”) from it.
- Disconnect the inlet and outlet air hoses from the valve.
- Using a pump or medical bulb, you must try to blow air into the system through the valve (into the holes for the hoses). It is important to ensure the tightness of the air supply. To do this, you can use clamps or a thick rubber tube.
- If everything is in order with the valve, it will be closed and air will not be blown through. Otherwise, its mechanical part will fail. You can try to restore it, but this is not always possible.
- It is necessary to supply electric current from the power supply or battery using wires to the valve contacts. At the moment the circuit closes, you should hear a characteristic click, which signals that the valve has actuated and opened. If this does not happen, then perhaps instead of a mechanical failure there is an electrical failure, in particular, its electromagnetic coil has burned out.
- With the valve connected to an electric current source, you must try to blow air into it in the manner described above. If it is working properly, and therefore open, then this should work without problems. If it is not possible to pump through air, then the valve has failed.
- Next, you need to reset the power from the valve, and there will be a click again, indicating that the valve has closed. If this happens, it means the valve is working.
How to repair the adsorber and valve
It’s worth noting right away that in most cases both the adsorber and the valve cannot be repaired; accordingly, they need to be replaced with similar new units. However, as for the adsorber, in some cases, over time, the foam in its body rots, which is why the carbon contained in it clogs the pipelines and the solenoid valve of the EVAP system. Rotting of foam rubber occurs for banal reasons - from old age, constant temperature changes, exposure to moisture. You can try to replace the foam separator of the adsorber. However, this cannot be done with all units; some of them are non-separable.
If the adsorber body is rusted or rotten (usually also due to old age, temperature changes, constant exposure to moisture), then you can try to restore it, but it is better not to tempt fate and replace it with a new one.
Similar reasoning is valid for the solenoid valve of the gasoline vapor recovery system. Most of these units are non-separable. That is, the electromagnetic coil is sealed into its body, and if it fails (insulation breakdown or winding break), it will not be possible to replace it with a new one. Same with the return spring. If it has weakened over time, you can try to replace it with a new one, but this is not always possible. But despite this, it is still better to perform a detailed diagnosis of the adsorber and its valve in order to avoid expensive purchases and repairs.
Some car owners do not want to pay attention to the repair and restoration of the gasoline vapor recovery system, and simply “turn off” it. However, this approach is not rational. Firstly, this really affects the environment, and this is especially noticeable in large cities, which are not known for their clean environment anyway. Secondly, if the EVAP system does not work correctly or does not function at all, then under pressure gasoline vapors will periodically escape from under the gas tank cap. And this will happen as often as the temperature in the gas tank increases. This situation is dangerous for several reasons.
Firstly, the tightness of the tank cap is broken, the seal of which is broken over time, and the car owner will probably have to periodically buy a new cap. Secondly, gasoline vapors not only have an unpleasant odor, but are also harmful to the human body. And this is dangerous provided that the car is parked in an enclosed area with poor ventilation. And thirdly, fuel vapors are simply explosive, and if they come out of the gas tank while there is a source of open fire next to the car, a fire hazard will arise with very dire consequences. Therefore, there is no need to “turn off” the fuel vapor recovery system; instead, it is better to keep it in working order and monitor the adsorber and its valve.
Conclusion
Checking the adsorber, as well as its electromagnetic purge valve, is not very difficult even for novice car owners. The main thing is to know where these components are located in a particular car, as well as how they are connected. As practice shows, if one or the other unit fails, they cannot be repaired, so they need to be replaced with new ones. As for the opinion that the fuel vapor recovery system needs to be turned off, it can be attributed to misconceptions. The EVAP system must work normally and ensure not only environmental friendliness, but also safe operation of the vehicle in various conditions.
Lada 2107 › Logbook › VAZ 2107 Fuel vapor recovery system
It was quite warm over the weekend and I went to get a gene test. Along the way there was a strong smell of gasoline. Inspection of the tubes and hoses in the trunk and on the bottom did not yield anything; there were no leaks. I think I’ll change the next gas cap (their pioneers are fucking crazy when they drain the gas...).
As a replacement, my native one previously purchased a cover from a Chevrolet Niva due to a seal. She sat down in her seat as she was there. It really seals better. The rubber ring did not wrinkle. On the original one there is simply a defective seal with spring rings. BUT... When I took it apart, I didn’t find anything there. I kept wondering why she was blown back and forth so easily.
It turned out that the tank communicated with the atmosphere and all the fumes went straight out through the lid and were sucked through the trunk into the cabin. There is a hole in the gas tank lining. Accordingly, there was a smell in the trunk. Replacement cover from Priora. It was blown through suction) easily, while blowing through with significant resistance. Found it in the only store for... Niva and Chevrolet Niva))
I left work due to need. There was still a smell of gasoline from time to time. Had arrived. I open the lid. Pshyyyyyk... I released the pressure))) The lid works! Accordingly, the adsorber, pipelines from the tank to the adsorber, the gravity valve, the separator are next in line. I remove the fitting coming from the pipeline to the gravity gun. The pipeline to the adsorber and the adsorber itself are purged. The adsorber communicates with the atmosphere through the third purge fitting. I remove the fitting on the “gravity” and... Pshyyyk... After blowing the separator out, it turned out to be fine. In addition, I also trimmed the fitting going to the “gravity gear”.
I excluded the “gravitap” from the vapor recovery system and connected the pipeline directly to the separator with an oil- and petrol-resistant hose without fittings. After the test drive, not a drop of smell! PS The sellers had difficulty identifying this device. It’s hard to find it in retail along the way...
How to eliminate the smell of gasoline in the interior of a VAZ-2107 (injector): tips
VAZ-2107 is the latest classic Zhiguli model. The “Seven” of recent years of production was characterized not only by an updated engine, but also by a new power system. The VAZ-2107 is the only classic that could have an injector installed from the factory. But even after such changes, owners complain about the smell of gasoline in the cabin. On a VAZ-2107 (injector) it can appear for various reasons. This is not always a technical failure. Read more about this problem, as well as how to eliminate the smell of gasoline in the cabin on a VAZ-2107 (injector) further in the article.
Fuel system features
"Seven" is an improved version of "Six". The latter, in turn, like all its predecessors, was distinguished by a carburetor power system. On the VAZ-2107 an injector can be used to supply the combustible mixture.
This system is more reliable and efficient. The use of an injection power system on the VAZ-2107 made it possible to increase power by 5 percent and reduce fuel consumption by 7 percent. An injection system is a whole complex of parts that combines the following elements:
- Control block.
- Sensors (mass air flow and lambda probe).
- Idle speed regulator.
- Fuel tank with adsorber valve.
- Pump.
- Filter.
- Injectors.
- Connecting tubes and hoses, as well as wiring.
A more detailed diagram of the VAZ-2107 fuel system (injector) is presented below.
How it works? Fuel is supplied to the injectors under pressure. It is much higher than that of carburetor cars, but it is pumped not by a mechanical, but by an electric pump. On injection “Sevens”, a submersible pump is installed directly into the tank. On carburetor engines it is mechanical and is located in the engine compartment. Because of this, he often overheated on hot days. A submersible pump pumps fuel out of the tank, where it enters the intake manifold through tubes under a pressure of 3 - 3.5 atmospheres. Gasoline first undergoes a purification procedure. For this purpose, a fine and coarse filter is provided (the latter is located directly in front of the pump). The amount of fuel that enters the cylinders is dosed by the injectors themselves using electronics. Excess gasoline flows through the fuel check valve into the tank. This element is two-way. It is indicated by the number 10 on the diagram of the VAZ-2107 fuel system (injector), which is presented above.
Video - causes and consequences of detonation
VAZ injector detonation is measured using an electronic system, the readings of which are displayed by a sensor (DS) on the dashboard. The main goal of DD is to control the detonation process in the vehicle cylinders. Inside the device there is a plate made of piezoceramics and a small resistor. Both elements of the VAZ-2108 or 09 are connected by a connecting block. The structure of the sensor is characterized by a broadband structure secured to a stud with a nut. Its diameter is 22 mm.