If the car starts to slip under load, most likely the problem is in the clutch. It is dangerous to move with a faulty unit, so it should be changed as quickly as possible. The article provides detailed instructions on how to replace a VAZ 2107 clutch, which device to choose, and also includes a video demonstrating the process.
When is it necessary to change?
The clutch system allows the car to move off smoothly, removing the load from the engine, which reduces wear on its parts and extends its service life. Overloads are caused by an inertial moment formed during the rotation of parts of the power unit if the crankshaft speed has sharply decreased.
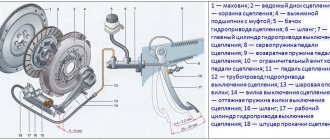
VAZ 2107 assembly diagram
There is no specific time frame for replacing the unit, since the service life of this device mainly depends on operating conditions and the driver’s driving style. It is recommended to diagnose the device after 80 thousand km.
Is it necessary to remove the gearbox?
Car enthusiasts on the forums warn that it is impossible to replace the basket or disc without dismantling the VAZ-2107 gearbox, but experts immediately correct it - it is not always necessary to remove the gearbox; in most cases, it is enough to slightly pull out the gearbox and do this so that the input shaft comes out unhindered clutch baskets.
This option is the most convenient, but only if you are sure what exactly the problem is. Auto mechanics, when getting to work, prefer to inspect the entire device; there will probably be shortcomings, which will also soon make themselves felt, and therefore the clutch will have to be changed again. A visual inspection should be carried out for the following components:
- clutch housing;
- oil seal suitable for the primary type gearbox shaft;
- crankshaft oil seal located at the rear.
Check the serviceability of the brake system; in the VAZ-2107 it often malfunctions.
Symptoms of a problem
The need to repair the clutch assembly is determined by the following criteria:
- extraneous noise occurs when changing speeds;
- the device slips, especially under load;
- the clutch does not disengage completely;
- rattling;
- jerking when starting to move;
- The clutch pedal falls out.
If the described signs appear, it is better not to delay repairs in order to avoid unpleasant surprises along the way.
This video shows the process of replacing a unit on a VAZ classic.
Sorry, there are no surveys available at this time.
Replacing the hose
Clutch hoses often fail, which leads to loss of fluid in the hydraulic drive. All this interferes with normal gear shifting.
Signs of a hose failure are:
- the car shakes after fully depressing the pedal;
- drops appear at the ends of the tube all the time;
- puddles remain at the parking site;
- The pedal, when released, stays in the down position.
Replacement is carried out as follows:
- first of all, remove all fluid from the hydraulic drive;
- then remove the fastenings of the expansion tank and move it;
- unscrew the nuts connecting the hose and clutch tube;
- remove the bracket from the bracket;
- discard the end of the hose;
- from the bottom, disconnect its other end from the working cylinder;
- dismantle the unusable element.
Then all that remains is to replace it with a new one. All work is carried out in reverse order:
- a hose is attached to the cylinder;
- its second end is connected to the clutch hydraulic system;
- the tank returns to its place;
- fresh liquid is poured in.
As you can see, replacing the clutch on the 2107 model, although troublesome, is not too difficult. You will need a new unit and a completely normal set of tools. At the same time, remember - if you do not have confidence in your own abilities, then it is better to contact a service center. This way you are guaranteed to avoid troubles and even greater expenses.
Source
Causes of VAZ 2107 clutch failure
Driven and driven discs are subject to the greatest wear.
Clutch failure can be caused by the following reasons:
- wear, oiling, defects on the surface of friction linings;
- too large gaps or lack thereof in the clutch release drive;
- air entering the hydraulic drive system;
- fluid leakage from the master cylinder and hydraulic drive system;
- loosening rivets;
- disc deformation;
- jamming, wear of the driven disk hub splines, clutch drive mechanism;
- bearing wear;
- malfunction of the driven disc damper springs;
- breakdown of the release fork or its release spring;
- wear of the sealing rings, which impairs the seal.
To eliminate these problems, in each individual case you need to change worn parts; it is better to replace the clutch system assembly.
Visual inspection of the disk
What you need to know
The release bearing is not the weakest link in the clutch system, but for some reason it is the one that causes problems and troubles.
coupling
Some car owners have gotten used to the whistle and simply ignore it. But this cannot continue for long, since untimely solution to the problem can lead to even more complex and expensive repairs. If the situation gets worse, then a simple replacement will not be enough for you.
What's the best way to change?
It is best to replace the device by placing the car on a lift, overpass or inspection groove. If this is not possible, then you can raise the car using a jack to get to the unit from below. For safety, you need to fix the wheels so that the car does not roll or put on the hand brake.
Tools
To carry out repairs, you need to prepare the appropriate tools:
- set of keys;
- screwdrivers;
- pliers;
- clean rags;
- jack;
- new consumables.
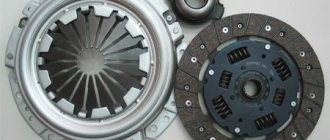
When choosing a new replacement kit, you need to buy original parts, preferably assembled.
Stages
The replacement procedure consists of the following steps:
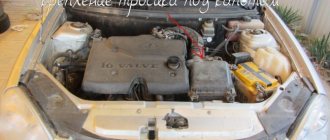
- Having opened the hood, first of all you need to turn off the power to the car. To do this, you need to remove the negative terminal from the battery.
Engine compartment of VAZ 2107
- Then you need to dismantle the air filter housing and unscrew the starter mounting nuts.
- Next in the cabin, you should remove the covers from the gearshift knob, floor mats and sound insulation. Then the gearshift lever must be disconnected from the gearbox. To do this, you need to press on it and use a screwdriver to pull out the white plastic sleeve.
- To perform further repairs, you need to move under the car.
- When removing parts, you should carefully inspect them for wear and defects. Change them if necessary.
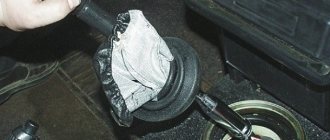
- At the next stage, we disconnect the exhaust pipe, the working cylinder, the universal joint, from which the wires should be disconnected.
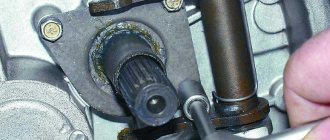
- Then we dismantle the starter, which we unscrewed, and remove the gearbox. The gearbox could simply be moved to the side, but it is better to remove it to check the condition of the oil seal. If necessary, the oil seal should be replaced. It is better to remove the gearbox with an assistant, as this is a labor-intensive process. It is advisable to wash the gearbox after removal.
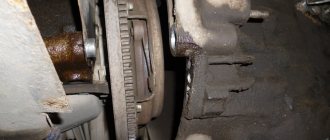
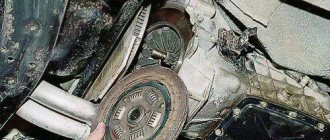
- Next, you can remove the basket and clutch disc. In this case, you need to remember how the disk was installed in order to install it correctly when reassembling.
Removing disks from a node
- Now you can evaluate the state of the components of the node. The anthers and driven disk are subject to the most wear. The master cylinder and clutch fork should be replaced.
- You can only change worn parts, or you can change the entire assembly. It is advisable to replace the clutch assembly, since, having replaced the old parts, there is no guarantee that after a short period of time you will not have to reassemble and disassemble to replace broken parts.
Installing a new drive
- Further assembly is carried out in the same order as disassembly.
After the repair is completed, the vehicle system should be checked for functionality.
Why it stalls - reasons and their elimination
The clutch usually slips due to the following:
- There is no gap between the pressure bearing and the fifth basket;
- the clutch drive is not adjusted;
- oil gets on the discs;
Depending on the cause of this problem, the repair progress is determined. If the problem is with the diaphragm spring, it will have to be replaced with another one. When the friction linings wear out, the driven disk is replaced. When repairing/removing linings, the gaskets are checked. If they are in poor condition, they are also replaced with new ones. If oil gets on the driven disc, you will need to treat it with kerosene and clean it with fine sandpaper.
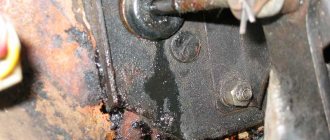
Grease may get on any side of the flywheel and pressure plate due to an increased oil level in the gearbox housing or a leak in the rear crankshaft bearing. To solve the problem, diagnostics are performed and the cause of the leak is eliminated - the seals are replaced, then the spare parts are cleaned.
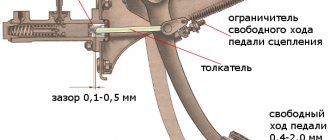
The free stroke according to technical conditions is 30-35 mm, the full stroke is 140 mm. Any deviation from the norm is associated with a malfunction of the transmission and requires adjustment work. The parameter is checked using a ruler. To do this, determine the distance from the pedal to the center of the platform. The adjustment is made on a pit or lift using open-end wrenches 13 by 17 mm and 17 by 19 mm. We clean the adjusting rod and nuts with a brush and treat them with WD-40. Next, the lock nut is loosened, and by rotating the adjusting nut we change the gap. If the free play needs to be reduced, we lengthen the thrust; if it is increased, we shorten it. After completing the work, tighten the locknut.
Damaged release clutch
Required spare parts
Depending on the type of repair - replacement of the VAZ 2107 clutch master cylinder, release bearing or the entire assembly, you will need the following spare parts:
- disk (article Y00200B or 2101-1601130);
- cylinder (article 2101-1602610-15);
- release bearing (article CT 319);
- spring (article - 2108-1601-188);
- bolt (article 13825821);
- clutch (article 2101-1600010, 3000240001 or 2103-1601085);
- rivet (article - 2108-1601-295);
- friction lining (article: 2109-1601-138-02 or 2109-1601-138);
- coupling assembly (article - 2110-1601-180).
Let's summarize
Practice shows that to replace the VAZ 2107 clutch cylinder, you can successfully use not only the original, but also its analogues (article 2101-1602615-17, MB01-1602610, A11.1602610, S1939 S3.1). The work often uses French spare parts from the Valeo brand, and German brands Luk, Kraft and Sachs. It is important that your efforts will be justified in any case, since you should not hit the road with a faulty car, and the price of urgently replacing a VAZ 2107 clutch at a car service reaches 5 thousand rubles.
Source
Tools you will need for your work
It is advisable to immediately prepare all the necessary tools so as not to be distracted from the process:
- jack;
- set of keys;
- pliers;
- hub key;
- screwdrivers;
- mandrel for removing the basket;
- set of heads;
- rags.
The running time depends on what you decide to do. Usually it is about 4 hours. Beginner takes longer. But the efforts will not be in vain, since in car services the usual price for replacing a VAZ 2107 clutch as of December 15, 2018 is 3 thousand rubles.