Replacement algorithm
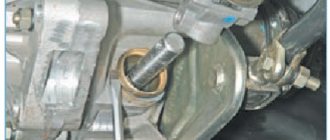
Location of the clutch cable under the hood.
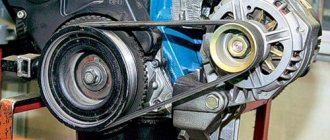
- Open the hood and remove the air filter housing. To do this, remove the sensor (mass air flow sensor), unscrew the clamp and remove the housing itself from the mounting holes.
Scheme for dismantling the air filter housing.
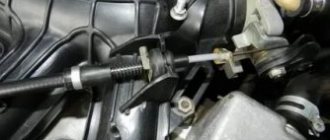
We use a key set to 17. Spray with WD-40 if it’s difficult.
We carefully pick up this bracket with a screwdriver.
Installing the cable is not all because you need to adjust its tension. To do this, you need to pull the cable all the way forward by the threaded end. Taking a caliper, measure the distance from the clutch release lever to the cable. It should be 27 mm .
Next, we assemble everything in reverse order.
How to know when it's time to change the cable
The following signs indicate the need to replace the clutch cable:
- Clicking sounds appear when you press the clutch pedal. They can be eliminated by tightening the cable. If such manipulations do not help, the part will have to be replaced.
- Periodic pedal jamming .
You should not delay replacing the cable, because it can break at the most inopportune moment. In such a situation, you can engage first gear and start from the starter. The car will roll forward with the starter and start, you will have first gear to get to the service station or parking lot! But this is dangerous and we do not recommend doing this. Moreover, this can be bad for the starter.
Source
Adjustment instructions
The Lada Priora is equipped with a clutch cable with a ratcheting mechanism. The cable is backlash-free and does not require adjustment, but manufacturers recommend this be done during every maintenance.
Clutch cable
To adjust the cable on the Lada Priora, you need to prepare a screwdriver and a ruler. The procedure then consists of the following steps:
- To perform work, you must open the hood.
- First you should disconnect the mass air flow sensor and.
- After this, a cable will be visible, at the end of which there is a plastic clip.
- Before adjustment, it is necessary to set the cable to its original position: overcoming the resistance of the spring, push the cable clamp forward until it stops in the direction of movement of the car.
- This clamp should be pulled towards you and the distance between it and the plug should be measured, it should be 27 mm.
- The distance is adjusted by turning the tip counterclockwise. In this way, an increase in distance can be achieved.
- Twist the clamp until the distance is 27 mm. Accuracy is very important here.
- Now you can release the cable and place it in the fork.
- After completing the steps, you need to get behind the wheel and press the pedal three times until it stops.
- Then again you need to measure the distance, it must be exactly 27 mm, otherwise we adjust until the desired distance is achieved.
- Next, you should insert the tip into the groove of the mechanism fork and release it. Thanks to the spring, the tip driver clamp is installed without any gap.
- After adjusting the cable, you need to return everything to its place, start the engine and check the operation of the mechanism.
After adjustment, the clicks disappear and the clutch release pedal operates softer.
Clutch pedals
When the clutch pedal travel is large, the clutch is not completely disengaged, so it still comes into contact with the flywheel of the power unit. When the stroke is low, the driven disk does not turn on completely, which leads to slipping and loss of torque.
You should measure your pedal stroke if the following symptoms occur:
- jerks appear when starting to move;
- noise and shock when shifting gears;
- the pedal gets stuck.
The symptoms described indicate that the mechanism requires adjustment. You can diagnose its operation on Priora yourself. To do this, start the engine, slowly release the PS and start moving. If, when the PS is released, the car immediately begins to move, this means that there is no free play. If the car does not budge even with the pedal fully released, then its travel exceeds the norm. The brake pedal should be at the same level as the brake pedal. In this case, its full stroke will be in the range of 125-135 mm. Fluctuations up to 160 mm are possible.
We measure the free play of the pedal
When making adjustments, loosen the first cable adjusting locknut located in the engine compartment on the bracket.
Locknuts for adjusting free play
By tightening the second locknut, the distance and stroke of the PS are adjusted. Thus, the desired result is achieved. After completing the procedure, the first locknut is tightened.
If you adjust so that the brake pedal is located above the brake pedal, then the clutch will barely leave the floor. If it’s lower, it will set almost at the very end. If the PS is located too high, the basket wears out faster. The ideal option is that the brake and clutch pedals should be at the same level.
Loading …
In order to extend the life of any mechanism, you should use it carefully. You should not constantly keep your foot on the PS; it is better to place it on the left on the floor. During each technical inspection of the Lada Priora, it is recommended to monitor the free movement of the PS and the clarity of gear shifting and, if necessary, make adjustments.
How to replace the clutch cable of a Lada Priora
As practice shows, replacing the cable connecting the clutch drive with the gearbox on a Lada Priora is very rarely required.
It breaks quite infrequently. The most common problem with it is the threads; its components become frayed. For this reason, the clutch mechanism begins to jam regularly and the pedal eventually does not want to return to its place. The replacement procedure is not particularly complicated, but it does require time and some effort. For work you will need the following tools and materials:
- a set of keys;
- flat screwdriver;
- cable clamp.
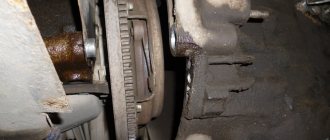
You can get to it in Priora only through the engine compartment. To do this, of course, you will need to open the hood. The cable itself is located next to the gearbox.
In what cases does an element need to be replaced:
- when broken;
- due to jamming;
- due to stretching;
- in case of failure of the mechanism regulating its length.
Level control and topping up
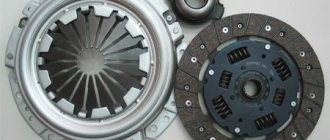
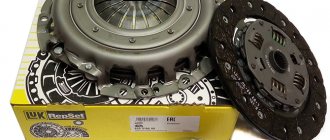
Replacing the VAZ 2114 clutch with your own hands
To diagnose the fluid level you will need a white napkin:
- Start the car engine and drive for 10 minutes, this will allow the transmission to warm up.
- Checking the level is carried out on a flat surface. Stop the engine and wait about ten minutes until the transmission fluid drains into the pan.
- Open the hood and locate the dipstick to check the level. It is located on the right side of the engine compartment.
- Wipe the dipstick with a napkin and reinstall it in the hole, then remove it. If the fluid level is normal, it will be located between the two marks on the dipstick.
The service station channel in Simferopol published a video demonstrating the procedure for changing the lubricant in a Solaris automatic transmission.
Removal process
First of all, you will need to dismantle the air filter:
- remove the cable itself, using a leash to remove it from the fork of the drive that disengages the clutch;
- using 17 keys (2 pieces), partially unscrew the two nuts holding its shell on the gearbox crater bracket and pull it out;
- under the dashboard, located directly in the car interior, tighten the nut with an 8mm wrench from the pedal itself.
You just have to remember that getting to the place where the lower part of the cable is attached to the pedal will be quite difficult.
Access is hampered on one side by the engine compartment partition, and on the other by the lower edge of the instrument panel. The work space is significantly limited. But performing the required operation is quite simple - using a flat-head screwdriver that fits the length.
It will be much more difficult to remove the staple. To make it easier to operate, the pedal is raised as high as possible. Ideally, the bracket should appear above the opening. The main thing is to remove the fastening from the cable itself. In the future, it is easy to put on the bracket either using pliers with long lips, or from the side of the power unit with your hands.
- remove the expansion tank of the engine cooling system;
- dismantle the thermal insulation of the engine on the left side;
- Unscrew the bolts and remove the fastening brackets holding the rubber boot in place (both on the left and on the right) and remove it completely;
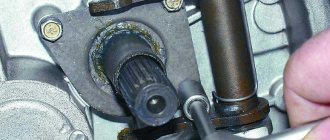
- Using a screwdriver, carefully remove the retaining bracket from the fastening axis of the cable guide;
- the latter, in turn, is removed from the foot drive finger.
How to install
Before installing a new cable, you need to thoroughly lubricate both the bushing and pin on the pedals.
The plastic composition Litol-24 is best suited for this. Then the end of the cable is threaded into a hole located in the bulkhead of the engine compartment on the passenger compartment side of the car so that it ends up in the engine compartment. The rubber cover is also tucked in there.
The gear tip driver is put directly onto the clutch drive pin and secured with a bracket.
The end of the shell is secured with a nut to the pedal bracket. Make sure that the fixation is secure. It is unlikely that anyone will like to, if something happens, climb there again due to a poor-quality connection.
Next, under the hood, the lower part of the shell is stuck into a special hole on the gearbox bracket.
The leash is screwed onto the end of the cable (there is a thread there) - the latter should protrude approximately one turn outward, but no more.
Now comes the time to adjust the clutch drive. Upon completion of this process, the pedal is pressed all the way two or three times and then the setting is repeated.
The working surface of the tip driver must be treated with the above-mentioned lubricant.
All that remains is to make sure that the entire mechanism is now working properly and install all previously removed parts in place.
You can learn more about the process in the video below:
Source
Replacing the clutch cable on a Priora
Welcome! The clutch cable is rare, but it still happens, and the most common thing that happens to it is the metal part of the cable waving, which is why it starts to jam and the clutch pedal simply cannot return back, but we won’t talk about the symptoms (More on that below we have already written) but let us briefly explain why this cable is needed at all, its real name is: “Clutch release cable”, you can already understand that thanks to it the clutch is disengaged (That is, the release bearing separates both disks from each other, thanks to which you can change the speed and in general, the clutch will be disabled when the engine can even work) and if this cable is not there, then switching gears will become much more difficult (Without a clutch you will have to switch them, it’s possible, but you just need experience and quick hands, if you are interested in that how you can change the speed without pressing the clutch pedal, then in this case, watch the video below, everything is explained there and shown with a clear example).
Note! To carry out the work of replacing the clutch cable, you need to stock up on: All the keys that are in your kit (If you have one) and a ruler or caliper (In general, something that can be used to measure the distance between the fork and the leash) and we also recommend in a spare parts store for a car, buy a clamp that attaches the clutch cable to the pin, just tell the consultant that you will still need this clamp if you suddenly lose the old one (And it’s very easy to lose it)!
Mechanics
Mechanically, the clutch operation process is extremely simple. Let's analyze it from the moment the movement begins. After starting the engine, the car is in neutral gear (starting the engine in gear is bad manners). The clutch is depressed all the way - this means that it is turned off, the driven and pressure plates have separated, that is, a moment is created to change gear. The gearshift lever is moved to position 1, and first gear is engaged.
The pedal is smoothly released (the clutch is engaged), at this moment the most important thing happens: the distance between the pressure plate and the driven one is constantly decreasing, and the force transmitted by the engine has already set one disk in motion, which makes the moment of “collision” of the two disks become difficult. If the pedal is released abruptly, they will quickly touch, which means that the disc will stop (imagine that you are walking and tripping on a stone - much the same thing happens to the engine)
The engine may stall, or in the best case, the car will simply “bite.” At such moments, the “petals” on the driven disk suffer greatly - the more “flattened” they become, the closer the time for replacing the “hitch” is. If the discs come into contact smoothly and the driven disc is slowly set in motion, the car starts from a standstill.