Heater (stove) control circuit for VAZ-2110, 2111 and 2112
Heater (stove) control circuit for VAZ-2110, 2111 and 2112
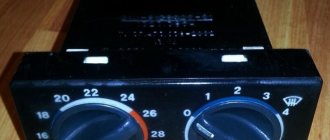
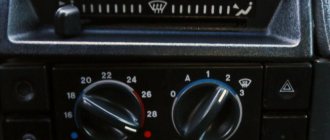
The VAZ-2110, 2111 and 2112 are equipped with an automatic heater control system (AHCS), which itself creates the temperature in the car set by the driver. A kind of climate control without air conditioning, winter version. The brains of the system are controller 3 on a diagram of type 13.3854 with two control knobs. With the left knob we adjust the temperature in the cabin (from 16 to 30 °C), with the right knob we adjust the fan: 0 - off; I - average rotation speed; II - low rotation speed; A - automatically. So, here is a breakdown of the VAZ-2110 heater circuit
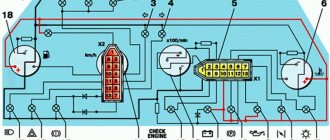
1 — fan electric motor; 2 - additional resistor; 3 - controller; 4 — mounting block; 5 — ignition switch; 6 — cabin air temperature sensor; 7 — recirculation switch; 8 — recirculation valve; 9 — micromotor gearbox for heater damper drive; A - to the instrument lighting switch; B - to power supplies
If the heater motor stops working, you should check fuse F18 in the mounting block
SAUO controllers (automatic heater control system). The one on the left - with automatic mode - is a primitive climate (it is tied to a temperature sensor under the ceiling). On the right is the more common 4-speed. When connected, they are compatible with the standard wiring of the VAZ 2110, with the exception of the misalignment of the MMR sensor (you just need to transfer + - on it).
How does a stove fan work?
The main task of the fan is to take air flow from the outside and deliver it to the deflectors.
The fan is activated by a mechanical button, to which a 12 V power supply is supplied. In the Lada Granta version, the fan operates at one of three speeds. The driver selects the most optimal mode depending on the temperature inside the cabin.
Additional resistors Grants
Without resistors, the fan operates at one speed with a stable rpm. There are a total of 3 resistors installed on the board.
When the lever is moved to the first position (three resistors), the fan rotates at the first speed, the very minimum. Transfer to the second position - second speed (two resistors). Transfer to third - third speed (one resistor). The detailed diagram of the stove is shown in the photo.
Air distributor flap
Installed to regulate the air flow coming from the fan to the glass for blowing through air ducts.
Often, deformation and bending of the plastic body under the influence of temperature leads to flow leakage and depressurization.
Temperature control flap
Regulates the supply of warm air flow from the stove heater to the car interior. The wider the damper is open, the greater the throughput of the “channel”, and vice versa, the narrower it is, the less.
Heat exchanger Grants
Its main purpose is to heat the air flow entering the cabin. The heat exchanger is connected to the power unit through two rubber pipes: supply and return for fluid circulation.
The standard location is the central part of the dashboard of the car interior.
Air temperature sensor inside the car
Structurally installed inside a plastic interior lighting lamp. To avoid overheating, the sensor is equipped with a forced airflow system.
The installation is designed so as not to distort the actual temperature readings.
Pipes
Rubber pipes literally permeated the entire cooling, stove heating, and air conditioning system. Without their help, it is impossible to connect sections of highways with each other. Fixation method: with clamps, metal ties.
Heater (stove) control circuit for VAZ-2110, 2111 and 2112
The VAZ-2110, 2111 and 2112 are equipped with an automatic heater control system (AHCS), which itself creates the temperature in the car set by the driver. A kind of climate control without air conditioning, winter version. The brains of the system are controller 3 on a diagram of type 13.3854 with two control knobs. With the left knob we adjust the temperature in the cabin (from 16 to 30 °C), with the right knob we adjust the fan: 0 - off; I - average rotation speed; II - low rotation speed; A - automatically. So, here is a breakdown of the VAZ-2110 heater circuit
- fan motor;
- additional resistor;
- controller;
- mounting block;
- ignition switch;
- cabin air temperature sensor;
- recirculation switch;
- recirculation valve;
- micromotor gearbox for heater damper drive;
A - to the instrument lighting switch;
B - to power supplies
If the heater motor stops working, you should check fuse F18 in the mounting block
SAUO controllers (automatic heater control system). The one on the left - with automatic mode - is a primitive climate (it is tied to a temperature sensor under the ceiling). On the right is the more common 4-speed. When connected, they are compatible with the standard wiring of the VAZ 2110, with the exception of the misalignment of the MMR sensor (you just need to transfer + - on it).
If you find an error, please select a piece of text and press Ctrl+Enter.
We recommend reading:
Privacy Overview
This website uses cookies to improve your experience while you navigate through the website. Out of these cookies, the cookies that are categorized as necessary are stored on your browser as they are as essential for the working of basic functionalities of the website. We also use third-party cookies that help us analyze and understand how you use this website. These cookies will be stored in your browser only with your consent. You also have the option to opt-out of these cookies. But opting out of some of these cookies may have an effect on your browsing experience.
Necessary cookies are absolutely essential for the website to function properly. This category only includes cookies that ensures basic functionalities and security features of the website. These cookies do not store any personal information.
Troubleshooting
Standard situation: the fan operates in all provided modes, but the heater only blows cold or hot air. In this case, you can conduct a fairly simple test. Turn on the ignition, turn off the heating fan and move the interior temperature control knob to the extreme left (minimum) or extreme right (maximum) position. In this case, you can determine by ear whether the micro-gearbox is working.
If it works, the heater fan is turned on at its fastest speed, and the temperature control is again moved to the far left and far right positions, allowing it to run in each of them for a few seconds. In this case, the sound of the air flow should change; if this is not the case, then this indicates a mechanical break in the connection between the electric motor and the damper or its jamming in one position. This will require further disassembly of the system and restoration of the functionality of the damper.
In a situation where during testing you cannot hear the operation of the micromotor-gearbox, you need to carry out other checks that will help you figure out why the stove temperature regulator is not working. Its handle must be set to the middle position. After this, remove it from its seat on the panel. Without disconnecting the pads, the controller should be turned towards you as much as possible.
We test the supply voltage to the control unit. To do this, you need to take a 12 V test lamp, connect one clamp contact in a small screwdriver, which is inserted into contact 3, with a black wire coming out of it. Insert the second contact into pin 6, which is located under pin 3 and the blue wire comes out of it. If the control lights up when the ignition is turned on, it means that power is supplied to the control unit, and the VAZ 2110 heater regulator stopped working for this reason. For diagnostics to proceed normally, the battery and on-board voltage must be at least 12.5 V.
Checking the automatic control system
Diagram of the automatic heater control system : 1 – fan electric motor;
2 – additional resistor; 3 – controller; 4 – mounting block; 5 – ignition switch; 6 – cabin air temperature sensor; 7 – recirculation switch; 8 – recirculation valve; 9 – micromotor gearbox for heater damper drive; A – to the instrument lighting switch; B – to power supplies Pinout of automatic control system :
The SAUO receives information from:
- – cabin air temperature sensor (No. 6), which has a built-in small-sized fan.
- – MMR (micromotor reducer) (No. 9), information about the position of the heater damper.
Damper control : Based on the received information and the set air temperature, the controller controls the position of the heater damper, sending appropriate signals to the damper drive micromotor.
Fan speed control : to obtain a low rotation speed (all but the last), an additional resistor (No. 2) is used, which has two spirals with resistance (0.23 and 0.82 Ohms). When both spirals are connected to the electric motor power supply circuit, the 1st fan rotation speed is ensured; if a spiral with a resistance of 0.23 Ohm is turned on, the 2nd speed is provided. When the electric motor is turned on without a resistor, the fan rotor rotates at the maximum 3rd speed (4100 min-1).
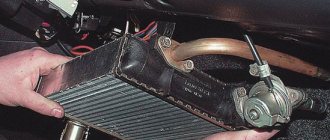
Restoring the functionality of the stove radiator using a grant
As you know, in some cases it is not practical to restore the heater; it is easier to replace it with a new product. Therefore, before removing the heater radiator on a grant, it makes sense to resort to some tricks, we will dwell on them in more detail.
For example, if the car's mileage is more than 40 thousand kilometers, there is a high probability of scale and foreign deposits forming in the system on the walls of the channels. To correct this situation, flushing with a special agent is ideal. There are many methods of flushing, both with and without draining the coolant.
In our opinion, the most acceptable way is to add a special product to a system that already contains antifreeze. With this approach, the following results can be achieved: - dissolve scale; - improve heat removal and restore the performance of the interior heater. Moreover, the cleaning agent does not corrode materials, gaskets, sealants . In general, whether to flush or replace the unit depends on the severity of the malfunction and the individual decision of each car owner.
Adjusting the automatic control system
Place a regular mercury thermometer near the temperature sensor on the ceiling. Turn on the heater controller and set the fan control knob to position “A”, and set the temperature dial to 2C higher than the air temperature in the cabin. If, with the doors and windows closed, after 15 minutes the temperature in the cabin does not correspond to the set temperature, then the heater control unit should be adjusted.
To adjust, pull out the SAUO block from the socket and rotate the regulator on the left side of the controller:
- turn clockwise to increase temperature.
- turn counterclockwise to decrease.
Check the operation of the heating system again by repeating the above steps.
Heating system control
To adjust the fan speed mode, the regulator has a gradation scale. The car owner independently selects the optimal fan rotation mode.
Heating system regulator in the cabin
Failure of the regulator blocks the operation of the entire vehicle interior heating system.
Interior ventilation and heating system of Lada Granta: checking, adjustment
The type of interior ventilation and heating system is supply and exhaust. The operating temperature of the interior heating fluid is in the range from 90 to 94°.
Warm (hot) air is supplied to the cabin by an electric fan. The feed speed is adjusted by a special regulator, which accelerates (reduces) the rotation speed of the impeller.
The electric motor has four positions:
- first;
- second;
- third speed;
- position: off
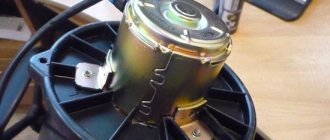
Stove motor
Air intake follows from the outside through air intakes under the frill in the engine compartment. A filter is pre-installed to clean the flow. Filling: synthetic material.
Air is exhausted through a ventilation window in the rear of the car, behind the bumper.
The heater module is installed in the central part of the dashboard, under the panel. During engine operation, the liquid heats up and circulates along the circuit (water jacket).
SAUO repair
Before repairing the SAUO VAZ 2110 unit, you should make sure that the problems with the stove are associated with it. To do this, you should connect a known working heater control unit (borrow from a friend or from a store). If there are no problems with the stove with the working unit of the automatic control system, then we try to find out what the reason is. If the obviously working unit of the automatic control system did not help, then the problem with the stove is somewhere else.
Remove the buttons next to the SAUO block. We take out the stove control unit. Set the controls to position 0 and remove, and then remove the front cover and glass from the latches. Unscrew 2 screws in front and 1 in back. We remove the board from the plastic case and check the integrity of all tracks, jumpers and resistors. In this example, a broken jumper was found. We solder it on one side and the other. Reassemble in reverse order. Now all speeds of the SAUO block work .
FAQ on the operation of the VAZ 2110 stove
1st oven speed does not work
- All heater fan speeds (except the last one) are connected through an additional heater resistor, which is located under the frill (wind flap). One of the reasons when the first speed of the heater does not work is a malfunction of this resistor. Depending on the ACS unit, this additional resistor varies:
RDO 2108-8101081 is used on the oldest SAUO units, which have only 2 speeds. (0 A 1 2).
RDO 2110-8118022-01 is installed on a modified heater until September 2003, the SAUO unit has 3 speeds (0 A 1 2 3). The most common malfunction in this resistance is that all stove speeds stop working, except maximum 3. The reason is that the thermal fuse is unsoldered (indicated by a red arrow), and is treated by soldering it in place. But if it is unsoldered later, you need to look in the direction of the motor, the motor takes a very large current (not lubricated, wear on the brush assembly, etc.).
RDO 2123-2118022 has been installed on the latest heaters since September 2003, the SAUO unit has 4 speeds and does not have an auto mode (0 1 2 3 4).
- In addition to a malfunction of the additional heater resistor, the problem may also be in the contacts of the heater control unit board. Often, due to high temperatures, the board becomes very hot and the contact is soldered off. Carefully examine all contacts on the boards, especially at the power supply points.
- Clean contacts.
Heater speed 2 doesn't work
- The reason is exactly the same as in the case when the first heater speed does not work.
3rd speed heater doesn't work
- If the 3rd speed is the last, then it works without resistance (directly). And the problem may be in the contacts of the ACS unit (stripped/crimped), or in the contacts on the board of the ACS unit.
- If you have a stove control unit with 4 fan speeds (0 1 2 3 4), then look for problems with the 1st stove speed.
4th oven speed does not work
- The reason is exactly the same as in the case when the third heater speed does not work.
The stove blows equally at speeds 1 and 2, that is, there is almost no difference between the first speeds, but at speed 3 it blows much stronger
- The reason is the additional heater resistor, it needs to be replaced.
The temperature on the heater control unit is not regulated or the heater fan does not work. Disassemble the ACS unit and carefully examine all tracks and contacts. If there are no visible defects, then you need to look for the cause in the part indicated in the photo.
- Another reason could be poor contact in the fuse box. On the back of the block there is a 6-terminal chip, the blue wire on it is to the fan. Perhaps it was burnt in this connector at the connection point. It is necessary to replace the chip and crimp the new connector. Remove the block, disassemble and solder the leg (perhaps it melted and became unsoldered due to heating).
ps If there are other solutions to problems with the operation of the stove , then leave comments, we will supplement the FAQ on the operation of the SAUO unit . By the way, malfunctions in the heater can be caused by other reasons.
What most often failed in the stove of your “ten”?
Heating system of Lada Grants with and without air conditioning - differences
The design does not have the specified additional equipment
| Availability of air conditioning | Absence |
| Separate duct | |
| Evaporator | |
| Heater block | |
| Heater housing |
Typical malfunctions of the Lada Granta heating system
| Malfunction | Diagnostics | Remedy |
| The stove operates at one speed mode | Checking the board with resistors | Replacing the board with resistors |
| The dampers are stationary | Drive cable diagnostics | Cable lubrication, additional tension |
| The gauge on the dashboard shows different temperatures | Checking the sensor resistance on the contacts | Replacing the sensor |
| The heater does not activate when the lever is pressed | Checking the power supply circuit | Replacement of electrical wiring, fuse |
| The fan operation is accompanied by a creaking or metallic grinding sound. | Diagnostics of the stove heater unit | Bearing lubrication, replacement |
| Cold air flies out of the deflectors | Checking the integrity of the air pipes | Seal the connection with sealant |
| There is no coolant supply to the heater | Check the stove pipe supply diagram | Replacing pipes |
Design features of the VAZ-2110 stove control unit and the specifics of its DIY repair
High-quality operation of a car’s heater in winter is one of the main conditions for comfortable driving. In domestic vehicles, even in new models, the heater is one of the problematic elements that very often fails. And if in the summer you can turn a blind eye to this, then in cold weather you immediately have to take measures to eliminate the problem.
To eliminate the malfunction, it is first important to diagnose which element of the car’s heating system has failed and repair the non-functioning unit. The easiest way is to turn to specialists for help, but their services are not very cheap. Very often, vehicle owners troubleshoot and repair the heater on their own, since domestic cars are highly maintainable.
This article will talk about how to diagnose a malfunction of the VAZ-2110 heater control unit and repair it yourself.
Checking the wiring in the engine compartment
For further diagnostics, you will need to remove all the plastic trims in the rear of the engine compartment under the windshield. This must be done carefully, and the bolts and screws holding the various elements must be placed in different containers so as not to get tangled during reinstallation.
In the opened space you can see the air intake of the stove, which should be covered with a filter. If there is no filter, a dense fabric such as felt can easily replace it. When the air intake is open, leaves, dust or dirt enter it, the result is a cold VAZ 2110 stove. Another problem with a clogged air duct is the burnout of an additional resistor, which is cooled by cold air. The filter needs to be cleaned periodically.
To the right of the electric motor there is a connector through which it is connected to the control unit. The red wire is connected to it, and the blue wire goes out. To check, you need to connect the control unit to the block, set the pointer to number 3 (rightmost position) to remove the regulating resistance from the circuit and turn on the ignition.
The control contact is inserted into the blue wire connector; if it lights up, it means that the contact between the control unit and the electric motor is normal. Otherwise, you need to inspect the wiring and find the break point. For preventive purposes, it is recommended to disconnect the connector itself, treat it with WD-40 lubricant and connect it again.
A ground wire should come from the electric motor housing and be connected to the car body. More often than not, it is the contact that breaks off or the contact at the attachment point oxidizes, which leads to a break in the chain. This wire needs to be stripped, made into a loop and reattached to the body, ensuring tight contact.
After troubleshooting the stove, we check its operation. This is very simple to do - from the passenger compartment with the ignition on, you need to turn on the heater control unit, check how it blows air in all modes, including automatic and all 3 speeds.
Only after this can you begin assembly. A standard or homemade filter is installed on the air intake of the stove. The plastic elements in the engine compartment are carefully assembled into place. The control unit is mounted, the fuse block is put in place and closed with a lid.
Thus, everyone can be convinced that if the speed does not work in the VAZ 2110 stove and other models of this family, this is not a death sentence. If you have minimal skills, simple tools and devices, some of which you can make yourself, for example, a control, many problems can be solved yourself.
There may be many reasons why the heater began to work worse or does not work at all, and not everything can be eliminated on your own. For example, if a stove radiator fails, it is better to turn to professionals, since the work requires serious skills and equipment. And the owner can easily deal with minor problems such as a non-working electric motor on his own in his garage.
Video: The “stove” does not work. We look for and find the fault.
Source
Design features of the VAZ-2110 stove control unit
One of the common heating system problems that VAZ-2110 owners encounter is the failure or malfunction of the heater control unit. Dozens of them are equipped from the factory with stoves, which are coordinated through an automatic heater control system. In short, the system is called the SAUO block. The main indicators of its malfunction are the operation of the heating system not in all modes. If one or more stove speeds do not work, then most often the problem is in the ACS unit. Thanks to the electronic module of the VAZ-2110, the temperature set by the driver is maintained in the car interior.
Before you begin repairing the VAZ-2110 heater, you need to find out what kind of heater is on your vehicle. Cars that were produced before September 2003 are equipped with old-style stoves. Accordingly, there are significant differences in the design, which are important to pay attention to during repairs.
The ACS unit consists of electronic elements, which are coordinated using handles on the central console of the machine.
The VAZ-2110 stove control unit is equipped with a controller with two handles. The right handle is responsible for turning on a certain fan speed. An additional resistor is directly responsible for switching its speeds. Old style stoves have resistors for two or three fan speeds. The new model stoves have a modified resistor RDO 2123–2118022. The unit for coordinating the operation of the improved stove model has four speeds and does not have an auto mode.
The left handle is responsible for turning on the temperature mode in the vehicle interior. Depending on the position of the handle, information about the set air temperature is supplied to the micro-reducer of the damper drive and, using the controller, the required position of the damper is set. Using the regulator, you can set the temperature from sixteen to thirty degrees Celsius.
Until 2003, cars were equipped with old-style stoves with four- and five-position controllers, which are now out of production and are very difficult to find. Also, the simple VAZ-2110 heater control unit is not suitable for car models that were produced after 2003 and are equipped with modified stoves from the factory.
Accordingly, before buying parts to repair the heating system of a vehicle, you need to look in the technical documentation to find out which heater model is on your top ten. The stoves differ not only in the ACS unit, but also in the heater radiator, micro-reducer, and resistors.
Removing the heating and ventilation system control unit
We remove the unit to replace it if it fails. Remove the instrument panel trim (see “Removing the instrument panel”).
Using a screwdriver, press out the two clamps of the shell tip holder (for clarity, the shell tip is removed)…
...and remove tip 2 of the recirculation flap rod shell from holder 1 on the heater body.
Using pliers we “recess” the traction lock on the damper drive pin...
...and remove the black rod from the recirculation damper drive. We disconnect in the same way...
Diagnostics of serviceability and dismantling of the stove control unit
The SAUO module is located on the center console of the car and is responsible for proper heating of the interior. Repairing the VAZ-2110 stove control unit requires certain knowledge in electronics, so before you begin repairing the part, you need to determine whether the problem is really in the electronic module itself.
To do this, you must initially dismantle the unit and install a known-good part in its place. Take the SAUO unit from friends or at a service center to diagnose the heating system of your car.
Before performing any work on the vehicle that involves electronics or wiring, turn off power to the battery to avoid shorting or burning out the electronic components.
Then you can proceed directly to removing the unit through which the functionality of the stove is coordinated. To do this, the buttons that are located on the sides of the stove are initially dismantled. The heater controls must be switched to zero positions. Only then can the module be pulled out. This must be done very carefully, since the power plugs are connected to the back of the unit. As soon as you see them, they must be carefully disconnected so as not to damage the contacts. At this point, dismantling can be considered complete.
The working unit is installed on the standard seat, and the operation of the vehicle’s heating system is checked. If the stove functions correctly with the new unit, then the fault is in the ACS unit itself. Otherwise, it is necessary to diagnose other elements of the heating system.
What to do if the stove does not turn on in any speed mode
If the VAZ 2110 stove unit does not work, the problem lies in the operation of the electrical network, since its electric motor is quite reliable and rarely fails. Before work you need to prepare a set of tools:
- Tweezers for removing fuses.
- Screwdriver Set.
- Chain tester.
- Jumper with contacts.
- 12 V indicator lamp (control).
- Wooden stand.
When working with wires, you may need pliers, wire cutters and other standard tools from an auto electrician's kit.
Checking the fuse
If a malfunction is detected in the VAZ 2110-12 heater and it does not turn on at any speed, the first thing to check is the fuse responsible for its operation. This fuse is located in the block located in the passenger compartment to the left of the steering column, has the number F18 and is rated at 25 A.
Having opened the block, remove it carefully using tweezers and check it with a device, since a visual inspection can only reveal obvious signs of burnout. To do this, a device is connected to both contacts of the fuse, and if the circuit is restored and the fuse is intact, it will give a signal. When using a multimeter, you need to remember to set the appropriate 25 A settings. If the problem is in the fuse, it must be replaced.
The control checks the voltage on the fuse installed in the block; for this, when the ignition is turned on, one contact closes to ground, the second to the fuse; if everything is normal, the light on the device will light up. The ignition must be turned on. If there is no voltage, you need to check the supply wiring.
Heater unit connector
To get to the connector, you need to remove the heater unit and disconnect it. After this, you need to use a tester to check whether voltage is supplied to the control unit through the contact block to which it was connected. The plus is supplied through the blue wire, but there may be another connector, so they need to be checked methodically. Contact with the heater is established via the red wire.
To check the engine, place a jumper in the contact where the positive was detected, and a second jumper in the contact with the red wire. If the engine does not start, the failure of the stove does not depend on the control unit. Otherwise, you need to disassemble the block or simply replace it with a new one.
DIY repair of the VAZ-2110 heater control unit
If during diagnostics it turns out that the problem is in the heater control module, then you need to try to repair it or install a new part. Since the price of new electronic units is quite high, the right decision would be to repair the control part, especially since this requires only basic knowledge of electronics, the ability to use a tester and a soldering iron if necessary.
Before you begin, you need to disassemble the heater control unit. To do this, the front cover with regulators is removed from the latches from the previously dismantled electronic module. Next, a special glass cover is detached. Using a screwdriver, unscrew two screws on the front panel of the unit and one on the rear wall. After this, the top cover of the module can be removed; this must be done very carefully so as not to damage the contacts inside the part.
Inside the module there are electronic tracks, contacts and resistors that are responsible for the high-quality functioning of the vehicle’s heating system controllers. It is necessary to inspect all contacts, electronic tracks on the board, resistors and jumpers. High operating temperatures can cause the board to become very hot, which will lead to disconnection of the contacts. Particular attention should be paid to the power supply points and the contacts should be cleaned. If there is visible damage to the electronic circuit, it is necessary to solder the damaged elements. In parallel, using a tester and an ohmmeter, the functionality of the electronic elements and resistors located on the board is checked. If necessary, non-functioning parts on the ACS module board are replaced.
After troubleshooting, the heater control unit is assembled in the reverse order and installed in its original place. Next, you need to connect the battery power and check the operation of the vehicle’s heating system; if necessary, adjust the heater controller.
How to change a heater
Replacement of the Lada Granta stove is carried out in accordance with the technological regulations of the manufacturer. But experienced car enthusiasts offer their own schemes for replacing this device, which are successfully used during repair work. First, you need to clear the space under the hood of the car: unscrew the battery terminals and bolts and remove it, remove the throttle body pipes, air ducts, and remove the air filter. After this, you can drain the antifreeze from the engine cooling system.
Work in the interior begins with dismantling the decorative cover of the handbrake: you need to unscrew two screws and release the tunnel fastening on the driver and passenger sides. Now you need to remove the gas pedal by unscrewing three bolts and disconnecting the contact group. Then you should remove the brake pedal mounting pin and press on it, freeing up space for further work. To access the heater radiator, remove the plastic side cover of the dashboard. To dismantle the heat exchanger, cut the pipes in two places.
The cut-off part of the pipes should be pulled out into the engine compartment, then bend the brake pedal and pull the old radiator into the cabin. After installing the new heat exchanger, its pipes are pushed into the cabin from the engine compartment, put on the radiator pipes and securely tightened with new clamps. Further installation of the removed parts occurs in the reverse order. Then the battery is installed and coolant is added.
Adjusting the stove controller
The manufacturing plant provides for heating the interior to the specified temperature in fifteen minutes with a deviation of up to two degrees. Use the controller knob to set a comfortable temperature in the car interior.
To check the proper functioning of the stove, use a regular mercury room thermometer. If after fifteen minutes the interior has not warmed up to the required temperature, the controller must be adjusted.
To do this, pull the heater control module back out and rotate the temperature regulator, first to the maximum value, then in the opposite direction. After carrying out such actions, install the unit in place and check the operation of the stove again.
At the same time, it is necessary to check the operation of the heater dampers. If there are extraneous sounds when switching temperature modes, then you need to check the condition of the dampers. If cold air flows well, but hot air hardly flows in, then the lower damper is faulty. If there is no normal flow of cold air but there is a good flow of hot air, there is a problem with the upper damper. The reason may be deformation of the dampers under the influence of air of different temperatures. In this case, it is better to replace the standard plastic dampers with aluminum analogues, which are more resistant to temperature changes.
After adjusting the controller, all heater elements are installed in their original places. Assembly is carried out in reverse order.
Elements of the Lada Granta heating system
Let's look at the design of the Lada Granta stove in the “Norma” configuration:
- radiator;
- three air pipes supplying flow to the left/right/central deflectors;
- control module;
- radiator housing;
- rubber seals;
- fan;
- fan housing;
- cables, mechanical rods of dampers;
- regulator resistors.
Heater radiator
In the modification with a pre-installed air conditioner, the list is supplemented by a separate air duct, evaporator, and heater unit housing.
Let's sum it up
Malfunctions of the VAZ-2110 heater control unit can lead to both incorrect functioning of the vehicle’s heating system and complete failure of the heater. During the cold season, this will affect not only a comfortable stay in the car, but also safe driving for the driver of the vehicle.
Repairing the stove control unit can be done on your own if you have basic knowledge of electronics, a desire to work and improve your comfort.
High-quality repairs and timely regular inspections of the unit before the onset of cold weather will help you save money on stove repair services at service centers and the purchase of expensive heating system elements.
Causes of unit malfunction
Engineers began to use a similar method of adjusting temperature and air direction back in the early decades. Since then, this system has been improved, and is already used on new models of the AvtoVAZ plant. Despite its rather simple design, the stove control unit periodically fails. There are several reasons for this:
- damage to mechanical parts in the structure;
- break in the power supply circuit of the unit;
- damper jamming.
To repair or replace the unit, you will need to dismantle the faulty module. For its time, this stove control design was considered truly innovative (at least for domestic cars), while now it fails more and more often. Repairing a block is not the easiest procedure, so more often than not, owners of cars of the “ten” family with such a problem change the block assembly.
Removing the temperature controller
To repair or replace the stove temperature regulator, you need:
- Unscrew and move to the side one of the climate dampers located under the steering wheel of the car.
- Next, the pedal assembly, consisting of the brake pedal and gas pedal, is dismantled. The wiring harness is disconnected from the assembly, and the connectors are disconnected from the pedals.
- Two connectors are unfastened from the heater regulator, and its contacts are diagnosed - maybe they are oxidized or burnt.
- At the final stage, the temperature regulator is unscrewed, which is held on by a pair of screws.
This completes the work on removing the regulator.
Source
Heater fuse location
Sometimes the heater fuse may blow. Unlike most cars, the fuse box on the Daewoo Nexia is located not in the engine compartment, but in the passenger compartment. The heater fuse is red and is located in the mounting block in the instrument panel. To replace it you will need:
- To the left of the steering wheel, find the fuse box niche.
- Remove the cover from the block.
- Using the information on the inside of the cover for each element, locate the red 10A fuse and pull it out with pliers for inspection.
The block cover contains a detailed diagram of the location of the fuses.
Table: assignment of fuses for the Daewoo Nexia
| Fuse designation | Rated current, A | Purpose of fuses |
| F1 | 10 | ECU (battery circuit) |
| F2 | 10 | Side lights, license plate lights |
| F3 | 10 | FlaflyBHafl airbag |
| F4 | 20 | High beam headlights |
| F5 | 10 | Left headlight (low beam) Electric drive for adjusting the direction of the light beam of the left headlight |
| F6 | 10 | Right headlight (low beam) Electric drive for adjusting the direction of the light beam of the right headlight |
| F7 | 30 | Electric fuel pump fuel injectors |
| F8 | 20 | Turn signals, hazard warning lights, brake lights |
| F9 | 30 | Windshield wiper |
| F10 | 10 | Fuel filler flap drive, ABS, immobilizer |
| F11 | 10 | Air conditioning compressor electromagnetic clutch activation relay |
| F12 | 30 | Cooling Fan Motor (Low Speed) |
| F13 | 20 | Reversing lamps, alternator circuit, instrument cluster, cigarette lighter fuse, melodic horn |
| Fi4 | 30 | Horn, Cooling Fan Motor Relay (High Speed) |
| F15 | 20 | Clock with display, interior light, trunk light, antenna drive motor |
| F16 | 30 | Window lift motors |
| F17 | 10 | Car radio (circuit from ignition switch) |
| F18 | 30 | Trunk lid lock control, rear window heated timer, central door locking system, car radio (battery circuit) |
| F19 | 30 | Heater fan relay |
The diagram clearly demonstrates the location of car fuses
The device of the VAZ 2112 stove
Heater parts
- electro-pneumatic valve;
- front housing;
- water deflector;
- control valve;
- back of the case;
- radiator;
- radiator casing;
- lid;
- resistor;
- Electrical engine.
Heater ducts and controls
- Rear heating ducts.
- Plastic lining of the tunnel.
- Foot heating channels.
- Ventilation nozzles of the central part.
- Side nozzles.
- Heated front doors.
- Mechanical heating lever.
- Distributor housing.
- Damper for heating feet, windshield.
- Heater.
It is important to know. Differences in the design of the old and new VAZ 2112 in the shape of the heater radiator, the SAUO controller, and the micro-gearbox. Conventionally divided before 2004 and after. When purchasing, be careful not to hand over unnecessary parts.
From the above it follows that the heating system of the VAZ 2112 operates separately. The VAZ 2112 stove pumps air at the required temperature into the cabin. The pipes supply flow to heat the windshield, passengers' feet, and rear row of seats. Deformation of the dampers and deflectors creates an obstacle to the air flow, so the stove does not blow well and requires diagnostics.
Reasons why the stove does not work
The most common breakdown in the heating system of VAZ cars is the temperature sensor. The device is located on the ceiling of the car, so in the event of another malfunction, it is recommended to start checking there. Experts note a number of reasons due to which the stove in the VAZ (10, 11, 12) may become faulty. The most common and frequently occurring breakdowns in these cars are the following:
- The ACS controller has failed;
- The temperature balance has ceased to be automatically adjusted;
- possible leakage of antifreeze from the system;
- the temperature sensor is faulty;
- failure of adjustable dampers to operate.
The normal functionality of the heating system in winter is very important, since at low temperatures in the cabin, the car windows can fog up, which makes driving not only uncomfortable, but also unsafe.
Heating, air conditioning and ventilation device Grants
| If your LADA Granta has any problems with the heater, ventilation (windows sweat) or air conditioning, then before going to the service, try to find out the reason yourself. And the study should begin with the installation of heating, air conditioning and ventilation. |
The heating (air conditioning) and air ventilation system operates effectively when the windows are closed and is a single complex that provides the most comfortable conditions in the car, regardless of weather conditions and ambient temperature. The system includes:
- A heater that increases the air temperature in any operating mode of the system;
- Air conditioning, which reduces the temperature and humidity;
- Control unit for mixing cold and hot air to achieve the required temperature in the cabin.
The complex provides low-inertia regulation of air temperature, practically independent of vehicle speed. The amount of air entering the cabin is mainly determined by the operating mode of the fan, so it must be turned on even while driving at high speed. Outside air can enter the cabin through the door windows when the windows are down and the air blower, the air intake of which is located in front of the windshield. Air from the air blower enters the vehicle interior through the windshield blower nozzles, side and central nozzles, as well as through the lower nozzles of the heater housing.