Cars produced in Tolyatti are not distinguished by consistency in both quality and defects. Here it can turn on and turn, but on another car of exactly the same year of manufacture - like enchanted. It turns, but does not blow, or blows, but in the wrong direction, or blows, but with cold air. We are talking about the VAZ 2110 heater. Many people drive for years and do not complain, and the temperature is fine, and the automation works. Others have the opposite picture. To understand all this, let's look at the design of the dozens of stoves, air ducts and curtains. Maybe we'll come up with something.
Refinement of the stove
Owners of VAZ 2110, 2111 and 2112 cars often face the problem of a poorly functioning stove. The most common complaint is the constant fogging of the side windows and poor airflow for the feet of both front and rear passengers. You can very easily deal with these problems even on your own, without contacting service centers. There are many recommendations on the forums for correcting these problems through small improvements with photos and detailed descriptions, but this article will provide an overview of the most common and effective methods.
Air duct modification
Damper leaking
The main reason for a poorly functioning heater is a leaky air flow distribution damper, which is originally installed on the car, causing the heat flow to dissipate in the heater itself.
In order to fix this, it is recommended to make a new damper from plastic, which will fit more tightly and ensure precise direction of air flow. Additionally, the housing is sealed to ensure higher heater efficiency.
As a rule, this helps solve the problem, but a more noticeable effect will be achieved if you additionally tune the heater as a whole.
Side windows fogging
For example, to solve the problem of side windows fogging, two options are used:
- or lay corrugations;
- or seal as tightly as possible the cracks in the panel itself, through which significant losses of air flow occur.
The corrugation helps to improve the airflow of the feet, but it will not have much effect for the airflow of the side windows. So the best way to improve side airflow is to seal all the cracks in the panel. It is especially worth paying attention to the holes for the fastening bolts - they should be sealed with tape or modelin. After this, you can additionally pay attention to the joining of the upper and lower parts of the panel.
These measures will help eliminate air loss, and all the warm air will be directed to the right place, so that the stove will begin to work noticeably more efficiently.
Airflow for the feet of the driver and passengers
As for the airflow of the driver's and passenger's feet. It's all about the air duct grille, it has the wrong angle, and all the warm air is most often directed into the foot mats and dissipated, thereby leaving the passenger's feet cold.
The solution is quite simple - you can dismantle the lower part of the grille and turn the guides to the upper side, thereby redirecting the flow of warm air.
If you don’t want to do something ugly, you can simply replace it with side door grilles, these are sold in car dealerships for about ten rubles apiece. In this case, there will be no overheating, since there is no need to set the heating to maximum, because the low temperature set will be used more efficiently.
Blocking the rear airflow
There is also an option for car owners who often drive alone or only with a passenger in the front seat.
If heating the rear seats is not important, then you can simply block the flow of warm air to the rear, and in fact you will not have a separation of flows - all the warm air will go exclusively to the feet of the driver and front passenger.
Shutting off the interior airflow
A roughly similar principle can be implemented with central dampers.
Car owners often block the flow of air into the cabin, thereby increasing the flow to the feet and blowing the glass, and the cabin itself warms up just as effectively.
Insulation of the interior
In order to make the interior warmer, it is recommended to insulate the interior itself; to do this, change the seals on the doors and additionally insulate the floor, ceiling and doors with any heat-insulating material for cars.
We are modifying the stove on the VAZ 2110
Materials and tools for work: - bitoplast 10; — plastic corrugation (tube); — grille (the author took it from old speakers); - Super glue; - a piece of sewer pipe; - cutting tools, screwdrivers, pliers, wrenches, etc.
Step one. Solving the problem of side airflow
If the stove does not blow well on the sides, then this problem can be solved in two ways. The easiest way is to simply seal all the cracks, which will increase the efficiency of the airflow. You can also lay a corrugation, but according to the author, the corrugation will allow the legs of the front and rear passengers to be well aired, but it will not have any effect for airflow of the sides. Therefore, sealing will be most effective in this case.
To seal the cracks in the panel, anti-creak (modelin) is used. It should also be used to seal the bolt holes.
Step two. Upgrading the stove damper
Thanks to the damper, air is directed to the windshield, legs and face. Initially, this damper does not fit tightly and some of the air goes through the cracks where it is not needed. Using modelin and double-sided tape, you need to seal the valve and all the cracks. The body can be covered with bitoplast 10 instead of a standard sponge. In some places the author glued as many as two layers.
After this, you will need a coffee can, plates are made from it and screwed as shown in the photo. The plates will need to be painted black, so they will not be visible through the grille. As a result, when you turn on the blower in your face, the air goes to the side windows and only into your face. When you turn on the flow to the windshield, the air goes only to the windshield and nowhere else. When the footwell flap is turned on, 50% of the air will go to the side windows, 25% to the feet and 25% to the windshield.
Checking the dampers of the VAZ 2110 heater system
If the controller starts acting up, the dampers themselves may be faulty. It is better to carry out proper inspection in a timely manner to avoid damage. The stove itself has 2 dampers. The upper part is responsible for bringing cool air into the cabin directly from the street, while the lower part heats the flow directly from the heater. If one of the dampers or actuator breaks down, you will experience constant discomfort due to poor heating or excessive heat input.
The breakdowns themselves can be divided into several types. For example, often the damper simply “jams” or “jams.” The damper actuator, also known as a micro-gear motor, may be damaged. Some valves may jam due to rust formed on them. Most often this happens on new samples, since the material of the dampers is metal, while the old ones are plastic with special foam.
If you do not hear the characteristic movement of the damper, remove the deflector in the main panel and simply move the damper by hand. If there is no movement, check the micro-gearbox, it is the drive mechanism of the damper. If the windshield is blown with warm air, and a hot stream enters the legs, it means that the damper itself has poorly blocked the air, which is constantly coming from outside the cabin.
How can you upgrade your VAZ-2110 stove yourself?
Owners of the “ten” often encounter various kinds of problems in the design of this car.
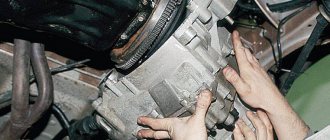
They can touch, in principle, any unit, including the stove. At the same time, when it’s winter outside, of course, no one wants to freeze while traveling. So we have to finish what the designers started, modernizing the stove in order to make it work more efficiently. Considering the harsh Russian climate, such improvements can safely be called a necessity, and not a whim of car enthusiasts. Generally speaking, the design solution of the VAZ-2110 stove can be described as quite successful. But in order for this unit to work normally, it also requires high-quality assembly and the absence of effects in the components. At the same time, both the first and second are long-standing problems of the domestic automobile industry. So motorists have to fix factory defects on their own.
Heater fan not working
It is quite simple to understand that the car's heater fan is faulty. To do this, just start the car and switch the heater operating mode. If during the switching process no additional sounds appear in the vehicle interior, this means that the heating system fan is not working. At the same time, if the fan does not spin only at certain speeds, then the problem is not in the fan itself, but either in the resistor or in the heating intensity toggle switch.
The stove fan does not work - the main reasons
There are six main reasons why the stove fan may not work:
1. The fuse has blown.
This is the most banal and simple reason, but at the same time the most problematic. The thing is that replacing a fuse is a very simple procedure that anyone, even the least experienced car owner, can handle. But it’s very difficult to identify the short circuit that caused it to burn out. To do this, you will have to go through the entire electrical circuit of the car's interior heating system.
Video. The fan on the VAZ 2110 does not work
It is worth noting that the fuse marked F7, which has a current strength of 30 amperes, is responsible for the operation of the stove. Note that the same fuse is responsible for the glove compartment lighting, the cigarette lighter, the rear window heating system, as well as the electric headlight washer motor. This means that if you do not find the cause of the short circuit in the electrical circuit of the heater, you will have to go through almost the entire wiring of the vehicle.
2. Poor quality contact inside the mounting block.
Oxidation of the contacts inside the mounting block is a very common cause of stove fan malfunction. To make sure of this, you need to move the block on which the flagella are attached; if the fan starts working, then remove it and clean the contacts.
3. Flooding the relay of the vehicle ignition system.
This problem is diagnosed quite simply. If your heater starts working only after the car has “warmed up”, then the reason is in the ignition relay. The only way to fix this problem is to replace the relay. It is located under the dashboard.
4. The stove only works at third speed.
In this case, the problem is related to the additional resistor. The thing is that at speeds 1 and 2, electric current is supplied to the fan through a resistor, and at speed 3, it is supplied to it directly. There is only one solution in this case - replacing the additional resistor of the heating system of the car interior.
Let us recall that in the previous article we looked at how to replace brake fluid with your own hands. This process must be performed regularly, according to the manufacturer's recommendations.
5. The vehicle interior heating system switch is faulty.
To check this switch, you should dismantle the center console, start the car, take a 12-volt marker light bulb with soldered wires and short the negative wire from it to the body, and touch the second to contacts 1, 2 and 3 of the additional resistor. If the light bulb is on, then the switch is working, and if not, then connect the wire of the light bulb to the positive terminal of the switch. If it does not light up, then the culprit is an open circuit or a blown fuse.
6. The electric fan motor does not work.
When you have checked all the previous options, but have not identified any problems, then there are only three reasons why the stove fan does not spin: - the electric motor has burned out - the electric motor has poor contact with the ground of the car - the brushes of the electric motor have become stuck.
How can you improve the VAZ-2110 stove
So, let's look at the situation when the interior of the "tens" is not heated efficiently enough. Accordingly, this problem should be eliminated. By and large, upgrading the stove of a VAZ-2110 car with your own hands is not a very difficult job, but it still cannot be done without a certain amount of time. Of course, you still need to have some skills, but almost anyone can do it. The main thing is to be patient and have the appropriate desire. In addition, to modernize the stove you will also need:
- sealant or silicone;
- polyurethane foam;
- simple locksmith tool.
You can, in particular, follow the simplest path with minimal effort. This option is the most optimal solution when the result needs to be obtained in the shortest possible time, but there is no time or desire to engage in a complete rework of the entire system.
In particular, the easiest way would be to simply block the stove ducts through which warm air is supplied to the rear passengers. Naturally, you sacrifice the comfort of those sitting behind you. But this option is fully justified if the driver almost always drives alone. This simple manipulation will increase the flow of warm air, heating the foot area in the front of the car.
The same result can be achieved using another simple method. In particular, the air channels of the central deflector of the stove should be blocked. To do this, you need to cut, for example, from an aluminum sheet, a plug of suitable size. By blocking the central deflector, you will thereby increase the flow of warm air directed to other furnace ducts of the car.
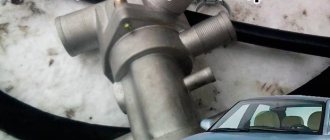
Another option for upgrading the VAZ “tenth series” stove is to replace the standard 5-hole thermostat with a more modern one, with 6 holes. In this case, you should not have any complications or problems. These thermostats are interchangeable. At the same time, the 6-hole version is more advanced from a technical point of view. For example, it helps to increase the heating efficiency of a stove radiator. And such a replacement will not be that expensive.
Now let's look at more labor-intensive upgrades to the "tens" stove. We are talking about improving the air ducts, and this will require removing the standard installation. Naturally, more time and effort will need to be spent on such work, however, the positive effect here is much more noticeable. In order to do everything thoroughly, you need to seal the cracks in the torpedo air ducts located on the front panel.
In addition, certain changes should be made to the design of the car's stove damper. It will also be necessary to upgrade the systems responsible for heating the rear passengers and the driver’s foot area. In particular, you will need to lay new heating ducts - this can be done using corrugation. As you can see, there really is something to work on. However, all the time and effort spent will more than pay off in the cold winter season when there is biting frost outside the window, and the car interior is warm and cozy.
So, let's get to work. First of all, you should remove the dashboard, dashboard and air ducts. Do not forget that before removing the instrument panel, you should unscrew the negative terminal from the battery. Next, we dismantle the cover of the floor tunnel lining, the air ducts of the heating system, and then the housing itself. The latter is easy to do - you just need to unscrew the screws. Before removing the dashboard, the glove box must be removed. There is also nothing complicated here, but everything needs to be done carefully so as not to break anything. Next, unscrew the bolts that secure the instrument panel, as well as all the mounting screws.
To ensure normal airflow of warm air into the interior of the “tens”, a sufficiently large number of cracks in the torpedo’s air duct system should be sealed. Thus, you not only reduce heat loss, but also increase the pressure of the air flow flowing to the side windows. To get rid of cracks, it is best to use silicone or modelin. Do not forget to also seal all fastening work. That’s it, the first stage of work on modernizing the “tens” stove is over.
Refinement of the thermostat and its connection diagram
The previously discussed modernization of the VAZ 2110 stove by replacing a 5-hole thermostat with a 6-hole thermostat is not least related to the diameters of the bypass channels of the devices that regulate the flow of Antifreeze between the small cooling circuit and the radiator of the heating system.
The standard size of the bypass channel on a 6-hole thermostat is 11 mm, and on a 5-hole thermostat the hole is measured with a diameter of 16 mm. Regardless of what type of thermostat you have installed, you can always further adjust the flow of coolant. Thus, the interior of the VAZ 2110 will warm up better at idle engine speed.
It is recommended to use an aluminum pad to set the bypass diameter in the range from 4 to 6 mm. It is worth understanding that in this way we slightly increase the engine warm-up time. But the cabin will become really warmer.
Components
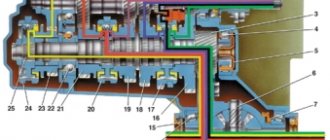
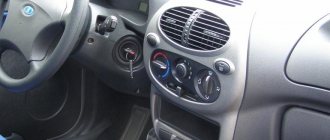
In VAZ 2110 cars, as in most modern cars, the normal air supply to the cabin is combined with heating and is controlled by a single mechanism consisting of:
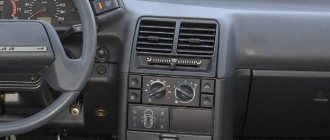
- SAUO block (stands for heater automatic control system). It has two handles. The one closest to the driver sets the temperature of the incoming air. The usual range is 16 -30°C. The extreme position of the handle with a blue dot indicates that the heater damper is closed and only cold air flows. Setting the handle to the position with the red dot means that this damper is fully open, maximum hot air flows. The handle located further from the driver is designed to set the fan speed. With its help, the strength of the air flow is ensured; SAUO unit tuned with LEDs
- Ceiling air temperature sensor in the cabin, and a mini-fan built into it. It is located next to the lighting fixture on the ceiling of the VAZ 2110. From the ceiling sensor, a signal about a decrease (increase) in temperature is sent to the control unit, the corresponding relay turns on or off the motor that controls the damper;
Removing the ceiling air temperature sensor in the cabin Internals of the ceiling air temperature sensor in the cabin
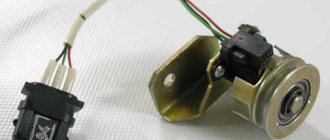
MMR (micromotor reducer) with a shaft position resistor. Available in new or old style. The old one was produced until 2003. These are, in fact, devices that provide comfort from the cabin. You also need to know how those located in the engine compartment work.
MMR of the old type MMR of the new type
Problem solving
Now let's talk about how to solve emerging issues, troubleshoot problems and return the heater to normal operation.
Each breakdown requires separate consideration.
Broken motor
Temperature not regulated
If the temperature of the air flows cannot be adjusted, the problem is hidden in the control unit or damper, or the temperature sensor on the ceiling inside the cabin does not work.
To check, turn the regulator all the way to the right and place your hand under the air flow. If warm air flows only when the regulator is in the maximum heating position, change the sensor. If that doesn't help, change the regulator. If heat is received in other positions of the regulator, the sensor should not be blamed.
Be sure to check that the damper is not stuck. It can be accessed through the engine compartment. If replacement is necessary, replace the standard plastic damper with an aluminum product. It is more durable.
Blowing cold
If the heater on your VAZ 2110 starts blowing cold air, you need to look for the reasons. The cause of the failure lies in the gear motor. A similar situation occurs in 9 out of 10 cases, so it is unlikely that you will have to look for alternative culprits.
Air flows with a broken damper
The gearmotor needs to be replaced. This is done as follows:
- Wipers are removed;
- The frill is dismantled;
- Unscrew the three screws that hold the gearmotor;
- The wiring is disconnected;
- A new one is installed in place of the failed device. Ask your assistant to switch the position modes of the regulator, and at this moment you will mount the gearmotor;
- The frill and wipers are returned to their place. Work is done.
But there is 1 case out of 10 that will force you to change the heater due to wear and tear of the old one. As the practice of VAZ 2110 owners shows, the heater from 2112 is best suited for replacement. Moreover, you can choose between two stove options - 2112-01 or 2112-02. The first one does not have an air filter, while the second option has one.
The windows fog up, the feet are not heated
It is not uncommon for VAZ models to have a problem when air flows normally from the stove, but it does not heat the feet and does not flow onto the windows.
Modification of air ducts
The issue can be resolved by upgrading your air ducts and getting rid of existing gaps in the cabin and warm air intake channels. This is a rather complicated procedure, the implementation of which will allow you to forget for a very long time about the problem with the stove, which does not warm your feet and does not blow on the side windows.
It would not be superfluous to install a pre-start heater. Due to it, the interior warms up faster.
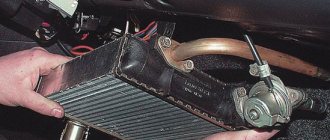
Coolant leaks
The stove may not heat up due to the fact that the level of coolant, that is, coolant, decreases. Do not rush to add antifreeze to the tank. First, be sure to check for signs of leakage in the pipes and connections.
Problems with the stove on a VAZ 2110
If your radiator is leaking, the news is not good for you. You will have to dismantle it and, most likely, replace it with a new one.
The heater is very noisy
Many owners of the domestic “ten” are faced with a situation where a working stove makes a lot of noise. In this case, everything works fine, air flows spread throughout the cabin in the same way as the regulators are set.
The noise does not affect efficiency, but it becomes seriously annoying over time. Sometimes it seems that the stove will be covered with a copper basin, although it can make noise for a long time without consequences for the integrity of the device.
Let's try to figure out why it makes noise.
- If the noise is similar to a squeal, or the sounds are sharp, check the fastening of the lower part of the stove. The fact is that fastening is carried out using hooks that can come off. This is what makes the noise.
- The heater body sometimes gets damaged by the protrusions holding the retainer. In this case, the housing simply needs to be replaced with a new one.
- If the fan itself is noisy, remove it, clean it, and check the condition of the electric motor.
- The textolite washers, which are designed to prevent axial play of the fan, may also hum. Any low friction washers will be suitable as a replacement. For example, elements made of fluoroplastic. Be sure to lubricate the washer. Some people use regular machine oil, but it really only gives a temporary effect. The best lubricant in this case would be thick graphite grease or lithol.
How heating and ventilation work
There is supply and exhaust ventilation in the interior of the VAZ 2110. The windshield trim has holes through which air either spontaneously (when the car is moving) or forcibly - with the help of a heater fan - enters the passenger compartment. The supplied air exits through the provided slots - at the ends of the doors, between the upholstery, and door panels.
But you don’t need to think that the VAZ 2110 is all covered with cracks, and the air simply doesn’t stay in it.
In fact, all of the holes mentioned are equipped with valves that work “for release” and prevent (at least hypothetically) the spontaneous entry of air from the outside.
However, you can make high-quality tuning of the heating system, then the car will be truly comfortable.
Heating is done as follows:
- The air passes through the heater radiator, while warming up. The heating temperature is controlled by a relay;
- Next, the warm air is distributed through the air ducts;
- Special deflectors direct the main flow of hot air to the windshield and to the center of the cabin. The flaps can be used to block/open the flow to the side windows;
- There are two more flaps - for heating the front window and also for the feet of the driver and passengers. For this purpose, deflectors are provided for the front seats: one pair is at knee level, the other is almost on the floor. For rear passengers, there are air ducts under the front seats plus a pad on the floor tunnel;
- There are special handles to control air flows;
- The fuse located in the mounting block protects the entire electrical heating system from blowing. Operating principle of the heater
If desired, you can carry out tuning, adjust the flow of heat to different parts of the VAZ 2110 interior, thereby improving comfort.
Operating modes
You can configure the heater operation manually or automatically. That is, you can set the temperature sensor according to your wishes, for example, at 22°C. If everything is in order, then the manufacturers promise that the deviations will be no more than 2°C, after which the relay will turn on the heating again, and after reaching the specified parameters, turn it off. But if failures occur, then after checking the functionality, it is quite possible that the sensor or relay will need to be replaced.
You can set the automatic mode. For this there is a special screw, the so-called tuning screw. It is advisable to make adjustments with the windows and doors closed. The fan handle should be in position “A”, and set the temperature at your discretion.
Checking components
Naturally, disassembling the stove on a VAZ 2110 and checking its components is necessary if you are dissatisfied with its operation, and also if it cannot be adjusted.
- The first thing to do is check to see if the fuse has blown. And although, if this happens, the thought immediately arises - change the blown fuse, do not rush. This is unlikely to immediately solve the problem; most likely, it is not the cause, but a consequence of some kind of failure that needs to be found;
- First of all, you need to check whether the damper moves when the parameters of the heater sensor change. Carefully, so as not to break the wire going to the backlight, remove the deflectors. Now you can clearly see whether the damper is turning or not. If you need to replace the heater damper, then installing an aluminum one instead of a plastic one will be justified;
- Check the resistance of the temperature sensor. If the temperature in the cabin is 16°C, then its resistance should be 250 Ohms, at 22°C - about 200 Ohms. If this is not the case, then installing a new sensor should help;
- It is also advisable to check the controller: remove it from the socket, turn on the ignition and, using the handle to change the temperature parameters, measure the voltage on the long connector. If the voltage does not change, then it is faulty;
- To check the gear motor of the stove, you will have to do a little disassembly: remove the frill, get to the drive of the gear motor (brown and pink wires are connected to it). Apply current from the battery to the connector. If it spins, it means it’s working, if not, you may need to install a new one;
- If the heater only operates in one position, the additional resistance (resistor) through which the fan is connected may have burned out. Installation of a new one is possible only from the engine compartment;
- Check if the wires in the controller are burnt out. To do this, it needs to be disassembled;
- On the right under the hood you will find the relay box. It is very possible that a wire has come loose from the relay responsible for operating the heater. At the same time, check the relay that turns on the heated rear window. If you do not have such heating, when tuning the stove, you can include this relay in the system;
- If the air entering the VAZ 2110 interior does not warm up sufficiently, be sure to check the antifreeze level, as well as the absence of its leakage from the heater;
If you are thinking about tuning the stove, then you should know that it is possible to install not only the “native” model, but also many others: Priorovskaya, Boshevskaya, etc.
How to check the serviceability of the SAUO controller
To check the automatic control system, you will need a multimeter to measure the voltage on the pink and brown wires (turn on the ignition and turn the temperature knob). Depending on which controller is installed on the car, the voltage changes differently. On cars before 2001, a heater control controller 1303.3854 was installed; its voltage in the “min” position decreases after 13 ± 5 seconds, and is constantly supplied to o. Thus, when the output voltage of the ACS unit does not change, it is not working. On cars after 2003, block 1323.3854 and stove 2111-8101012 were installed.
When the controller malfunctions, the dampers may not work, but in order to diagnose other causes of the malfunction of the VAZ 2110-12 heater, you will have to disassemble the heater.