VAZ-2110 is a front-wheel drive sedan produced by the Volzhsky Automobile Plant. Production of the car began in 1996 and continued until 2007. Knowledge of the structure of the car's gearbox allows the owner to objectively judge the need to adjust the gearbox, repair or replace it. And also consider the possibility of repairing the VAZ 2110 gearbox yourself.
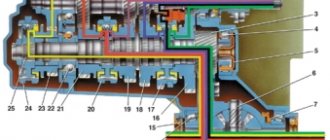
VAZ 2110 gearbox diagram:
| 1 – clutch release bearing; | 18 – driven gear of the second gear of the secondary shaft; |
| 2 – guide sleeve of the clutch release bearing; | 19 – driven gear of the third gear of the secondary shaft; |
| 3 – main gear drive gear; | 20 – synchronizer for 3rd and 4th gears; |
| 4 – roller bearing of the secondary shaft; | 21 – driven gear of the fourth gear of the secondary shaft; |
| 5 – oil sump; | 22 – ball bearing of the secondary shaft; |
| 6 – satellite axis; | 23 – driven gear V of the secondary shaft transmission; |
| 7 – speedometer drive drive gear; | 24 – 5th gear synchronizer; |
| 8 – axle gear; | 25 – secondary shaft; |
| 9 – differential box; | 26 – rear cover of the gearbox housing; |
| 10 – satellite; | 27 – drive gear of 5th gear; |
| 11 – clutch housing; | 28 – ball bearing of the input shaft; |
| 12 – driven gear of the main gear; | 29 – input shaft; |
| 13 – adjusting ring; | 30 – gearbox housing; |
| 14 – tapered roller bearing of the differential; | 31 – roller bearing of the input shaft; |
| 15 – axle shaft seal; | 32 – input shaft oil seal; |
| 16 – driven gear of the 1st gear of the secondary shaft; | 33 – breather. |
| 17 – synchronizer of 1st and 2nd gears; |
The operating scheme is as follows: the input shaft (29) is made in the form of a block of drive gears, which are in constant engagement with the driven gears of all forward gears. The secondary shaft (25) is hollow, with a removable drive gear (3) of the main gear. On the secondary shaft there are driven gears (16, 18, 19, 21, 23) and synchronizers (17, 20, 24) for forward gears. The front bearings (4, 31) of the shafts are roller, the rear bearings (22, 28) are ball. An oil sump (5) is located under the front bearing of the secondary shaft, directing the flow of oil into the secondary shaft and further under the driven gears.
The differential is two-satellite. The preload in the differential bearings is adjusted by selecting the thickness of the ring (13). The driven gear (12) of the main gear is attached to the differential box flange.
Box design
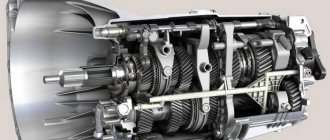
Diagram 1 – Gearbox of VAZ passenger cars
a – general view; b, d – diagrams of the box and synchronizer; c – synchronizer; 1 – input shaft; 2, 12, 14, 19 – covers; 3, 5, 6, 9, 10, 16, 17, 23 – gears; 4, 7 – synchronizers; 8 – secondary shaft; 11, 29 – springs; 13 – lever; 15 – fork; 18 – axis; 20 – plug; 21 – intermediate shaft; 22 – crankcase; 24, 26, 28 – sliders; 25 – retainer; 27 – lock; 30 – ring; 31 – hub; 32 – coupling; I – IV – gears
In the gearbox housing 22 cast aluminum alloy, the primary (drive) 1, secondary (driven) 8 and intermediate 21 shafts . The input shaft is made as one piece with gear 3, which is in constant mesh with gear 23 of the intermediate shaft, which is a gear block.
Gears 5, 6 and 9, respectively, of 3rd, 2nd and 1st gears are freely mounted on the secondary shaft The hubs of synchronizers 4 and 7 and the reverse gear 10 are also rigidly fixed to the secondary shaft. The reverse intermediate gear 16 is freely mounted on the axis 18.
When engaging 1st and 2nd gears, synchronizer 7 connects gears 6 and 9, respectively, to the secondary shaft of the gearbox. When engaging III and IV gears, synchronizer 4 connects gear 5 and input shaft 1, respectively, with the secondary shaft. Reverse gear is activated by fork 15 by engaging gear 16 with gears 17 and 10.
The gearbox housing is closed with covers 19, 2 and 14. Gaskets are installed under the lower 19 and rear 14 covers.
Synchronizer device
The synchronizer consists of a hub 31, a sliding clutch 32, locking rings 30 and springs 29. The synchronizer hub is fixed to the secondary shaft of the gearbox. It has external splines on which a sliding coupling 32 with internal conical surfaces is installed. The locking rings 30 have external conical surfaces and internal teeth with bevels. The locking rings are constantly pressed by springs 29 towards the sliding clutch 32.
The operation of the synchronizer is based on the use of friction forces. Engaging the gear is possible only after preliminary equalization of the angular velocities of the secondary shaft and the gear of the gear being engaged. After equalizing the angular velocities due to friction between the conical surfaces of the sliding clutch 32 and the locking ring 30, the teeth of the clutch engage with the synchronizer ring gear made on the gear. In this case, the freely rotating gear on the secondary shaft is connected to the secondary shaft using a synchronizer, and the transmission is engaged.
Gear shift mechanism
The lock consists of two locking pins and a pin between them. When the middle slider 26 moves, both nuts come out of its recesses and lock the outer sliders 24 and 28, preventing their displacement. When one of the outer sliders moves, the block comes out of its recess, blocks the middle slider and, acting through a pin on the other block, also locks the other outer slider, which prevents the inclusion of two gears at the same time .
The gearbox is attached to the rear end of the clutch housing. Transmission oil is poured into it through a threaded hole with plug 20. The internal cavity of the gearbox communicates with the atmosphere through the breather. The oil from the gearbox is drained through a threaded hole with a plug located in the bottom cover 19.
Gear shift drive diagram:
| 1 – gear selection rod lever; | 10 – hinge bushing; |
| 2 – gear selection lever; | 11 – hinge tip; |
| 3 – gearbox housing; | 12 – clamp; |
| 4 – clutch housing; | 13 – protective cover of traction; |
| 5 – gear selection rod; | 14 – gearbox control drive rod; |
| 6 – rod bushing; | 15 – gear shift lever; |
| 7 – rod seal; | 16 – ball joint cage; |
| 8 – protective cover; | 17 – ball joint of the gear shift lever; |
| 9 – hinge body; | 18 – jet thrust. |
The gearbox control drive consists of a gear shift lever (15), a ball joint (17), a rod (14), a gear selection rod (5) and gear selection and shift mechanisms (crumpled “P”).
To prevent spontaneous switching off of the P due to the axial movement of the power unit on its supports when the vehicle is moving, a reaction rod (18) is introduced into the gearbox control drive, one end of which is connected to the power unit, and a clip (16) of the ball joint of the lever (15) is attached to the other end ) switching P.
A lever (1) is attached to the inner end of the rod (5), which acts on the three-year lever (2) of the P selection mechanism. This mechanism is made as a separate unit and is attached to the plane of the clutch housing.
When repairs are needed
The principle of repair work on a gearbox for a VAZ 2110 car completely depends on the characteristic features of this device. As a rule, these machines have a two-shaft five-speed gearbox, which is combined with a differential and a main gear. It is known that the input shaft consists of a block of gears, which, in turn, are in engagement with the secondary gears of the forward gears. The secondary shaft also houses the driven gears and front gear synchronizers.
In addition, the front shaft bearings are roller type, and the rear shaft bearings are ball type. The gearbox control drive consists of a gear selection rod, a gear shift lever, a ball joint, as well as gear selection and shift mechanisms. The oil sump, which directs the flow of oil into the secondary shaft and to the driven gears, is located under the front bearing of the secondary shaft.
When does the VAZ 2110 gearbox require the intervention of a car mechanic? As a rule, repair work here is necessary if noise is observed in the box. In this case, it is necessary to replace the worn gear parts. Noise can also occur due to worn bearings, which also require replacement. Also check the oil level, if it is not enough, add and replace damaged oil seals, if necessary.
Gearbox repair is needed if shifting gears has become more difficult. Here the cause may be incomplete disengagement of the clutch, weakening of the gear selection rod lever or hinge mounting screws, or deformation of the transmission control drive rod. It is also necessary to take into account possible wear or breakage of drive parts that are made of plastic, or look for the cause in incorrect adjustment of the drive.
Gear selection mechanism:
| 1 – gear selection lever (forward); | 6 – reverse fork axis; |
| 2 – guide axis of locking brackets; | 7 – locking bracket; |
| 3 – axis of the gear selection lever; | 8 – reverse fork; |
| 4 – spring; | 9 – gear selection lever (reverse); |
| 5 – retaining ring; | 10 – housing of the gear selection mechanism. |
Two axles are mounted in the housing (10) of the gear selection mechanism. A three-year-old gear selector lever and two locking brackets (7 and 12) are installed on the axis (3). The other axis (2) passes through the holes of the locking brackets, securing them from turning. The gear selector lever arm (1) is used to engage P forward gear, the lever arm (9) is used to engage reverse gear, and the third arm is used by the gear selector rod lever. A fork (8) for engaging reverse gear is installed on the axle (6).
Oil is poured into the gearbox of a VAZ 2110, the level of which should be between the control marks of the oil level indicator.
Like any car, the VAZ 2110 is equipped with a gearbox. In the case of the designated model, this mechanism has 5 stages and is controlled via a shift lever, which, in turn, is located inside the car.
To ensure that there are no problems with the operation of your VAZ 2110, and that you can correct all kinds of failures yourself, you will need to understand the principles of operation and the design of the gearbox. We will also consider the process of changing the oil for the “ten”.
Gearbox VAZ 2110
The design of the gearbox is as follows: to ensure switching, the gearbox contains a so-called input shaft, which consists of a special block and gears. They are located in such a way that they are in constant mesh with the drive gears from speeds 1 to 5 (those that allow you to move forward). There is also another secondary shaft on which the main gear drive gear and synchronizers are located, which ensure forward movement. In addition, bearings and the so-called oil sump are located here.
The VAZ 2110 device assumes the presence of a two-satellite type differential. The drive part of the gearbox consists of a shift knob, a ball joint, a rod, a rod and mechanisms for selecting gears. The presence of jet thrust is explained by this - this is a measure to protect the gearbox from so-called “overshoots”. This traction is fixed with a support and a power unit.
Pro tips, driver actions after gearbox repair
First of all, the starter and battery are removed. Then you should drain the oil from the device. Next we perform the following steps:
First you have to disconnect the clutch cable. This should not cause any difficulties, because here it is enough to loosen the two nuts and then remove the cable; unscrew the fastening nuts, and then remove the cable from the box bracket; we compress the spring clips, after which we disconnect the wires from the speed sensor; Next, you should unscrew a couple of bolts, thanks to which the box is attached to the power unit; we are engaged in unscrewing the fastenings of the VAZ 2110 gearbox, which connects the box to the ignition; then the jet rod is removed (we unscrew the fastening bolts, loosen the clamp, and then pull the rod back); dismantle the left wheel drive (the right one can be left in place); then the bolts that are located on the steering knuckle, as well as in the lower right part of the box, are unscrewed. The bracket nut, clutch housing bolts and the left lower mounting bolt are also unscrewed; at this stage you can already get the power unit
It is important to secure it well so that it does not interfere with work and is not damaged; We dismantle the extreme fastenings; then we proceed to unscrew the two nuts of the rear engine mount; We begin to shift the gearbox from the guide bushings. Here it is worth holding it a little so that the unit does not fall; When we move the box as far as possible to the left, it will be possible to completely remove the device from the vehicle.
Adjustment work with the VAZ 2110 gearbox
Many of the owners of the VAZ 2110 mention cases when shifting gears is difficult, they are difficult to engage, and there are also frequent cases when these same gears are simply knocked out. Manufacturers have made sure that for such cases there is a special adjustment mechanism for the drive to select the speed.
This mechanism will be very useful when:
- The gearbox has been removed or was previously removed for repair work.
- One of the gears fails.
- Shifting gears occurs with effort, is difficult, or they simply get knocked out while the car is moving.
Provided that one of the described problems is typical and present in your VAZ 2110, you will need to make adjustments. It consists of the following steps:
- On the bottom of your car you will need to find the nut of the bolt that tightens the clamp that secures the rod required to carry out the gearbox control process. The nut will need to be loosened.
- Next, you need to move apart the grooves at the end of the rod using a screwdriver and also the crack on the clamp. Such manipulation will be required so that the rod can easily move relative to the gear selection rod. Set the rod itself to the neutral position.
- The shift knob must be freed from the cover.
- The lever is set according to a special pattern. In the rear speed locking bracket adjustment window, a template is set. Next, a stop for the lever axis is inserted in place of the template groove, and it is necessary to press without unnecessary effort in the transverse direction.
- Next, the axial play of the rod is adjusted in the rearward direction.
- The clamp is fixed a few millimeters from the end of the rod. Next, tighten the same clamp with a bolt.
When and how often do you need to repair the gearbox on a VAZ 2110
(“Volzhsky Automobile Plant”) provides comprehensive information on when and how often the gearbox needs to be repaired. It turns out that this mechanism does not have a service life as such. The only thing AvtoVAZ engineers insist on is the timely replacement of transmission oil:
- After the first 2 thousand kilometers on a new car.
- After 60 thousand kilometers.
- Further, as necessary, depending on the care of the owner and the frequency of use of the car.
Accordingly, the plant does not have any specific wishes or requirements for preventive or repair work. However, in any case, regardless of the mileage, it is necessary to carefully monitor all the nuances in the “behavior” of the box, since repairs will be necessary if the slightest malfunction occurs.
Gearbox VAZ 2110 disassembled
VAZ 2110 gearbox malfunctions
The main and most common malfunctions of the VAZ 2110 gearbox include:
- Crunching and grinding noises while driving
- Doesn't engage or gets out of gear when driving
Let's talk in more detail about these faults and how to fix them
The transmission does not start
No, the transmission is on! This is probably the most common problem of the VAZ Ten. There can be many reasons:
- Clutch wear (disc, basket),
- Wear of the gearbox synchronizer can be found out by disassembling the components and carrying out troubleshooting.
- Clutch malfunctions
In any of the above cases, you will probably need to overhaul the gearbox to identify the exact cause and subsequent repairs.
Knocks out gear when driving
Repair usually comes down to adjusting the shafts, adjusting the rocker clamp; less often there is a need to replace synchronizers, and in very rare cases the flywheel needs to be replaced.
The process of repairing a VAZ 2110 gearbox
If the problem is not solved immediately after it occurs, after a couple of thousand kilometers (and sometimes several hundred kilometers are enough), the box may become unusable and cannot be repaired, but only completely replaced.
Crunching and grinding in the box while driving
There are many reasons why a crunching noise occurs when the VAZ 2110 gearbox is operating. Eliminating some of them does not require much intervention in the mechanism, while others require a near-overhaul of the box. Most often, the gearbox crunches when changing gears for the following reasons:
- Synchronizer malfunction. The problem may lie either in the failure of the element or in the insufficient amount of lubricant in the part. If the synchronizer has “crumbled” due to age, the lubricating components with the resulting “garbage” risk causing serious damage to the entire unit, so the situation needs to be corrected as soon as possible;
- Failure of the “basket”. A component such as a “basket” consists of “petals” that begin to fall out due to the high mileage of the mechanisms. If the “petals” fall out, the driver cannot increase the speed, and extraneous sounds will appear when one or more gears are engaged. In such a situation, it will be necessary to replace the “basket” and diagnose the condition of the synchronizers;
- Problems with the clutch cable. A fairly common malfunction for domestically produced cars. If the clutch cable is broken, it will need to be replaced, otherwise the car simply will not move;
- Gearbox shaft malfunction. If the shaft is jammed while you are parked, the car will not move, the main thing is that it does not jam in motion, then the consequences can be disastrous, both for the car and for the passengers in it. Operation at elevated temperatures leads to shaft malfunction, which negatively affects the materials of the assembly.
Above are only the most common reasons why the VAZ 2110 gearbox fails. At the same time, we should not forget about possible manufacturing defects.
The process of assembling a VAZ 2110 gearbox
Repairing the box
In the case where this kind of adjustment work did not bring much results, you will have to remove and disassemble the gearbox of your VAZ 2110. The main attention should be paid to the gears, since they are most often knocked out. This is especially true for first and second speeds. It will also be important to check the latch.
There are three latches in total in the gearbox. The very first of them is very long and is responsible for 1st and 2nd gears. Next comes the clamp for third and fourth gears, and the shortest of the clamps is intended for 5th gear.
complete gearbox assembly
Problems
Often, VAZ 2110 owners voice a problem regarding the switching or departure of first gear. Most likely, the reasons lie in the following:
- synchronizer problems;
- damage to the retainer spring when the lever dangles and the gears are switched on randomly;
- damaged rod and fork.
A common problem is when the second gear is reluctantly engaged, or it is simply knocked out. The most likely causes of the problem:
- poor engagement of the gear and clutch that engages the gears;
- wear of gear teeth and coupling;
- problems with the clutch.
Changing the oil
According to the documentation, the lubricant component in VAZ 2110 engines and transmissions must be changed every 15 thousand kilometers or at least once a year.
So, we need to warm up the engine well and prepare the required oil and, preferably, a new oil filter, as well as the tools necessary for the job.
gearbox housing 2110
To drain the waste, you will need to unscrew the plug from the oil pan. Next, within 10-15 minutes, the oil is drained into a special container, which will need to be prepared in advance. Then the drain plug returns to its original position and is screwed tightly. Now you can replace the old oil filter with a new one (if necessary).
Now that the old oil has been drained, pay attention to its color and presence of inclusions. If the oil is dark brown in color and to the touch contains various types of inclusions such as metal dust or pieces of dirt, then the transmission will need to be flushed.
DON'T WASTE MONEY ON REPAINTING! Now you can remove any scratch from the body of your car in just 5 seconds.
For this purpose, special solutions are used, which are poured into the engine and gearbox before new oil. In this case, you will need to drive the car with such a solution for a short time and not quickly, five minutes along the garage will be enough, and then drain the mixture and the dirt that it has collected in the same way as described for the process of draining the “working off”.
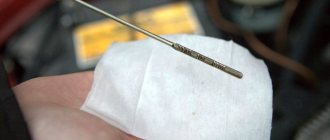
In order to fill with fresh oil, you will need to remove the filler cap. In this case, from 3 to 4 liters of oil are poured into the engine, depending on the readings of the dipstick. Ideally, the oil level is between the min. marks. and max.
These marks are marked on the dipstick as the minimum and maximum values. Next, you will need to start the engine and wait until the oil light (or oil pressure light) goes out. After this, turn off the engine, check the oil level and, if necessary, remove excess or add more oil.
There are times when the light bulb just won't go off. In such cases, it is better to check the quality of the oil filter or replace it if it was not changed during the replacement process.
Gearbox device VAZ 2110, VAZ 2111, VAZ 2112, Lada Ten
1 – rear cover of the gearbox housing 2 – drive gear of the 5th gear 3 – ball bearing of the input shaft 4 – drive gear of the 4th gear of the primary shaft 5 – input shaft 6 – drive gear of the 3rd gear of the input shaft 7 – gearbox housing 8 – drive gear of the 2nd gear input shaft 9 – reverse gear 10 – reverse intermediate gear 11 – 1st gear drive gear of the input shaft 12 – roller bearing of the input shaft 13 – input shaft oil seal 14 – breather 15 – clutch release bearing 16 – clutch release bearing sleeve guide 17 – main drive drive gear 18 – roller bearing of the secondary shaft 19 – oil sump 20 – pinion axis 21 – speedometer drive drive gear 22 – axle gear 23 – differential box 24 – satellite 25 – clutch housing 26 – oil drain plug 27 – main drive driven gear 28 – adjusting ring 29 – tapered roller bearing of the differential 30 – axle shaft oil seal 31 – driven gear of the 1st gear of the secondary shaft 32 – synchronizer of the 1st and 2nd gears 33 – driven gear of the 2nd gear of the secondary shaft 34 – driven gear of the 3rd gear of the secondary shaft 35 – synchronizer of the 3rd and 2nd gears IV gear 36 – driven gear IV gear of the secondary shaft 37 – ball bearing of the secondary shaft 38 – driven gear V gear of the secondary shaft 39 – synchronizer V gear 40 – secondary shaft
Transmission control drive
1 – protective cover of the rod 2 – gearbox control rod 3 – gear shift lever 4 – pin of the spherical gear shift lever 5 – ball joint cage 6 – ball joint of the gear shift lever 7 – buffer 8 – spring 9 – reaction rod 10 – rod lever gear selector 11 – gear selector lever 12 – gearbox housing 13 – clutch housing 14 – gear selector rod 15 – rod bushing 16 – rod seal 17 – protective cover 18 – joint body 19 – joint bushing 20 – joint tip 21 – clamp
The gearbox is mechanical, two-shaft, with five forward gears and one reverse gear, with synchronizers on all forward gears of the VAZ 2111. It is structurally combined with a differential and main gear.
The VAZ 2111 gearbox housing consists of three parts (cast from aluminum alloy): clutch housing 25, gearbox housing 7 and rear cover of the gearbox housing 1. During assembly, a gasoline-oil-resistant gasket sealant is applied between them (for example, KLT-75TM or TB- 1215). There is a special magnet in the crankcase socket that retains metal wear products.
The input shaft 5 is designed as a block of drive gears, which are in constant mesh with the driven gears of all forward gears. The secondary shaft 40 is hollow (for supplying oil to the driven gears), with a removable drive gear of the main gear 17. Driven gears 31, 33, 34, 36, 38 and synchronizers 32, 35, 39 for forward gears are located on it. The front bearings of shafts 18 and 12 are roller, the rear bearings 3 and 37 are ball. The radial clearance in roller bearings should not exceed 0.07 mm, in ball bearings - 0.04 mm. Under the front bearing of the secondary shaft 18 there is an oil sump 19, which directs the flow of oil into the shaft.
The differential is two-satellite. The preload in the bearings 29 (0.25 mm) is adjusted by selecting the thickness of the ring 28 installed in the gearbox housing housing under the outer ring of the differential bearing. The driven gear of the VAZ 2110 main gear 27 is attached to the differential box flange.
The gearbox control drive consists of a VAZ 2110 gear shift lever, a ball joint, a rod, a gear selection rod and mechanisms for selecting and shifting gears of a VAZ 2110. Before assembly, TB-1324 thread glue is applied to the screws that secure the rod and lever to the gear selection rod. The lever and hinge mounting screws vary in length, coating and tightening torques. The lever fastening screw is phosphated (dark color), 19.5 mm long, tightened with a torque of 3.4 kgf.m. The hinge fastening screw is cadmium-plated (golden), 24 mm long, tightened with a torque of 1.95 kgf.m. LSC-15 lubricant is placed in the ball joint before assembly.
To prevent the gears from spontaneously switching off due to the axial movement of the power unit when the vehicle is moving, a reaction rod is introduced into the gearbox control drive, one end of which is connected to the power unit, and a ball joint race for the gear shift lever is attached to the other end.
A lever is attached to the inner end of the rod, which acts on the three-arm lever of the gear selection mechanism of the VAZ 2111. This mechanism is made as a separate unit and is attached to the plane of the clutch housing.
The housing of the gear selection mechanism of the VAZ 2112 has two axes. One has a three-arm gear selector lever and two locking brackets. The other axis passes through the holes of the locking brackets, securing them from turning. One arm of the VAZ 2112 gear selection lever is used to engage forward gears, the other is used to engage reverse gear, and the third arm is used by the gear selection rod lever. A reverse fork is installed on the axle.
The gearbox is filled with TM-5-9p oil at the factory, designed for 75,000 km. The oil level should be between the reference marks on the oil level indicator.
The gearbox communicates with the atmosphere through breather 14 located in its upper part.
Repairing a gearbox by hand, how to bring spare parts into the desired form
- If it is necessary to replace the rod hinge, remove the protective cover on it, and then unscrew the bolt securing the hinge. For strength, a special glue TB-1324 was applied to the bolt. Therefore, before assembly, it is necessary to clean the bolt and apply this glue to the surface.
- Check the magnet, if it is intact, just clean it of dirt. If small cracks are found or if it does not magnetize well, it should be replaced.
- Clean the surfaces of the gearbox housings, clutches and rear cover from sealant.
- Using transmission oil, lubricate all rotating elements.
Gearbox VAZ 2110
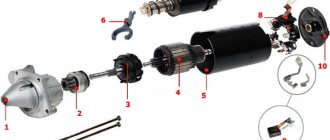
Cross-sectional design of a gearbox on a VAZ 2110
Main parts of the VAZ 2110 gearbox: 1 – rear cover of the gearbox housing, 2 – fifth gear drive gear, 3 – input shaft ball bearing, 4 – fourth gear drive gear of the input shaft, 5 – input shaft, 6 – third gear drive gear input shaft, 7 – gearbox housing, 8 – drive gear of the second gear of the primary shaft, 9 – reverse gear, 10 – intermediate reverse gear, 11 – drive gear of the first gear of the primary shaft, 12 – roller bearing of the input shaft, 13 – oil seal input shaft, 14 – breather, 15 – clutch release bearing, 16 – clutch release bearing clutch guide sleeve, 17 – main drive drive gear, 18 – secondary shaft roller bearing, 19 – oil sump, 20 – pinion axis, 21 – drive drive gear speedometer, 22 – axle gear, 23 – differential box, 24 – satellite, 25 – clutch housing, 26 – oil drain plug, 27 – main drive driven gear, 28 – adjusting ring, 29 – differential tapered roller bearing, 30 – oil seal axle shaft, 31 – driven gear of the first gear of the secondary shaft, 32 – synchronizer of the first and second gears, 33 – driven gear of the second gear of the secondary shaft, 34 – driven gear of the third gear of the secondary shaft, 35 – synchronizer of the third and fourth gears, 36 – driven gear of the fourth transmission of the secondary shaft, 37 – ball bearing of the secondary shaft, 38 – driven gear of the fifth gear of the secondary shaft, 39 – fifth gear synchronizer, 40 – secondary shaft.
Gearbox control drive VAZ 2110
VAZ 2110 backstage diagram: 1 – protective cover of the rod, 2 – gearbox control rod, 3 – gear shift lever, 4 – pin of the spherical gear shift lever, 5 – ball joint cage, 6 – ball joint of the gear shift lever, 7 – buffer , 8 – spring, 9 – reaction rod, 10 – gear selection rod lever, 11 – gear selection lever, 12 – gearbox housing, 13 – clutch housing, 14 – gear selection rod, 15 – rod bushing, 16 – rod seal, 17 – protective cover, 18 – hinge body, 19 – hinge bushing, 20 – hinge tip, 21 – clamp.
The principle of operation of the VAZ 2110 gearbox
The gearbox is mechanical, two-shaft, with five forward gears and one reverse gear, with synchronizers in all forward gears. It is structurally combined with the differential and main gear.
The gearbox housing consists of three parts (cast from aluminum alloy): the clutch housing, the VAZ 2110 gearbox housing and the rear cover of the gearbox housing. During assembly, a gasoline-oil-resistant gasket sealant (for example, KLT-75TM or TB-1215) is applied between them. There is a special magnet in the crankcase socket that retains metal wear products.
The input shaft of the VAZ 2110 is designed as a block of drive gears, which are in constant engagement with the driven gears of all forward gears. The secondary shaft of the VAZ 2110 is hollow (for supplying oil to the driven gears), with a removable drive gear of the main gear. It houses the driven gears and forward gear synchronizers. The front shaft bearings are roller, the rear are ball. The radial clearance in roller bearings should not exceed 0.07 mm, in ball bearings - 0.04 mm. An oil sump is located under the front bearing of the secondary shaft, directing the flow of oil into the shaft.
The differential is two-satellite. The preload in the bearings (0.25 mm) is adjusted by selecting the thickness of the ring installed in the gearbox housing housing under the outer ring of the differential bearing. The main drive driven gear is attached to the differential box flange.
The gearbox control drive consists of a gear shift lever, a ball joint, a rod, a gear selection rod and gear selection and shift mechanisms. TB-1324 thread glue is applied to the screws securing the rod and lever to the gear selector rod before assembly. The lever and hinge mounting screws vary in length, coating and tightening torques. The lever fastening screw is phosphated (dark color), 19.5 mm long, tightened with a torque of 3.4 kgf.m. The hinge fastening screw is cadmium-plated (golden), 24 mm long, tightened with a torque of 1.95 kgf.m. LSC-15 lubricant is placed in the ball joint before assembly.
To prevent the gears from spontaneously switching off due to the axial movement of the power unit when the vehicle is moving, a reaction rod is introduced into the gearbox control drive, one end of which is connected to the power unit, and a ball joint race for the gear shift lever is attached to the other end.
A lever is attached to the inner end of the rod, which acts on the three-arm lever of the gear selection mechanism. This mechanism is made as a separate unit and is attached to the plane of the clutch housing.
The housing of the gear selection mechanism of the VAZ 2110 has two axes. One has a three-arm gear selector lever and two locking brackets. The other axis passes through the holes of the locking brackets, securing them from turning. One arm of the gear selection lever is used to engage forward gears, the other is used to engage reverse gear, and the third arm is used by the gear selection rod lever. A reverse fork is installed on the axle.
The gearbox is filled with TM-5-9p oil at the factory, designed for 75,000 km. The oil level in the VAZ 2110 gearbox should be between the control marks on the oil level indicator.
First stage. Removing the gearbox from the car
Repair of the VAZ 2107 gearbox must be carried out when the first signs of a malfunction appear. For repairs, it is necessary to remove the gearbox from the vehicle.
- the first thing to do is to lift the vehicle above the pit or onto an overpass;
- disconnect the wire with a minus sign that goes to the battery;
Do not forget that on VAZ cars, for repairs, the radio panel must be removed.
- press the box lever;
- a screwdriver is inserted into the marked hole. It has a bushing that is of the locking type;
- the screwdriver needs to be moved down;
- remove the sleeve from the rod;
- we separate this rod located on the RPP.
- the rubber bushing of the damper is removed from the rod using pliers;
- then you need to unclench the petals that grip the damper bushing, then you need to remove them from the lever (see the figure).
- then the damper spacer bushing is removed;
- the floor upholstery moves;
- the bolts that secure the cover covering the hole are unscrewed;
- the lever is removed simultaneously with the foam rubber seal;
- the receiving pipe is removed from the device releasing gas;
- we climb under the car;
Read the latest news from the world of sedans here, you will learn everything about tuning here.
the starter is removed; the “cross” is removed; the support cross member of the power device is disconnected; it is necessary to remove the flexible shaft, which is connected to the speedometer drive; The hydraulic cylinder must be separated from the crankcase
Important! The hose attached to it does not need to be touched; remove the bolts securing the clutch housing cover using a ten key; it is necessary to install a support under the gearbox; you need to take an extension cord and put it on a 19 socket type key; using a key and a “cross” hinge, you need to unscrew the bolts securing the cylinder block with the clutch; using a screwdriver that was inserted into the gap, it is necessary to press the clutch away from the cylinder; remove the starter from the directional bushings; the input shaft of the VAZ 2107 gearbox must be removed from the driven disk hub; we displace the primary shaft from inside the bearing ring located in the crankshaft; and finally, remove the gearbox from the car.
Gearbox VAZ 2110
Like any car, the VAZ 2110 is equipped with a gearbox. In the case of the designated model, this mechanism has 5 stages and is controlled via a shift lever, which, in turn, is located inside the car.
To ensure that there are no problems with the operation of your VAZ 2110, and that you can correct all kinds of failures yourself, you will need to understand the principles of operation and the design of the gearbox. We will also consider the process of changing the oil for the “ten”.
Why do you need a gearbox slide?
In fact, most often the gearbox is in good condition, but the rocker may fail.
You can replace the unit with a new one, or you can get by with proper adjustment of the rocker. Adjusting this element will help troubleshoot problems and make sure that the problem is related specifically to the gearbox linkage. It happens that a car owner simply begins to change one component after another without understanding the problem, wasting money and time to no avail.
The gearbox itself is designed to prevent gears from switching spontaneously. It happens that due to incorrect or erroneous adjustments, the entire transmission system begins to work incorrectly and may even fail. Therefore, you need to be able to adjust the gearbox rocker with your own hands, especially since this procedure is not complicated.
When does the rocker need adjustment?
Gear shift mechanism.
The procedure for adjusting the gearbox linkage is recommended in the following cases:
- After the transmission on the car has been replaced or removed.
- When loosening the fixing clamps.
- If the cardan was changed.
- If the link starts to rotate on its hinge.
Although visually it may seem that the rocker is in place, even the slightest movement of the rocker can lead to incorrect operation of the gearbox. It happens that it is enough to tighten the link to the cardan by 1 mm, after which all functions of the gearbox will be restored.
Gearbox VAZ 2110
The design of the gearbox is as follows: to ensure switching, the gearbox contains a so-called input shaft, which consists of a special block and gears. They are located in such a way that they are in constant mesh with the drive gears from speeds 1 to 5 (those that allow you to move forward). There is also another secondary shaft on which the main gear drive gear and synchronizers are located, which ensure forward movement. In addition, bearings and the so-called oil sump are located here.
The VAZ 2110 device assumes the presence of a two-satellite type differential. The drive part of the gearbox consists of a shift knob, a ball joint, a rod, a rod and mechanisms for selecting gears. The presence of jet thrust is explained by this - this is a measure to protect the gearbox from so-called “overshoots”. This traction is fixed with a support and a power unit.
How to repair a gearbox on a VAZ 2110
Adjustment does not always achieve the desired effect. Therefore, the motorist will need to carry out repair work. Practice shows that repairing a VAZ 2110 gearbox involves dismantling and reassembling the gearbox. Now I will tell you in detail how to do this.
How to remove/dismantle a VAZ 2110 box
How to remove the box? Before disassembling the gearbox, it must be cleaned
It is important that water does not get inside the box.
Main stages:
- Power from the battery is turned off.
- The block is disconnected from the speed sensor.
- Transmission fluid is drained.
- The bolts securing the jet thrust are removed.
- It is necessary to remove the constant velocity joints from their standard location.
- The existing ball joint bolts are loosened.
- Using a tool, unscrew the nuts holding the clutch cover to the gearbox housing.
- The bolts securing the gearbox to the engine are disconnected.
- The power plant must be lifted (use a jack).
- The engine mounts must be removed.
- To pick up the gearbox, you can use a screwdriver.
- The speed box slides off the guides. The input shaft should disengage from the clutch.
How to properly disassemble a VAZ 2110 gearbox
- We remove dirt and wash the outside of the gearbox (do not allow water to enter the crankcase).
- Using a 17mm wrench, unscrew the bolt securing the power unit suspension bracket.
- Using a 13mm socket, unscrew the six nuts securing the rear crankcase cover.
- Remove the bracket.
- Tapping with a copper hammer (or an ordinary one through a soft metal mandrel) on the tides of the lid, and remove it along with the sealing gasket from the studs.
- Having pressed the gear selection rod all the way, we turn on the third gear, or, by retracting the rod all the way, we turn on the fourth.
- Using a 10mm spanner, unscrew the bolt securing the fifth gear fork.
- Using a soft metal drift, we strike the fork downwards, including the fifth gear of the VAZ 2110
- Use a beard to straighten dents in the nuts of the primary and secondary shafts
- Using a 32" socket with a powerful wrench, unscrew the shaft nuts.
- Using a screwdriver, pry off the fifth gear fork and remove the fifth gear assembly. Remove the fifth gear shift fork.
- Remove the synchronizer sliding clutch from the hub. Remove the synchronizer blocking ring. We take out the thrust plate.
- We move the hub inside the sliding clutch of the Synchronizer and remove the hub, springs, clamps and crackers of the fifth gear synchronizer.
- Using a copper hammer we strike the end of the input shaft. Insert two screwdrivers into the resulting gap between the thrust plate and the fifth gear drive gear. Prying up the gear with screwdrivers, we press it
- Using the “13” socket, unscrew the three plugs of the gearshift rod clamps. Remove the springs and retaining balls from their sockets.
- Using a Phillips impact screwdriver, unscrew the four screws securing the thrust plate. The screws have special lock washers.
- Remove the thrust plate. Use two screwdrivers to pry off the thrust washer of the fifth gear driven gear bushing. We insert the puller arms into the resulting gap between the end of the rear bearing and the thrust washer and compress the gear sleeve and the thrust washer.
- Use two screwdrivers to separate the retaining ring on the input shaft and remove it. In the same way, remove the retaining ring from the secondary shaft.
- We insert a screwdriver into the socket of the latch and, applying a magnet to it, remove the ball.
- Using a “13” socket, unscrew thirteen nuts and one bolt securing the gearbox housing to the clutch housing.
- By inserting a screwdriver into the groove at the junction of the crankcase mating planes, carefully lift the box crankcase and remove it.
- Using a 10mm spanner, unscrew the bolt securing the 1st-2nd gear shift fork to the rod. We lift the rod up and disengage the fork. Using a 10mm spanner, unscrew the bolt securing the 3rd-4th gear shift fork to the rod. Use a screwdriver to remove the rod from the gear selection mechanism.
- Raise the rod up and remove the fork from the groove of the synchronizer sliding clutch.
- By turning the 5th gear engagement rod, we remove it from the gear selection mechanism. We take out the axis of the reverse intermediate gear.
- Remove the reverse intermediate gear. We simultaneously remove the primary and secondary shafts from the roller bearings of the clutch housing.
- We take out the differential assembly.
- Using a 10mm socket, unscrew the three bolts securing the gear selection mechanism and remove it.
- Using a 10mm socket, unscrew the installation bolt of the gear selector lever. Remove the gear selector lever from the rod.
- Using a screwdriver, remove the protective cover of the rod from the bushing. We take out the gear selection rod.
Adjustment work with the VAZ 2110 gearbox
Many of the owners of the VAZ 2110 mention cases when shifting gears is difficult, they are difficult to engage, and there are also frequent cases when these same gears are simply knocked out. Manufacturers have made sure that for such cases there is a special adjustment mechanism for the drive to select the speed.
This mechanism will be very useful when:
- The gearbox has been removed or was previously removed for repair work.
- One of the gears fails.
- Shifting gears occurs with effort, is difficult, or they simply get knocked out while the car is moving.
Provided that one of the described problems is typical and present in your VAZ 2110, you will need to make adjustments. It consists of the following steps:
- On the bottom of your car you will need to find the nut of the bolt that tightens the clamp that secures the rod required to carry out the gearbox control process. The nut will need to be loosened.
- Next, you need to move apart the grooves at the end of the rod using a screwdriver and also the crack on the clamp. Such manipulation will be required so that the rod can easily move relative to the gear selection rod. Set the rod itself to the neutral position.
- The shift knob must be freed from the cover.
- The lever is set according to a special pattern. In the rear speed locking bracket adjustment window, a template is set. Next, a stop for the lever axis is inserted in place of the template groove, and it is necessary to press without unnecessary effort in the transverse direction.
- Next, the axial play of the rod is adjusted in the rearward direction.
- The clamp is fixed a few millimeters from the end of the rod. Next, tighten the same clamp with a bolt.
Repairing the box
In the case where this kind of adjustment work did not bring much results, you will have to remove and disassemble the gearbox of your VAZ 2110. The main attention should be paid to the gears, since they are most often knocked out. This is especially true for first and second speeds. It will also be important to check the latch.
There are three latches in total in the gearbox. The very first of them is very long and is responsible for 1st and 2nd gears. Next comes the clamp for third and fourth gears, and the shortest of the clamps is intended for 5th gear.
complete gearbox assembly
Often, VAZ 2110 owners voice a problem regarding the switching or departure of first gear. Most likely, the reasons lie in the following:
- synchronizer problems;
- damage to the retainer spring when the lever dangles and the gears are switched on randomly;
- damaged rod and fork.
A common problem is when the second gear is reluctantly engaged, or it is simply knocked out. The most likely causes of the problem:
- poor engagement of the gear and clutch that engages the gears;
- wear of gear teeth and coupling;
- problems with the clutch.
Changing the oil
According to the documentation, the lubricant component in VAZ 2110 engines and transmissions must be changed every 15 thousand kilometers or at least once a year.
So, we need to warm up the engine well and prepare the required oil and, preferably, a new oil filter, as well as the tools necessary for the job.
gearbox housing 2110
To drain the waste, you will need to unscrew the plug from the oil pan. Next, within 10-15 minutes, the oil is drained into a special container, which will need to be prepared in advance. Then the drain plug returns to its original position and is screwed tightly. Now you can replace the old oil filter with a new one (if necessary).
Now that the old oil has been drained, pay attention to its color and presence of inclusions. If the oil is dark brown in color and to the touch contains various types of inclusions such as metal dust or pieces of dirt, then the transmission will need to be flushed.
For this purpose, special solutions are used, which are poured into the engine and gearbox before new oil. In this case, you will need to drive the car with such a solution for a short time and not quickly, five minutes along the garage will be enough, and then drain the mixture and the dirt that it has collected in the same way as described for the process of draining the “working off”.
In order to fill with fresh oil, you will need to remove the filler cap. In this case, from 3 to 4 liters of oil are poured into the engine, depending on the readings of the dipstick. Ideally, the oil level is between the min. marks. and max.
These marks are marked on the dipstick as the minimum and maximum values. Next, you will need to start the engine and wait until the oil light (or oil pressure light) goes out. After this, turn off the engine, check the oil level and, if necessary, remove excess or add more oil.
There are times when the light bulb just won't go off. In such cases, it is better to check the quality of the oil filter or replace it if it was not changed during the replacement process.