Standard elements of the exhaust system of a VAZ 2104 passenger car last from 30 to 50 thousand kilometers. Then the problems begin - due to wear, the preliminary and main muffler tanks burn out. Symptoms of the malfunction are noticeable without any diagnosis - the breakthrough of gases through the fistulas is accompanied by an unpleasant roaring sound. Replacing worn parts is not difficult for an experienced motorist; beginners are advised to first study the design of the Zhiguli exhaust tract.
- Exhaust tract design
- Main muffler - device and types
Video: how to make a forward flow yourself
- What tool will you need?
Video: how to replace the muffler yourself
- Video: repairing exhaust using sealant
- Video: how to replace the resonator on classic VAZ models
Exhaust system design of VAZ 2107
Like most passenger cars, the VAZ 2107 has an exhaust system consisting of three main parts:
- a receiving pipe into which gases enter from the exhaust manifolds;
- VAZ 2107 resonator (additional muffler), where gases are directed from the exhaust pipe and where the exhaust sound is partially reduced;
- muffler, which absorbs most of the engine exhaust noise.
In addition to the above parts, the exhaust system includes:
- muffler mounting pad;
- pillow bolt;
- muffler suspension belt;
- clamp bolt and clamp securing the muffler to the resonator;
- clamp bolt and clamp securing the resonator to the exhaust pipe;
- clamp bolt and clamp securing the exhaust pipe to the body;
- nuts securing the exhaust pipe to the manifold;
- pad;
- locking plate;
Types of products
You can buy the following types of mufflers for the domestic brand:
- assembly model “Izh-Auto”, which is suitable for VAZ 2104, 2106 and 2107;
- model for a sedan body, which is suitable, in addition to the VAZ 2107, on varieties 2101, 2103, 2105 and 2106.
The following types of exhaust systems are available on the market:
stamped and welded. They involve stamping two metal parts of the product can, welding them and attaching them to the pipe. Initially, exhaust systems were made in this way, but then the more reliable rolling method replaced it;
sunset Involves wrapping sheet metal around the muffler. Despite the reliability of the method, factory parts are made only by the first method, so you can purchase roll-up exhaust systems separately.
Differences between the exhaust systems of carburetor and injection VAZ models
Installation of an injection system on a VAZ 2107 required modernization of the exhaust system. Two additional details were added to it:
- an oxygen sensor that determines the composition of the mixture, which is embedded in the exhaust manifold;
- an exhaust gas catalyst (“catalyst”), which is installed in front of the resonator, in the central tunnel under the bottom.
In connection with the installation of the catalyst, the VAZ 2107 resonator (injector) was moved a little back.
The new exhaust system has become a little more complicated, but it allows for a reduction in the toxicity of the VAZ 2107 exhaust and ensures that the car complies with EURO-2 standards.
Advantages and disadvantages of the injection modification of the VAZ 2107
The “Seven” in injection version and with a modernized exhaust system has a number of advantages over the old “carburetor” model. They are as follows:
- thanks to the injector, the engine operates more stable in all modes;
- the specific power and torque of the injection engine are higher;
- the exhaust of a VAZ 2107 with an injection system is cleaner than smoke from a carburetor engine;
- Driving a car with an injection engine is easier, it is not so demanding on the driver’s qualifications and “forgiven” mistakes when operating the gas and clutch pedals.
But installing the injector at the same time worsened some performance characteristics:
- the clearance of the injection “seven” decreased to 7 cm, which worsened its cross-country ability;
- due to the installation of the catalyst, the “survivability” of the exhaust system has decreased;
- the high temperature of the catalyst sometimes causes grass and dry leaves to ignite when the car is stopped.
How to remove and replace pants and the receiving tube on a VAZ 2107
Of all the parts of the exhaust gas system, it is the pants (exhaust pipe) that is the most durable. If, for example, you have to replace the muffler at least once every 50-70 thousand km, then the pants can last more than 100,000 kilometers for your VAZ 2107.
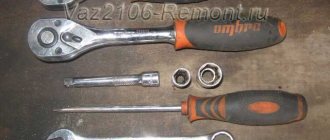
Tools needed to remove the exhaust pipe:
- Ratchet handle
- Head deep 13
- Open-end wrench or socket wrench 13
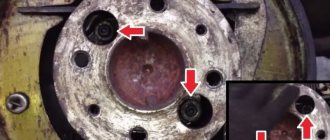
Before proceeding with this type of repair, the first step will be to disconnect the exhaust pipe from the resonator. All this is attached to a clamp, which is compressed with two bolts and nuts. These are the first things you need to unscrew.
Then you can start unscrewing the nuts securing the pants to the exhaust manifold, of which there are only 4 pieces. First, it’s better to disrupt connections using a regular key:
And then it’s most convenient to use the ratchet handle to make it more convenient and faster:
After all the nuts are unscrewed, you can move the exhaust pipe back a little by pulling it off the studs:
Then you can try to remove it completely, turning it a little from side to side to find the most convenient position for final removal:
And the photo below shows the final result of the work done:
If it is necessary to replace the pants, we buy new ones that will fit your VAZ 2107 and install them in the reverse order of removal. The price of a new exhaust pipe is about 500 rubles.
Exhaust system functions and parts replacement intervals
Despite its apparent simplicity, the exhaust system performs several important functions:
- removal of fuel combustion products;
- reduction of noise level from the exhaust;
- maintaining air balance in intake and exhaust systems;
- ensuring ventilation and cleaning of cylinders;
- reduction of CO content (in the presence of a catalyst).
Exposure to high temperatures, moisture, fuel and oil combustion products leads to through corrosion of exhaust system parts. This is aggravated by the external influence of gravel, sand and salt solutions that are used to treat roads in winter. Therefore, parts of the system have to be changed. The frequency of replacement depends on the following factors:
- car use activity;
- frequency of machine operation in bad weather (rain, snow);
- fuel quality;
- quality of exhaust system parts.
Replacing the muffler VAZ 2107
The VAZ 2107 muffler (injector and carburetor) is connected to the resonator with a clamp, which is located in front of the rear axle. Before removing the clamp, it should be tapped with a hammer to make it easier to unscrew the threaded connection and uncouple the pipes. To change the muffler, you need to do the following:
- loosen the clamp bolt and remove (move) the clamp;
- pull the flared muffler pipe off the resonator (if that doesn’t work, knock it down with a hammer and chisel);
- remove the muffler from the cushion and mounting straps;
- install a new muffler on the VAZ 2107;
- tighten the clamp.
Replacement Tools
What you will need to change the muffler:
- The key for 12 and 13 is more convenient with a cap
- Head for 13
- Ratchet
- Metal brush
- Rust cleaner (WD-40 and similar)
Replacing a VAZ 2104 muffler requires WD-40
- Chisel
- Pliers
- Hammer
- Bulgarian (preferably small)
- Mount
And also parts of the exhaust system:
- Pipe clamps
- Intake pipe mounting clamp
- Elastic bands (fastening straps)
- Gasket + 4 nuts
Set of fastening parts for VAZ
Replacing the VAZ 2107 resonator
The VAZ 2107 resonator does not have fastening parts to the car body, so it is necessary to hold it when replacing it. Otherwise the exhaust pipe will be bent.
The replacement work consists of the following steps:
- tap clamps and pipe connections with a hammer;
- loosen the bolts of the clamps and move the clamps fastening to the “pants” and the muffler;
- disconnect the resonator from the muffler by undocking the pipes;
- disconnect the resonator from the receiving pipe (“pants”);
- install the new resonator in the correct position;
- connect the parts and tighten the fastening clamps.
Note: the resonator tank must be parallel to the ground, otherwise the part will knock on the bottom of the car and cling to uneven road surfaces.
Removal process
In the process of removing an element of the exhaust system from a VAZ 2107 (injector) for its subsequent replacement. The following tools will be useful to you:
- wrench 13 (open-end type);
- ratchet or crank;
- deep heads on 13 and 10;
- Bulgarian;
- flat screwdriver (can be replaced with a chisel);
- pliers;
- hammer.
To figure out how to remove the muffler from your VAZ correctly and replace it. Please read the following instructions carefully:
- install the car over an inspection hole or on an overpass;
- unscrew (cut with a grinder) the crimp coupling;
- using a screwdriver or thin chisel, bend the flared ends of the pipe;
- using a hammer, which you will use to knock on the pipe, separate the muffler from the resonator;
- Unfasten the hanging pillows.
After this, the product can be freely removed to be replaced with a new one, which is installed in the reverse order.
Please note that the connection between the muffler pipe and the resonator pipe is located in front of the rear axle. The ends of the pipe with slots and female-male fasteners are tightened using a coupling. Removal of the product can be complicated by corrosion, which develops under the influence of temperatures and lubrication.
For this reason, moisten corroded parts with an anti-corrosive agent in advance (motor oil or brake fluid will also work). If you are planning to install a new muffler, it would be a good idea to purchase new suspension rubber bands (1 for the rear and 2 for the center location).
As some drivers joke, the muffler is one of those parts that “does not affect speed.” Indeed, getting to the garage without a muffler, if this happens, is acceptable
But everyday comfortable and safe operation of a car is impossible without this important design element.
Replacing the exhaust pipe (“pants”) of a VAZ 2107
When replacing the exhaust pipe, be sure to replace the gasket between it and the exhaust manifold. It is also better to change the nuts securing the “pants” to the manifold. The procedure is as follows:
- loosen the clamp and disconnect the pants from the resonator;
- unscrew the four nuts securing the exhaust pipe to the manifold;
Important: unscrew the nuts carefully so as not to twist the fastening studs. Otherwise, you will have to drill out and replace the studs.
- remove the “pants” (exhaust pipe) and gasket;
- install a new gasket;
- install a new exhaust pipe;
- connect the exhaust pipe to the resonator, tighten the fastening clamp;
- tighten the nuts securing the “pants” to the manifold.
Exhaust 2104
It's time to change the exhaust pipe and resonators. Questions arose:
1. Does the system on 2104 differ from sedans only in the muffler or also in the exhaust pipe and pipe with resonators?
2. Is it better to take a system with one resonator or two? Criteria: cheaper, last longer and have higher ground clearance. Apparently it’s better with one resonator. But won't it be a bit noisy? Is there even a pipe with one can for 2104?
3. What to take besides the pipes themselves? Two clamps, a suspension clamp for the gearbox, a gasket for the exhaust pipe. What else?
4. Is it really possible to change it yourself? Where is it more convenient to unscrew the nuts - from under the hood or from under the car?
5. The silencer seems normal. I want to leave it, is it possible to disconnect it from the pipe without an angle grinder? Surely a new pipe with resonators will fit it?
6. Which pipes by manufacturer are best to buy (Peter)?
Re: Exhaust 2104 > 1. Does the system on 2104 differ from sedans only in the muffler or also in the exhaust pipe and pipe with resonators? I don’t know > > 2. Is it better to take a system with one resonator or two? With two
> Criteria: cheaper, last longer and have higher ground clearance. It doesn't happen that way. Either it’s cheaper or it lasted longer.
> 3. What to take besides the pipes themselves? Two clamps, a suspension clamp for the gearbox, a gasket for the exhaust pipe. What else? Bronze nuts for exhaust pipe
> 4. Is it really possible to change it yourself? Where is it more convenient to unscrew the nuts - from under the hood or from under the car? Really. You need a rhombic jack - press out the engine when you pull out/put on the pipe. Unscrew the nuts from the top.
> 6. Which pipes by manufacturer are best to buy (Peter)? Walker
Why is it better with two? Just by sound? It seemed to me that a regular pipe would last longer than a pipe with a resonator.
It may turn out that a leaky exhaust system leads to unstable operation at idle?
Source of the article: https://forum.auto.ru/vaz-classic/1310763/
Exhaust System Mounting Parts
The clamps and suspension elements of the exhaust system are exposed to moisture and salt during machine operation. In addition to corrosion, metal “fatigue” accumulates in clamps. The clamps begin to loosely hold the connection, as a result of which exhaust gases begin to break out, creating noise. Old suspension cushions may break off, which can damage exhaust system parts. Therefore, it is advisable to change the mounting parts; whenever large parts are replaced, the mounting elements on which they are attached should also be changed. This will avoid unnecessary problems and expenses.
Standard elements of the exhaust system of a VAZ 2104 passenger car last from 30 to 50 thousand kilometers. Then the problems begin - due to wear, the preliminary and main muffler tanks burn out. Symptoms of the malfunction are noticeable without any diagnosis - the breakthrough of gases through the fistulas is accompanied by an unpleasant roaring sound. Replacing worn parts is not difficult for an experienced motorist; beginners are advised to first study the design of the Zhiguli exhaust tract.
Functions of the VAZ 2104 exhaust system
To get maximum energy from the engine, you need to burn the fuel under optimal conditions. The required volume of air is added to the gasoline, then the mixture is sent through the inlet manifold into the cylinders, where it is compressed by pistons 8-9 times. The result is that after the flash, the fuel burns at a certain speed and pushes the pistons in the opposite direction, the motor performs mechanical work.
In addition to the energy that rotates the engine crankshaft, by-products are released when the air-fuel mixture is burned:
- exhaust harmful gases - carbon dioxide CO2, nitrogen oxide NO, carbon monoxide CO and other chemical compounds in smaller volumes;
- a large amount of heat;
- a loud sound similar to a rumble that is formed with each flash of fuel in the cylinders of the power unit.
A significant portion of the released thermal energy is dissipated into the environment thanks to the water cooling system. The rest of the heat is taken up by combustion products that escape through the exhaust manifold and exhaust pipe.
What problems does the VAZ 2104 exhaust system solve:
- Removal of flue gases from the cylinders during the exhaust stroke - combustion products are pushed out of the chambers by pistons.
- Cooling of gases by heat exchange with ambient air.
- Suppression of sound vibrations and reduction of noise levels from engine operation.
The latest modifications of the “fours” - VAZ 21041 and 21043 were equipped with an electronically controlled fuel supply system - an injector. Accordingly, the exhaust tract was supplemented with a section of a catalytic converter that neutralizes toxic gases through chemical reduction (afterburning).
Exhaust tract design
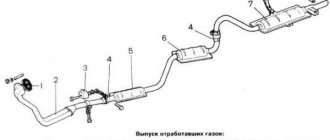
On all classic VAZ models, including the Four, the exhaust is designed the same and consists of three parts:
- a receiving section in the form of a double pipe is screwed to the exhaust manifold flange - the so-called pants;
- the middle part of the tract is a single pipe equipped with a resonator tank (on cars with 1.5 and 1.6 liter engines there are 2 such tanks);
- at the end of the tract the main muffler is located.
In the injection modifications of the “four”, a neutralizer tank is added, installed between the “pants” and the resonator section. The efficiency of the element is controlled by an oxygen sensor (otherwise known as a lambda probe), which sends signals to the electronic control unit.
Each part of the system performs its function. The receiving pipe dampens the primary noise, collects gases into a single channel and removes the lion's share of the heat. The resonator and the main muffler absorb sound waves and finally cool the combustion products. The entire structure is supported by 5 fasteners:
- The intake pipe is connected to the motor via a flange connection, fasteners are 4 nuts with M8 threads, made of heat-resistant bronze.
- The second end of the “pants” is screwed to a bracket located on the gearbox housing.
- The barrel of the main muffler is suspended from the bottom by 2 rubber struts.
- The rear end of the exhaust pipe is attached to the body using a rubber cushion.
The middle resonator part is not attached to the bottom in any way and is held in place only by the adjacent sections - the muffler and the exhaust pipe. This point must be taken into account when disassembling the exhaust. Being an inexperienced car enthusiast, I changed the muffler myself and, in the process of disconnecting the pipes, I broke off the clamp securing the “pants”. I had to look for and buy a new clamp.
Troubleshooting
The first problems with the gas exhaust system may begin after 20 thousand kilometers. How do muffler malfunctions manifest on the VAZ 2104 model:
- the main symptom is an increase in noise level from the exhaust pipe due to gas breakthrough; the volume of the sound depends on the size of the defect;
- the fastenings of the sound-absorbing section wear out, the tank begins to wobble and hit the body elements, while driving, a dull knock is heard from under the bottom;
Rubber products stretch over time, the muffler body begins to dangle in a horizontal plane and touch the bottom of the car. - in rare cases, the pipe becomes clogged with soot, preventing the flow of gases, the engine stalls and will no longer start;
- Failure of lambda probes on cars with an injector leads to over-enrichment of the fuel mixture, a sharp increase in gasoline consumption and malfunctions during the operation of the power unit in all modes.
Receiving signals from the lambda probes, the electronic control unit regulates the supply of fuel to the cylinders. When the oxygen sensor does not show signs of “life”, the controller goes into emergency mode and dispenses fuel “blindly”, following the programmed program. Hence the excessive enrichment of the mixture, jerking while driving and other troubles.
The catalyst is an expensive element, so owners of “fours” replace it with a straight piece of pipe
A clogged muffler or catalyst leads to complete failure - the engine refuses to start. My friend searched for a long time for the reason when he encountered this problem on his “four”. I changed spark plugs, high-voltage wires, measured the pressure in the fuel rail... and the culprit turned out to be a clogged converter - the ceramic honeycombs were completely clogged with soot. The solution turned out to be simple - instead of an expensive element, a straight section of pipe was installed.
The lower burnout of the housing indicates condensation that has accumulated at the bottom of the tank
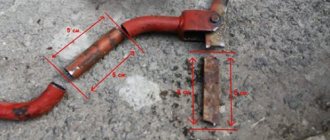
The most common problem with a muffler is burnout of the tank or pipe connection secured with a clamp. Causes of malfunction:
- Aggressive condensate accumulates in the muffler can, gradually corroding the metal. Due to the effects of chemical corrosion, many small holes are formed in the bottom wall of the tank, where smoke breaks through.
- Natural wear of the section. From constant contact with hot combustion products, the metal becomes thinner and breaks through in a weak spot. Usually the defect appears near the welded joint of the pipe and the tank.
- Mechanical damage to the can from an external impact or as a result of fuel burning out inside the exhaust manifold. In the latter case, a loud bang is heard from the pipe; sometimes the shock wave can tear the muffler body at the seams.
A burst muffler is a consequence of problems in the ignition or gas distribution system - the remaining fuel burns in the exhaust tract
The most harmless malfunction is the breakthrough of gases at the junction of the muffler and resonator pipes. The exhaust noise increases slightly, but if no action is taken, the volume gradually increases. The fastening of the joint weakens, the resonator section begins to sag and touch the protrusions of the road surface.
A clear sign of gases escaping at the junction of the exhaust pipes is the flow of condensate that breaks through along with the smoke when the car’s engine has not yet warmed up to operating temperature.
A fistula at the junction of the pipes can be identified by wet traces of condensation
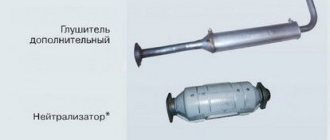
Main muffler - device and types
The factory-made element is made of refractory “black” steel and coated with a layer of anti-corrosion paint. The part consists of 3 parts:
- front pipe, curved to bypass the rear axle;
- three-chamber muffler tank with a system of partitions and pipes inside;
- outlet pipe with a bracket for mounting a rubber cushion.
At the end of the front pipe there are slots for connection to the resonator. The connection is fixed from the outside with a clamp, a tightening bolt and an M8 nut.
The mufflers for “classics” sold today are not reliable - spare parts are often made from second-rate metal and burn out after 15-25 thousand kilometers. It is quite difficult to identify a low-quality part when purchasing; the only way is to visually check the quality of the welds.
In addition to the factory version, other types of mufflers can be installed on the VAZ 2104:
- element completely welded from stainless steel;
- sports (direct-flow) option;
- a homemade section with a round cistern made from a thin-walled iron pipe.
A stainless steel exhaust element will cost 2-3 times more than a factory part, but can last up to 100 thousand km. I was convinced of this personally when I bought and installed a stainless exhaust system on my VAZ 2106 - the design is identical to the exhaust tract of the V4. I happily forgot about the pipe burnouts for several years.
The direct-flow type of muffler differs from the standard part in its operating principle. Gases pass through the perforated pipe and do not change the direction of movement, the resistance of the section is zero. Result: it is easier for the engine to “breathe”, but the noise is suppressed less well - the operation of the motor is accompanied by a rumbling sound.
If you are “friendly” with a welding machine, the factory version of the muffler can be modified or the element can be made from scratch. In home-made products, the principle of direct flow is implemented, since welding a flat tank with partitions is much more difficult - it is easier to buy a ready-made part. How to make a main muffler with your own hands:
- Select pipes for the outer casing and direct-flow channel. As a tank, you can use a round muffler from a Tavria, or take a curved front pipe from an old section from a Zhiguli.
- Make an internal perforated pipe by drilling holes Ø5-6 mm and making through slots with a thin circle on the metal.
The final stage of manufacturing is painting the part with a heat-resistant composition. After installing any muffler - factory or homemade - the protruding end of the pipe can be refined using a decorative nozzle, fixed from the outside with a locking screw.
Video: how to make a forward flow yourself
What is a muffler for?
The exhaust system of any vehicle is based on the use of a special element called a muffler. Operating a car without a muffler is basically impossible.
The muffler is designed to perform two main tasks:
- reduce exhaust noise;
- transform the temperature and pulsation of the exhaust.
The rationale for using a muffler is explained by the fact that the exhaust gases, after exiting the engine cylinders, have very high pressure and temperature. At the same time, sound waves are launched ahead of the gases in the exhaust system, which can make very loud noise during the exhaust. The muffler converts sound waves into heat energy, thereby reducing the amount of noise created by the exhaust. However, all modern mufflers in some way affect engine performance, since the transformation creates counteraction, due to which engine power is reduced.
The end of the pipe should protrude no more than 5 cm beyond the car body
VAZ car mufflers use several different methodologies to reduce noise:
- expansion/constriction of gas flow;
- change in flow direction;
- sound wave interference;
- sound absorption.
Mufflers use multiple chambers of varying volumes to expand or narrow the flow of gas exhaust.
On VAZ 2106/2107 cars, one muffler is installed. For comparison: modern foreign cars can have up to five mufflers.
Muffler on VAZ classic
The entire exhaust system on domestic Zhiguli cars of the sixth and seventh models consists of three parts: the exhaust pipe, the main muffler and the resonator. Each of them performs its own function: the pipe extracts exhaust gases from the engine, the muffler converts gases and sounds, and the resonator reduces the noise level.
Mufflers for VAZ 2106–2107 are “famous” for their fragility, since thin metal can burn out very quickly. Original factory products last for 60–70 thousand km, while homemade mufflers often do not last even 30 thousand km.
Traditionally, VAZ classics are equipped with mufflers manufactured by AvtoVAZAgregat. They are made of stainless steel with a thickened wall. Therefore, their service life can be considered durable. Silencers of more modern Zhiguli models can be considered alternative options, but not all of them are optimally suited to the “sixes” and “sevens”. However, craftsmen quickly remake the fastening elements and equalize the length of the mufflers in order to make them identical to the originals.
The modern muffler produced by AvtoVAZAgregat is an integral part of VAZ cars
Traditionally, the muffler on a VAZ classic is installed under the bottom of the car and is secured using bolted connections and special suspension rubber bands. The exhaust pipe exits from the rear of the body on the left side.
Repair and replacement of muffler section
When fistulas are detected in the element body, experienced drivers prefer to contact a familiar welder. The technician will check the thickness of the metal and immediately give an answer - whether the defect can be eliminated or whether the entire part will have to be replaced. The burnout of the bottom of the tank is welded directly on the car; in other cases, the muffler must be dismantled.
Without welding equipment or sufficient qualifications, you will not be able to weld a fistula yourself; you will have to buy and install a new spare part. If you can see many small holes in the wall of the barrel, eaten away by corrosion, there is also no point in contacting a welder - the metal is probably rotten, there is no need to grab a patch. It’s easier to change the muffler yourself and not pay for a fairly simple operation.
What tool will you need?
To disconnect the pipes and remove the muffler, prepare the following tools:
- 2 socket wrenches size 13 mm;
- open-end wrench 10 mm;
- pipe wrench No. 3, designed for reliable gripping of round parts measuring 20...63 mm;
- mechanic's hammer;
- pliers;
- slotted screwdriver with a wide tip;
- fabric gloves.
Consumables will require a new set of rubber hangers (a cushion and 2 stretchers with hooks) and WD-40 aerosol lubricant, which greatly facilitates the unscrewing of stuck threaded connections.
It is recommended to carry out work on a pit, overpass or car lift. Lying under the car, it is very inconvenient to disconnect the muffler from the resonator - due to the lack of free space, you will have to use your bare hands, it is unrealistic to swing and hit with a hammer.
I had to disassemble a similar VAZ 2106 exhaust system on the road. Since I couldn’t separate the pipes by hand, I jacked it up as much as possible and removed the right rear wheel. Thanks to this, it was possible to disconnect the pipe by hitting it 3-4 times with a hammer.
Disassembly instructions
Before starting work, drive the “four” into the inspection ditch and let the car cool for 15-30 minutes. The exhaust system parts get quite hot from the exhaust gases and can burn your palms even through gloves.
When the muffler has cooled, apply WD-40 lubricant to the joint and bolt of the mounting clamp, then proceed to disassembly:
- Using two 13 mm wrenches, unscrew the nut and loosen the mounting clamp that holds the resonator and muffler pipes together. Move the clamp to the side.
Using a wide screwdriver, you need to unbend the edges of the stuck pipe, and then loosen the connection with your hands, holding the resonator with a gas wrench. If the above methods do not help, simply cut the pipe with an angle grinder.
Installation of a new spare part is carried out in reverse order. Here it is important to push the muffler pipe all the way, otherwise the exhaust tract elements will begin to hit the bottom or the resonator section will sag. Lubricate the threaded connections with grease.
Video: how to replace the muffler yourself
Elimination of minor defects
In the absence of welding, a small fistula in the muffler can be temporarily repaired using a high-temperature ceramic sealant. A special composition for repairing exhaust pipes is sold at any automobile store. Additionally, you will need the following consumables:
- tin 0.2…0.5 mm thick;
- degreaser - white spirit, galosh gasoline;
- rags;
- a brush with metal bristles, coarse sandpaper, metal scissors.
A piece of tin can be cut from a galvanized profile used for installing plasterboard systems.
Before sealing the fistula, it is advisable to remove the muffler, otherwise you risk missing other defects. An exception is sealing the holes in the bottom of the can; in this case, it is not necessary to dismantle the section. How to properly close a fistula:
- Using a brush and sandpaper, clean the defect area from dirt and rust. The operation allows you to level the surface and maximize the location of the damage.
- Prepare a tin clamp - cut a strip to the size of the defect.
When the sealant has hardened, start the engine and make sure there are no gases escaping. Repair with a bandage is a temporary measure, the patch is enough for 1-3 thousand km, then the muffler still burns out.
Video: repairing exhaust using sealant
Instructions for replacing the muffler and more
Replacing the muffler on a Priora can be easily done by driving the car onto an overpass, or placing it above an inspection hole
Some car enthusiasts simply lift one side of the car with jacks, but in this case it is very important to use safety stands
Before you start replacing the muffler, it is worth understanding a few more parts of the exhaust system. The need to replace spacer rings, rubber hangers or corrugations may appear during the inspection or even dismantling of the muffler.
Changing the O-ring
The sealing ring is made of heat-resistant reinforced material and serves to lower the temperature of the exhaust gases. It burns out during use.
The muffler O-ring not only makes the connection airtight, but also reduces the temperature of the exhaust gases
It is most convenient to change the ring while installing a new muffler. To replace, you need to unscrew the bolts connecting the muffler and the resonator. By opening the muffler parts, you will see the O-ring and can replace it.
Installing new rubber suspensions
It is better to replace the rubber suspensions on which the muffler and resonator are mounted at the first signs of wear. This can save you from more serious problems with your exhaust system. To remove the mount, you first need to disconnect the muffler from it, and then remove the suspension itself from the hook. Before installing a new suspension, it is better to wash the hook from dirt so that the new elastic band holds securely.
Muffler hangers for Priora are sold in most spare parts stores
Changing the muffler corrugation
The muffler corrugation serves to reduce vibration of the exhaust system. This unit is usually made of stainless steel. It serves for quite a long time, but over time it still requires replacement. If you have argon welding skills, you can change the muffler corrugation on a Priora yourself.
Weld the corrugation carefully so as not to damage the muffler
First of all, you need to measure the old corrugation and select a new one of the appropriate size. Then you should carefully cut out the old corrugation, and insert and weld a new one in its place.
Instructions for replacing the muffler and resonator on the Lada Priora
To replace the muffler on a Priora, you will need the following tools:
- wrenches 7 and 13;
- flat blade screwdriver;
- chisel;
- hammer.
By following the instructions below, you can remove the old muffler yourself and install a new one. If necessary, you can change the resonator.
- Unscrew the bolts of the clamp connecting the muffler and resonator pipes.
- Open the pipes and remove the O-ring.
- If you need to change the resonator, unscrew the bolts securing the resonator pipe and remove the reinforced spacer.
- Remove the muffler and, if necessary, the resonator from the rubber suspensions.
- Place the main and additional mufflers under the vehicle in the position in which they will be installed.
- Secure the resonator with elastic bands.
- Insert a new spacer and screw the resonator to the exhaust pipe of the catalyst. Do not overtighten the nuts; screw them in until they are tight.
- Hang the muffler on rubber bands.
- Insert the O-ring and connect the muffler to the resonator pipe.
- Check all connections and hangers.
All spacer rings should be replaced with new ones when installing the muffler.
Video: replacing the muffler and resonator on a Lada Priora car
Changing a muffler is quite simple on almost any car, and Priora is no exception. A properly functioning muffler not only protects the environment, but also your peace of mind. When the car runs quietly, and there are no knocks or rattles coming from under the car, you can relax and fully concentrate on driving.
Purpose and design of the resonator
The structure of the resonator is similar to a direct-flow muffler - a perforated pipe is laid inside the cylindrical body without any partitions. The difference lies in the jumper that divides the jar into 2 resonator chambers. The element performs 3 functions:
- perceives and pre-damps sound waves;
- dissipates part of the heat coming from combustion products;
- Extends the service life of the main muffler.
When operating, a two-chamber tank uses the principle of resonance - sound vibrations are repeatedly reflected from the walls, collide with oncoming waves and cancel each other out. The VAZ 2104 was equipped with 3 types of sections:
- Cars with a carburetor power system were equipped with a long resonator for 2 tanks. For the modification with a 1.3 liter VAZ 2105 engine, an element with 1 can was installed.
Damage and malfunction of the resonator cans are similar to the main muffler section. During operation, housings and pipes burn out, rust or break due to external influences. The repair methods are identical - welding, temporary bandage or complete replacement of the part.
Video: how to replace the resonator on classic VAZ models
Over the years, it has become more difficult to find high-quality spare parts for domestic cars that have long been out of production. Practice shows that it is better to repeatedly repair the original factory muffler than to buy a part of unknown origin that will literally fall apart after 10 thousand km. The second reliable option is to incur financial costs, but install a durable stainless steel exhaust pipe.
What materials are they made from?
Silencers of all types can be made from:
- Of stainless steel;
- Aluminized (alloy of aluminum and steel);
- Regular black steel.
A stainless steel product can last, during active vehicle use, from 6 to 10 years, as it is least susceptible to corrosion.
They are sold on the market in a high price range, their big advantage is that despite the high price, they are mass produced and can be matched to most car brands.
Products made from aluminized steel are sold in the middle price range, they are also quite durable, but they are difficult to match to a specific car brand, since the choice on the market is not large (only a few companies produce them).
It is problematic to make such a muffler in a garage. The main advantage is a long service life of up to 6 years, and are less susceptible to corrosion.
Products made of black steel are mass produced because they are the cheapest. They can be made in a garage for any brand of car, but they will serve for 3, maximum 5 years, then the aggressive environment and rust will do their dirty work.
Purpose and design of the muffler for VAZ 2104–2107 cars
Exhaust gases escape from the engine cylinders under high pressure and with loud noise. The muffler receives and slows down gases, converts their kinetic energy into thermal energy, smoothes out pulsations and muffles the sound, then releases the weakened exhaust into the atmosphere.
Thus, among the main functions of the muffler:
- reduction of engine noise;
- conversion of exhaust gas energy;
- safe release of gases into the atmosphere.
In everyday life, a muffler is called an exhaust tract or exhaust system. In fact, it is only one, albeit the most important, element of the fuel system. For VAZ cars with a classic layout, it consists of a reception pipe connected to the engine exhaust manifold, an additional (resonator) and a main muffler.
For VAZ cars with a classic layout, the exhaust gas system consists of a reception pipe connected to the engine exhaust manifold, an additional and main muffler
All of the above is located under the bottom of the car. The system elements - pipe, resonator and muffler - are attached to each other with clamps. The exhaust pipe is rigidly screwed to the manifold and the gearbox cover, the main muffler body is suspended from the body by rubber straps, and the exhaust pipe is suspended by a rubber cushion.
At the Politburo, the Minister of Automotive Industry Alexander Mikhailovich Tarasov made a report in which he spoke about the state of affairs in the automobile industry and spoke about the need to build a new plant using foreign experience, and Dmitry Fedorovich Ustinov, the former head of the Ministry of Defense, who oversaw issues of the military-industrial complex, objected, that having such a “defense industry”, it costs nothing to build a new plant on our own. And then Kosygin proposed building two factories - one using Soviet “patterns”, and the second - with foreigners. The idea was accepted, and as a result, two with a capacity of 220,000 cars per year and a VAZ with an annual capacity of 660,000 cars appeared.
Innokenty Kishkurno
Wheels
Where is it located and how does it work?
The muffler is installed on the underbody of the vehicle at the end of the exhaust system.
As a rule, a resonator is installed in front of it, closer to the engine, which reduces low-frequency vibrations and plays the role of an additional component in the exhaust system.
Despite the seemingly small size of the device, the sound wave travels through it for several kilometers. This is achieved by the presence of labyrinths inside the muffler, which attenuate sound waves.
The further a wave travels, the more energy it loses and the smaller the sound becomes.
To understand what a muffler consists of, you need to understand what types of devices there are and how they differ from each other.
Replacement and repair of muffler for VAZ 2104–2107 cars
To replace the muffler you will need:
- inspection hole or lift;
- screwdriver;
- a set of car keys;
- hammer.
Removing and installing the muffler
To dismantle the “glushak”, repair it, and then return it to its place, follow this sequence of actions:
- Drive the car into the inspection hole. Stop the engine and turn off the ignition. Wait until the exhaust manifold cools down.
- Unbend the hooks of the rubber suspension straps of the muffler.
Using a screwdriver, straighten the hooks of the rubber straps on which the muffler is suspended
Unscrew the exhaust pipe fastening to the rubber cushion with a wrench
Loosen the clamp between the pipes of the main and additional muffler
Carefully knock the resonator out of the mount by hitting it with a hammer through a wooden spacer
Unscrew the exhaust pipe from the gearbox bracket
Carefully bend the stoppers and unscrew the exhaust pipe from the manifold
Install the new muffler in the opposite order of removal. However, do not use a used gasket. Before assembly, treat the pipes at the places where they are connected with clamps with graphite lubricant.
Video: replacing a VAZ 2107 muffler in a garage
In 1979, at VAZ, a car was built especially for “dear Leonid Ilyich,” which received the common name “half past six.” This happened after the presentation of the VAZ-2105 and 2107 models to the country's leadership, the serial production of which was still quite far away, and Brezhnev wished to give such a car to one of his family members. The result was a unique car, the body and interior of which was a hybrid of a “six” and a “seven” - hence the name.
Innokenty Kishkurno
Wheels
How to repair a muffler with your own hands
Before you begin repairing the muffler, you need to evaluate the feasibility of these actions. Not every car owner has the skills to work with a welding machine. In addition, the muffler cannot always be properly repaired - in cases of severe burnout, it is best to immediately replace it with a new one.
Reasons for failure
Most often, mufflers on the VAZ 2106/2107 lose their functionality for the following reasons:
- mechanical damage while driving on uneven roads, impacts;
- rapid changes in temperature conditions, especially in winter, when it is cold outside, and inside the case there are very high temperatures due to exhaust;
- impurities in gasoline that come out along with exhaust gases and affect the condition of the metal surfaces of the muffler.
It is unsafe to operate a car with such damage to the muffler.
However, how urgently do you need to repair the muffler if you suddenly notice some damage to its body or black exhaust from the pipe? What are the dangers of operating a Zhiguli with a burnt out or deformed muffler?
Firstly, if there are holes in the body of any element, then the generated gases will enter the cabin. The main danger is that the exhaust is colorless and odorless and cannot be felt. In this case, the driver begins to experience headaches, nausea and dizziness. If you stay inside a car with the engine running for a long time, you can lose consciousness and even die.
Secondly, if the exhaust system does not work properly, engine power is reduced. This is especially noticeable when accelerating, starting from a standstill, or overtaking.
Thirdly, if the plug is faulty, the engine begins to consume a lot of gasoline. The carelessness of the car owner will lead to the fact that the muffler will work worse and worse, and the displacement per 100 km will increase.
How to weld a muffler
Most often, the muffler loses its tightness and therefore cannot work normally. In this case, holes can appear both on the pipes themselves and on the welds.
It is recommended to clean the weld seam and paint the work area with heat-resistant paint
Using a welding machine and metal patches can be considered the most reliable way to repair mufflers.
In order to weld a “muffler”, you need to prepare electrodes of a suitable size (it all depends on how large the hole is burned in the muffler) and a sheet of metal of the required size. After which it is recommended to carry out welding as far as possible from the edge of the holes, since the thinned edges of the metal can quickly collapse:
- Clean the torn edges of the muffler from rust and dust.
- Degrease the metal with a solvent.
- Apply a metal patch to the body and grab it in several places around the perimeter of the hole.
- After this, you can begin to apply full welds.
- After the seams have hardened, it is recommended to clean the slag with a wire brush.
It is recommended to apply welds carefully so as not to burn through the muffler body
How to change the gasket
There is a reinforced gasket between the main muffler and the resonator part. Its purpose is to prevent the resonator from heating, so it is made of heat-resistant metal.
After dismantling the muffler, it is recommended to change the gasket. This does not take much time, since the element is inserted into the muffler pipe and clamped between its parts.
How to replace hanging rubber bands
This is perhaps the simplest procedure in repairing Zhiguli mufflers. The rear part of the pipe is attached to the body with three hanging rubber bands. During the ride, some of them may get lost or seriously deformed.
To change these rubber bands, you just need to drive the car into an inspection hole or overpass, remove the old products and install new ones in their place. Some car owners change suspension rubber bands without an overpass, simply crawling under the body from the rear left side.
Video: changing the resonator and muffler on a VAZ 2106/2107 car
The muffler in classic VAZ cars cannot, of course, be called a durable element. However, it is up to the owner to carry out the necessary repairs in a timely manner or change the plug if necessary. Moreover, the procedure is simplified as much as possible by the design of the VAZ 2106/2107 themselves. Therefore, any work on the muffler can be done with your own hands in a garage.
- Author: ratico19
Rate this article:
- 5
- 4
- 3
- 2
- 1
(4 votes, average: 3 out of 5)
Share with your friends!
How are knocking and muffler position related?
If the muffler suddenly starts knocking on some parts of the car, find the source of the extraneous sounds. Usually the reason lies in stretched rubber fasteners. After replacing them, the knocking will stop.
Sometimes a knock appears after work related to removing the muffler. In this case, extraneous sounds are a consequence of installation errors. Round pipes at the joints with clamps can be slightly rotated relative to the correct position: more or less than required, pushed into each other.
To eliminate knocking, restore the optimal position of the exhaust system elements.
Sagging mufflers can be “treated” using similar methods—by replacing rubber bands and correcting the position of joints.
Video: repairing a sagging VAZ 2106 muffler
DIY exhaust system repair
Replacing the main muffler of a VAZ 2106 with your own hands
Before starting repairs, let the entire system cool down. Working with hot pipes is simply unsafe. From the tools we need two 13mm wrenches, as well as a straight screwdriver.
1. Using a wrench, loosen the clamp nut a little, and use a second wrench to hold the bolt from turning. Next, use a screwdriver to unclench the clamp, and then move it down the inlet pipe of the main muffler.
2. Now use a wrench to unscrew the bolt that secures the rubber cushion. After this, disconnect the pillow from the mounting bracket, push it out and remove it.
4. Remove the rubber muffler hangers by pressing the wire fasteners.
5. With some effort, rock the muffler and disconnect it from the additional muffler. After disconnecting, remove the main muffler.
We install the new muffler in the reverse order of removal.
The nuances of muffler repair
The muffler of “classic” VAZ cars, according to the manufacturer’s recommendations, cannot be repaired. If a malfunction occurs in any element of the exhaust tract, the part must be replaced with a new one.
In fact, motorists often prefer to repair holes burned in the muffler - the most common defect - by welding.
The occurrence of “fistulas” is indicated by a change in the sound of the engine and the appearance of smoke from under the car. To troubleshoot, place the machine on a platform and inspect the elements of the exhaust system.
If the cause is a burnt gasket, remove the muffler and replace it. When you have an assistant, you can do without removing all elements of the system. Proceed in the following order:
- Unscrew the pipe fastening to the gearbox.
- Unscrew the nuts securing the exhaust pipe to the manifold.
- Together with an assistant, pull the “pants” off the pins while simultaneously rotating the bend of the resonator pipe.
- Replace the gasket, install the pipe in place, tighten the fasteners.
Replacing a burnt muffler gasket eliminates extraneous sounds from the engine
A welded muffler usually lasts less than a new one. But welding is also cheaper than buying. Usually, if it is necessary to repair a muffler by welding, they turn to professionals. If you have the equipment, you can do the work yourself. For this you will need:
- welding machine;
- blanks for patches made of sheet metal 1–2 mm thick;
- a piece of pipe of the same diameter as the failed one;
- grinder with cutting disc for metal;
- metal brush;
- sandpaper;
- heat-resistant paint for metal.
To repair the muffler, follow this sequence:
- Remove the muffler from the vehicle.
- Using an external inspection, determine the location of the malfunction and the extent of the damage.
- If there is a large hole in the muffler body, evaluate the condition of the internal parts. It is possible that repairing the external surface will not bring the desired restoration of the functions of the muffler without replacing the internals. In this case, it is advisable to contact professionals or simply replace the faulty part with a new one.
- Cut out the burnt area. From the blank, make a patch larger than the damage. Weld the patch over the hole with a continuous seam.
- If there is damage at the junction of the pipe and the muffler body, cut out the defective area, replace the damaged part of the pipe, and weld the repaired pipe to the muffler with a continuous seam.
- Clean the repaired muffler from dirt and rust, paint the part with two layers of heat-resistant paint.
Photo gallery: muffler welding
Interchangeability of Silencers for VAZ-Classics
#1 Ghost in shell
- Users
- 762 messages
- Registration 14-November 06
- From: Kyiv
- Car: VAZ 2102
It burned out on my 2102. It’s impossible to weld: it’s paper thick and everything is rusty.
2106-1201005 was stored in the attic. I got up with a small alteration of the extreme fasteners (near the outlet hole). I got to the Internet and was surprised to find out that the Glushak was from 2106. But it was much better than the old one, and I didn’t have to bend the skirt.
Hence the question: will any 210X-1201005 become?
Found 2104-1201005 VAZ 2104 muffler with sunset mineral filler (made in Ukraine) - can I take it? Are welded ones better?
#2 dil_v
I used to have a sich motor. I was happy as an elephant, but it lasted for 4 years. Now I installed stainless steel from Poland. It only feels negative. It doesn't stop working normally and its sound is louder. I don’t know how to solve it yet, but apparently I’ll have to digest it and then cook the stainless steel, and I don’t have a semi-automatic machine or stainless steel wire. By the way, also 2102
#3 andre34
- From: Kremenchug
- Car: VAZ 2102
#4 Ghost in shell
- From: Kyiv
- Car: VAZ 2102
The problem with stainless steel is guessing the brand - they are very different. This is especially true for the extreme conditions of Glushak - all chemical reactions are accelerated.
Where can I find a piece of pipe to weld for bending? Mine burned in the sieve. I will study the entrance bend for use.
#5 andre34
- From: Kremenchug
- Car: VAZ 2102
Where can I find a piece of pipe to weld for bending? Mine burned in the sieve. I will study the entrance bend for use.
#6 Ghost in shell
- From: Kyiv
- Car: VAZ 2102
So from the old one, the pipes usually remain intact.
Source of the article: https://vaz2101.com/index.php?/topic/29790-vzaimozamenyaemost-glushitelej-na-vaz-klassiku/