Sometimes a car enthusiast may notice that wet spots of fuel appear near the gas tank flap, and they can occur both when the tank is full and when the level of fuel in it is low. In the vast majority of cases, the VAZ 2114 separator, which has failed, is to blame for this. Today we will talk about what it is, where it is installed and how to replace it with a new one.
Separator VAZ 2114
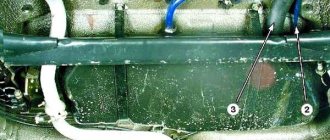
No. 17. Simplification of the tank ventilation system - logbook Lada 2115 2005 on DRIVE2
Good day to all. Ever since I replaced the tank, one of the reasons for which was a cracked fuel gas separator, I have had a bad ventilation system using a fuel filter from a classic. That is, the ventilation pipe went to the filter left under the bumper and that was all. Recently, the problem of a small spill of gasoline on the bumper when fully refueling began to plague me, and, as it turned out, gasoline was flowing out of this pipe. I then decided to study the tank ventilation schemes according to the new and old (without adsorber) scheme, since the always dirty bumper from gasoline was very annoying for me, and I don’t like refueling 10 liters at a time, it’s better to have a full tank at a time. In addition, a long time ago comrade Maniak665 suggested completely removing the adsorber from the system. After searching the Internet, I found the following two diagrams.
New scheme with adsorber
Old scheme without adsorber
According to the new scheme, the pipe (13) from the gas tank goes to the separator (12), from the separator it goes to the tee, and then along one path it goes to the check valve (11), and along the other to the gravity valve (10), a two-way valve ( 9) and only then to the adsorber (6). According to the old one, after the separator (10), the pipe simply goes to the check valve (4) and that’s it. Decide to see how I did it. As a result, it became clear that even without taking into account that over the 12 years of the car’s life the adsorber had not worked for a long time, a year ago I had already disconnected it from the entire system. This means that it remains to solve the problem of gasoline pouring out of the pipe. At first I wanted to do it according to the old scheme, replacing the separator with a new one, but it turned out to be problematic to find it in my city, and besides, many on the forums wrote that it would not last long. I was thinking about buying an iron separator, but finding one turned out to be even more problematic. Then I decided to do without it (especially since I didn’t want to disassemble half the back of the car to change it). Maniak665 suggested plugging the separator pipe and installing a tank cap with a valve, but again he couldn’t find it in the city (what a city, you can’t find anything xD), then he decided to do it using the same fuel filter from the classics and a check valve. The scheme is as follows.
Full size
Check valve
Full size
Check valve
Full size
fuel filter from the classics, located below
During the period of using this scheme, there are no problems with gasoline odors, there are no overflows when filling a full tank (the check valve is at the level of the separator), no water gets into the tank, as I had with a cracked separator. Thank you for your attention.
Price: 150 ₽ Mileage: 203010 km
How to get rid of the adsorber?
First of all, answer one question: “Do I need to get rid of it?” This device has advantages, albeit minor ones. But for the “operation” to be successful, you will need:
- Buy a filler cap for the gas tank.
- Plug the tubes going from the tank to the adsorber.
- In some cases, change the firmware.
The fact is that when a breakdown occurs, a “Check Engine” alert appears, indicating that there is a breakdown in the car system. To prevent it from appearing, you need to write in the ECU operating algorithm that polling the adsorber sensor is not required. Only in this case will the operation of all vehicle systems be normal.
Of course, it’s worth mentioning the gasoline savings - even if they are small, they are still there. There will be no problems when passing a technical inspection, since the gas analyzer only measures the level of CO in the exhaust. How much gasoline vapor comes out of the tank is not recorded; technicians can only visually determine that the adsorber is turned off or dismantled.
1200 rub. for the photo report
We pay for photo reports on car repairs. Earnings from 10,000 rubles/month.
Write:
Many car owners may be interested in the question of how to check the adsorber and its purge valve when the diagnostics showed it to be faulty (an absorber error popped up). It is quite possible to make such a diagnosis in a garage, however, for this it will be necessary to dismantle either the entire adsorber or just its valve. And to carry out such a test, you will need metalworking tools, a multifunctional multimeter (to measure the insulation value and the “continuity” of the wires), a pump, and a 12 V power source (or a similar battery).
If you open the tank and hear “Pshik”... - logbook of Lada 2114 CHORNAYCHOP 2009 on DRIVE2
...then there is an obvious problem in the ventilation of the fuel tank. Something similar happened last year, but I didn’t pay attention until recently. One day, approaching the car, I smelled a serious smell of gasoline, walked around the car, looked under it and, to put it mildly, gasped! There was a puddle on the asphalt and gasoline was steadily dripping from the tank drop by drop, even if you put your palm up and wet it! Such movement was observed when it was +25 or higher outside, as well as in the tank 3/4 or more. In a lying position, with a flashlight, the leak was found, shown in the photo below.
After scouring the forums, it was concluded that the separator drain hose was plastic and had simply dried out over time and shortened, which is why it was not fixed properly. Having removed the fitting from the tank, some kind of gasket fell out of it. In principle, it became clear why it was leaking, but then the question is, why is excess pressure created in the tank? We search the forums further and find out that on 1.5i engines, a safety valve (8) is installed in the section of the line on the adsorber between the separator (9) and the gravity valve (7).
1.5i
Let's go further and look at the 1.6i engine diagram
1.6i
There is no safety valve in the system; its role is played by the cover itself. But the blow-out lid is very tight; I tested several of them in the store. Having unhooked the fitting from the adsorber and blown into it, I realized that something was wrong in the line, and the culprit was found. The gravity valve had become sour and rusty, and because of this the system was not purged.
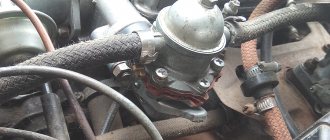
Next, the ventilation scheme of the carburetor nines was examined.
At number 21 we see a two-way valve that works in both directions, and it works harder to release pressure than to retract. I bought it at the car market for 130 rubles and went to the garage.
The old plastic hose was thrown out and replaced with a gas-resistant rubber hose, and the clamps were freshened. At the second end of the separator, which went to the gravity valve->adsorber, I stuck a short hose from the low crankcase ventilation and brought the valve to the filler neck area. There was an elastic band, just for it)
Afterwards a full tank was filled, and active skating took place. There is no longer excess pressure in the tank, no gasoline leaks are observed. There is a slight aroma of gasoline, but only if you get closer to the tank flap. Therefore, you can now throw out the adsorber, since it is also excluded from the system. On the throttle, the adsorber fitting is plugged with a piece of hose with a bolt screwed into the sealant. Long live the free space under the hood)
Features of the engine power system 11183 (1.6i)
Receiver
engine 11183 (1.6i) is made of plastic.
Engine Intake Module 11183 (1.6i):
1 – flange with an o-ring for fastening the throttle pipe; 2 – receiver with o-rings for connection to the inlet pipeline
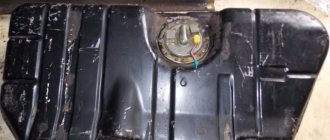
Engine Fuel Module 11183 (1.6i):
1 – inlet pipe (for supplying fuel to the pressure regulator); 2 – outlet (discharge) pipe; 3 – module cover; 4 – fuel level indicator sensor; 5 – intake chamber; 6 – module cover guide
Fuel pump
combined with a fuel level indicator sensor and a fuel pressure regulator into a single unit -
a fuel module
(often called an electric fuel pump). Fuel from the pump (through the outlet pipe of the fuel module) enters the fuel filter. Purified gasoline is again supplied through the fuel line and through a tee to the inlet pipe of the fuel module, and then supplied to the fuel rail.
Engine fuel pressure regulator 11183 (1.6i):
1 – hole for dumping excess fuel; 2, 4 – sealing rings; 3 – holes for supplying fuel to the regulator; 5 – body; 6 – terminal for connecting the regulator to ground
Fuel rail for engine 11183 (1.6i) complete with injectors:
1 – diagnostic fitting; 2 – fuel rail; 3 – fitting for connecting to the fuel line; 4, 5, 6 and 7 – nozzles
Ventilation system for the fuel tank (gasoline tank) of VAZ 2108, 2109, 21099 cars and their modifications
VAZ 2108, 2109, 21099 cars with a carburetor engine are equipped with a fuel tank ventilation system. It is part of the power supply system. The ventilation system of the gas tank is necessary to prevent the occurrence of excess pressure in it, which is created by the fuel vapors generated here (especially at high temperatures in the summer or when the car is strongly rocked while driving).
Operating principle of the gas tank ventilation system
Through two drainage tubes located in the fuel tank, fuel vapors, which create excess pressure in the tank, enter the separator through a hose. They condense in it, and the resulting gasoline flows back into the fuel tank. Fuel vapor is removed through a two-way valve connected by a hose to the separator.
Installation of the fuel tank ventilation system for VAZ 2108, 2109, 21099
Elements of the fuel tank ventilation system for VAZ 2108, 2109, 21099 cars
— Drainage tubes inside the tank
Two drain tubes are inserted into one another, their ends are located at the edges of the fuel tank to prevent fuel from leaking out when the car turns. They have a common outlet to the drain hose to the separator.
— Gasoline vapor separator
A sealed plastic tank installed in the rear right side of the car on a bracket. Connected by hoses to the fuel tank and a two-way check valve. Serves to condense fuel vapors entering it from the tank. Capacity 7 liters. The gasoline condensate from the separator is drained back into the fuel tank, and the vapors are released into the atmosphere through a two-way valve.
— Two-way check valve
Located near the fuel tank filler neck. Connected by a hose to the separator. Double-acting check valve: it introduces atmospheric air into the gas tank and, when the pressure of fuel vapors in it increases, releases them into the atmosphere.
Malfunctions of the gas tank ventilation system
— Breakdown of the two-way check valve
— Clogged hoses
— Damage to the separator
The result of a valve failure or clogged hoses will be that the pressure in the tank exceeds the norm, which can lead to its deformation, damage to the hoses and separator. As a result, a fuel leak may occur and a persistent smell of gasoline may appear both in and around the car.
Notes and additions
— On the injection engine 2111 of VAZ 2108, 2109, 21099 cars, instead of a fuel tank ventilation system, there is a fuel vapor recovery system. It is similar to the ventilation system, but in addition it has an adsorber with a valve that absorbs fuel vapors and, at the command of the control unit (purge of the adsorber), sends them back to the engine for afterburning. This allows you not to release toxic fumes into the atmosphere and comply with certain toxicity standards.
More articles on carburetor engine systems of VAZ 2108, 2109, 21099 cars
— Diagram of the engine cooling system of VAZ 2108, 2109, 21099 cars
— Exhaust system of the carburetor engine of VAZ 2108, 2109, 21099 cars
— Ventilation system for the carburetor engine of VAZ 2108, 2109, 21099 cars
Consequences of dismantling the adsorber
A certain part of motorists believe that any measures aimed at improving the environment of the car have a negative impact on the performance characteristics of the power unit. In particular, the adsorber, the need for the presence of which is, indeed, due to the requirements of environmental standards, also came under such criticism. Pessimists argue that this device is not just useless, it is harmful, because instead of saving fuel it produces excessive consumption, instead of improving dynamics it reduces engine response, etc.
As a result, the device (or solenoid valve) is simply dismantled. How justified are such actions, is there any logic to them? From the point of view of the impact on engine operation, if the adsorber is working properly, it is practically zero, since it has virtually no effect on the operation of the fuel system in terms of supplying gasoline to the engine. Are there any savings achieved? Theoretically, yes, although only slightly, since some of the gasoline does not evaporate, but returns to the gas tank.
In practice, it is quite difficult to verify this, especially in quantitative terms. And if you believe the reviews of car owners, then positive materials are much less common than negative ones, although the degree of trust in them is much greater. In any case, you should not expect any miracle from the adsorber, especially regarding fuel economy. To be honest, the environmental contribution can hardly be called tangible, especially compared to the functioning of the catalytic converter.
As for the claims about the harm of the device, they appear to be unfounded. You can remove the adsorber and in 99% of cases you will not feel any changes in the behavior of the engine. However, there is an opinion that since gasoline vapors will no longer condense, you will thereby eliminate all artificial obstacles on the way of fuel to the combustion chamber (valves, sensors, separator, filter).
The procedure for disabling the adsorber itself consists of adding a fine filter (suitable for VAZ carburetor models) to the hose coming from the separator. In this case, gasoline fumes will safely escape into the atmosphere. In this case, the hose coming from the solenoid valve is simply pinched. But since the operation of the adsorber is controlled by the on-board computer, such a design change will be perceived as a breakdown, with the corresponding Check Engine lighting up.
To remove this error, you will need to reflash the ECU. The undoubted disadvantages of such a step include the following: you will make a “feasible” contribution to the deterioration of the environmental situation. Minimal, but still; the smell of gasoline/diesel may appear in the cabin; the same smell will be felt next to the car, but it is far from obvious.
There are also advantages that are also noted by many users: when the adsorber is located in the engine compartment, if it is removed, a lot of scarce space is freed up, because the can of activated carbon itself has a substantial size; unstable operation of the power unit in idle mode usually disappears; there is no need to replace a failed valve or other components of the device. It’s up to you to follow the lead of home-grown experts or adhere to the recommendations of automakers, but if you really belong to that category of the population that is not indifferent to global problems, including environmental ones, a fuel adsorber will be a useful and even necessary element of the car’s design.
inspection of the separator and replacement of check valves - logbook Lada 2114 gReyMouse 2005 on DRIVE2
It’s already warmer outside and due to the above-zero temperatures, the old problem has returned, namely the smell of gasoline and the constantly wet separator.
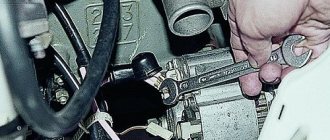
but in order to ensure its integrity and carry out a visual inspection, you need to remove the bumper.
Let's start removing the bumper
unscrew these bolts to pull off the bumper on clips along with the stiffener, I didn’t have clips)))) PS forgot to take a photo, two more bolts are located at the bottom of the bumper almost in the middle
unscrew the protection approximately to the middle of the wing so that there is more opportunity to bend it
Now let's move on to the side mounts
for convenience it is better to jack it up
and here is the mount itself, unscrew it on both sides and the bumper is removed! You can’t do without WD-40, but it didn’t help in this case either, the bolts broke (((
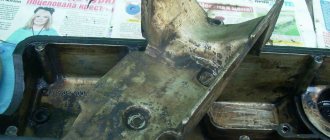
such perfect cleanliness awaits you under the gas tank flap))))) The culprits who caused it all to start are marked in red. the separator turned out to be intact...
this is basically the end result, I changed some presses, valves that were clogged, changed them to regular ones
On the left is my valve, only there is something metallic rattling inside, and on the right what should it be)))))
I bought new mounts for the bumper, 2a check valves and a clamp
Result of the work: after two days of driving, everything is dry near the neck! Thanks to everyone who finished reading, I hope this post is useful to someone! Good luck to everyone and avoid any breakdowns!
never remove the bumper like this)))))
Issue price: 250 ₽
How to identify a problem at work?
The most common symptoms of malfunction include:
1) Sometimes the engine starts to run unstable at idle speed;
2) If clogged, you may feel a slight increase in fuel consumption;
3) The car engine does not start the first time when hot;
4) A noticeable loss of traction at low speeds. At higher speeds, the loss of torque is less sensitive.
Another common malfunction is the appearance of cracks in rubber plugs. Through these cracks (holes), additional air is sucked in, and as a result, leads to problems with the engine.
see also
- Selecting a fan for ventilation
- Breezer supply ventilation
- Kitchen with ventilation box in the corner design
- Ventilation and heating center
- Ventilation blows in the opposite direction
- Design of a ventilation system for an apartment in an apartment building
- Electric motor for ventilation
- Ventilation without heat loss
- Dimmer for ventilation
- Safety goggles with indirect ventilation
- An anemometer is a device for measuring ventilation performance
Consequences of dismantling the adsorber
A certain part of motorists believe that any measures aimed at improving the environment of the car have a negative impact on the performance characteristics of the power unit. In particular, the adsorber, the need for the presence of which is, indeed, due to the requirements of environmental standards, also came under such criticism. Pessimists argue that this device is not just useless, it is harmful, because instead of saving fuel it produces excessive consumption, instead of improving dynamics it reduces engine response, etc.
As a result, the device (or solenoid valve) is simply dismantled. How justified are such actions, is there any logic to them? From the point of view of the impact on engine operation, if the adsorber is working properly, it is practically zero, since it has virtually no effect on the operation of the fuel system in terms of supplying gasoline to the engine. Are there any savings achieved? Theoretically, yes, although only slightly, since some of the gasoline does not evaporate, but returns to the gas tank.
In practice, it is quite difficult to verify this, especially in quantitative terms. And if you believe the reviews of car owners, then positive materials are much less common than negative ones, although the degree of trust in them is much greater. In any case, you should not expect any miracle from the adsorber, especially regarding fuel economy. To be honest, the environmental contribution can hardly be called tangible, especially compared to the functioning of the catalytic converter.
As for the claims about the harm of the device, they appear to be unfounded. You can remove the adsorber and in 99% of cases you will not feel any changes in the behavior of the engine. However, there is an opinion that since gasoline vapors will no longer condense, you will thereby eliminate all artificial obstacles on the way of fuel to the combustion chamber (valves, sensors, separator, filter).
The procedure for disabling the adsorber itself consists of adding a fine filter (suitable for VAZ carburetor models) to the hose coming from the separator. In this case, gasoline fumes will safely escape into the atmosphere. In this case, the hose coming from the solenoid valve is simply pinched. But since the operation of the adsorber is controlled by the on-board computer, such a design change will be perceived as a breakdown, with the corresponding Check Engine lighting up.
To remove this error, you will need to reflash the ECU. The undoubted disadvantages of such a step include the following: you will make a “feasible” contribution to the deterioration of the environmental situation. Minimal, but still; the smell of gasoline/diesel may appear in the cabin; the same smell will be felt next to the car, but it is far from obvious.
There are also advantages that are also noted by many users: when the adsorber is located in the engine compartment, if it is removed, a lot of scarce space is freed up, because the can of activated carbon itself has a substantial size; unstable operation of the power unit in idle mode usually disappears; there is no need to replace a failed valve or other components of the device. It’s up to you to follow the lead of home-grown experts or adhere to the recommendations of automakers, but if you really belong to that category of the population that is not indifferent to global problems, including environmental ones, a fuel adsorber will be a useful and even necessary element of the car’s design.
Separator design
The VAZ 2114 gasoline vapor separator is a small, completely sealed tank made of metal or impact-resistant plastic. It is installed in the right rear part of the car on a special bracket. Using a hose system, it is connected to the gas tank (from where vapors flow through drain pipes) and to a two-way valve. The total volume of this device is 7 liters.
Once in this tank, the vapors accumulate in it and, due to increased concentration and cooling, condense. Drops of condensation settle on the walls and bottom, after which they gradually flow back into the gas tank. The same vapors that did not have time to condense flow towards the two-way valve. From its name it is easy to guess that it works in both directions at once - “for the intake” of atmospheric air into the tank and “for the release” of fuel vapors outside.
Comments • 61
You can't really see anything
Good day, Vladislav Chikov, please tell me why the adsorber stinks of gasoline? I installed a new one, and it still stinks, especially when there are 5-7 liters of gasoline left in the tank. Help out!
Nothing is visible or clear, you suck as a blogger.
Just now I noticed from the gasoline drips, almost a year ago one muddle on a Kamaz was driven in with tow hooks and the right brake light needs to be replaced, as well as on the trunk. Today I noticed drips and a crack, I will then change almost the entire set, and removing the bumper is not a difficult process, as well as disassembling everything in principle, some are simply too lazy to do this, so they send it to services, where handymen often work.
Can water get into the tank through it when it rains?
I have a black valve on the absorber
IS IT DANGEROUS TO DRIVE WITH A BURST AS IS? OR WITHOUT IT?
What if there is leakage around the filler cap? (I changed the cap) even when the gas is at least “the light is on”?!
Did you not have a curtain on the neck of the fuel pipe or was it already unscrewed/removed beforehand?
I am very grateful to you for your detailed analysis and comments, it was necessary to change the platform and rubber (gasket) under the neck of the gas tank on a VAZ 2115, no one knew and did this work. In the end, my friend and I, with the help of your video, changed everything, additionally checked the safety valve, clamps and everything else. Thank you
Explained everything perfectly. Apparently VAZ cars have a couple of places with problems with the smell of gasoline. It’s either in the area of the filler neck. The separator bursts at the seam. Or there’s a problem with the fuel pump. It’s located under the back seat. The eternal problem is the small studs. The edges are always licked off. The nuts don’t hold. The studs break .The benz comes out and starts to stink.
Or could there be a large overrun due to a crack?
Bitch. replaced the cracked separator. there are no leaks. There is a hose on the left nipple of the separator, nothing is put on the right nipple. but the slight smell of gasoline can still be felt (((((
Or maybe their separator prevents the car from starting in warm weather? The car is parked in the sun the first time it does not start, I open the gas tank cap and everything starts to start normally
Thank you! There was also a smell of gasoline, I went and looked and the separator actually burst!
Periodically smells of gasoline when driving when the tank is not full. I didn’t even suspect that there was such crap in our nines and fours. I bought a new tank. I thought that it was rusty on top, as usually happens. I was puzzled by this video. I'll have to sort out my whole ass because of this barrel.
Well done! He sees very useful things; Everything is explained clearly
Most of what was shown on the screen was not clear. Please shoot normally.
explanations on the screen without commas - you won’t understand what you mean!
I just have this hose dangling and gasoline flows from it to the separator, if it is plugged what will happen?
BB, crap store, a lot of substandard and expensive cabbage
I wonder what moronic designer came up with the idea to put it there. Half the car needs to be dismantled because of this moron! Bought. I'll go change it. I'm afraid that there won't be enough supplies of Russian swearing.
@Dmitry Tsykhmistrov You’ll see a cretin in the mirror!
I didn’t notice that the floor of the car can be disassembled, literally, the bumper is held on by 6 bolts, if you remove it completely, it’s even easier in the pit. Look into foreign cars and you will see your idiotic decisions.
Is it plastic or what? I have an iron one and the valve is located on the adsorber under the hood. Do you know how to check the gravity valve for functionality? If so, tell me.
Hi, if there is a big crack on the separator, can water get into the tank through it??
HELLO. WHAT IF YOU THROW OUT THE SEPARATOR AT ALL? WHAT CAN HAPPEN? INSTALL COVER WITH VALVE.
For the Trolls..Have you ever changed the gas tank on a 14K? I advise you to immediately change what is described here, and you will be happy.
Vasily Ivanov, well, the only troll here so far is you.
I was too lazy to remove the bumper...and change the valves and separator, and this is the result! I'll plug the gas tank with a rag and get some damn spare parts... the stupid guy gets fucked twice!
I replaced the gas tank on 14k due to a crack.. a week later the separator died.. I’ll look into it..
Please tell me the VAZ 2110 produced in 2005 has a separator. Thank you
Iskan Sher yes there is, under the left rear fender
My cover is spinning, I bought a new one, the same crap, what should I do?
how to change the safety valve without removing the bumper? on a VAZ 2108 (1988 carburetor)? I have pressure building up in the tank. I recognize it by the smell from the central nozzles of the stove. presses out pressure after the check valve from the carburetor.
I removed the separator but did not see any cracks! created pressure in it and no bubbles under water! but the smell never goes away! Under the hood everything is fine, everything is clamped, everything is dry! what could be wrong please tell me
but there are also times when the VAZ is happy for a long time even without investment - this is also a fact.
Yes, don’t even talk about it, you don’t have time to get to one thing, so other troubles come up. Now the car somehow started to wobble and the traction felt worse, it’s not to the point of sepor now.
I don’t know exactly, maybe change everything, I changed everything, even that didn’t help)))AvtoVAZ))
When you fill in a lot of gasoline, at least 25-30 liters, there is always a terrible stench of gasoline, then when the tank is empty to at least 15-18 liters, everything returns to normal, the stench disappears, Vladislav, do you think it’s the separator?
+Timur Tavkeshev hoses, clamps, valves, adsorber, look at everything. I had everything new, but in the heat with the window open, it still smelled of gasoline, I couldn’t overcome it, I think the seals in the gas tank area when you open the window create a vacuum and through them it pulls into the cabin. - This is nine.
there may be a smell due to the fact that there is no hose from the separator to the valve, which also does not exist, as well as a gravity one)*.
What a great story you say =) The last phrase also sounded good))
PPT on my 4 car there is no valve at all near the neck.
I have such crap on the spot. No valves, no hose.
The same. I looked through everything. There are no valves of any kind.
+Ivan Ivanov and me)) and there is no gravity valve either. and there is no second hose on the separator
why does it (separator) burst in injection
+ Anatoly Kulik because the valve gets clogged, and a vacuum is created in the separator and compresses it
Hi Vlad, I have a couple of questions about the 1.8t engine, help me out! How can I correspond with you?
Vlad, such a thing, it’s worth a new turbine, a flame arrester, a new bypass and the 75th timing marks are all in place. but the trouble is, she doesn’t want to pull from the bottom, not from the top. the boost reaches 0.7 but there is zero pickup and at the peak of the boost the shocks are not strong. It costs HBO-4 and it drives equally badly
@Denis Konovalov hello, here or in contact.
What do i do ? Many smart people advised to remove the separator, now gasoline is thrown out of the Artsorber valve when driving like a volcano. They say they remove it and it drives normally, but I don’t understand what’s wrong
Thanks for the advice, I thought so too, I bought another one and am going to install it the other day using your video. I hope everything works out
@Omarov Ruslan put the separator in place and all the valves, you can buy a metal one, it’s stronger.
When I worked at a service station, we didn’t change the nuts; on foreign cars, the original ones cost a lot of money. We had cans of old grease, like the kind from CV joints that had already served its purpose. Before throwing the CV joint into scrap, we scooped out the grease into a jar and brought unnecessary toothbrushes from home. And lubricating the threads before assembly is a nice thing, it doesn’t stick, doesn’t rust, and then everything can be unscrewed with pistols easily and simply. Any grease and their mixture will work, the main thing is to observe the tightening torque)))
@Vadim Orel yes, that’s true, I also preserve it after assembly, but not the thread, but the entire bolt and nut after tightening, so that they don’t rust, especially under the bottom, with a lubricant that is not afraid of water.
Welcome to VAZ.EE+ Extended Edition
Since May 2013, our portal has expanded the thematic sections of the forum for the exchange of experience: subforums Americans, Koreans, Germans, French, Japanese have been added, due to the increase in the fleets of our visitors.
In addition to changing the style, our Chat, Mail, Entertainment and photo/video sections, Literature have become built-in and do not require separate registration. In addition, there are other useful and pleasant innovations that you can all familiarize yourself with when visiting the portal.
You can contact the administration with questions and suggestions in a special section of the forum or through the feedback form.
- literature Articles
- Library
- Jokes
- Cars
- Gallery
- Automobile
- Help
- Search
- Users
- Reputation
- Forum home
- Experience exchange
- Body
- print version
- Download/Print theme
- Display Modes
- Switch to: Tree-like
- Standard
- Switch to: Linear
Separator design
The VAZ 2114 gasoline vapor separator is a small, completely sealed tank made of metal or impact-resistant plastic. It is installed in the right rear part of the car on a special bracket. Using a hose system, it is connected to the gas tank (from where vapors flow through drain pipes) and to a two-way valve. The total volume of this device is 7 liters.
Once in this tank, the vapors accumulate in it and, due to increased concentration and cooling, condense. Drops of condensation settle on the walls and bottom, after which they gradually flow back into the gas tank. The same vapors that did not have time to condense flow towards the two-way valve. From its name it is easy to guess that it works in both directions at once - “for the intake” of atmospheric air into the tank and “for the release” of fuel vapors outside.
Despite the obvious simplicity of the fuel ventilation system and the minimum of parts located in it, it still breaks down, leading to rather unpleasant consequences.
So, signs of a vapor separator failure may include:
Having noticed these signs, we can conclude that the VAZ 2114 gas tank separator is cracked or leaky and is no longer doing its job.
Common FLS malfunctions
Often, the driver can observe the following situation: while driving on a flat road, the instrument panel displays information about a full tank, and after driving off-road, about an empty one. The readings jump, which is clear evidence of a malfunction of the VAZ-2114 FLS. This disease often manifests itself due to wear on the contact tracks.
In some cases, the situation can be corrected quite easily - bend the slider so that it is located above the worn-out place in the diagram. But such a solution to the problem is not always appropriate. Sometimes you have to replace the entire regulator.
Other malfunctions of the mechanism include:
- The pointer is at zero - most likely the problem is related to the limited travel of the float.
- The low fuel light does not light up - there may be a problem with the potentiometer.
- When starting the engine, the indicator does not light up - there is a problem with the electronics.
- Incorrectness of the data displayed on the instrument panel - you should check the tightness of the float.
If such symptoms of a device malfunction appear, experts also recommend checking all the wires securing the nut sensor. The fastening elements clamp the mass, so if they are not tightened well, the contact will appear and disappear. If the sensor does not show the fuel level of the VAZ-2114, then the contacts need to be cleaned, and if this cannot be done, then they can be completely replaced.
What does the fuel level sensor consist of and how does it work?
The fuel level sensor can work properly for a long time. The mechanism itself is not one of the most painful areas of the VAZ-2114, but, like all other devices, sooner or later it fails. Its breakdown is most often due to the fact that the FLS is in unfavorable conditions.
The device body is quite fragile, which often leads to the sensor breaking due to mechanical damage. Among other things, constant temperature changes significantly reduce its service life. The fuel sensor of the VAZ-2114 is especially painful during the frosty season.
In a VAZ-2114 car you can most often find a sensor of the BM-150 type. Regardless of the design feature, the operation of each fuel controller is based on a measuring float made of lightweight material. The operating principle of the device is as follows: a unique signal corresponds to a certain amount of gasoline in the tank. The design also includes a lever and a resistor element.
Withdrawal procedure
- The first step is to remove the rear bumper.
Use a screwdriver to loosen the clamp securing the tube to the filler pipe.- Remove the tube from the pipe.
- Now you need to loosen the clamp on the filler neck hose.
- Using a 10mm wrench, unscrew the 2 nuts securing the filler pipe to the body and cut the clamp securing the plastic tube to the filler pipe.
- Remove the hose from the filler pipe.
- Unscrew and remove the filler cap.
- We take out the filler tube from the shield.
- Using a 10mm wrench, unscrew the bolt securing the separator shield.
- We take out the bracket from under the shield.
- Then you need to fold back the right luggage compartment trim.
- Using a 10mm wrench, unscrew the nut of the stud securing the separator shield.
- We take the pin out of the hole and take out the separator from the body niche.
- loosen the two clamps and disconnect the two tubes from the separator and remove the separator.
- Reinstall the separator in reverse order.
Separator replacement
Due to the fact that the separator is an ordinary tank (most often plastic), it is hardly worth trying to repair it with improvised means - due to the high fluidity of gasoline, the problem may remain, and time for repairs will be wasted. That is why the best option in this situation is replacement (especially since a new vapor separator is very inexpensive).
If possible, it is better to purchase a metal separator - it is more resistant to vibrations and has an increased service life.
To replace this device you will need the following set of tools:
The separator replacement itself is performed in the following order:
The new gas tank vapor separator should be installed in exactly the same order, but in reverse order.
Source
Separator replacement
Due to the fact that the separator is an ordinary tank (most often plastic), it is hardly worth trying to repair it with improvised means - due to the high fluidity of gasoline, the problem may remain, and time for repairs will be wasted. That is why the best option in this situation is replacement (especially since a new vapor separator is very inexpensive).
If possible, it is better to purchase a metal separator - it is more resistant to vibrations and has an increased service life.
To replace this device you will need the following set of tools:
The separator replacement itself is performed in the following order:
The new gas tank vapor separator should be installed in exactly the same order, but in reverse order.
Photo and video instructions for those who plan to independently change the separator on a VAZ 2114, 13, 15 car. To perform this type of work, you will need an overpass or an inspection hole.
Before starting work, make sure that the fuel level in the tank is below the entry point of the filler neck.