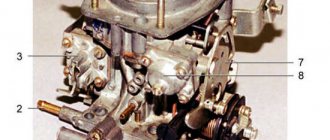
The majority of VAZ cars of the Samara family, and in particular the VAZ-2109, came off the assembly line with a carburetor power system, and only later a small series received injectors. The carburetor system has a simple design and is quite reliable, but its main component, the carburetor, requires periodic adjustment. The VAZ-2109 and other models of the family were equipped with Solex carburetors, characterized by a relatively simple adjustment technology that every car enthusiast can perform.
There are two main carburetor settings - the fuel level in the float chambers and the engine speed at idle (idle). These adjustments are carried out when the engine is unstable at idle and when certain symptoms of improper operation of the power system appear:
These problems indicate that the fuel level in the chamber is not normal.
Possible malfunctions of the RTD
Considering that the design of the pressure regulator is mechanical, malfunctions in its operation can occur quite often. The most common device malfunctions include:
- weakening of the membrane spring;
- valve jamming;
- regulator clogging;
- violation of the tightness of the junction of the regulator and the ramp body.
When the diaphragm spring weakens, the valve cannot cope with the air pressure coming from the intake manifold. As a result, the pressure and amount of incoming fuel are reduced.
Valve jamming leads to an uncontrolled supply of fuel to the manifold and its “waste” into the fuel line. In this case, gasoline consumption increases, and the engine stops starting normally due to interruptions in the fuel supply.
Similar signs of malfunction can be observed when the regulator is clogged. Dirt and deposits reduce the throughput of the system, as a result of which the fuel pressure decreases significantly, the engine “chokes”, and normal idle speed disappears.
If the seal between the regulator and the ramp is broken, the air pressure may drop, which again will lead to a decrease in fuel pressure.
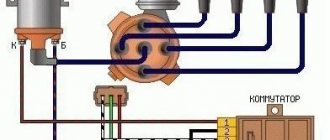
Adjusting the ignition angle
Sluggish acceleration of the car and instability of the idle speed are also often associated with incorrectly set ignition; this procedure is mainly carried out in car repair shops using special equipment. But if you wish, it’s easy to make the adjustment yourself, and without a strobe, and quite accurately:
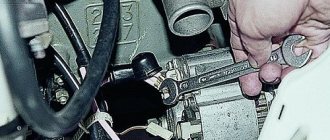
- with the engine stopped, loosen the three nuts securing the distributor (the third fastening is located at the bottom, it is not visible from above);
- we start the car, turn the distributor-distributor clockwise (to “+”), and if the ignition was late, the idle speed will increase noticeably;
- we select the optimal position of the distributor (the operation of the internal combustion engine should be smooth, without failures), reduce the speed using the quantity screw, turn off the engine, fix the distributor-distributor with one nut for now, and check the results of the ignition adjustment on the fly.
If, under heavy load and sharp acceleration, your fingers begin to noticeably “knock” (engine detonation appears), you should move the distributor a little to “minus”, then check the car again while driving. This way you can set the ignition quite accurately, and sometimes even better than with a strobe light.
Fuel system check valve malfunction
Symptoms of a problem
The fuel pump of the VAZ 2108, 2109, 21099 carburetor engine does not pump
. There are several characteristic signs that may indicate a malfunction of the check valve:
- The engine runs unsteadily and intermittently at minimum speed.
- The engine starts only after a long rotation of the starter while simultaneously pressing the gas pedal.
- Gasoline leaks from the fuel hoses and continues to leak after replacing them and tightening the clamps.
- The speed changes sharply at idle.
Due to the fact that the design of the check valve is completely mechanical, its diagnosis using special instruments is impossible. It will not be possible to disassemble the check valve and repair it, since its entire structure is quite cheap, and there are no individual spare parts on sale.
You can find out whether the valve is working properly by measuring the pressure in the fuel system with a pressure gauge. To do this, connect the pressure gauge to the section that supplies power to the engine. A rapid decrease in pressure when the engine is stopped will indicate a valve malfunction.
Another way to check the valve's functionality is to monitor the pressure level when the return hose is pinched. The pressure should increase, but this method is not suitable for all cars, since in some of them these hoses are made of metal.
If the engine runs erratically, clamp the return hose and observe the engine again. If the required power is gained at this moment, and the cylinders are functioning, you can safely change the valve.
Basic faults
The main malfunction of a check valve is failure due to long-term use. Any car part has its own expiration date, after which, even with proper handling, it will no longer function as before.
Other common valve malfunctions are mechanical damage or blockage, which occurs, for example, due to the use of low-quality fuel. Most often, the spring and membrane wear out.
Causes of malfunctions
Why does the valve fail? Recently, the auto parts market has been flooded with cheap Chinese parts. Quite often such spare parts fail due to manufacturing defects. The check valve is no exception.
As mentioned above, wear and tear is often caused by time and poor quality fuel. If gasoline or diesel fuel is mixed with water, then such a mixture will be destructive for many units of the fuel system.
Valve clogging as a result of using low-quality fuel can also be a significant cause. Clogging generally leads to a decrease or cessation of the performance of many vehicle components (for example, air filters).
Once fuel is mixed with water and enters the system, moisture may enter the regulator. Often along with dirt if the filter is faulty.
You may also be interested in our author's article on how to remove a faulty fuel pressure regulator.
Problems
Why does OK fail? This happens quite often, since the market today has become more defective as a percentage.
Chinese counterfeits at low and medium prices attract the attention of motorists who do not suspect a trick. It is worth installing such a part, and after a while problems arise
How to check the fuel system check valve
If the part is of high quality, then the malfunction occurs for a natural reason - due to wear. As a rule, either the spring or the membrane deteriorates. It is extremely rare for the valve to fail completely, which is a credit to it.
Another common cause of failure that we have seen lately is low quality fuel. Gasoline or diesel fuel mixed with water is harmful to many parts of the fuel system.
Typical symptoms of an OK malfunction look like this:
- the speed changes unexpectedly in idle mode;
- the engine starts only after pressing the gas pedal, although previously it started only by twisting the starter;
- at low speeds the engine operates extremely unstable;
- Liquid leaks from the supply and return fuel pipes, although the sealing of the hoses is beyond doubt.
OK has a mechanical design. On the one hand, it seems to be good and can be easily fixed if you understand the mechanics. In fact, the element is non-separable, and it is impossible to diagnose its functionality using electronic devices, sensors, for example.
Ways to check functionality OK
Various methods are used to determine the serviceability of the valve. One of them is based on checking the pressure level. It is measured by a pressure gauge connected to that part of the system that supplies the engine with gasoline. The normal pressure level should be 3 kg/cm2 (passenger cars). Also, the level should not drop sharply when the engine is stopped. Otherwise, this also indicates a malfunction of the return valve.
Pressure gauge
Some experts advise checking OK by squeezing the return hose. In this case, if everything is in order with the valve, the pressure level should increase. The method is suitable for those machines in which the “return” is made of a rubber hose. However, many cars are equipped with metal pipes or the “return” is too short, it is impossible to compress it.
There is another diagnostic method, without a pressure gauge, suitable for engines that are unstable and have difficulty picking up speed. Again, the return line is pinched. At the same time, you need to monitor the operation of the internal combustion engine. If the engine speed increases and all cylinders are functioning normally, the OK is most likely faulty.
Obviously, nothing good can be expected from a damaged valve. A drop in engine speed, unstable cylinder operation, difficult starting, airing - all this will come sooner or later if the valve does not work.
Clamp the return line
It will be interesting to consider the reason for the airing of the system, which opens our eyes to the principle of operation of the OK. After stopping the engine, a certain amount of fuel liquid must remain in the chamber, awaiting the next start. If there is no valve or it is damaged, gasoline/diesel goes back into the tank, and air takes its place. Until the system is ventilated and the pressure is brought back to normal, the engine will not start.
Pros and cons of modernization
Replacing the generator drive belt 37.3701 for VAZ 2108, 2109, 21099 cars
A do-it-yourself return line will reduce the load on the needle of the carb's float chamber and relieve pressure on the valves. In addition, the return flow will allow gasoline to constantly flow through the system and not stagnate in one place, which will prevent the fuel from boiling, for example, in extreme heat in the summer.
Without a return line, some cars, especially used ones, consume a lot of fuel. If, for example, a passenger car consumes more than 14 liters per 100 kilometers, it is necessary to upgrade the system.
Read more: The mystery of what you can’t do in space
The disadvantages of such modernization include difficulties with launching. For example, some drivers experienced this situation. They write that the car behaves great on the highway, the throttle response and other characteristics are excellent. However, as soon as you brake and leave the engine to idle for a while, it stalls and is not going to start again. Only after the hood opens does the situation become clear: it turns out that the fuel filter is empty and air is coming from the return line. As long as you don't pinch the line, pumping doesn't happen.
This is the only disadvantage of manufacturing and installing a return line to the carb. And this does not necessarily happen on all machines, but it should not be ruled out.
On some car models with a Solex carburetor, return flow is provided as standard. The manual says that it is designed to prevent fuel from leaking out of the tank when the car overturns. In other words, it was done to improve fire safety.
For the first time something similar appeared on the GAZ 24 with K-126 carburetors. Only this was not a full-fledged return, but only a tee that ensured that fuel was drained back into the tank through a small hole. The goal is to maintain pressure in front of the carburetor.
Article: 2108-1156010
Order code: 001030
- Buy with this product
- show more
Passenger cars / VAZ / VAZ-21071 drawing
» href=»/catalog/vaz-3/legkovye_avtomobili-30/vaz_2107-8/truboprovody_toplivnye-84/#part23675″>Fuel valvePower system / Fuel pipelines
- Passenger cars / VAZ / VAZ-21092 drawings
- » href=»/catalog/vaz-3/legkovye_avtomobili-30/vaz_2109-9/truboprovody_toplivnye-90/#part32361″>Fuel valvePower system / Fuel pipelines
- » href=»/catalog/vaz-3/legkovye_avtomobili-30/vaz_2109-9/truboprovody_toplivnye-89/#part32327″>Fuel valvePower system / Fuel pipelines
- Passenger cars / VAZ / VAZ-21101 drawing
- » href=»/catalog/vaz-3/legkovye_avtomobili-30/vaz_2110-10/truboprovody_toplivnye-116/#part40666″>Fuel valvePower system / Fuel pipelines
- Passenger cars / VAZ / VAZ-21121 drawing
- » href=»/catalog/vaz-3/legkovye_avtomobili-30/vaz_2112-12/truboprovody_toplivnye-116/#part49282″>Fuel valvePower system / Fuel pipelines
- Passenger cars / VAZ / VAZ-21314 drawing
- » href=»/catalog/vaz-3/legkovye_avtomobili-30/vaz_2131-73/truboprovody_toplivnye-101/#part62846″>Fuel valvePower system / Fuel pipelines
- » href=»/catalog/vaz-3/legkovye_avtomobili-30/vaz_2131-73/truboprovody_toplivnye-101/#part62847″>Check valve Power system / Fuel pipelines
- » href=»/catalog/vaz-3/legkovye_avtomobili-30/vaz_2131-73/truboprovody_toplivnye-99/#part62799″>Fuel valvePower system / Fuel pipelines
- » href=»/catalog/vaz-3/legkovye_avtomobili-30/vaz_2131-73/truboprovody_toplivnye-99/#part62800″>Check valve Power system / Fuel pipelines
- Passenger cars / VAZ / VAZ-21142 drawings
- » href=»/catalog/vaz-3/legkovye_avtomobili-30/vaz_2114-647/truboprovody_toplivnye-18/#part1669166″>Fuel valvePower system / Fuel pipelines
- » href=»/catalog/vaz-3/legkovye_avtomobili-30/vaz_2114-647/truboprovody_toplivnye-18/#part1669167″>Check valve Power system / Fuel pipelines
- Passenger cars / VAZ / VAZ-212131 drawing
- » href=»/catalog/vaz-3/legkovye_avtomobili-30/vaz_21213-731/truboprovody_toplivnye-66/#part2009240″>Fuel valvePower system / Fuel pipelines
- Passenger cars / VAZ / VAZ-21084 drawings
- » href=»/catalog/vaz-3/legkovye_avtomobili-30/vaz_2108-18/truboprovody_toplivnye-81/#part28046″>Fuel valvePower system / Fuel pipelines
- » href=»/catalog/vaz-3/legkovye_avtomobili-30/vaz_2108-18/truboprovody_toplivnye-80/#part28016″>Check valve Power system / Fuel pipelines
- » href=»/catalog/vaz-3/legkovye_avtomobili-30/vaz_2108-18/truboprovody_toplivnye-80/#part28015″>Fuel valvePower system / Fuel pipelines
- » href=»/catalog/vaz-3/legkovye_avtomobili-30/vaz_2108-18/truboprovody_toplivnye-81/#part28047″>Check valve Power system / Fuel pipelines
- Passenger cars / VAZ / VAZ-210992 drawings
- » href=»/catalog/vaz-3/legkovye_avtomobili-30/vaz_21099-79/truboprovody_toplivnye-90/#part36300″>Fuel valvePower system / Fuel pipelines
- » href=»/catalog/vaz-3/legkovye_avtomobili-30/vaz_21099-79/truboprovody_toplivnye-89/#part36266″>Fuel valvePower system / Fuel pipelines
- Passenger cars / VAZ / VAZ-21111 drawing
- » href=»/catalog/vaz-3/legkovye_avtomobili-30/vaz_2111-11/truboprovody_toplivnye-116/#part44974″>Fuel valvePower system / Fuel pipelines
- Passenger cars / VAZ / VAZ-21152 drawings
- » href=»/catalog/vaz-3/legkovye_avtomobili-30/vaz_2115-65/truboprovody_toplivnye-80/#part53090″>Fuel valvePower system / Fuel pipelines
- » href=»/catalog/vaz-3/legkovye_avtomobili-30/vaz_2115-65/truboprovody_toplivnye-80/#part53091″>Check valve Power system / Fuel pipelines
- Passenger cars / VAZ / VAZ-2110, 2111, 21121 drawing
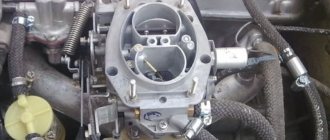
“Return” of the fuel system of an engine with a Solex carburetor, VAZ 2108, 2109, 21099 cars
The power supply system (fuel system) of an engine with a Solex carburetor, front-wheel drive VAZ 2108, 2109, 21099, has two lines: a fuel supply from the gas tank to the carburetor and a return line from the carburetor to the gas tank (“return”). The return line is designed to drain excess fuel from the carburetor when the car engine is running in different modes.
Solex carburetor fuel return system design
— Fuel return fitting with calibrated hole
Designed to limit the volume of fuel drained into the return line. This ensures optimal pressure in the fuel line from the fuel pump to the carburetor needle valve.
— Fuel return line
Rubber hoses and a metal tube under the bottom of the car from the fuel return fitting of the carburetor to the fitting on the fuel pick-up in the fuel tank, through which excess fuel is drained into the fuel tank.
— Check valve
Only allows fuel to flow in one direction. Designed to prevent fuel from spilling out of the gas tank when the vehicle rolls over.
Operating principle of the Solex carburetor fuel return system
When the engine is running, the fuel pump creates a certain pressure in the fuel supply line up to the needle valve. This pressure is excessive for normal operation of the carburetor needle valve (possible “overflow”). Therefore, excess fuel is discharged through a fuel outlet fitting with a calibrated hole into the return line and then into the gas tank. This ensures normal operation of the carburetor and car engine, cooling of the fuel pump and the fuel passing through it due to its constant circulation, and removal of air pockets from the fuel pump and fuel supply line. A calibrated hole in the fuel return fitting, which meteres the volume of drained fuel, ensures that the required pressure is maintained in front of the carburetor needle valve.
Fuel return system malfunctions
The main malfunctions are clogging of the return line and failure of the check valve. As a result, the drain line stops functioning normally, the fuel pressure on the needle valve increases, it begins to pass it into the float chamber, the level in it rises, causing excess fuel to enter the engine through the carburetor GDS system. The fuel mixture becomes very rich. As a result, spark plugs flood and interruptions in engine operation in different modes. Among other things, the fuel pump overheats greatly, and air pockets form in it and the supply line. The engine stalls. In some cases, a wet rag placed on top of the fuel pump helps to quickly restore the functionality of the fuel pump.
Therefore, the permeability of the return line and the check valve of the fuel system must be periodically checked (blowed in the direction of the gas tank, with the cap removed from its filler neck); if clogged, it must be cleaned. Notes and additions
— In addition to the above, the fuel return system to the gas tank prevents a sharp increase in fuel pressure on the carburetor needle valve after stopping the car engine.
— An increase in fuel pressure at the carburetor inlet can also occur due to a malfunction of the fuel pump valves or incorrect adjustment of its drive.
More articles on the fuel system of carburetor engines
— Ventilation system for the gas tank of carburetor engines of VAZ 2108, 2109, 21099 cars
— Cleaning the gas tank of VAZ 2108, 2109, 21099 cars
— No fuel supply to the carburetor, causes, elimination
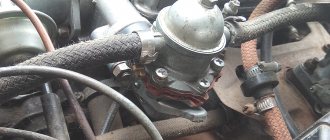
Let's consider the principle of operation of the gas pump.
Replacing generator bearings on a VAZ 2110 with your own hands, what bearings cost numbers, which ones are better to choose, LuxVAZ
As already mentioned, a mechanical fuel pump is more often used in cars with a carburetor, where the fuel mixture circulates under low pressure. Electric analogues, in turn, are often installed in cars with an injector, where the fuel mixture circulates under high pressure. If the vehicle is equipped with a carburetor, the fuel pump functions as follows. At the moment when it becomes necessary to fill the fuel chamber with the mixture, the diaphragm shifts to the lower part. The return mechanism moves the diaphragm to the reverse position, which leads to the supply of fuel to the carburetor. The principle of operation of an electric fuel pump on cars equipped with an injector is in many ways similar to its mechanical counterpart. The central part of the device is drawn into the electromagnetic pulse valve until the contact group opens, which stops the current supply.
Before you begin diagnosing or replacing the fuel pump, you need to familiarize yourself with its location. To do this, you must resort to the manufacturer's instructions. The standard location of the element on a VAZ 2110 car is under the rear seat of the car.
Fuel system design
Fuel system check valve
Any check valve in any hydraulic system serves to ensure that fluid flows along the line in only one direction. This may be necessary in many cases, but when applied to a fuel system, a check valve prevents unused fuel from draining from the fuel line into the tank. For various reasons, but that's the gist. This applies to both gasoline engines with carburetors, injection engines, and diesel engine power systems.
Video about the operation of a check valve
Structurally, most often the check valve is designed extremely simply - it is a ball valve with a precisely calibrated seat made of soft metal. The valve allows fuel to pass unhindered in one direction, but at the same time fuel cannot flow back into the tank, closing the valve with its own pressure. A simple device, nothing complicated, but sometimes its malfunction or simple absence leads to serious problems. People often confuse a pressure relief valve and a check valve, but these are completely different things. In diesel and injection engines, where pressure is required for the operation of the power system, the pressure reducing valve is responsible for stable pressure, however, it works in tandem with a check valve. It’s logical to solve all problems as they arise, so that’s what we’ll do.
Automatic choke without drive
The principle of this modification is based on the installation of an additional thermostat, which will provide control of the air damper. Many drivers are familiar with such a device as a thermostat, which is used on air filters. This device is designed to open the cold air damper by extending the rod when the temperature of the air flow increases.
To install this auto-suction pump on the carburetor with your own hands, you need to buy a thermostat for 8 and 9 and install it in a 0.5-inch tee. In addition, you will need fittings, a plug, a tee, a lever and a bracket. You don’t have to buy the last two elements, but make them yourself.
On both sides of the tee we screw fittings under the tube, which provides heating to the collector. The third outlet must be plugged, and then a hole must be drilled in the plug. After this, we cut a thread for the thermostat and screw it into the tee. We connect a lever to the resulting structure, which is connected through a cable to the air damper. We also screw the fasteners under the shirt.
When the engine is not warmed up and there is cold fluid in the system, the damper is closed. As the temperature of the antifreeze rises, the thermostat is activated, which moves the lever. The cable tightens and opens the valve. The air intake closes under the action of a spring when the engine cools down.
Breakdowns
The following signs indicate that the sensor is broken and not working properly:
- a sharp increase in fuel consumption;
- unstable operation of the power unit, it stalls at idle, despite the serviceability of all systems and a sufficient fuel level;
- drop in engine power, feeling of lack of it;
- when driving, the speed disappears for a while;
- increased level of emissions from the exhaust system;
- high concentration of CO and CH in the exhaust;
- too high or, conversely, low crankshaft speeds;
- the engine starts with great difficulty, especially if the car has been standing for some time;
- poor response to the gas pedal.
If the above symptoms appear, the car owner urgently needs to correct the problem, otherwise it may lead to failure of the entire power unit.
It stalls at idle without any choke. After hitting the wheel.
Good afternoon, a week ago a friend and I were driving along an intersection and hit the right wheel twice. The problem is that before the car started and ran cleanly and smoothly, the exhaust came out of the pipe evenly. But after the impact, we drove another 100 meters, stopped (by myself) and tried to get going again... and at first the engine simply stalled in gear, and almost immediately the engine began to pick up speed and drop it on its own, the tachometer needle twitched and you could hear the engine itself picking up speed and resets AS IF someone is pressing on the gas. Somehow we set off with the choke pulled out and arrived at the parking lot. And for a week now I can’t figure out what the problem is. I thought it was the idle speed sensor. I checked it by pulling it out and turning it on while the engine was running, the result was 0 as it did not work smoothly and still works. And only with the choke pulled out (temperature between 50 | 130), if you press the choke in, it immediately loses speed and stalls. I removed the carburetor. Cleaning and washing. I'll post after installation. But I would still like to hear what else could be the problem?
How to check the pressure in a system with no return?
The VAZ-2110 with a volume of 1.6 liters has constant pressure indicators in the ramp, which, as a rule, vary around 3.6-4 bars.
In addition to the most commonly used measurement methods described above, there are several more unusual solutions:
a) Here we return again to the hose with a pressure gauge, the diameter of which should be 7.5-8 millimeters. Measurements should be taken at the outlet of the fuel pump module. Five to seven atmospheres are normal test results.
b) Remember how the return line is closed on motors with a drain frame. It is recommended to turn off the engine directly at the gasoline pump. Next, you will need to remove the double hose and insert a plug (“The nipple” from an old fuel filter may also be suitable for this task). Now you need to pull a single tube onto the pump fitting. The measurements themselves must be made at the fuel rail.
How to clear a blockage if the fuel supply line is clogged.
One of the reasons for low pressure may be a malfunction of the sensor that regulates the fuel pressure before injection. Low pressure may also be a consequence of a clogged fuel line. By taking proper measurements, you can accurately determine the cause of the malfunction. First, you should check the pressure of the pump and line, then measure the pressure in the ramp. All of the above will help determine the exact cause.
How to clear clogged fuel injectors.
There are several signs to tell you that your fuel injectors are dirty. Let's start in order.
- Difficulty starting the engine.
- Unstable engine operation.
- Dips in the timing of sharp pressure on the gas pedal.
- Loss of power and deterioration in acceleration dynamics.
- Increased toxicity of treated gases.
- Increased fuel consumption.
- The occurrence of detonation.
- Popping sounds in the exhaust system.
- Misfires.
To solve this problem you need to clean the fuel injectors.
Clogged valve. How to identify and fix the problem.
When the valve is clogged, fuel is difficult to pass through, and because of this, it begins to leak everywhere. A significantly increased fuel consumption indicates that it is time to change the regulator, since it is the leading component. Fuel stops being supplied to the supply system if the valve becomes completely clogged.
What to do if the valve is stuck.
Uneven pressure in the system is usually the result of a stuck valve. Because of this, the vehicle's movement may be uneven. The car may also jerk or stall.
Which way to go
There are two options for eliminating the problem. Take the car to a service station and wait for the repairs to be completed. In this case, you need to shell out a certain amount of money, it’s a pity.
Having knowledge and understanding of the car’s structure, you can carry out repairs yourself. Saving money in person. However, there is a possibility of stepping on a pitfall. Can't deal with the problem.
Then you will have to shell out additional money for repairs in a specialized center, how do you like this prospect? In any case, the decision is yours to make.
Experts recommend not to reinvent the wheel, but to give the car to professionals who will replace it quickly, with a guarantee of quality.
Purpose and principle of operation
The functional purpose of the DCPV is to supply the ECU with fourteenth information about the current position of the crankshaft, on the basis of which the controller synchronizes the operation of the ignition system and injectors. Simply put, the moment at which the fuel mixture is supplied to the combustion chambers and the frequency of spark occurrence on the spark plugs depend on the DCPV.
If the DCVP fails, the operating mode of the engine will be completely disrupted - due to the fact that fuel will be supplied excessively or, conversely, ignition will not occur at the right time, the engine will begin to stall, the car will twitch when driving and lose speed.
For fourteen different years of production, different DCPVs were installed - frequency and inductive, the differences between them lie in the principle of operation.
Inductive sensors, also known as electromagnetic sensors, have an electromagnetic core covered with a winding of copper wire. When a metal part (crankshaft) appears near the core, the core reacts to its electromagnetic field, as a result of which its electrical potential changes.
The potential difference is transferred to the copper winding and alternating current is generated on it. The winding itself is routed to contacts located on the DCPV housing. The wires connecting the device to the engine control unit are connected to the contacts. The resulting alternating current is transmitted to the controller, on the basis of which the brains of the fourteenth determine the current position of the crankshaft.
The design and operating principle of a frequency-type crankshaft sensor is somewhat more complicated. Such devices also have an electromagnetic core, but they are also equipped with a converter operating on the Hall principle, which generates a frequency pulse from the resulting alternating voltage.
Information is supplied to the ECU in the form of pulse signals, the frequency of which changes when a metal object is located next to the sensor (in this case, the crankshaft ring teeth).
The best cheap processor car radios
ACV ADX-901BM
pros
- good and clear car sound
- clear controls
- Bluetooth
- optimal price-quality ratio
Minuses
no significant shortcomings were noted by users
From 3,020 ₽ ON GOODS PURCHASES YANDEX.MARKET
ACV ADX-901BM is equipped with a monochrome LED display. The model has good acoustics, has low and high pass filters, and a 13-band equalizer. Supports MP3, WMA, FLAC formats.
KENWOOD KMM-304Y
pros
- many audio settings
- adjustable RGB backlight
- excellent sound quality
- good full crossover
- small price for such functionality
Minuses
squeaks when pressing buttons
From 4100 ₽ ON GOODS PURCHASES YANDEX.MARKET
KMM-304Y is a cheap processor radio from the KENWOOD brand. Equipped with a two-line LCD display with variable backlight. High-quality sound tuning is provided by a 13-band equalizer and tone compensator. The device plays MP3/WMA/AAC/WAV formats, and can read tracks from iPhone/Android.
Information
The M2 federal highway runs from Moscow to Crimea and further to the Ukrainian border. It was put into operation in 1950 during Soviet times
The M2 highway is an important part of the road infrastructure of Russia and the European direction E105
At the beginning, the old route, which today is also called 1 M2, runs west of Shcherbinka, Klimovsk and Polsk. The new route goes around these cities on the eastern side and then goes through the central and western regions:
- Moscow.
- Tula.
- Orlovsky.
- Kursk.
- Belgorodsky.
Due to the presence of the old western road leading from Moscow, the Crimean Highway is also called M2. It continues along the same route as the new section of the route starting in Moscow. It passes not only through Russia, reaching the Ukrainian border, it continues through the territory of Ukraine, leading to Crimea. The M2 road on Ukrainian territory goes through the following cities:
- Kharkiv.
- Dnepropetrovsk
- Zaporozhye.
The route ends on Russian territory on the Simferopol – Yalta section. The M2 highway has a length of 720 km from Moscow to the Ukrainian border at the Nekhoteevka checkpoint. The width is from 8 to 10 meters.
M2 passes through 5 Russian regions to the Ukrainian border:
- Moscow.
- Tula.
- Orlovskaya.
- Kursk.
- Belgorodskaya.
The road goes through hilly and rough terrain
There are areas on it that require increased attention and caution from the driver. On the map they are indicated by the following kilometers: 137, 138, 140, 143, 147, 153, 163, 173
In these places M2 rises and falls sharply
You should pay attention to the fact that after 1 dangerous kilometer 137 there is immediately a sharp ascent and descent at 138 kilometers
The map also shows particularly dangerous sections with sharp turns, which are at kilometers 136 and 268. In general, this is a convenient highway that has no intersections, pedestrian crossings, or railroad crossings crossing it. The route does not pass through cities, which avoids traffic jams and uneven road congestion.
There are 7 bridges on this highway that allow motorists to cross 6 fairly large river arteries in the western part of Russia:
- Oku.
- Ulu.
- I'm floating.
- Zushu.
- Sejm.
- Northern Donets.
The length of the bridges is over 50 m, and the load capacity is from 60 to 80 tons. Along the main length of this road there are 4 lanes, two in each direction. At its very beginning, 8 km from Highway No. 4, 8 lanes were laid in both directions to increase the capacity of traffic flow coming from Moscow and towards it.
The road surface along the main length of the route has an asphalt surface, it is smooth, but there are some sections on this road that are slightly rutted. From time to time, road services carry out repair work on them, trying to time their completion to coincide with the beginning of the summer season.
In general, the highway leading from Moscow to Crimea is actively used throughout the year, but its maximum congestion occurs in the summer, when vacationers travel from Moscow by car to the Crimean resorts.
The route connects the Russian capital with Ukraine and Europe, as well as the western Russian regions with Moscow. This road, built in the middle of the last century, has a developed infrastructure. Drivers can always find gas stations, traffic police posts, cafes and roadside motels on it.
Fuel pressure control valve
The fuel pressure regulator, installed on the fuel rail, maintains constant fuel pressure in the central channel of the rail in all engine operating modes. Regulation of the fuel pressure supplied to the injectors is based on the principle of monitoring the pressure difference in the ramp and inlet pipe, which under any conditions must be at least 265 kPa (2.65 kgf/cm2). The electric fuel pump delivers more than is required to maintain system functionality. Therefore, when the engine is running, using the pressure regulator, part of the fuel is constantly drained through the return pipeline into the fuel tank. Depending on the vacuum in the intake pipe, the pressure regulator reduces or increases the drainage of excess fuel, maintaining constant pressure in the rail.
Vacuum is a decrease in pressure. There is less ordinary air in the same volume, or the same volume of air is in a larger volume. In the intake manifold, a vacuum appears due to the fact that the piston moves to BDC. The volume in which the air is located increases and a vacuum appears.
The pressure regulator is a closed cavity divided by a diaphragm into vacuum and fuel chambers.
The vacuum chamber communicates through a vacuum hose with the engine intake pipe. The fuel pressure regulator is connected to the throttle body for a reason. This is necessary to adjust the pressure depending on the load. No load (or small) → the valve is closed (closed) → the vacuum is high → the fuel pressure is reduced. And vice versa.
The fuel chamber communicates through a channel in the regulator body with the cavity of the fuel rail. During engine operation, the regulator valve is closed under the action of a spring if the pressure difference in the intake pipe and fuel rail is no more than 0.27 MPa. There is no backflow of fuel; the pressure in the fuel line begins to increase. When the pressure drop exceeds 265 kPa (2.65 kgf/cm2), the regulator diaphragm bends and a gap is formed between the valve and its seat, through which excess fuel is drained into another regulator channel connected to the drain pipeline - the pressure decreases.
As the engine load increases and the throttle valve operates at a wide opening, fuel consumption increases and the pressure in the fuel rail drops. At the same time, the vacuum in the intake pipe decreases.
The spring presses the pressure regulator valve to the seat, the draining of fuel into the fuel tank stops - the pressure rises. These processes are repeated continuously, resulting in constant pressure being maintained in the fuel rail.
1 - body; 2 - cover; 3—pipe for vacuum hose; 4 - diaphragm; 5 - valve; A - fuel cavity; B - vacuum cavity/
The fuel pressure regulator consists of valve 5 with diaphragm 4, pressed by a spring to the seat in the regulator body. When the engine is running, the fuel pressure regulator maintains pressure in the fuel rail of the injectors. The regulator diaphragm is affected by fuel pressure on one side, and pressure (vacuum) in the intake pipe on the other. When the pressure in the intake pipe decreases (the throttle valve closes), the regulator valve opens at lower fuel pressure, passing excess fuel through the return line back into the gas tank. The fuel pressure in the fuel rail decreases. As the pressure in the intake pipe increases (when the throttle valve opens), the regulator valve opens at a higher fuel pressure and the fuel pressure in the rail increases.
Installation of SAUVZ
The system is supplied with a gearmotor, the housing of which contains a built-in electronic board and the necessary wires for connection. Software settings are individual for each car model and are set by the driver. The design of the gearbox uses plastic parts, which eliminates the formation of frost inside. Traction force ensures movement of the damper in any frost.
The device is installed in accordance with the user manual. First we connect the ground. To do this, attach the required cable to the nearest convenient place. After this, we connect the wires to the power plant speed sensor and to the handbrake button-lamp.
We attach the temperature sensor, which is supplied in the kit, to the cooling system hose (SOD), closer to the engine block. It is recommended to cover the sensor to prevent cold air from blowing in. This will eliminate the possibility of underestimating the SOD temperature readings.
After this, we connect the power directly to the battery or through the ignition key. It is not recommended to connect directly to the ignition coil terminal, as there may be large interference. If there is no other way out, then the connection to the ignition coil connector must be made only through an additional relay.
To fasten the gearmotor, a set consisting of a plate, a traction lever, a cable clamp, bolts, washers and nuts is provided. Flexible traction (cable) must be purchased separately. SAUVZ is mounted next to the carburetor. In this case, the damper control cable should be as short as possible and without bends.
Depending on the type of carburetor, you can install the auto choke directly on the carburetor, so that the damper is controlled by turning the air intake axis without a cable. In this case, you will have to do the fastening yourself.
We remove the flexible rod that goes from the passenger compartment to the damper and replace it with a new cable. It must be connected to the gearbox. The auto-suction pump is attached to the plate using bolts and nuts with washers. To adjust the installation height of the drive, additional nuts are provided. The plate with the lever is mounted between the main plate and the gearmotor. We thread the central core of the flexible rod into the hole of the lever and form it. We fix the shell on the plate, adjusting the desired position. The lever assembly must be placed on the drive axis in the “extended” position.
Product design differences
There are shut-off elements that move parallel, perpendicular or at an angle to the pipeline axis. The valve is located in a special recess - a seat, into which it is able to lower under its own weight, depending on the temperature of the pipes
That is why, when installing individual models, it is important to observe the position of not only the flow direction arrow, but also the location of the guide elements of the locking part
The main component of the check valve is the internal lock, which can take different shapes:
- a spool consisting of locking plates and a rod;
- solid or halved disk;
- ball with sealing gaskets and a spring mechanism.
Valves with a diameter of more than 400 mm are equipped with a disk that can strongly push against the body when returning to the seat, which leads to damage to the device. To avoid premature wear of the valves, such valves are additionally equipped with hydraulic dampers that ensure smooth movement of the disc. One way or another, such models are rarely found on sale anymore.
Smaller ball or butterfly valves are more popular and in demand. In the first case, the shut-off device is a small ball that moves in different directions depending on the direction of the water, and in the second, two halves of the disk are attached to one rod and, if necessary, ensure that the pipe is closed. It is worth noting that there are also non-return valves that force the valve to open or close. In this case, the flow is controlled by automatic or mechanical devices, but such units are used exclusively in the industrial sector.
Types of devices by type of fastening
Trailer brake control valve
Important features of shut-off devices include the method of fastening, which depends on the material and technology of pipeline connection. According to the method of connection to the pipeline, check valves are divided into:
- coupling;
- fatty;
- flanged;
- wafer.
The first type is connected to pipes through a threaded transition. The welded version is more suitable for use in pipelines through which aggressive media are pumped. Flange devices are equipped with flanges with seals through which the connection is made. As for check valves with wafer mounting, they have special fixing pins. Moreover, the latter option is available exclusively in double-leaf or disk versions.
Water supply systems typically use shut-off devices with a lift-spring mechanism and a coupling connection. They are easy to install and dismantle, and their repair is most often limited to replacing the spring, which is the weakest element in the entire fitting.
Replacement
It is necessary that the gasoline level is no more than half the volume of the tank. Next we proceed like this:
- Disconnect the negative battery;
- Removing the back seat;
- Remove the cover from the hatch;
- Disconnect the electrical connector;
- We remove the fuel supply pipe by unscrewing the fitting;
- We do the same with the drain pipe;
- Remove the clamping ring (it is secured with nuts 7);
- Carefully remove the float from the hole in the tank, remove the electric fuel pump along with the fuel level sensor;
- Using a screwdriver, disconnect the fuel level sensor;
- We remove the clamps and remove the fuel pump itself from the guides;
- Reinstalling a new Bosch pump is simple and straightforward.
Alternative way
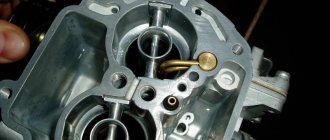
There is a simpler method for determining the correct position of the floats, which does not require measurements. Place the carburetor cover on a flat table and look at the stampings made on the side surfaces. When the floats are in a normally adjusted position, these strips are parallel to the lid.
Then we lift the floats up and look at their bottom, which after lifting should be parallel to the surface of the lid. If necessary, adjust the position of the floats by bending the tongue.
After adjustment work, we assemble the carburetor.
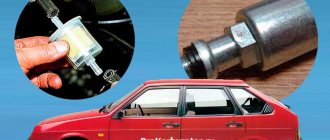
About installing a fine fuel filter
We should not forget that a carburetor malfunction such as “sneezing” or a sudden loss of power or jerky movement may indicate clogging of the fuel jets. This can happen due to small particles getting into the fuel. The reason could be either low-quality gasoline from the factory or the drain of the last batch of fuel from the tank of a fuel truck that ended up in your tank. If the fuel is not filtered, then repair of the carburetor or fuel pump is not far off.
How effective this “trap” is can be seen in the figure.
If the filter is not installed, you need to install it yourself. On average, the filter resource is 20-30 thousand kilometers. There is no difficulty in the installation procedure, you just need to remember three main points:
There is a rule according to which a fine filter must be installed before the fuel pump. In this case, the fuel pump will last longer and repairs will not be required. For example, in the figure we see an incorrect installation of the filter - after the fuel pump, in addition, the filter is located in a very hot area of the engine. If the housing is cracked, gasoline may leak out, be carried back by the air current onto the hot exhaust manifolds, and cause a fire.
conclusions
The fuel system check valve is an important component of this system, the failure of which can cause a lot of problems for the driver. This will be especially painful during movement. Therefore, it is worth using only high-quality fuel, and at the slightest sign of a malfunction, which were listed above, diagnosing the fuel system.
After all, the problem may lie not only in the valve, but also in other small parts. Diagnostics at a service station almost always reveals such faults, so do not forget about timely maintenance of the car, even if everything seems to be in good order. Good luck and easy travels!
Source