As the requirements for the engine power supply system became more stringent, carburetors, as the most complex components on the way of gasoline and air to the cylinders, underwent serious modifications and went from simple fuel sprayers to serious multi-tasking pneumohydraulic devices.
In Russia, this path ended with the creation of Solex-type carburetors; nothing more advanced was produced in our country; the time has come for fuel injection systems.
Recommended Method
Level control technology includes a number of stages:
- We dismantle the housing of the air filter element. To do this, unscrew the fastening nut of the housing cover, unclip the latches, remove the cover, take out the filter and tighten the 4 nuts that secure the housing to the carburetor.
- Raise the body and disconnect the rubber pipes. We move the body to the side.
- Loosen the clamps securing the fuel pipes going to the carburetor and disconnect them.
- Remove the wire suitable for the idle speed solenoid valve;
- Disconnect the drive cable of the air damper (the “choke” handle);
- Unscrew the 5 screws securing the carburetor cover;
- Having removed the cover, we immediately determine the fuel level in the chambers by lowering a ruler or caliper into one of them until it stops (using its depth gauge). If the measurement shows a level of 25-26 mm, it corresponds to the norm and no adjustment is required;
If the amount of fuel in the chamber is lower or higher than normal, we perform a visual inspection and a series of measurements on the floats, and if necessary, we correct their position.
To carry out adjustment work, place the removed carburetor cover on a flat horizontal surface with the floats facing up.
First, we look at the position of the elements from above. The outer side surfaces of the floats are parallel to the special imprints on the gasket. Deviations can cause the floats to touch adjacent elements and surfaces, causing the fuel level to be incorrect. If necessary, adjust the position of the floats by bending their mounting arms. The next step is to measure the gap between the floats and the gasket. A rod with a diameter of 2 mm is useful here - this is how much the specified gap should be.
If it does not correspond, we bend the tongue of the floats, with which they act on the locking needle. After this adjustment, we check the total height of the floats, which is normally 34 mm. If this is not the case, check the gap again, adjust it if necessary and measure the height again.
The last stage of setup is determining the working stroke of the floats. To do this, place a caliper near the float, mark the distance from its lower corner to the surface of the cover, then lift the float with your hand and mark where the lower corner is.
A working stroke of 15 mm is considered normal; if it differs, it is adjusted by bending the tongue.
Adjusting the Solex carburetor
Solex 21083 carburetor jets, what are they?
As the theory of internal combustion engines says, you should start with the float chamber, in which you need to check and adjust the fuel level.
- Start the engine for a few minutes and then turn it off.
- Pull out the air filter.
- Pull out the fuel supply hose by loosening the clamp.
- Remove the five bolts and carefully remove the carburetor cover. Turn the lid over and place it on a flat surface.
- Using a caliper, measure the distance from the edge of the body of the float chambers to the level of the fuel in them. The distance should be within 25.5 mm. Otherwise, you need to achieve this value by bending the tongue of the float bracket.
- Check the parallelism of the floats to the surface of the cover; if there are discrepancies, their brackets should be adjusted.
Next, the starting device (PU) is adjusted. The theory of setting up the device states that it is necessary to carry out the operation on a carburetor removed from the car.
- Close the air damper using its lever drive.
- Press the PU rod in with a screwdriver.
- Measure the gaps between the damper and the chamber wall. Check with the calibration data for your carburetor model. If the gap is not correct, see the next point.
- Loosen the accelerator pump lock nut and turn the adjusting screw. By acting on the screw against the movement of the second hand, the gap increases, and as it moves, it decreases.
- Then the throttle clearance of the first chamber is measured. The air damper must be closed. The starting gap must correspond to the calibration data in the table. The gap is adjusted by rotating the throttle valve adjusting screw.
After the adjustment operations have been completed, it is necessary to adjust the idle speed. The XX setting is carried out on a warm engine. The authors of the journal “ICE Theory” recommend using a gas analyzer and a tachometer. If you don’t have a gas analyzer at hand, setup proceeds as follows:
- With the engine not running, tighten the mixture quality screw all the way, then unscrew it 3-4 turns, after first removing the plastic plug.
- Start the engine, remove the choke, turn on the high beams and the heater fan.
- Use the mixture quantity screw to set the speed to about 800 rpm.
- Use the quality screw to set the maximum speed.
- Use the mixture screw to bring the speed up to 900 per minute.
- Using the quality screw, set the engine speed to 800 rpm.
- Tighten the quality screw until the engine speed reaches an unstable zone, and then loosen the screw from half a turn to one turn back.
The main thing to remember is that all malfunctions lead to excessive enrichment or leanness of the mixture and have a direct impact on the performance of your car and its appetite!
Aerosols
It is convenient to work with them, since the aerosol comes out under pressure and additionally clears blockages with a flow of air with the mixture. Sprayers contain propane, acetone and a number of other dangerous components. Therefore, avoid getting them in your eyes and hands. How to check the oxygen sensor on a VAZ 2114 is frozen. They catch fire easily and can only be extinguished with carbon dioxide fire extinguishers.
Aerosol Abro for carburetor cleaning
Aerosols do an excellent job, but they cannot clean the float chamber.
The cleaning process is the same for all cars:
- Remove the air filter;
- Spray cleaner through the tubes outside and inside;
- After 3 minutes, start the engine at high speed and spray the product intermittently for 2 minutes.
This process will take you a maximum of 15 minutes.
Scooter starting enrichment device
Setting up the carburetor 2107 ozone
There are two types of starting concentrators - manual and automatic.
The manual (mechanical) starting enrichment requires adjustment - it must be opened at startup and closed after the engine warms up using a cable on the steering wheel. But manually opening and closing the additional channel for supplying the mixture is inconvenient. An automatic starting enricher (thermoelectric valve) is installed on most modern 2t and 4t scooters. We will learn about the device of the automatic starting enrichment further.
- Solenoid valve body
- Ceramic heater
- Drive (powder)
- Stock
- Pusher
- Damper
- Fuel chamber
- Float chamber
- Starting fuel jet
- Spring
The scooter carburetor has a small additional fuel chamber 7, which is connected to the main float chamber 8 through the start nozzle 9. The tube from chamber 7 leads to the mixing chamber into which air is supplied and from which the air-gasoline mixture goes into the engine. A valve 6 can move in the mixing chamber, similar to a carburetor throttle valve, only much smaller in size. Just like the throttle valve, the starting valve contains a spring-loaded needle that closes the fuel channel when the valve is lowered. Valve body 1 is wrapped in thermal insulation (polyethylene foam) and covered with a rubber boot. This enricher design is used on almost all modern scooters.
Older models may use a design without an electric heater, heat is transferred to the drive through a copper heat-conducting cylinder directly from the scooter's engine cylinder, and instead of a powder with a heating element, a membrane is installed. One cavity of the flask, where it is located, is connected through a thermal valve to the intake manifold, which is mounted on the cylinder head.
Washing with partial disassembly
Adjusting the carburetor VAZ 2109
Let's consider the process of flushing a carburetor with its partial disassembly using the example of a Solex carburetor and Jet 100 Ultra. You don't need to buy a lot of it. One 200 ml can will be enough. The cost of this product is 450–500 rubles. In addition to the special liquid, you will also need:
- set of wrenches;
- Phillips and slotted screwdrivers;
- pliers;
- a container with a wide “neck” with a volume of 2–3 liters (for soaking the carburetor lid);
- a container with a wide “neck” with a volume of 0.2–0.5 l (for soaking small parts);
- kerosene (refined gasoline, acetone);
- tire pump or compressor with a tapering tip;
- toothpicks;
- old toothbrush;
- a clean, dry, lint-free cloth (preferably rough);
- a small wooden spatula (like an ice cream stick).
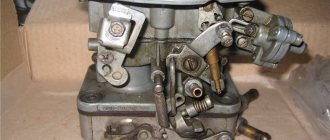
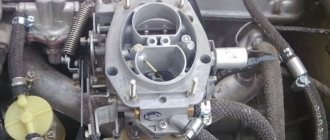
Removing and disassembling the Solex carburetor
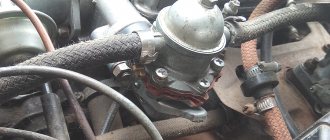
Using a 12mm wrench, unscrew the four nuts securing the supply flange and remove it.
Having loosened the clamps, remove the fuel supply hose from the carburetor fittings. Do not apply too much force: the fitting may be pressed out. If the hose is very hard, cut it.
It is advisable to plug the fuel supply hose. A wrench from the standard tool kit is suitable for this.
We remove the wire from the electromagnetic valve of the EPH system.
Disconnect the sensor-screw connector EPHH.
Remove the vacuum supply hose to the vacuum ignition timing regulator.
Having prepared a small jar (0.4–0.5 l) to collect the coolant, remove the hoses from the throttle valve heating unit. You can simply disconnect the heating unit from the carburetor, but due to severe corrosion of the threaded connection, unscrewing the screw can be difficult.
Remove the crankcase ventilation system hose from the fitting.
Using two “8” keys, disconnect the air damper drive cable from the lever.
Using the “8” key, we disconnect its shell from the bracket and move the cable to the side.
Disconnect the throttle cable from the lever.
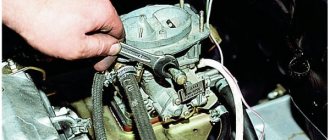
Using a 13mm wrench, unscrew the four fastening nuts.
. and remove the carburetor from the engine. It is advisable to cover the hole in the intake manifold with cardboard or a rag.
Using a screwdriver, unscrew the five screws securing the cover.
and carefully, trying not to damage the gasket, separate it from the body
Place the lid with the floats facing up. (Be careful not to lose the mounting screws).
Using a rod of suitable diameter, knock out the axle.
. and remove the floats.
Turn it off with the 11 key.
. and remove the needle valve along with the sealing ring.
Using the “13” key, unscrew the fuel filter holder plug.
...and remove it from the lid.
. complete with filter and O-ring.
Using the “13” key, unscrew the solenoid valve.
...and take it out of the lid.
Remove the idle fuel jet and the O-ring.
Using a 14mm wrench, unscrew the bolt securing the three-profile air damper lever.
. and remove the lever, holding the latch, consisting of a spring and a ball.
After unscrewing the four screws...
. remove the cover of the diaphragm device of the starting system.
By turning the rod, we disengage it and remove the diaphragm from the body.
Unscrew the four screws of the accelerator pump mechanism cover.
. remove the diaphragm and its spring.
Unscrew the three screws of the economizer diaphragm device cover.
...we take out the diaphragm, the spring, and also unscrew the fuel nozzle.
Carefully pry with a screwdriver (do not bend the tubes!). remove the accelerator pump nozzle with built-in discharge valve
. We take out the accelerator pump nozzle with a built-in discharge valve.
Using a slotted screwdriver with a blade width of at least 7 mm, unscrew the air jets of the main dosing system.
. and remove them from the housing along with the emulsion tubes.
Using a slotted screwdriver with a 4 mm wide blade, unscrew the main fuel jets located at the bottom of the emulsion wells.
Turning the housing over, remove the main fuel jets. If necessary, you can use a sharpened stick or self-tapping screw with a diameter of 3–4 mm and a length of at least 80 mm for this.
We remove small diffusers with pliers.
If necessary, partial disassembly of the carburetor can be done without removing it from the car.
Common faults
In cars with a Solex carburetor, the most common breakdowns are:
- Clogged GDS and XX jets. This malfunction is most often caused by poor quality fuel cleaning.
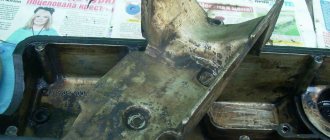
- Deformation of the bottom of the housing . Overheating of the carburetor causes the body to begin to change its shape. The modified part allows air to pass through, so the proportions of air and gasoline in the fuel mixture change. This breakdown can lead to the engine refusing to run on a lean mixture.
- Looseness in the diffuser carburetor housing.
- Damage to the accelerator pump diaphragm . The diaphragm loses its functionality after a certain time. Cracks, tears and other damage appear in it.
All faults can be easily corrected during repairs. In some cases, it may be necessary to replace individual parts on the Solex 1107010 carburetor, but this is not a big problem, since they are available in almost every car shop.
Video - Do-it-yourself Solex adjustment
https://youtube.com/watch?v=zXsp8ev5iA0
"x/x" setting
Adjusting the Solex carburetor without performing this step does not make sense, and therefore performing this adjustment requires special attention. So let's get started:
We set the level, warm up and turn off the engine. We tighten the screw for adjusting the “quality” (item 2) of the fuel mixture until it stops (clockwise) while observing safety precautions. After that, turn it back 5-6 turns in the opposite direction. We start the power unit and completely remove the “suction”. Using the screw for adjusting the “quantity” (item 1) of fuel, we adjust the speed until the engine operates stable with the simultaneous occurrence of a minimum vacuum in the vacuum advance fitting. The tachometer readings should be in the range of 500-1200 rpm. By screwing in the “quality” screw, we achieve unstable operation of the power unit, after which, by unscrewing (slowly) the screw 1.5 turns, we return the engine to a stable mode. Slowly rotating the “quality” screw, we achieve a tachometer reading of 850-900 rpm in the “x/x” mode
If malfunctions occur, slightly unscrew the quality screw. The last two points must be completed until the stable operation of the power plant does not coincide with the corresponding tachometer readings (see above). The setup is complete.
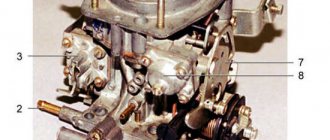
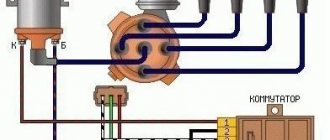
Idle air system adjustment screws: 1 – sensor-screw for adjusting the amount of combustible mixture; 2 – screw for adjusting the quality (composition) of the combustible mixture; 3 – sealing ring; 4 – plug for the fuel mixture quality screw installation channel
When performing the above actions aimed at setting the “x/x” mode, problematic questions may arise, to which we will try to give you the correct answers. The most common problem is the following: the engine does not “respond” to manipulations with the screw for adjusting the “amount” of fuel. This symptom indicates that a large amount of gasoline has entered the “x/x” channel. The reasons for this phenomenon may be: – mismatch between the sizes of the “x/x” jet;
- The solenoid valve (plug) is not installed correctly. Loose installation allows you to “suck in” gasoline bypassing the nozzle;
- deformation of the nozzle seat (the nozzle itself) “x/x”. To conclude our story, we offer information about some of the nuances that sometimes arise during the process of adjusting Solex carburetors.
It happens that when implementing the tuning scheme described above, the end result is absolutely unsatisfactory to the car enthusiast. The power unit in the “x/x” mode is unstable. The reasons for the “capriciousness” of the engine are:
- incorrect functioning of the forced “x/x” economizer;
- partial contamination of the main elements of the carburetor (channels, jets, etc.);
- The fuel level is not standard.
In this case, you must take one of the following actions:
- Troubleshooting and troubleshooting;
- Unscrew the screw for adjusting the “quality” of the fuel mixture and achieve stabilization of the crankshaft speed. After that, use the screw to adjust the “amount” of fuel to bring the speed to 850.
The Solex carburetor adjustment is complete.
Remove and wash the carburetor
Now we can talk directly about how to clean the carburetor on a VAZ 2109 by removing it and disassembling it.
Be sure to prepare an instruction manual, read it several times first, and understand all the intricacies of the work. Unscrew the fasteners of the air filter cover, remove the filter and housing. Remove the carburetor cover by unscrewing all screws. Remove the float from the chamber, remove the gaskets, check their quality and replace with new ones, if necessary. Remove the main jets from the device. Take out all the other jets and emulsion tubes. Using a screwdriver, remove the retaining plate of the main fuel jet plugs. Unscrew the plugs and pay attention to the copper sealing washers. If they are deformed, be sure to replace them with new ones. Unscrew and remove the main fuel jets from the housing, doing this as carefully as possible
Mark each jet and the location where it was installed so that you can reassemble it in the same order. Remove the fuel filter, soak it in acetone and blow with compressed air, then put it back in place. Fill the float chamber with fuel, and use a tire pump to blow out the emulsion channels. At the same time, fuel and contaminants accumulated inside will begin to come out of the channels. how to remove and clean the injectors. Which carburetor is better to install on a VAZ 2121? Demonstration of a faulty air flow sensor on a viburnum. If necessary, perform this operation several times. Try to make sure that the splashes do not fly in all directions. Clean with acetone, rinse the jets thoroughly, clean them with a toothpick and blow with compressed air. Do not clean the jets with metal objects. Pay close attention to all springs and nuts to avoid losing them. After disassembling the carburetor, clean each element. If you are concerned about the integrity of your own hands, be sure to use protective gloves. The same applies to the safety of the eyes. Do not treat plastic and rubber parts with cleaners, as they can corrode and deform them. After disassembling the VAZ 2109 carburetor has been completed, place the metal parts in a metal basin, fill them with cleaner and let them stand for a while. Stir them periodically to remove dirt from their surfaces. Using a stream of water, a toothbrush and cotton swabs, rinse each part and remove any remaining dirt. Do not poke around inside the parts, as air and fuel enter through their channels and openings. how to clean a gas stove burner. How to clean the grate on a gas stove without. Diesel for VAZ 2108 | forum VAZ 2108, 2109, 21099, 2113. Aerosols and compressed air are suitable for cleaning them. Liquid cleaners can be used 2-3 times, so it is not necessary to get rid of it after the first use. Close it tightly in the container and keep until next use. After all, now you know how to clean a VAZ 2109 carburetor.
At the final stage, all you have to do is dry all the carburetor parts properly and assemble and install it in the car according to the instruction manual. Of course, do not forget to adjust the device, which you will learn about in our materials.
At this point, the washing can be considered complete. The work is quite complex, but it is quite possible to do it yourself with high quality. It is not at all a fact that the service station would have done better.
Liquid for filling into the tank
Not everyone knows how to clean the carburetor on a VAZ 2109. We recommend contacting the automotive chemicals department, which sells a large number of liquid preparations for cleaning the carburetor. Typically the volume is up to 150 milliliters, which must be poured into the tank before refueling and this fuel must be completely used until the reserve light comes on.
According to the manufacturer, such measures will allow:
- Remove dirt and deposits;
- Improve the quality of engine starting;
- Reduce exhaust toxicity;
- Reduce fuel consumption;
- Improve engine responsiveness.
We recommend paying attention to the company Hi-Gear, which has proven itself in this area and offers truly high-quality liquid. Such preparations are used once every 3-15 thousand kilometers, depending on the operation and quality of the fuel being poured.
Jet selection
When choosing a set of new jets for modifying a carburetor, it is worthwhile to thoroughly study this issue: Solex 21083 is modified very often, and a couple of additional tips from experienced drivers will not hurt. Recommendations for choosing most often sound like this:
it is very important to take into account the engine volume: with a large displacement, it is better to choose air jets with a small cross-section in order to improve the combustible mixture; First of all, you should choose fuel jets, and only then look for air ones; The sequence is also important when installing jets: first they are installed in the first chamber, and only then in the second - this step-by-step approach will allow you to choose the most suitable scheme.
As an example of selecting jets for a 1.5-liter engine, you can consider the following combination:
- in the first chamber a fuel jet of 102.5 is installed, and the air jet has a cross-section of 155;
- For the second chamber, a fuel jet of 110 is selected, and an air jet is marked 125 or 135.
It is worth paying attention to the fact that Solex 21083 was originally designed for 1.5-liter engines, and its installation on a power unit with a large displacement is not recommended: due to the design features of this carburetor, an engine that is too “voluminous” will not receive sufficient quality flammable mixture
It is also worth remembering that all Solex carburetors have a similar design, which ensures the interchangeability of their elements. This rule also applies to jets: if necessary, you can select jets from another carburetor that have a different cross-section for your version.
And the last recommendation: when selecting jets with a large cross-section, sometimes there is a desire to bore them yourself. This should not be done, since the operation of the jets requires the correct ratio, which cannot be achieved in “garage” conditions even with the appropriate equipment.
Liquid for filling into the tank
Not everyone knows how to clean the carburetor on a VAZ 2109. We advise you to contact the auto chemistry department, where they sell a huge amount of watery preparations for cleaning the carburetor. Typically the volume is up to 150 ml, which must be poured into the tank before refueling and this fuel must be fully used until the reserve light comes on.
According to the manufacturer, such measures will allow:
- Remove dirt and deposits;
- Improve the quality of engine starting;
- Reduce exhaust toxicity;
- Reduce fuel consumption;
- Improve engine responsiveness.
We recommend paying attention to the company Hi-Gear, which has proven itself in this area and offers truly high-quality liquid. How to adjust the carburetor on a scooter, how to adjust a scooter (50 cc carburetor VAZ 2109 Cheboksary. 2109 for repair. Anti-repair of Solex Solex carburetor. Such preparations are used once every 3-15 thousand kilometers, depending on the operation and the quality of the fuel being poured.
Adjusting the Solex 21083 carburetor
The Solex carburetor has several types of adjustments, and you can adjust:
- gasoline level in the float chamber;
- number of minimum idle speeds;
- qualitative composition of the fuel mixture (FC) using the idle speed screw (IQ).
Adjusting the quality of the vehicle is very simple, and any car owner can do the adjustment with his own hands. To do this, you need to warm up the engine well and set the speed screw to 800-900 rpm. Then:
- tighten the quality screw until the internal combustion engine begins to operate with some interruptions and reduce the number of revolutions;
- We unscrew the screw so that the motor starts running smoothly again, usually one turn is enough. If the screw is loosened too much, fuel consumption will increase.
In other cases, you have to loosen the quantity screw more, since dips appear in the engine’s operation.
One of the most common idle problems is the inability to adjust the Solex 21083 carburetor using a quality screw - when it is tightened and unscrewed, the engine speed does not change. There are several reasons for this malfunction:
- the jet in the solenoid valve is clogged;
- the XX channel, which is located under the “quality” screw, is clogged;
- The solenoid valve (EC) itself is faulty.
It’s quite easy to check the functionality of the EC itself; we do it as follows:
- with the engine not running, remove the wire from the valve;
- unscrew the EC;
- we remove the fuel nozzle from it, it is pulled off by hand;
- turn on the ignition;
- We connect the wire to the EC - at the moment of contact, a dry, clear click should be heard, and the valve stem is recessed. If there is no click and the rod does not move, such an EC must be replaced.
It is also necessary to immediately blow out the nozzle - in some cases, such a small speck gets into it that it is practically invisible. There is also a problem with Solex - the idle channel under the quality screw becomes so clogged that it is impossible to clear it.
You can check the performance of the EC in another way - while the internal combustion engine is idling, you need to pull the wire from the solenoid valve - if the engine stalls, it means that the solenoid valve is working properly.
If the XX channels are clogged, the engine starts to work intermittently at minimum speeds and stalls when the gas is released. When you don’t have time to do repairs, but you need to get to your destination urgently, there is one way to make the engine run stably at idle. To do this, while the internal combustion engine is running at idle, we loosen it with a 13 EK key and find the position in which the engine operates most stably. But you shouldn’t drive like this all the time - with this position of the solenoid valve, fuel consumption increases sharply, since the idle system bypasses the XX fuel nozzle.
Expert advice
Clean carburetor
Since you decide to do the cleaning yourself, then pay attention to a few tips from professionals.
- Buy carburetor cleaners at automotive chemical stores. Some sellers will try to sell you a different, "better" product that is not designed for carburetors. Refuse, since it is unknown how such a drug will react to dirt inside the carburetor.
- The well-known, world-famous product WD40 is not suitable for cleaning the carburetor. The reason is simple - it contains oil.
- You will need carburetor cleaner in a bottle. Finding him is not a problem.
- Don't think that simply spraying carburetor spray will fix the problem. VAZ (Lada), carburetor for Niva 2121 carburetor and which carburetor to put on. How to easily clean a burner on a gas stove - youtube. This is wrong. There may be an effect, but it will be temporary.
- If it is heavily soiled, there is nothing left to do except remove, disassemble and wash the carburetor.
- You can contact a service station. But only if you are confident in the professionalism of the people or you have friends who work there. They charge a lot of money for the work, but not everything is washed as efficiently as they would do it for themselves. Plus, it is unknown what means they use. It is not uncommon for special expensive cleaners to be replaced with cheap gasoline or simple solvents.
Setting up Solex
Many drivers strive to install a Solex-type carburetor on their car, since at the moment this carburetor is considered one of the best. It works great in any conditions, even with severe overflow. Many people mistakenly believe that the most difficult thing in this situation is installing a carburetor, but in fact, setting it up and adjusting it is also often difficult.
Some people prefer to delegate the work of installing or adjusting carburetors to specially trained people, however, most motorists strive to do all possible work themselves and have a great interest in this.
The procedure for setting up the carburetor is as follows:
We set the level in the float chambers. As a rule, in the manual the level is set using special floats using a special template. This is not an easy method unless there is a special factory setting. If there is no factory setting, you need to do it yourself. To do this, you need to start the engine and give it a few minutes to warm up.
then turn off the engine and remove the fuel hose
This must be done carefully, as a lot of gasoline will pour out of the hose. If gasoline flows into the chamber under pressure, the readings will be blurred
Now unscrew the carburetor cap and remove the choke cable. Carefully, horizontally, lift the carburetor cover. Otherwise the floats will be damaged. It is necessary to measure the distance from the surface of the gasoline to the lid of the Solex itself. You need to measure in each chamber, since the level in them is not the same, which means the distance will be different. The norm is 25-35 mm. For calculations, you should take the average value of the two cameras. If the level is lower or higher than normal, you need to bend the float in the right direction and drain some of the gasoline. An important point is that you cannot adjust the gasoline level without starting the engine, since if it is running, you will end up with an overflow of gasoline. The second stage of tuning is setting the engine idle speed. To do this, it is recommended to warm up the engine to normal temperature. After this, the engine is turned off and tuning begins. Now, using a screwdriver, you need to find the mixture quality screw in the hole in the carburetor sole; this screw should be turned to the right until it stops, but without using force. After this, you should carefully start the engine and remove the choke. Using a screw, the permissible minimum number of revolutions is set. It must ensure constant, stable operation of the engine and at the same time its discharge must be minimal.
The normal speed is 500 – 1200, in this case we can say for sure that the carburetor is in order. We tighten the quality screw until the engine starts to run unstably. Then we return it to normal operation by turning it 1-2 turns back. Now you need to set the speed, the optimal value is 800-900 revolutions, but this number should be adjusted individually. The screw is turned until the optimal ratio is reached. Some difficulties may arise when adjusting the idle speed. It often happens that when the quality screw is rotated, the engine does not respond to it. Normally it should work unstable, you can adjust it with a screw. If this does not happen, it means gasoline is getting into the idle channel and the screw cannot close it. The reason for this situation may be that the jet is too large, if the plug is not screwed in properly, or if the jet itself is deformed. Diagnosis of the problem can be carried out as follows: remove the valve with the engine idling. In this case, the engine should stall. If the engine turns off, the problem is in the large jet. If not, it means the gasoline is flowing past the nozzle. In this case, you need to check the locking screw of the second chamber, which ensures smooth opening of the throttle valve.
Solex 21083 carburetor design for VAZ cars
During the production of this brand, several modifications changed. The base model now is Solex 21083, so it makes sense to consider the design of a carburetor of this type using its example.
- the main body, which combines diffusers, a gas pump, a system for ensuring idle operation, a pump and an economizer;
- a cover containing an air damper, floats, an EM valve and a starting part for starting a cold internal combustion engine.
Now let’s look at the design of the Solex carburetor in more detail.
Starter and air damper
The task of the launch system is twofold:
- It should prepare a rich fuel mixture when starting a “cold” engine.
- But immediately after this, it must lean the mixture so that the candles do not get wet from fuel vapors (a phenomenon known to all motorists as “plug flooding”).
The device that contains the Solex carburetor 21083 operates as follows:
- The driver, starting the cooled engine after a long stop, pulls the “choke” handle - manual control of the starting device.
- The starting device is cocked under the influence of traction, turning counterclockwise.
- A specially shaped groove releases the control lever pin, and the air damper closes completely, cutting off the first chamber.
- The Solex throttle valve opens to the required angle (starting gap).
- The starting system begins to operate. Under the pressure of air after starting the engine, the damper begins to move, leaning the fuel mixture and saving the spark plugs from flooding.
Float mechanism diagram and fuel level
Another important part that the carburetor contains is the float mechanism. Its task is to maintain the required fuel level in the Solex 21083 carburetor
The level is maintained automatically by a valve, which is closed by a shut-off needle. When the level drops, the floats drop, the needle is released - and the hole in the valve opens, allowing a new portion of fuel to pass through.
Jets, diffusers and other replacement parts
From the user's point of view, an important part of any carburetor are the parts that need to be changed regularly. In Solex carburetors these include:
- Jets are “plugs” with calibrated holes that allow strictly dosed portions of fuel to pass through per unit time. Their capacity determines whether the carburetor will provide the engine with the proper amount of fuel mixture. In this case, the fuel jets should have a small cross-section, and the air jets, on the contrary, should have a much larger cross-section. The factory set of jets is designed for economical fuel consumption, and therefore their cross-section is small. In the event that you need to increase engine power, even at the cost of excessive gasoline consumption, you can purchase another kit, increasing the throughput of the units. In addition, replacement and a new selection of jets is required if the Solex carburetor is used not on the “native” BAC engine, but on cars of the GAZ, UAZ, etc. brands.
- Diffusers are narrowings in the channel pipes of the carburetor. If large diffusers at Solex are usually a direct part of the housing of the mixing chambers, then small ones are replaceable parts of the carburetor GDS. The peculiarity of the operation of diffusers is the following: the larger their cross-section, the higher the engine power - but at the same time the fuel mixture is atomized less efficiently. Therefore, the selection of a diffuser must be based on these mutually exclusive rules, and setting up the Solex 21083 carburetor involves selecting a cross-section based on the expected operating mode. In particular, by choosing the right cross-section, you can increase engine power at high speeds and high vehicle speeds. Therefore, changing small diffusers is one of the important elements of car tuning.
- UN sprayers. This is not only a replaceable part, but also one of the elements that must be replaced during tuning. In particular, fans of fast driving replace the standard nozzles with those included in the carburetor repair kit 21073-1107010. With minimal modifications, it is possible to achieve that, at the cost of increased fuel consumption, acceleration increases noticeably.
- Pressure cam UN. Solex carburetors use two main types of this part, marked “4” and “7”. To increase the dynamics and acceleration of the car, throttle response at high speeds, they usually change “seventh” to “fourth”. In the same place where “4” is standard, you don’t need to touch anything.
What to do if there is no spark
The peculiarities of our climate are such that a car engine may not start due to the fact that it has lost a spark. There are several reasons for this:
- the operation of the switch is disrupted;
- The Hall sensor is not functioning correctly;
- the ignition coil does not work;
- contacts are dirty or oxidized;
- a breakdown occurred in the high-voltage wire;
- The ignition switch does not work.
But there is another reason why there may not be a spark. It is associated with a lack of contact on the spark plug, as a result of which it turned black from soot. The spark disappears if the ignition timing in the carburetor is incorrectly set.
It should also be said that there are many more reasons why the wire may not start, but first of all it is worth checking the performance of the carburetor.
Principle of operation
The carburetor on an OKA car works according to the same scheme as similar models on other cars. Gasoline from the float chamber is directed through the fuel system into wells to form a mixture with air. After this, due to the sprayers, this mixture is supplied to the diffusers of the main mechanism, that is, the carburetor on the OKE.
The idle speed device takes gasoline from the well, after which it moves through the nozzles and creates a certain mixture with air in specified proportions. In addition, air from the first and second chambers of the carburetor is added to them. By the way, its quantity is adjusted manually by rotating a special screw responsible for the level of opening of the throttle valve.
When the throttle opens slightly, a mixture of gasoline and air is directed into the chamber. When the fuel fluctuates, the economizer makes adjustments and ensures smooth engine operation.
Aerosols
It is convenient to work with them, since the aerosol comes out under pressure and additionally clears blockages with a flow of air with the mixture. Sprayers contain propane, acetone and a number of other dangerous components. Therefore, avoid getting them in your eyes and hands. They catch fire easily and can only be extinguished with carbon dioxide fire extinguishers.
Aerosol Abro for carburetor cleaning
Aerosols do an excellent job, but they cannot clean the float chamber.
The cleaning process is the same for all cars:
- Remove the air filter;
- Spray cleaner through the tubes outside and inside;
- After 3 minutes, start the engine at high speed and spray the product intermittently for 2 minutes.
This process will take you a maximum of 15 minutes.
As for manufacturers, today the following brands are in deserved demand: Abro, Hi-Gear, Mannol, Gunk, STP, Turtle Wax, Wurth.