Many car enthusiasts do not know how to change a damaged wheel or install a spare tire themselves. We are so accustomed to using the services of service stations and all kinds of car services that in field conditions we become literally helpless. If you have never previously had to deal with a situation where a tire went flat on the road, and you can change it only by relying on your own strength, this does not mean at all that this will never happen. Therefore, in order to be fully prepared in such a situation, we suggest that you read the guide on the topic “how to change a tire on a car yourself.”
The detailed instructions given below contain 14 points, which describe in detail the simplest manipulations for changing wheels. Let us immediately note that there is nothing complicated about this. All you need is to have the necessary tools and just a little effort.
Things to consider before removing a wheel - safety precautions
Before replacing a wheel, you need to choose the right location. It is advisable to choose a site with a hard surface. This will allow you to optimally position the jack. If this is not possible, you can put a wide board under the jack.
The area must be level. It is not recommended to change a tire on descents or when there is a pronounced slope. The presence of a slope may cause the vehicle to fall off the jack, roll away, or tip over.
Be sure to place wheel chocks under the wheels. It is advisable to carry specialized stops with you in the trunk. If they are not there, you can use a brick or other similar object. During work, the spare wheel should lie under the threshold, this will protect your car in case it falls from the jack, then we put the removed wheel there until the work is completed.
The car must be put on the handbrake. This will prevent rolling. If you need to change a wheel on the rear axle, additionally engage first gear.
Rearranging wheels
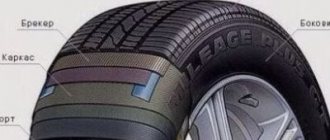
The treads of tires installed on the driven and driven axles of the car wear out at different rates. It is not difficult to guess that drive tires wear out much faster. To ensure even wear, manufacturers recommend swapping wheels instead of buying new wheels in pairs.
Most car enthusiasts use the simplest scheme - every 10 thousand km they move the rear wheels to the front axle, and install the front ones back. Advantages of the method:
- suitable for cars with front, rear and all-wheel drive;
- allows you to rotate tires with a directional pattern without turning over on the rims;
- relevant for cars with a spare wheel of the “dock” type.
The disadvantage of the scheme is that a full-fledged “spare” is excluded from circulation. Its tread remains high, which is why when installed as a result of a puncture, almost new rubber is subject to increased abrasion due to the action of the differential. To ensure that all 5 tires wear equally, use the following scheme:
- the right rear tire is placed forward on the same side, its place is taken by the “spare”;
- the right front wheel is moved back diagonally;
- The rear left wheel is installed on the front axle on the left side;
- the removed front ramp becomes a spare one.
Note. The replacement interval is 10 thousand km. This option is not suitable for tires with a directional pattern and cars with “rolling”.
To rearrange the wheels yourself in a garage, you need to get a strong stand - a block or a metal support. You will need to remove 2 slopes at a time, which cannot be accomplished with a single jack. The remaining wheels must be properly secured with shoes on both sides so that the machine does not move when lifted.
The replacement algorithm is simple: lift one side, remove the wheel and replace the block. Then move to another slope. Since at the time of lifting the support seat is occupied by the jack, fit the stand to one of the bottom stiffeners, or, in extreme cases, under the lower arm of the wheel being removed. It is better to loosen the fastening nuts of both disks in advance so as not to exert much force while hanging.
What car are you the owner of? — Front-wheel drive, rear-wheel drive or all-wheel drive. Do you understand the mechanisms of a car, do you understand how its power and maneuverability on the road are justified, especially during descents and ascents? Often, the operation of cars takes place on a whim, only a part of the owners with their vehicle are on a first-name basis. An experienced and attentive driver clearly understands which part needs to be replaced as planned, whether it is necessary to rearrange the wheels, and what diagram is suitable for this. Not everyone, for example, can afford to allocate up to 20-30,000 rubles from the family budget twice a year to purchase a set of winter and summer tires. In order to save money, car owners are looking for acceptable solutions to the situation. And there may be several of them.
- “Once - yes much.” Some motorists think so and decide that it is better to buy expensive tires from a well-known brand, then you can count on quality, service, prestige and wear resistance of the product. Definitely the right decision. Firstly, premium tires are manufactured using innovative technologies, all high-level indicators are thought through, a quality stamp is given, and service life is extended. Secondly, expensive tires are a big responsibility. Of course, you can hope for their quality, and whether you can predict the road situation, whether you are able to find the ideal roadway without potholes or foreign sharp objects. There are no 100% safe roads, and any tire, be it economy class or premium, still does not last forever and is not insured against force majeure.
- “The sum does not change by changing the places of the terms.” A familiar rule from childhood. Among car owners, it is also used, only it is designated with a technical slant and sounds like this: rearranging the wheels on a car, the standard scheme is used.
- “A shirt worn to holes – still warm.” It’s practically a rag, but it’s a shame to throw it away. It may be a pity to part with your favorite clothes, but it is necessary if they no longer warm or decorate. But, of course, you can’t drive on bald tires! Unfortunately, in our society there are many reckless drivers who do not pay attention to the condition of the tires, they are not interested in rearranging the tires according to the scheme, they simply want to get to the goal in their car and are still happy that the car starts up every morning and does not refuse to carry passengers. And the fact that the braking distance has already exceeded all maximum indicators, that the car can sometimes drive, go into an uncontrolled skid - it doesn’t matter.
Preparatory work
Before removing the wheel, you need to prepare the tool. Usually a jack and a wheel wrench are sufficient. A socket wrench is used as a bolt. Most passenger cars have bolts or nuts of 19. But, just in case, you should make sure that in some cases there may be options for 17 or 21.
The current standard is to use bolts as fasteners. They are mistakenly called wheel studs. But, on SUVs, light and heavy trucks, you can find fasteners using nuts that are screwed onto studs coming out of the hub.
It is impossible to say which method is more reliable. Typically, the manufacturer chooses the mounting option based on the technical features of the vehicle.
How to remove a wheel cover
Drivers often use decorative wheel covers. Removing them is often difficult; they are made of plastic and easily crack with careless movement. You need to understand how to remove them correctly.
- Check for the presence of plastic ties, they are used to avoid losing the cap. All ties must be cut.
- Next, use your fingers to find the latches holding the disk on one side. It is convenient to use the slots for this. It is better to wear gloves; the inside of the cap is quite dirty. We press the latches, and after waiting for a slight click, we disconnect the cap from one side.
- We repeat the action on the opposite side.
As a result, the cap should remain in our hands.
How to turn a secret
The next step may be unscrewing the secret bolts. To avoid wheel theft, bolts with special heads are often used. To unscrew them, just use the adapter, which usually comes with the locks.
But what to do if the adapter is lost? In fact, you can unscrew the bolt, but you will have to tinker. If you are replacing it at a car service center, you can ask them to weld a regular nut onto the lock. On the road you will have to use a different method.
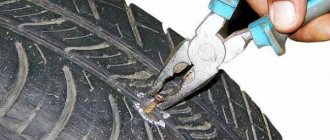
To do this you will need a jack, a hammer, and pliers. Tighten the bolts without sockets as tightly as possible. We hang the wheel and deliver several strong blows to the lock. Lower the jack, unscrew all the bolts, and raise the wheel again. We grab the tire with both hands and pull it towards ourselves several times. Lower the jack and tighten the remaining bolts.
We repeat the process 3-5 times. Usually this is enough, and the secret can be unscrewed with pliers.
Replacement instructions
First of all, slightly lift the jack so that it does not fall out during the next step - loosening the nuts. How to change wheels correctly:
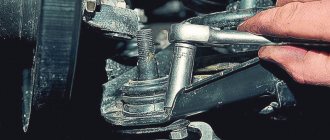
- Use a wheel wrench to loosen the nuts or bolts in any order. If necessary, lengthen the short “balloon” using a lever from a pipe or another wrench.
- Raise the car with a jack until the wheel hangs above the ground. During the lifting process, make sure that the handheld device does not warp or slide on the surface - this is a clear sign of the machine rolling away.
- Completely unscrew the nuts and remove the wheel.
- Roll up the spare tire and try it on the mounting studs. Since the punctured tire was lower, the car must be raised to the level of the good wheel.
- Place the spare tire on the studs and attach the nuts or hand-tighten with bolts. Lift the wheel slightly so that the chamfers of the nuts fit neatly into the recesses. Tighten the fastenings with a wrench.
- Lower the jack. When the tread is on the ground, finally tighten the bolts with maximum hand force.
Advice. Follow the specified order of operations. Loosen the threaded connections until the tire rests firmly on the ground, and then raise the car, otherwise you will not be able to unscrew the bolts.
To prevent the wheel change from ending with the car falling off the jack, do not allow the lifting device to tilt. It is better to lower the car once again, hammer in the wheel chocks more tightly and correct the position of the jack.
The tightening pattern depends on the number of wheel mounts . Four nuts are tightened crosswise, five or more - with a “star”, that is, through one. Do not tighten the threaded connections with your feet while jumping on the wheel wrench. Otherwise, the next time you change it, it will be much more difficult to unscrew the wheel. In the worst case, you'll break a pin or break a bolt.
If one wheel mount is broken, the remaining bolts can be used to get to the garage - slowly and carefully.
Types of jacks
It is important to have the right jack. There are several types of jacks; we will consider only three types that are easiest to carry in the trunk.
- Screw. The simplest option. Can be vertical or horizontal. The disadvantage is the height. Not suitable for sports models or modern sedans with a ground clearance of 15-20 mm.
- Rack and pinion. Another type of mechanical jack. It has a low height, but requires a lot of effort. It is considered insufficiently stable.
- Hydraulic jack. Bottled varieties are carried in cars. The disadvantage is the high height, suitable only for SUVs or trucks.
- Pneumatic. Uses compressed air pumped by a compressor. It has a low seating position and high load capacity.
How to install a jack correctly
An important point is the correct installation of the jack. If you place it incorrectly, you can jam the threshold. This will lead to the need for body repairs.
On all passenger cars, near each wing there is a special platform - a “jack”, it is equipped with a special protrusion in the form of a rib. This rib must fit into the recess of the jack.
Sometimes on older cars “the jack is missing or rusted. In this case, you can take a board 25-50 mm thick and up to the middle of the body; it is inserted between the jack and the body.
Place the jack on a hard and non-slip surface. If you have to lift a car on a dirt road, it is better to place a plank under the jack.
You often have to change a tire on the side of the road; it usually has a sandy surface; just in case, take a small plank or plywood with you.
The wheel must be lifted until it is completely off the ground. It is enough to achieve a separation of 1-2 cm.
How to remove a wheel
Removing the wheel yourself is not a problem. But, this needs to be done correctly. Let's look at the process in detail.
- The front wheels must be level.
- Remove the decorative cap.
- Using a wrench, remove the bolts. They unscrew counterclockwise. To simplify the task, you can put a pipe on the key, the lever will be larger, and it will be easier to remove the bolts. We don’t unscrew them completely, we just ensure mobility.
- We hang the wheel on a jack.
- Completely unscrew the bolts.
- We take the wheel with both hands and pull it off the hub.
If the wheel is stuck and cannot be removed, gently tap the edge.
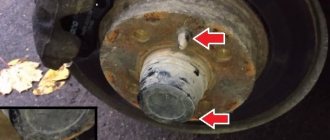
Clean the hub
In order for the wheel to be easily removed in the future, you need to clean the hub. This can be done with a wire brush. If you have graphite grease, it is a good idea to lubricate the junction of the hub and the wheel.
Just do not overdo it with lubricant in threaded connections, it is not applied very liberally there. Remember that there is a scheme for rearranging wheels. You can swap wheels to ensure even wear.
Wheel rotation scheme:
Wheel installation
Installing the wheel yourself is also not difficult. To put the wheel in place, simply follow these steps.
- We take the spare wheel with both hands and put it on the hub. Sometimes without a disc the suspension sags a little, just jack up the car a little.
- We check the alignment of the holes in the hub and the disk. We tighten the bolts.
- We tighten the bolts. This should be done evenly, preferably crosswise, tightening opposite bolts in turn.
- The car is lowered from the jack. Performs final tightening of bolts.
At this point we can assume that the wheel has been replaced.
After 5-10 kilometers, check the tightness of the bolts.
Unscrew the wheel nuts or bolts
Take the wheel wrench and loosen the bolts on the wheels. There is no need to unscrew the bolts completely, just half a turn will be enough. Remember which way to unscrew.
Counterclock-wise.
They may easily not give in.
How to unscrew the nut in this situation. To do this, you can use an aerosol, as described above, or apply pressure with your foot.
Proceed carefully so that the key does not fall off. Otherwise, it may hit you and damage the threads of the nuts. Prepare a spare tire. Place it next to the car, never lean it against the car.