Tubeless tire repair kit
The repair kit is a very useful thing.
It should be kept in the car just in case, because it is the best assistant in such a situation. With its help, you can quickly patch a puncture. The main advantage is that the set is small in size and will not take up much space in the car. Puncture
How to use the repair kit and seal a tubeless tire
Simply pulling a sharp object out of the tire and driving on will not work, the air will come out of the hole, here you need to solve the problem differently. Having a set in your car, the problem with a punctured wheel will be resolved very quickly. There will be no need to call a tow truck and carry out repairs at a specialized service center. A puncture repair kit is a very necessary item and consists of all the necessary repair items to fix the problem.
It is necessary to have wire cutters in the car, since they are not included in the kit, but will be needed at the first stage of the repair.
Everything must be done in the correct sequence:
- Before removing a nail or other object from the tread, it is worth preparing a rasp. A small amount of glue from a tube is applied to the metal pin.
- You should take a pair of wire cutters and remove the object that punctured the tire. The main thing is not to overdo it with the applied force, so as not to “tear” the puncture even more.
- As soon as the foreign object is pulled out of the tire, a rasp is immediately inserted. These actions are done so that the wheel goes down a little to facilitate repairs.
- After installing the rasp with a small amount of glue, the puncture is “kneaded” to smooth out the unevenness of the hole and give it a more rounded shape. The ribbed surface of the rasp helps smooth out the hole. This action is easy to perform, because the rasp itself is sharp, and the applied adhesive composition will not only further secure the tourniquet in the chamber, but also serve as a kind of lubricant when working with hard rubber. The tool is not removed until the tourniquet is ready for use.
- The harness, onto which you must first apply glue and then wait (the time is indicated in the instructions for the composition), is fixed on the surface of the wheel with a finger near the hole.
- Once everything is successfully completed, you can remove the rasp from the hole. At the same moment, a tourniquet is immediately pulled into the puncture site with an awl to fill the entire volume of the hole.
- Next, very carefully and slowly you should remove the awl from the tire so that the tourniquet remains in the hole and does not come out. When pulling out, you can turn the awl rod a little if the tourniquet sticks to it and is simultaneously pushed out of the puncture hole. This is often observed when the hole is not sufficiently processed with a rasp.
The main role here is played by a tourniquet with glue secured inside the breakdown. If there is excess material, you can cut it off.
Kit
It's not at all difficult to fix a car if you have this kit. The repair will take a little time and a minimum of effort.
You might be interested in this About tires for Kamaz - tire diameter and weight
How to use the set
Repairing tubeless tires yourself will allow you to save on services. Removing a nail from a wheel and sealing the resulting fistula is not difficult. It is advisable to watch a video of the work being carried out, which will allow you to get an idea of all stages of the repair. What are the stages of self-repair of a tire?
One of the first tasks is to completely remove the sharp object from the rubber of the wheel. This can be done using ordinary wire cutters. The repair kit does not have such a tool, but every driver can definitely find one in his garage. Why pull out the nail? Completing this stage of work will allow you to simplify subsequent repairs using a rasp and applying a tourniquet to the puncture site.
To eliminate the puncture site, you need to insert a tourniquet on which glue is applied. To do this, you need to prepare a hole in the rubber. Before removing a metal object from the tire, prepare a rasp. Apply glue from a tube to the metal pin of the tool. Only after this can you begin to remove the nail or screw.
One of the important points is the sequence of actions. As soon as you pull out the nail, you need to immediately insert the rasp, which is included in the repair kit, into the resulting hole. This is necessary for the tire to go flat.
After installing the tool on which the glue was applied, it is necessary to develop a hole. After watching a few videos, you will be able to understand the best way to do this. The ribbed surface of the metal base of the tool smoothes the edges of the hole in the rubber. How is tire integrity restored? The harness on which the glue is applied is securely fixed to the rubber of the wheel, which leads to sealing of the puncture. The videos will allow you to clearly see the process of sealing a tire puncture with a tourniquet.
Tire repair using harnesses
Another popular, but more energy-intensive way to repair a tubeless tire puncture is the use of harnesses. They are sold complete with an awl, a file and special glue.
This approach is no less effective than repairing with sealant, but will require more time and, possibly, removal of the wheel.
Do-it-yourself tubeless tire repair kits of various brands have the same content. In rare cases, a knife for cutting strands is added to them. Since this set can be used repeatedly, some owners have the following problem: they opened the set for the first time, used glue, and after a while it dried out. Fortunately, manufacturers have foreseen this problem. Glue for repairing tubeless tires with bundles is sold both in a set and as a separate unit.
How to repair a tire with a DIY harness
Having figured out the completeness of the “first aid kit”, let’s see how to use this set. First you need to ensure safety. The car must be parked on level ground, be sure to set the handbrake. Before work, you need to inflate the tire.
Repairing a tire with a harness occurs in the following order.
- It is necessary to find a puncture. Wet the protector generously with soapy water or other viscous liquid. You can use windshield washer fluid. We determine the puncture by the bubbles that stand out. If a nail or other object has pierced the tire, the rubber does not need to be wetted.
- Use a rasp to widen the puncture. We clean it thoroughly. The better the work is done, the better the repair will be.
- We thread the cord rope through the eye of the awl.
- Lubricate the harness with glue. This should be done immediately before repairs.
- We drag the tourniquet with an awl inside the tire. We remove the awl; the rubber should fill the damage.
Cut off excess rubber. The work is completed.
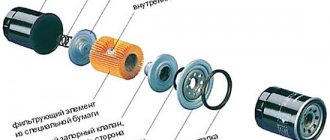
What is included in the tire fitting kit for tubeless wheels?
The repair kit includes the following items:
- Rasp. It is this that simplifies repairs, as it creates a perfectly even hole for further repairs.
- Awl. Its task is to help seal the puncture in the car tire evenly with a tourniquet.
- Tourniquet. Serves to fill the hole space.
- The glue helps to secure everything securely.
The repair kit is inexpensive (much cheaper than repairs that would be done at a car dealership), everyone can buy it for easy repairs. You can quickly fix the problem by working with this kit.
What kits should you buy to repair damaged tubeless car tires?
Below are 15 sets that are most often found in car dealerships. A brief summary of each of them will help you more or less decide when purchasing. The first three options showed decent results and can take their rightful place in any motorist’s first aid kit.
Top three
- Titan T-609 - the kit for 130 rubles includes five reinforced strands, glue, an awl with an eye and a device for forming holes and stripping. The budget kit fully coped with the task, showing an excellent ratio of quality and price.
- DoneDeal DD0320 - consists of an awl with a twisted tip, a needle with an eye, glue, a cutter and eight strips of raw rubber. The handles are comfortable, and the presence of a cutter allows you to carefully complete repair procedures. Unfortunately, the cost of 540 rubles did not allow this repair kit to become the leader of the test.
- Michelin Tire Repair Tools Kit – to buy this kit for repairing punctured tubeless tires, you only need to have 180 rubles in your pocket. The equipment leaves much to be desired, however, there is a rasp, a needle and strips of rubber for repairs. The glue is a bit runny, but we managed to repair the wheel.
The only repair kit Titan T-609, which is equipped with a decent set of tools at an affordable price. The DD0320 is equipped with a cutter for cutting harnesses, and if not for the price of 540 rubles, the package is not so bad.
Briefly about other available repair kits
- AVS RK-110 A 78220S - a set from China for 180 rubles includes a spiral awl, an installation needle, five strips of raw rubber and glue. During repair work, the awl breaks the cord threads, but after restoration the wheel continues to move.
- CityUp CA-793 - a repair kit costing 200 rubles consists of an awl with an eye, stripping, glue and five pieces of reinforced strands. The rasp handle immediately turned, so I had to take another one. There is no way to recommend this option.
- Tire Repair Kit - the kit for 160 rubles includes an awl with a twisted tip, a needle, glue and five strands. The wide groove of the eye of the needle makes the work somewhat difficult, but the set still passed the tests.
IMG Tire Repair Toolbox V125 is one of the most expensive packages from China at 720 rubles. The box contains: a rasp, a pressure gauge, glue, a tool with an eye, a key for cleaning the valve threads, 10 patches for the chamber, 4 spool valves and 4 caps. The most complete set presented here, but the tool is inconvenient, and not all components may be useful.
Repairing a punctured tire - test of 16 repair kits and advice from ZR
In ancient times, there was GOST 5170–73 “First aid kits for repairing pneumatic tires.” There were so many components that were not in these first aid kits! And a fungus, and a grater with a plaster, and a roller... And now each manufacturer decides for himself what to put in his kit.
Let's check what the descendants of those travel first aid kits are capable of. Grant's editorial office, one of whose wheels gave up the ghost, pushed for decisive action. Instead of a tire shop, we visited several stores where we purchased 16 different kits for repairing tubeless tires. The price range is sevenfold, although the principle of operation is the same. After finding a puncture, you need to remove the culprit of the problem (screw, nail), then widen the hole and tightly insert a folded rubber band into it. The nuances of technology and tools may vary, but in general the repair algorithm is exactly the same.
Having repaired a tire that encountered a self-tapping screw on the road, we decided to test all 16 repair kits on the poor thing. However, in the end, only 13 stab wounds were inflicted on her, since three sets were immediately rejected: the flagella in them were frankly bad, they instantly tore in the hands.
The instruments also vary quite a bit. Thus, the nice handle in the CityUp CA-793 set managed to rotate relative to the tip during the first attempt to penetrate inside the tire.
Note that some sets do not provide any “picking tools”, and in some places there is no glue. And the names of the instruments are different for almost all manufacturers - in the explanations we give exactly the “proprietary” version.
A tire with so many holes in the tread passed the test at speeds over a hundred for a couple of weeks without losing a drop of precious air. For the sake of the experiment, we didn’t even cut off a few ponytails - and everyone kept it together. We also managed to deal with a small puncture in the sidewall using a flagellum. Although the reliability of sealing is noticeably lower than in the case when the harness is kept in a thick (even a worn tire) tread layer.
Toward the end, they carried out another test - a kind of “everyday” one: they pierced the sidewall of the tire, like some hooligan with a knife or screwdriver. We were no longer engaged in comparative tests, but simply fought for survivability. By the way, the same damage occurs, for example, when the tire comes into hard contact with a curb or the sharp edge of a hole. Such a temporary repair is a priori more difficult: the sidewall is thinner than the tread, and therefore it is more difficult for the flagellum to stay in the hole.
Approximate price:
180 rub.
Equipment:
spiral awl, tool for installing harnesses, strips of raw rubber (5 pieces), adhesive activator
The spiral awl destroys the cord—when installing, you can hear the crackling sound of breaking threads. However, the repaired wheel runs successfully.
Approximate price:
200 rub.
Equipment:
tool for cleaning and forming a hole, an awl with an eye, reinforced strands (5 pieces), glue
The beautiful rasp handle immediately turned - the set can be removed from testing. Okay, we took an analogue of the “picker” from another set... In the end, the wheel was repaired, but I can’t even think of recommending purchasing such a first aid kit.
Approximate price:
540 rub.
Equipment:
tool with a twisted tip, tool with an eye, glue-activator for raw rubber, strips of raw rubber (8 pieces), cutter
The spiral awl is good, the handles are comfortable. Note that the kit includes a cutter; other kits do not have it. I liked the first aid kit, but it was a bit expensive.
Approximate price:
330 rub.
Equipment:
a tool with a twisted tip, a tool with an eye, an adhesive activator for raw rubber, raw rubber flagella (3 pieces)
I didn’t like the picker: it breaks the cord. But the wheel was repaired anyway.
Approximate price:
160 rub.
Equipment:
tool with a twisted tip, tool with an eye, adhesive activator for raw rubber, harnesses (5 pieces)
A tool with a hole like the eye of a needle has a groove that is too wide. Nevertheless, the set passed the test.
Approximate price:
130 rub.
Equipment:
tool for cleaning and forming a hole, an awl with an eye for installing a rope, reinforced ropes (5 pieces), glue
The inexpensive set coped with the task successfully, demonstrating the best price-quality ratio.
How to disassemble a tubeless wheel yourself
A huge advantage of tubeless wheels is that they can be repaired without removing them.
We wrote above about how to properly patch a puncture on a tire. It is necessary to understand the topic of dismounting a tubeless wheel. This is necessary, for example, when repairing a side cut of a tubeless tire or when replacing it with a new one if the puncture is too large.
Disassembling a wheel is a rather difficult process if it is old. The difficulty is that over a long period of time driving the car, the tire sticks to the rim and is difficult to remove. In order to peel off a tire, there are two methods of beading, which will be discussed later. But if the wheel is new, then disassembling it is not a problem.
Beading
The first method is shock
From the name it is clear that in this method you need to hit the wheel with something heavy. This could be, for example, a sledgehammer.
- Place the car on a jack and remove the wheel.
- Air is being released from the tire. It is also necessary to stand on the wheel to make sure that any excess air that interferes with beading has escaped.
- It is worth carefully placing mounting blades or a corner under the disk.
- It is necessary to hit the entire circumference of the wheel with a sledgehammer.
- When the tire comes unstuck from the metal surface of the disk, a narrow rubber strip of the tire (bead) is pulled out towards you using convenient equipment.
- The wheel is turned over to the opposite side and the whole process is repeated again.
The process is quite easy, but it requires special care and precision, because you can damage the wheel or disk itself, or damage your limbs with a sledgehammer.
Repair
A special patch is used to repair cuts. Before you begin gluing and patching, the tire must be thoroughly cleaned of dirt and the cut must be measured. Then remove the tire from the rim:
- Using a drill, we clean the area for the patch.
- Apply a thin layer of rubber to the cut and solder it. All soldering should be evenly distributed over the surface, not only around the cut, but also over the cleaned area.
- After the rubber has set, it is ground again so that it follows the shape of the wheel.
- You can stitch the soldered rubber with nylon threads. This will strengthen the tire a little.
- Degrease the surface to be repaired.
- Apply a layer of activator glue and wait for it to become matte (dry).
- Then we apply another thin layer and apply a special patch (cord patch).
- Carefully press the patch, smoothing it from the center to the edges.
The repair of the side cut of the tubeless tire is completed. Of course, such a wheel can only be used as a spare.
Replacing the nipple in a tubeless wheel
A valve malfunction can sometimes become quite a dangerous situation when driving. A tire can burst right on the highway due to low pressure in the tire if you don’t notice how it went flat.
If the problem is not entirely large-scale and the tire is at least half deflated (then the nipple has worked and holds pressure), then you need to drive at low speed to the service center and fix it there. What to do if the nipple is stuck or frozen? How to fix the problem?
To repair the nipple yourself, you will only need a few devices that are usually available in the garage:
Having all this, the problem can be easily resolved by following the sequence of actions:
Nipple
- Loosen the nuts on the wheel that has this problem.
- Raise the car on a jack and finally remove the nuts from the wheel.
- It is worth removing the plug from the nipple and using a sharp object to pump out the air.
- Disassemble the wheel (how to do this was written above).
- Use pliers to remove the nipple.
- Lubricate the nipple with oil or special lubricant.
- To accurately fix the nipple, you should insert it from the inside and pull it up from the outside.
- The wheel is inserted back.
- The chamber should be pumped up to the required pressure.
- The nuts are inserted back, do not forget to tighten them a little.
- Lower the car to the ground and tighten the nuts completely.
To summarize, it can be noted that the process of replacing a nipple is not as simple as it might seem, but it is quite possible to repair a wheel with your own hands, even in a garage, without using professional services.
Tire repair kit - what is special about tubeless tires?
The main advantage of such rubber is better pressure retention during a puncture, because even if you run over a nail and it remains in the car tire, the rubber layer will tightly cover this nail, and air leakage will be very slow. In addition, their weight is significantly less than that of ordinary ones, which reduces the load on the bearings and suspension, which helps extend the life of the entire car. However, such tires also have some disadvantages, first of all, they are quite expensive, so not every motorist can afford them.
And, secondly, they are more intended for smooth roads, without holes and potholes, since tubeless tires have one weakness, their integrity is determined by the condition of both the rubber and the rim. And if the latter is bent, then in this place the tire bead will either not fit at all, or will fit very weakly. And the air will simply “fly away”, so no tire repair kit will help. A strong cut, for example, from a piece of glass or another sharp object, is quite dangerous; in this case, whether there is a camera or not does not matter much, because. It will not be possible to save the life of the tire.
For which punctures is the DIY tire repair kit suitable?
The tire repair kit makes it possible to independently repair tread punctures on tubeless tires. There is no need for vulcanizers or other complex tools; this approach simplifies the process; repairs can be performed right on the road.
The main advantage of the repair kit is the ability to constantly carry it with you. The set fits in a small bag and can easily be placed in the glove compartment. Accordingly, it is always at hand, even if the car is far from civilization.
Another advantage is the reliable sealing of the puncture. There is no need to visit a service center to perform additional repairs. A repaired tire serves for a long time without problems, after 10-20 kilometers it is impossible to find the location of the damage.
Should only be used to seal punctures on the tread. Cuts in the tread or sidewall cannot be repaired using a repair kit. More serious work is required there. Punctures with torn out pieces of rubber are also not always amenable to such repairs, much depends on the size of the damage.
Tire retreading
The tire can be repaired on the road on your own or at a service station. It all depends on the extent of the damage, the availability of consumables, tools, skills and time for repairs. If you are not confident in your abilities, then it would be best to put on a spare tire or call a tow truck.
On the road
On the road, you can seal the tire yourself. How to do this (with a tourniquet, sealant or patch) is up to you. However, if the damage is significant, then it is better not to take risks and not expose yourself and other road users to danger.
In the tire shop
A tire repair shop can also repair fairly large punctures and cuts (up to 5 cm in length) on car tires. This is done as follows: the area is cleaned, then the rubber around the damage is vulcanized, after which a special patch is installed on the glue, the structure is similar to the tire material. However, even with proper repair (which is not the case everywhere), such a tire will not last long. Therefore, a driver facing such a problem should consider purchasing a new wheel in the near future.
How to store it correctly?
To prevent the glue from drying out, make sure that the tube is always tightly closed. Don't leave it in the sun. Frost, as well as overheating, can cause drying out. Storage conditions are indicated on the packaging. Store the rubberized strips included in the kit in a plastic bag. Protect all components from contact with chemicals. It is better to put the tube of glue in a place where nothing will put pressure on it. Otherwise, it may be punctured or crushed. If any of the components are lost or become unusable, you can replenish the kit by purchasing the missing items.
Diagonal tire repair
When repairing a bias tire, you need to assess the extent of the damage. If the cord threads are severely damaged, then repair is most likely impossible. Because in this case the design of the tire itself will be damaged. Some tire repairs can be even more expensive than buying new ones. Therefore, if you find that the tires are badly damaged, it is wiser to purchase a new set. Repair of side cuts is not carried out in every workshop. Many car repair shops refuse to do this kind of work. And the reason for this is very simple.
The fact is that many car components cannot be repaired these days. They are most often replaced in car services. This is the so-called modular system. This repair principle prevails not only in car services, but also in computer centers. It is convenient, cheap and comes with a guarantee of quality. Repairing shock absorber struts, for example, is best done this way.
If the tire has been repaired for side cuts, this does not mean that the repair was successful. You can only understand how correctly all the work was done while driving. The basics of road safety may not be effective here. Sometimes nothing depends on the car service specialists. The tire may not hold up simply due to the amount of damage.
Repair work
After the tools have been prepared and the puncture site has been identified, the repair should begin directly.
Tire repair using harnesses
The described steps are only valid for tubeless tires. If you repair tires equipped with a tube in this way, it will not bring the desired result.
The algorithm for repairing a tubeless tire is as follows:
- Removing dirt from the damaged area. After cleaning the area that requires repair, you can visually detect the puncture. In addition, the repair process itself will be more efficient and comfortable. It is also important to pay attention to the diameter of the puncture; if it is less than 5 mm, then the tourniquet can help create a patch; if the hole is too large, then you will have to go to a service center.
A large puncture can be repaired with several tourniquets. This measure does not imply further long-term use of the tire, but will allow you to get to the nearest service station. There, specialists will install a special “fungus” into the tire, which will completely seal the damaged tire.
- Reducing tire pressure to 0.5 atmospheres . In this way, the tension will be relieved from the structure, and the cord will retain its shape. Next, you will need to insert a “corkscrew” into the puncture, twist it and remove it. The operation must be repeated 2-3 times.
- Harness insertion . Before performing the operation, the tourniquet is coated with glue or paste. Afterwards, it is inserted using a special device. At the end of the operation, you only need to carefully trim the excess ends of the tourniquet.
The harness has virtually no weight, so after installing the “harness” patch, there is no need to balance the wheel.
- Examination. The patch area must be treated with a special aerosol or soap solution. If air bubbles appear on the surface, the above steps will have to be repeated. If everything is in order, then all that remains is to inflate the tire to an acceptable condition and you can confidently use it until it wears out.
Repair with sealant
However, a puncture is not the only reason for a tire to leak air. It can occur due to deformation of the wheel rim or corrosion. In the first case, you will need to go to a service center, where they will align the wheel rim (the wheel can be aligned with the power of a hammer, although this method is a temporary measure). If the disc is damaged by corrosion, the tire should be removed and the junction of the disc rim and tire should be treated with sealant.
Stamped steel wheels are quite cheap, so buying a new wheel will be much more profitable. If the cast disk has been damaged, it can be restored in a workshop.
Side cut
The malfunction is practically beyond repair. A small side cut can be vulcanized - repairs are carried out in a specially equipped workshop. For larger cuts, a temporary patch can be installed. Using a harness in this case is ineffective, since the side surface of the tire is made of thin rubber. When repairing a side cut, cord cutting is often used; after such repair, the tire can last for several years, or it may burst at the first serious load. Some “masters” insert a tube into a tubeless tire, but due to the rapid heating of the air, it can burst.
Even after the most reliable repair, a tire with a side cut will need to be replaced with a new one.
Other faults
The list of other malfunctions that may occur with the tire includes problems with the nipple and spools. In both the first and second cases, these components of the tubeless tire will need to be replaced, which is performed by professionals at a service center.
The spool may leak air due to dirt accumulated inside. To do this, use short and sharp movements to press the spool. Contamination can be eliminated, and the part will no longer allow air to pass through. However, a more reliable way to solve the problem is still to buy a new part.
How to use all this?
Puncture of a bicycle tube is one of the simplest problems, that is, solving it does not require a completed engineering education, special tools, or even special skills. The procedure for eliminating a camera puncture is as follows:
1. Remove the damaged wheel from the frame and completely release the air before disassembling it, if this has not already happened spontaneously.
2. Using pry bars or available tools, carefully remove the tire from the wheel rim.
3. Release the chamber, starting from the nipple, and find the damaged area on it.
If the puncture is not visible to the naked eye, find an opportunity to lower the inflated chamber into water at least in parts and determine where the air is coming from by the bubbles. For the same purpose, you can wipe the rubber with soapy water. An option for very field conditions is to hold a wet hand at a close distance from the surface of the chamber: at the site of the hole you will feel coolness.
4. Select a patch from the repair kit according to the size and shape of the damage.
Replacing a bicycle tube
5. Thoroughly clean and dry the puncture site and its immediate surroundings. Ideally, it is also advisable to degrease them if you have gasoline, acetone, etc. at your disposal.
6. Gently rub the camera and patch with emery cloth to make the surfaces for gluing rough - this way they will connect better and hold tighter.
7. Apply glue to both surfaces, wait the time specified in the instructions for this particular composition and seal the hole.
8. Wait for the glue to dry, place the bicycle tube in the tire, put the tire on the rim and pump the wheel up to the required hardness.
Side cut repair
What to do with such damage? A side cut is either repaired manually or at a service station where there is a tire repair service. At a tire repair shop, they will do everything for you and without your participation, so there is no point in telling the process. But knowledge of repairs in the field will definitely be useful to you, so stock up on a kit for such a procedure. The repair procedure and methods are also suitable for truck tires, only here damage to no more than 10 cord threads is allowed; if more than 10 cord threads of a truck wheel are damaged, there is no point in repairing it.
To seal a side cut there are the following methods:
Heating method
This is a do-it-yourself repair in the field, which is not always possible, since you also need a heating hair dryer powered by a battery, or another heater (soldering iron, etc.) that can be powered by a battery. You can actually make a fire and heat a metal object on it, which you can then use as a soldering iron. This type of repair is called hot vulcanization. When heated, raw rubber boils and swells like lava from an erupting volcano. After warming up, it hardens, like lava.
Instead of a soldering iron, small gas cylinders are now sold; they are also convenient for heating something in the field. Therefore, along with the vulcanization kit, have such a can. A tire with a side cut is cooked in the following sequence:
The tire will have to be removed and disassembled. Clean the damaged area with sandpaper and degrease with gasoline. After this, fill the slot with raw rubber from the repair kit. Cover the damage on both sides with film and heat it to brew using a heating device. After the patch has hardened, you need to assemble the wheel and inflate it; if the air does not leak, you can put it back and drive carefully. Manual vulcanization takes 1-2 hours.
Gluing the patch
This type of DIY tubeless tire repair does not require heating devices. Tire patches should be included in the repair kit; special glue is also sold with them. Along with the repair kit, you need to carry a clamp, with which the patches are pressed tightly on both sides. To carry out repairs, the wheel will also have to be removed and disassembled. The surface around the cut should be cleaned with sandpaper and then degreased; gasoline is suitable for this purpose.
How to make suitable patches - the patches are cut to a size 2-3 millimeters wider than the slot. Then you need to apply glue and press the patch firmly. The patches are pressed for 1-2 hours; if there is no clamp, you will have to glue them one at a time, pressing them with a heavy object. After assembling and inflating the wheel, if there is no air leakage, then you can hit the road.
For a tubeless tire, there is another option, how to repair a small hole with your own hands. Stores sell kits with a rubber band, an awl and a metal wrench for repairing holes. If there is a relatively small breakdown along the way, you can perform the following actions. The detected damage is expanded with an awl, then we take out the tourniquet and attach it to the knob. Then, using a wrench, push the tourniquet into the punched hole on the outside of the tire. There should be a loop inside the tire, with a diameter larger than the puncture hole. The outside of the harness on the tread is cut with a knife. Is it possible to repair a large cut this way? No, this method will not work for cuts larger than the diameter of the tourniquet. After inflating, return the wheel back.
The main thing is to know that the structure of a punctured tire is damaged, so is it possible to drive on sealed wheels for a long time? You can't ride for a long time. Patches and other methods do not restore cords; they are just a way to get to a tire repair shop or store. Repairs along the way help you get to your destination and replace the cut tire there.
Is it worth repairing a cut tire at a repair shop? It's up to you to decide how long you are going to ride with such a wheel. Prolonged driving has a bad effect on the wheel bearing, and the patch may come apart. Is it possible to make a permanent patch? Only when the cut is not through and the cord is not damaged. In other cases, the patch may burst. A tire bursting at speed is a guaranteed accident. The structure of the cord is broken, so the wheel gradually bends, which can cause the car to pull to the side.
Now you know how to repair a cut in a tubeless tire, and what you need for this. Subscribe to updates, send the link to your friends and acquaintances, they may also find it useful, until we meet again.
The last method “for the lazy” is to repair a tubeless tube using a special spray
Tire sealant, which is popularly called a “spare in a can,” as a rule, comes in a repair kit in “premium class” cars, where do-it-yourself car repairs, in principle, are not provided for. However, over time, such cans became available for free sale, and now any lazy person can quickly and inexpensively seal a wheel with automotive sealant for tubeless tires.
- The first step is to unscrew the nipple, although it all depends on the type of sealant and how it is used, some manufacturers claim that there is no need to unscrew the nipple.
- Next, the contents of the bottle are squeezed into the nipple hole, according to the instructions and recommendations of the manufacturer. After this, the nipple is screwed into place.
- The wheel is inflated to the required pressure and 10 minutes after completion of the procedure you can continue driving.
Despite the apparent simplicity and “frivolity” of such repair of tubeless tires, the sealant is quite popular among motorists, who confirm the uniqueness and high efficiency of this method of repairing wheels.
Determining the tire type
The method for restoring wheel seal depends on the type of tire. Tubeless and tubeless are now used on cars. But due to the fact that the second option is outdated and is used less and less, we will not consider methods for repairing tube tires.
But here it is worth noting that before selecting a restoration method, you should make sure that the tire is tubeless. Of course, the easiest way to find out is by disassembling the wheel. But there are other signs that do not require any disassembly. There are only two of them:
- Marking. All tires are marked with information that includes dimensional parameters, design and operation features, as well as its type. If, while looking at the marking, you find the word “tubeless”, it means the tire is tubeless. Chamber type is designated as “tube type”. In some cases, not words are used for designation, but letter indices - for tubeless it is “T”, and for tubeless it is “TT”.
- Nipple. If the marking is erased or the type designation is not found, you can carefully examine the nipple. In a tubeless tire, the valve is not high and has a lip at the base, which ensures a tight fit in the rim hole. In a tube tire, the nipple is high and if you move it, it easily changes position relative to the disk. Alternatively, you can deflate the wheel and try to press the valve inward (in a tubeless tube this is impossible to do without applying significant force, since it fits tightly);
We figured out the type of tire, now about repairs. The best option in case of a puncture or cut is to go to a tire service station, where the wheel will be disassembled and the damage will be properly repaired from the inside. But this is not always possible, so you will have to repair tubeless tires yourself.
Video: How to seal a tubeless wheel on the road. Do it yourself!
There are several ways to restore tightness. It is worth noting that if you find a self-tapping screw, a piece of wire or a nail sticking out in the tire, you should not rush to pull it out. While the element that has punctured the wheel is in it, it clogs the hole. And although the air will leak through it, it won’t be too much. It will be possible to operate the car by periodically checking the condition of the tire and inflating it.
If you pull out the element, air will escape through the hole very quickly. In this case, repair is required, which boils down to blocking the resulting hole.