Russian-made cars of the VAZ-2170 or Lada Priora brand have received recognition from many motorists. This is due not only to the modern design of this car, but also to the fact that the vehicle is equipped with a type 21126 engine. This is a 16-cylinder engine with a volume of 1.6 liters and a power of 106 hp. Along with the advantages, the Priora has a disadvantage, which manifests itself when the timing belt breaks. If the timing belt is not replaced in a timely manner, then when it breaks, the valves will bend. To prevent this from happening, the timing belt on a Priora 16 valve must be replaced in a timely manner, which can be done with your own hands. This procedure is not complicated, and each owner will be able to perform it independently, having understood some of the nuances.
- 2 When a belt replacement is needed on a Priora: possible consequences
- 3 Features of self-checking the serviceability of the timing belt on Priora
- 4 Necessary tools for replacement
- 5 Replacing rollers and timing belt: step-by-step steps
- 6 How to check tension
6.1 Video: replacing the timing belt and rollers with a pump on a Priora VAZ 2172, 2170, 2172 (timing marks)
Timing belt and its purpose
The timing belt is a rubber product that has a toothed surface on the inside. Durable types of rubber are used to make this belt. The product is put on the crankshaft and camshaft gears, which allows you to synchronize the operation of these mechanisms. With its help, fuel is supplied to the engine cylinders in a timely manner.
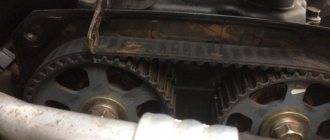
The teeth on the belt are designed to ensure reliable adhesion to the gears and prevent slipping. Priora is equipped with belts that have 137 teeth. If the belt breaks, the car will not be able to continue moving due to incorrect operation of the engine. That is why the regulations state that this element must be replaced every 30-45 thousand kilometers.
This is interesting! If it is noticed that the timing belt shows signs of wear or damage, but the mileage has not yet reached the specified value, then it is definitely necessary to replace it. This is especially important to do on a VAZ-2170 or Priora car, since in the event of a break, the valves fail.
The timing belt not only connects the crankshaft to the camshaft, but also drives the water pump. Despite the fact that the device is a “piece of rubber”, its importance in the design of the engine of any car is priceless.
Alternative manufacturers
Not all vehicle owners can choose the right spare part for their car. This is due to the wide variety of products, including timing belts. The main supplier of rubber products for VAZ cars is the RTI plant in Balakovo. In addition to this, sellers can offer buyers Bosch products, which have high quality workmanship and reliability. Also on display you can see products from the companies Daiko, Kontitek, Lynx. Their cost ranges from 700 to 1500 rubles.
Reviews
Sergey. Moscow city. I decided to tidy up the timing drive mechanism on my Priora. Experts suggested trying a product from Contitech. I don’t know why they chose this belt, but it has been working for more than 30 thousand km without any complaints.
Nikolai. Tambov. On the engine of my car, the timing belt broke and two valves were bent. The engine was repaired by specialists who chose a belt from Bosch. After a run of 10 thousand km, we checked the condition and tension in the timing drive, there were no comments.
Source
When does a belt need to be replaced on a Priora: possible consequences
It is recommended to replace the timing belt every 30 - 45 thousand kilometers. Of course, the probability of a belt breaking with such a mileage is very low, but the indicated mileage is the resource of the product. There are many cases where motorists clock twice the mileage indicated above on the tachometer, and have never changed the belt. The serviceability of the product in question is measured not only by its integrity. During operation, it stretches, therefore the quality of engagement decreases and the likelihood of slipping increases.
Timing belt with worn teeth: what can happen if the product is not replaced in a timely manner
This is interesting! The service life of the timing belt is influenced by various factors: the nature of the ride, the quality of the product, the ingress of foreign liquids and objects onto the belt drive, etc. It is impossible to indicate the exact mileage that a timing belt will last. To avoid having to go to a service station for major repairs, it is recommended to monitor the operating time of the product on a car such as the Priora.
Signs that the timing belt on a Priora needs to be replaced are the following factors:
- presence of extraneous noise when the engine is running;
- changing the color of exhaust gases;
- problems when starting the engine;
- extraneous vibration.
Photo of a worn and torn belt on a Priora: what you shouldn’t let your car do
Replacing the timing belt on a Priora 16 valve may be necessary much earlier than at 30-45 thousand km. This is due to oil, dirt and antifreeze getting on the belt drive. Antifreeze or coolant poses a particular danger to the integrity of a rubber product. If a coolant leak occurs, which is caused by a leak in the pump gasket or failure of the pump, then the service life of the rubber product is reduced tenfold. If a coolant leak is detected, the causes should be promptly identified and eliminated. If the cause is a violation of the integrity of the pump or gasket, then the timing belt will need to be replaced at the same time. If there are problems with the strength of the belt at high speeds, irreparable consequences may occur in the form of broken pistons and deformation of connecting rods.
Bending valves on Priora 16 valves
Cylinder head repair
We mark all hydraulic compensators with numbers using an ordinary clerical touch and put them away. An ordinary magnet will help you pull them out. We dry out the valves and remove the oil seals (valve seals), the valves into scrap metal, the oil seals into the trash. We clean all channels. We take the head for grinding, just in case. After washing it again with kerosene after sanding and blowing it with air, we begin to assemble it.
We arrange the recently purchased valves in the sequence in which they will be located in the cylinder head and begin to grind in one by one. Lubricate the valve stem with clean oil and apply lapping paste to the edge.
We insert the valve into place and put a valve grinding tool on the valve stem. The stores sell a device for manual lapping, but since this is the twenty-first century, we are mechanizing the process. We take the old valve and cut off the rod from it, select a rubber tube for it of such a diameter that it fits tightly. The rod is in a reversible drill, one end of the tube is on it, the other is on the valve being ground in. At low speeds we begin to grind the valve, constantly change the direction of rotation and periodically press it to the seat or weaken the force. On average, the valve takes about twenty seconds. We take it out and wipe it.
The valve is considered ground in if a uniform gray strip of at least 1.5 mm wide appears on the chamfer.
The same stripe should appear on the valve seat.
Video of manually grinding valves
For a sixteen valve head, everything is the same, only there are twice as many valves.
After lapping, all valves and seats are thoroughly wiped and washed with kerosene to remove any remaining lapping paste. We check for leaks.
We tighten the old spark plugs and put all the valves in place. Pour kerosene and wait three minutes, if the kerosene does not run away all is well, otherwise we grind the valves on this cylinder. We had to grind four valves again, after which the kerosene stopped flowing.
We stuff new valve seals.
We put the valves in place and dry them.
Before doing this, lubricate the valve stems with clean oil.
After lubricating it with clean oil, we put the hydraulic compensators in place and, covering them with a clean cloth, remove the head out of sight. We're done with the cylinder head.
Features of self-checking the serviceability of the timing belt on Priora
If you are thinking about the need to replace a rubber product on a Priora, then it won’t hurt to initially check the belt drive. The inspection will reveal signs of wear and the presence of places where the product is deformed. To carry out the check, you will need to use a hex wrench set to “5” or a T-30 star-shaped bit (depending on the year of manufacture of the Priora).
The procedure for checking the belt drive is as follows:
- Use a hexagon to unscrew 5 mounting bolts, with which the front upper timing drive cover is secured.
Removing the timing cover
- Place the jack on the passenger side, suspend the wheel, and then engage 5th gear. While rotating the wheel, carefully inspect the integrity of the rubber product.
- The presence of cracks, cuts, peeling and signs of thread appearance indicates the need for replacement. If traces of a coolant leak are visible in the pump area, then the rubber product must also be replaced.
- The tension roller is inspected. Its service life is 90-100 thousand km, so it is recommended to change it every other time when changing a rubber product.
- Belt deflection measurement. To do this, you need to press on the product with a force of 10 kg. The degree of deflection is measured between the gears of the two camshafts. The permissible degree of deflection is 5-7 mm.
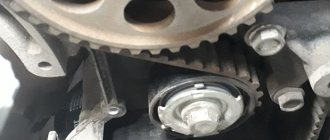
- Belt stretch is checked by checking the alignment of the marks. One mark 1 in the form of a recess is located on the outer race of the tensioner roller. The second mark 2 has the form of a tooth-shaped recess located on the base of the tensioner roller. The permissible deviation from mark mismatch is 3-4 mm.
Marks on the tensioner pulley
This is interesting! The timing belt for the VAZ-2170 on the outer rim has the following information: engine type (21126 or 21127), number of teeth - 137, as well as marking with a product width of 22 mm.
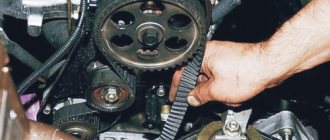
Step-by-step instruction
It will not be possible to completely remove the belt since the engine mount passes through it and if you want to change it you will have to unscrew it. It will not interfere with replacing the drive belt.
On newer models we will need an asterisk.
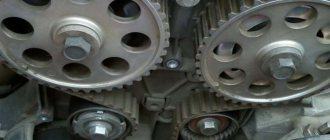
- We tint the marks on the camshaft toothed pulleys with a marker for ease of control.
- Unscrew the bolts securing the lower timing belt protective cover. Hexagon 5.
Lower timing cover.
The front right wheel does not need to be removed, but turned all the way to the right.
- We lock the crankshaft. We place stops under the front wheels, turn on fifth speed and unscrew the crankshaft pulley bolt. 17mm head and extension with a pipe as a lever. Turn off the speed.
Crankshaft pulley.
- We dismantle the pulley and the lower protective cover. behind the pulley, do not forget it when installing.
Set the top dead center
- It is necessary to screw the crankshaft bolt into place and use this bolt to turn the crankshaft clockwise until the marks on the crankshaft pulley and the ebb on the oil pump coincide. The head is 17. We put a mark with a marker for convenience. Many manuals suggest putting a mark on the flywheel, but climbing under the thermostat is not very convenient, so we’ll take the simple route.
Necessary tools for replacement
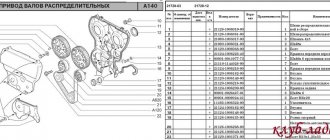
Having decided that you need to replace the timing belt on a Priora, you should prepare the necessary material and tools. The materials will require a new timing belt. Moreover, you can buy both the original belt and analogues. The original belt product is also equipped with two rollers: a tensioner and a thrust roller. The cost of such a kit is about 5 thousand rubles.
Original kit for timing system on VAZ-2170
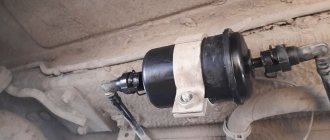
If necessary, you should purchase a new pump if the car’s mileage exceeds more than 100 thousand km and the product has never been changed. If you are replacing the pump, you will also need to replace the coolant.
This is interesting! Antifreeze needs to be replaced every 2 years, and antifreeze every 4-5 years.
Of the tools to replace the timing belt on a Lada Priora, 16 valves will be needed:
- Head at "17".
- Set of open-end wrenches.
- Screwdrivers.
- Hex key or T-30 sprocket, depending on the year of manufacture of the car.
- Special key for adjusting the roller. Comes with a set of belt and 2 rollers.
It is not necessary to install the Priora in the inspection hole, since most of the actions will be performed in the engine compartment. Once all the tools and materials are ready, you can start working.
What should be included
When the time comes to replace the timing belt in the Lada Priora, many owners invariably face problems related to the fact that they do not know which spare parts still need to be replaced. The presence of two camshafts in the timing drive mechanism has lengthened the toothed belt, so in addition to the tension roller, a support device is also installed. The bearings of the support and tension rollers are designed for a long period of operation, but experts recommend replacing them.
Kits are available for sale that contain a toothed belt and rollers, support and guide. Often the cause of problems with the drive is the pump, which sometimes jams while the engine is running. In this case, the valves in the cylinder head and the piston are damaged. Therefore, it is advisable to purchase a replacement cooling pump, as well as antifreeze or antifreeze for topping up.
If the engine has a “solid” mileage, the camshaft and crankshaft gears will have wear, so they also need to be replaced. If they are not replaced, the teeth will be damaged. If engine oil gets into the working area of the timing mechanism drive, it is deadly, so oil seals on the shafts (distribution, crankshaft) that have lost their elasticity may need to be replaced.
How to check tension
At the end of the work, it is necessary to adjust the tension of the timing belt drive on the Priora. The adjustment is made as follows:
- Using a special wrench, you need to turn the tensioner pulley counterclockwise.
Tensioner adjustment key
- Align the marks on the roller as shown above, and then tighten the fastening bolt.
- Rotate the crankshaft pulley 2 turns by the mounting bolt in a clockwise direction. At the same time, the coincidence of the marks on the camshaft and crankshaft pulleys is checked.
You can check the tension by applying force to a rubber product weighing 10 kg. The deviation value should not exceed 5-7 mm.
When tightening the pulley and roller bolts, it is recommended to use a torque wrench. The tightening torque for each element is equal to the following values:
- for the tension roller – 35-41 Nm;
- thrust roller – 105-110 Nm;
- pump mounting bolts – 15-20 Nm.
After adjustment, you can put the protective cover back in place. Finally, the generator belt tensioner roller is installed, as well as the belt itself. It is also recommended to replace these elements with new ones. Finally, do not forget to fill the coolant before starting the engine.
Upon completion of the work done, you can start the engine and check its operation. If the marks are correctly set, the engine will start the first time the key is turned in the ignition switch. In this case, the engine should operate evenly and keep the speed in the region of 800-900 rpm. Listen to the timing belt drive. There should be no extraneous sounds or noises. The presence of a whistle or hum indicates that the tensioner is too tight and needs to be loosened.
Video: replacing the timing belt and rollers with a pump on a Priora VAZ 2172, 2170, 2172 (timing marks)
In conclusion, it should be noted that the process of replacing the timing belt on a Lada Priora car does not present any difficulties if all steps are performed one by one. Even an inexperienced driver can handle this procedure, so don’t be afraid when the time comes to replace the belt product.
- Author: Andrey
Rate this article:
- 5
- 4
- 3
- 2
- 1
(28 votes, average: 4.2 out of 5)
Share with your friends!
Home →
Maintenance and Repair →
Engine →
Camshaft marks
The VAZ 21126 engine uses two switchgears. One of them is needed for optimal operation of the intake valves, and the second is installed in order to regulate the movement of the exhaust valves.
Each camshaft has its own pulley, which is not recommended to be replaced with another. This pulley allows the camshaft mechanism to operate correctly. A phase sensor is installed on the right side of the pulley.
The marks are located on the pulleys. They are located on the crown of the ledge at the bottom. Experienced mechanics call them movable because they move with the rotation of the camshaft.
Attention! Beginning car owners should remember that the marks have different sizes. It all depends on the manufacturer who made the pulley
To see the marks, experienced mechanics advise wiping the pulley with a clean rag to get rid of dirt and dust. Then you will notice a small notch in the metal.
But the crankshaft marks will help all parts of the 126 engine from the Lada vehicle work equally. At the output of the crankshaft there is a gear. And this gear is connected to the device by means of a key. This is where the mark for correct installation of parts is located. Because if the position is incorrect, the key simply will not fit as expected.
The notch is made in the form of a slot or a conical hole. It is found on the outside of the engine pulley.
Additional guidelines are also applied to the outer engine housing so as not to make mistakes when setting marks. To do this, install another mark on the rear side of the timing belt housing. It is needed for the correct alignment of the camshaft pulleys.
Similar article Engine for Niva from a foreign car without modifications
Another notch is located on the engine oil pump. It is needed for the correct orientation of the crankshaft. And it will be difficult to find the last mark. It is located on the flywheel.
There is a small cutout in the flywheel housing. According to the standard, it is covered with a rubber plug. It is pulled out and inserted with pliers.