Every driver from his experience, especially the first months after receiving a driving license, can recall problems with parking a car. Sticky sweat covering your back, clenched fingers on the steering wheel and complete helplessness when parking your car sideways.
Often, the knowledge gained in a driving school turns out to be insufficient to park freely, especially when there is catastrophically little space. It is necessary to carefully control the car in order to place the car in a free space and prevent an accident.
That is why beginners are often forced to leave the car far from the place they need precisely because of the inability to park among dense rows of vehicles. Only after many years of practice does confidence come, and the driver can freely park the car even in a limited space.
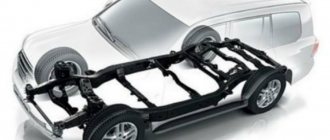
As practice shows, the greatest difficulties arise with side parking of a car. The development of modern automotive technologies has eliminated this problem. Installing parking sensors allows the driver to forget about parking problems. Former fears and uncertainty remain behind. Parking sensors are the electronic ears and eyes of the modern driver.
Operating principle of parking sensors
Previously, drivers were skeptical about installing this device and doubted its effectiveness.
Time passed, and the level of confidence in the device increased significantly, especially against the backdrop of an increase in the efficiency of its operation. An increasing number of modern cars are equipped with parking sensors off the assembly line. The operating principle of the parking sensors is simple and straightforward. Even a schoolboy can figure this out. The main element of the system is the ultrasonic sensor. The efficiency and reliability of the entire system depends on their quantity.
The operating principle of the electronic system is as follows:
- During operation, the sensor located on the rear bumper of the car continuously emits an ultrasonic signal. If the sent signal encounters an obstacle in the path of the vehicle, it is returned. The time required for the sent ultrasonic wave to be reflected indicates the distance to the obstacle.
- On average, the sensor is capable of detecting obstacles up to 2 meters from the car. If the obstacle is located at a distance of more than 2 meters, it can be seen in the rearview mirrors.
- The parking sensors begin to work after the driver engages reverse gear. Recently, parking sensors operating in non-automatic mode have become increasingly popular. They are convenient when driving in a large populated area with heavy traffic. Automatic electronic devices in this case constantly emit a warning signal, which is very annoying for the driver.
Parking sensor device
The parking device uses sound and light elements to warn the driver. This is very convenient, since the driver can quickly navigate and make a decision.
Is he needed?
Often, owners of cars with rear parking sensors are faced with a dilemma: is a similar sensor needed at the front. This applies more to beginners who find it difficult to park their car using parking sensors. But not installing such an important system is a mistake.
Its presence reduces the likelihood of major and minor collisions, from damage to the bumper on a curb stone to an accident.
If the car has high ground clearance, radars are not necessary. But with low ground clearance they are irreplaceable.
The following main elements of a car parking system can be distinguished:
Electronic control unit.
Receives and processes signals from ultrasonic sensors. The central core of the parking sensors. Among the main tasks is timely warning of the driver about the malfunction of individual sensors or the entire system.
Sensors
They ensure timely detection of obstacles and transmit information to the electronic control unit. They can be placed on both the rear and front bumpers of the car. The principle of their operation is based on the use of an ultrasonic signal.
Sound device.
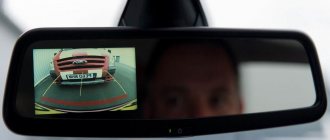
Installed in the vehicle interior. As a rule, it is fixed under the rearview mirror. When the sensors detect an obstacle, it emits a sound signal. Some models show the distance to the obstacle.
Different models of parking sensors may differ in the number of installed sensors. The minimum number of sensors is at least two. The more sensors, the higher the accuracy of the parking sensors.
Device
A parking radar kit usually includes:
- set of sensors (2-8 pcs.);
- display unit (graphic monitor, full display, buzzer, etc.);
- and a control center (the electronic brain of the system).
The sensors are mounted on the car body, the display unit is placed in the cabin, in front of the driver’s eyes, and the control center is the hardware part of the gadget (usually placed inside the display unit).
The parking sensors work automatically, the rear sensors turn on when you start reversing, the front sensors turn on when the vehicle speed drops to 20 km/h or less.
Next, let's look at the operating principle of the device from a physics point of view.
Types of parking sensors
There are a large number of models on the market, differing in cost and performance. Experts recommend giving preference to products from well-known manufacturers.
Rear type.
Installed on the rear bumper of the car. Activated when reverse gear is engaged. The minimum number of sensors required for the system to function is two. The more sensors are installed, the higher the accuracy of the parking sensors.
Front type.
It is recommended to install the front type of sensors when the driver still does not “feel” his car well. The front sensors' coverage area is very wide and allows you to monitor the area on the side of the car.
Combined type.
The sensors are mounted on the front and rear of the vehicle. A fairly popular type of device that provides maximum control of the space around the vehicle. The likelihood of an accident when parking a car is reduced to a minimum level.
What is required to install the equipment
If you decide to install parking sensors yourself, then this procedure will require theoretical support. At least in the form of our note. So, let's try to figure out how to install parking sensors with your own hands.
On a note! Such work does not oblige the performer to have professional mechanic skills. Any owner of a passenger vehicle will be able to cope with this task. There would be desire and time.
What you need to prepare:
- the installation device itself with sensors individually;
- a cutter for drilling holes (with the exception of installing strip parking sensors);
- drill or screwdriver (if the parttronic is wired);
- spanners;
- pencil or marker;
- insulating tape;
- construction tape;
- roulette;
- multimeter;
- equipment diagram.
It also wouldn’t hurt to have pliers, a soldering iron and related tools for soldering copper. And now about how to connect the parking sensors.
Installation diagram
As soon as all the necessary tools and equipment are laid out, we begin to mark the places where the sensors will hang. This stage should be approached with all responsibility.
It is recommended to place each parking sensor according to the instructions supplied with the device, in compliance with the requirements specified therein, and at the distance from each other as specified.
Note! Typically, tape is applied to the area where the hole will be drilled to prevent the paint from crumbling around the edges. The center of the window being made is marked with an awl.
Installing rear parking sensors
After marking, you can start drilling holes in the rear bumper.
We take the cutter and perform the procedure. There is no need to put strong pressure on the tool; the speed should be at maximum.
As a rule, the parking sensor console is located in the luggage compartment, or in the inner part of the wing, or less often on the dashboard. A monitor and alarm system are also installed on it.
The sensors are placed strictly with the sensors facing out. They are secured on the back side using special rings.
The signal processing unit is mounted to the panel with good double-sided tape. The surface of the place where it will be installed must be thoroughly degreased. Parking sensors are activated by engaging reverse gear. Power is supplied from the reversing lamps.
If a wired device is used, then immediately after installing the sensors, the craftsmen begin laying wires on the right or left side. The installation is completed by connecting the wiring to the system control unit. On sale, parking sensors can come complete with a rear view camera.
You can connect elements in two ways:
- with stripping the insulation on both wires, twisting them and wrapping the connecting wire with electrical tape. This is done with each pair of wires;
- using terminals, after squeezing which contact is formed between the wires. Terminals (rivets) can be equipped with parking sensors or purchased additionally. The positive wire of the reverse lamp is fixed in one of the holes in the terminal. Another, negative wire of the block is connected to the second hole. And then the jumper is pressed with pliers, which, under the influence of the tool, pierces the insulation of the wires and forms an electrical circuit.
The screen is fixed on the dashboard with double-sided tape. After which it is connected to the signal unit. The wiring from the console to the display is routed under the trim or mat to protect it. The harness is organized with clamps or electrical tape.
The question arises: how to check the parking sensors? After installation is complete, turn on the ignition, then turn on reverse gear. If the parking sensors are installed correctly, the screen will certainly light up. And then - the test is passed!
If the sensor fails, then you should know how to remove the parking sensors from the rear bumper and replace it with a working one. To dismantle the faulty element, it is necessary to remove it from the mounting socket by removing the retaining ring and disconnecting the wire from the device. Sometimes the bumper has to be removed to perform the operation. If new sensors are supplied along with wires, then you can cut off the damaged element and connect a new line in return. Finally, the external sensor is caught with some kind of spatula, removed from the housing and disconnected.
Installation of equipment from the front
The installation event with the front parking sensors is organized according to the same technological scheme as with the rear parking sensors. The only difference is that such a parking sensor crashes into the front bumper.
Methods for attaching parking sensors to the bumper
The methods for installing parking sensors on a car are varied and allow you to install sensors as much as possible to ensure complete control of the space near the vehicle. It should be noted that often the methods of installing sensors differ depending on the parking sensor model.
Mortise
To install the sensor, a hole is drilled in the bumper. The device is flush mounted. The aesthetic appearance of the bumper is not spoiled by protruding third-party elements. The most common and convenient way to install ultrasonic sensors.
Invoices
Parking sensors are glued to the surface of the bumper. Many car enthusiasts do not trust this installation method. They believe that sooner or later the sensor will come off and be lost. You can install sensors of this type yourself without outside help. They are usually used in cheap systems.
Repair and replacement
It is very impossible to repair the sensor yourself; this requires knowledge in electrical engineering. If the piezoelectric crystal is damaged, it cannot be restored. It's easier to replace it yourself. First you need to select a compatible analogue of the damaged element. Next is required:
- Apply a special solution to the sensor, which helps to detach the sensor body from the factory glue or sealant;
- Use your finger to press the sensor from the inside and push it out;
- Disconnect the electrical power plug;
- Align the plug of the new sensor with the socket of the electrical power cable;
- Insert the new element into the standard hole.
Afterwards, you need to turn on the ignition and let the on-board computer read the new device and configure it.
How to choose and buy parking sensors?
When choosing parking sensors, you must remember that cheap or expensive models are not always clearly good or bad. When choosing a model, you need to read as many reviews as possible and get a truly objective assessment of the model.
The following parking sensors are popular among motorists:
1. Ultravox D-104B.
A popular parking sensor model among consumers. The kit includes 4 sensors, wired connection. The installation type of the model is combined. Obstacle detection zone up to 1.5 meters. LED display is used.
2. ParkMaster 32/33-8-A.
The system comes with 8 ultrasonic sensors. There are 2 displays that can be installed in any place convenient for the driver. Combined installation type. Obstacle detection zone up to 2 meters.
3. INCAR PT-208B.
A convenient and reliable device to use. The set includes 8 sensors. Combined installation system. It is protected from dust and moisture. The operating range of the device is up to 1.8 meters.
How to deceive him
Well, now everything is clear and obvious, let's begin.
We need to generate an echo of approximately known amplitude and approximately known duration. This needs to be done as simply as possible, as cheaply as possible, so that there are two channels at once, and so that there is no need for additional power (so that the connection completely replicates the original sensors). The following circuit came to mind (clickable image) for a couple of channels on one of the cheapest microcontrollers.
In the diagram, it seems to me, everything is quite obvious and understandable; if anyone has questions or suggestions, you are welcome to comment.
Because it’s not comme il faut to put something on breadboards and wires in a car, and our Chinese friends (God grant them health and strength in the fight against the virus) already make boards so easily, quickly, conveniently and inexpensively, it was designed and ordered, on one of the well-known sites, fee.
It was quickly assembled from scrap materials and a simple firmware was written in the evening that implements echo generation through two channels. At this point, the attentive reader will ask the question: “What about the requirements for components and performance of automotive electronics?” Yes, they were not followed, I did the maximum of what was possible in “home” conditions. Or not the maximum? Your opinion? What could have been done better?
This is what the result of this “simulator” looks like:
PS The unit has calmed down and no longer requires connecting the missing sensors, and the entire set is waiting for warm days to install.
Conclusion
Parking sensors are a useful and versatile tool that greatly facilitates the tasks of motorists when maneuvering while parking their own vehicle. Here it is necessary to take into account the fact that there is no point in spending additional money on the purchase of equipment and subsequent installation if the car owner already has a perfect sense of the dimensions. For those who have difficulty recognizing the dimensions of their car, it will be useful to acquire such assistants, provided that these devices were not previously preinstalled by the manufacturer.
Operating principle
To install front parking sensors on a car with your own hands, you need to roughly understand how this system works. The principle of operation is very simple, and we will now look at it in detail.
The control unit sends a signal to the ultrasonic sensors. As a result, the sensors begin to emit an ultrasonic wave. This radiation is directed at an angle of 120 degrees. If the wave collides with any obstacle, it is reflected and necessarily recorded by the sensor. This information is then transmitted to the control unit. The block counts the time it took for the wave to reflect from the obstacle, and thus calculates the distance. This information will be sent to the warning device.
The radar turns on automatically. If the driver engages reverse gear, a group of rear sensors will begin to operate. If the driver brakes, then the front parking sensors are activated.
Manufacturers
The domestic market offers a variety of parking radar models in different price ranges. Thus, among domestic brands you can purchase the Spark 4R Bison model. This is a Russian innovation. The device differs from similar products from other companies. There is a display that can be installed in different ways. The model monitors blind spots, and activation is carried out by turning on the turn signal. Reviews say that this will help avoid problems when rebuilding. The device also has a learning mode - with it you can customize the system to suit any needs. The price of front parking sensors is 4.5 thousand rubles.
You can also highlight the budget but high-quality SHO-ME KDR-36 system. With its price of 5.5 thousand rubles, the user receives a display to which you can connect a rear view camera. The kit is completely self-contained. Includes sensors, display, connection wires, cutter. Reviews say that this is a pretty good budget parking sensor.
What to do if the parking sensors do not work
It happens that after some time of use the device refuses to function. Well, it happens! There is nothing eternal in the world. And even more so in the technical field.
It is preferable to contact a service workshop, where specialists will diagnose the computer and, if necessary, make repairs.
However, you can try to identify the cause of the problem and fix it yourself.
The most common point is the presence of a constant signal coming from the device to the monitor, during which the sensor does not turn off.
Such a problem can be caused by a foreign object, dirt, or oxidation of copper contacts sticking to the device. Therefore, after bad weather or visiting a car wash, it is recommended to dry the device.
Malfunctions
First of all, if the parking system is not working or there is a constant alarm about an obstacle, you need to make sure that the sensors are clean from dust, snow and moisture, as well as that there are no stuck objects, such as leaves.
Parking sensors do not work properly if at least one component is faulty and at least one sensor is faulty or dirty.
Possible system malfunctions or reasons for its incorrect operation include:
- violation of the integrity of the electrical wiring. Refers to the wired parking sensor system. Possible destruction of the wire insulation, squeezing or rupture;
- internal sensor malfunction or manufacturing defect;
- poor fixation of the sensor in the bumper and its displacement;
- mechanical damage to the sensor, for example, after an accident;
- internal malfunction of the parking system ECU or manufacturing defect;
- malfunction of the information device (sound or light indicators, graphic display).
Connection to the checkpoint
This scheme is a little more complicated. To implement it, you will need a first gear engagement sensor. You can use a regular button for this. You also need to make your own holder or bracket for the button. When first gear is engaged at the gearbox, the selector presses the button, which will activate the parking radar.
Here's how to connect the front parking sensors using this diagram. First, you should disassemble the gearbox cover. There is always free space here. There are also fasteners there. A holder is made individually for existing fasteners. It is better to purchase a button with a click - this can sometimes be more useful. Next, the button is embedded in the holder for it. After this, you can check the solution on the car in motion. Adjustment may be necessary if necessary.