Every car owner knows that in order to prolong the life of the power unit of the Lada Priora and any other car, it is necessary to promptly replace filters and engine oil, as well as other consumables. The fuel filter, as recommended by the manufacturer, should be replaced every 30 thousand km, but as experienced car owners advise, it is better to shorten this interval, since most cars are operated in difficult conditions, which include driving on dirt roads, the dust from which settles in machine components and low-quality fuel.
In this material, we invite you to study the information on how and when the fuel filter is replaced on the popular Lada Priora in our country, which has 16 valves. Below we will tell you where the filter we need is located, and how to change it yourself.
And now in more detail
Lada Priora Sedan constructor, assemble it yourself Logbook Mileage and clutch replacement
How can I check the functionality of this device? The fundamental element in the absorber is the valve. To understand the function, let’s look at how the adsorber works. When a car is parked, a huge amount of gasoline vapor can accumulate in its tank. Some of the vapor is caught by the recuperator, and the rest settles back into the tank. The part that was caught goes into the adsorber. When the engine is running, the absorber valve closes and interrupts the access of vapors, now they are sent to the combustion chamber. What is it for? When you start the car, our device prevents vapors from entering the exhaust manifold, thereby reducing the amount of harmful substances in the gas.
In a car, the adsorber absorbs fuel vapor from the gas tank ventilation system and supplies it to the intake, because according to environmental standards, the gas tank must be isolated from the atmosphere.
From Wikipedia;
Adsorber (from Latin ad - on, with and sorbeo - absorb) is a device for absorbing (thickening) a surface layer of a solid, called an adsorbent (absorber), of dissolved or gaseous substances, not accompanied by a chemical reaction. The adsorber is used in chemical, oil refining and other industries. The process occurring inside this apparatus is called adsorption.
Gasoline vapor filtration system. The diagram is quite conventional, but it reflects the essence. Gasoline vapor from the tank passes through a carbon filter, is cleaned and supplied to the inlet through a solenoid valve controlled by the ECU.
Now the first question is - why filter gasoline vapors if they still go into the intake? The answer is simple - adjusting the internal combustion engine control program by adding the nth number of clean air at the inlet is much easier than making adjustments based on the fuel-air mixture (gasoline vapor from the tank) of an unknown proportion.
And now the answer to the main question - why delete it? So, although some manufacturers claim that this device will have enough resources for the entire life of the car, we know that they are lying)
In general, over time, the adsorber becomes clogged and stops passing air. As a result, we get excess pressure in the tank, which interferes with the normal operation of the fuel pump. In the cabin (sometimes under the hood) we get a periodic smell of gasoline, the vapors of which are squeezed out of the ventilation tube. And the engine starts running on a rich mixture due to lack of air.
Now guess how our country solves this problem? That's right, most people simply throw out the adsorber and turn off the system as shown in the diagram:
A fuel filter from a carburetor classic is usually placed on the tube from the gas tank, and the solenoid valve, through which clean air should flow into the engine, is simply shut off with a bolt.
In the picture I already wrote that this is wrong and here’s why. This method of removing the adsorber only partially solves the problem. Yes, the smell of gasoline disappears, the tank is ventilated, but no air is supplied to the intake and the engine continues to run on a rich mixture.
And now the following diagram:
And now it already shows how it SHOULD be done. The same filter from the classics is put on the hose from the valve to the adsorber, which now serves as an air filter and prevents dirt from getting into the receiver. This is how the fuel-air mixture is brought to normal parameters.
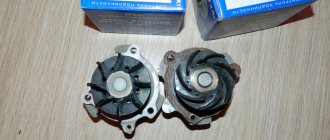
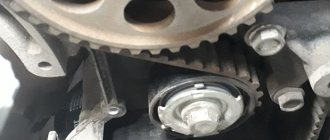
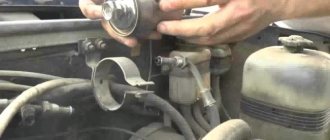
Well, now a couple of visual photos of what it all really looks like:
Everything is clear here, one tube goes to the gas tank, the second through the valve to the engine.
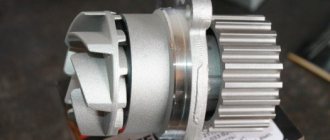
Bottom part of the adsorber. There is a fitting for supplying air from the atmosphere so that a vacuum is not created in the adsorber.
So this is all done on my machine. I didn’t take a photo of the tube from the tank, it’s hard to get to it even without a phone
Operating principle of a lambda probe
The main task of the lambda probe is to determine the chemical composition of exhaust gases and the level of oxygen molecules in them. This figure should range from 0.1 to 0.3 percent. Uncontrolled excess of this standard value can lead to unpleasant consequences.
During a standard car assembly, the lambda probe is mounted in the exhaust manifold in the area where the pipes connect, however, sometimes there are other variations in its installation. In principle, a different arrangement does not affect the operating performance of this device.
Today you can find several variations of the lambda probe: with a two-channel layout and a broadband type. The first type is most often found on older cars produced in the 80s, as well as on new economy class models. A broadband sensor is typical for modern mid- and high-class cars. Such a sensor is capable of not only accurately determining the deviation from the norm of a certain element, but also promptly balancing the correct ratio.
Thanks to the hard work of such sensors, the vehicle's operating life is significantly increased, fuel consumption is reduced and the stability of idle speed is increased.
From an electrical engineering point of view, it is worth noting that the oxygen sensor is not capable of creating a uniform signal, since this is prevented by its location in the collector zone, because a certain number of operating cycles may pass in the process of reaching the device with exhaust gases. Thus, we can say that the lambda probe reacts rather to destabilization of the engine, which it subsequently notifies the central unit about and takes appropriate measures.
The most common reasons when the Check Anger light comes on on a Priora
Lada Priora Sedan Logbook Replacing valve seals
But the Priora has the most common breakdowns. To begin with, it is worth listing the main sensors included in the Priora ECM.
- Mass air flow sensor (MAF).
- Throttle position.
- Camshaft positions.
- Crankshaft.
- Knock sensor.
- Oxygen sensor (2 pcs.).
- Speed.
- Rough road sensor.
And also the actuators can make the “Check” light up.
- Idle air control (IAC).
- Fuel injectors (4 pcs.).
- Ignition modules (4 pcs.).
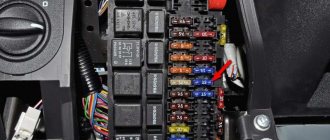
- Canister valve.
- Electric fuel pump.
All these components are activated through the computer, and therefore, if their operation fails, the “Check” light immediately lights up.
MOST COMMON ECU ERRORS THAT CALL THE “CHECK LIGHT”
In the first place, of course, there will be malfunctions of the oxygen sensor. These devices are installed in the exhaust manifold (sensor No. 1) and after the fuel afterburner (catalyst), No. 2. They read the percentage of CO content in the exhaust gases. Due to soot from burnt fuel, they most often deteriorate. The car begins to lose power, the “Check” light comes on. After all, the computer receives a signal that there is too much fuel.
Alas, it is only possible to accurately determine the reason why the signal may have come on using software diagnostics.
On the second place, the mass air flow sensor deservedly stands. A thin thread made of a special alloy changes resistance depending on the amount of air passing through the nozzle. The malfunction is characterized by severe engine malfunction. The revolutions “float”, the power drops, and, of course, the “Check” light comes on. And also checking only with diagnostics through the program.
And the camshaft sensor closes the top three. Its malfunction is characterized by an increase in startup time. Sometimes there may be slight jerks when accelerating. Again, there is no way to determine a breakdown without a program.
PRIORA ACTUATORS
Here in the first place is the IAC, a device that regulates the supply of additional air bypassing the throttle valve. It works by means of a micromotor that extends and retracts the shutter mechanism. If there is a malfunction, the engine will not start at idle. Or, conversely, it increases the speed to 1500-2000. "Check" lights up
Then the ignition modules. When it fails, the motor “troubles” and the speed “floats”. Power is lost. And as a result, the “Check Anger” icon lights up.
Faulty injectors give similar symptoms. It is interesting that all breakdowns of actuators, with certain skills, can be diagnosed without a computer. At least they will make the “Check” signal light up. This is done by either replacing it with a known-good unit, as with IAC, or by replacing it in places, as with ignition modules or injectors. And only the adsorber valve requires connecting equipment.
So what can we say. There is only one conclusion. If the “Check” indicator light on the instrument panel lights up, you need to do computer diagnostics in any case. This is the surest way out.
Why are they needed at all?
Forced fuel cleaning is a necessity to ensure the performance of any engine running on liquid fuel. Filling the filter cavity, gasoline passes through a layer ( there may be several
) filter material, leaving on its surface particles of dust, dirt and other solid inclusions that have a detrimental effect on engine parts.
If the “food” ration of a car engine is diesel fuel, then an additional separator is required, which will help clean the fuel, in addition to mechanical inclusions, from water content.
Its operating principle is based on the fact that water is heavier than diesel fuel, and centrifugal force helps separate them from each other. Due to the specific operation of separators, most of them are heated.
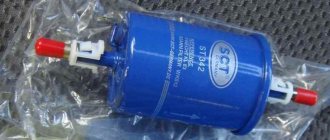
Manufacturers and prices of analogues
What car owners expect from analogues is maintaining normal pressure in the fuel supply system. If the electrical system is quite weak, there is no point in installing it. There is a list of proven devices for supplying fuel to the engine, which have been well rated by other owners and are suitable in their parameters for replacing the standard device:
- Soate 21101-1139-01, price – 1,600 rubles.
- Bosch 0580-453-453, cost – 4,500 rubles.
- Pekar 2110-11139009-00, price 3,100 rubles.
- Stellox 10-01202-SX, cost – 1,000 rubles.
- Stellox 10-01680-SX, cost – 3,000 rubles.
- STARNER 2112-11390-09, cost – 1000 rubles.
- Masuma MPU-103, cost – 2,800 rubles.
- Denso DFP-0105, priced at RUB 3,200.
Procedure for replacing the fuel pump mesh
The procedure for replacing fuel filters looks like this:
- Purchase of spare parts.
- Choosing a workplace.
- Preparing the tool and vehicle for disassembling part of the fuel system.
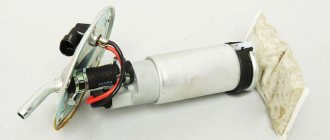
- Removing the electric fuel pump and installing a new filter.
If the gasoline pump screen is not changed in time, the suction pipe may become clogged with dirt.
Since the FTO is located on the bottom of the car, replacing it will require a lift, inspection hole or overpass. Replacing the fuel pump mesh can be done by simply placing the car on a flat surface. In this case, the gas tank must be at least half empty. Otherwise, when manipulating the FGO, you can spill fuel on the casing, and a persistent smell of gasoline will appear in the cabin.
Preparing for work
You can dismantle the electric fuel pump in any convenient place, observing fire safety measures.
The following tools will be required:
- two screwdrivers - flat and figured;
- pointed pliers or round nose pliers;
- socket or socket wrenches for 10, 12 and 13;
- car vacuum cleaner and rags.
To dismantle the electric fuel pump you will need a minimum set of tools
Preparing the car involves providing access to the top hatch of the gas tank. To do this, the rear seats are removed and the surface under them is cleaned with a vacuum cleaner. This will prevent debris from entering the tank.
The hatch under the seats is covered with a layer of dust that needs to be removed
Then the fuel supply system releases the pressure that remains after the engine stops. If this is not done, then when you remove any tube, gasoline will splash out. Pressure can be relieved in three ways:
- The electrical connector is disconnected from the fuel pump. The engine starts and runs until it stops completely.
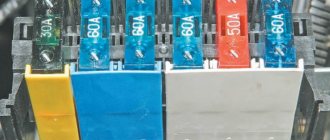
- The fuel pump can be turned off by removing the corresponding fuse. The car starts and runs until the remaining fuel in the lines is completely exhausted.
- A universal option is to relieve pressure through the diagnostic fitting on the ramp. The hood opens and the cap is removed from the valve at the end of the ramp. The pressure will decrease when pressing on the spool with a screwdriver - in this case you need to place a small container. The cap is then screwed into place.
The valve is a regular spool closed with a plastic cap
Procedure for removing the mesh
To get to the metal hatch located under the rear seats, you need to fold back the floor flap at the right (in the direction of travel) door. Further operations are performed in the following order.
- Use a Phillips screwdriver to unscrew two self-tapping screws that press the cover to the bottom of the car. The hatch is removed and moved to the side.
The hatch covering the fuel pump is screwed on with two self-tapping screws. - The bolt on the negative terminal of the battery is loosened, and the battery is disconnected from the on-board power supply. The plastic tab on the fuel pump power connector is bent and the block is disconnected.
The block is easily removed from the socket - The fuel hoses are disconnected. On the supply hose, the plastic stopper is first unlocked, then the wire lock. The return hose is secured with a metal clamp, which must be carefully squeezed with pliers to remove the pipe.
To remove the tubes, you need to bend the wire retainer - The eight nuts holding the mounting flange are unscrewed, and the washers are removed from the studs (they may get lost). The flange is dismantled.
The flange holds the pump housing and is secured with eight nuts - Having remembered the correct position of the plastic cover, the electric fuel pump is removed from the tank. When the body is halfway out of the opening, tilt the tank and pull out the float. To prevent debris from entering the tank, cover the hole with a clean rag.
When demolishing, the electric fuel pump housing rises up and then tilts to the side - To remove the suction pipe with filter from the glass, the internal connector is disconnected. Then you should simultaneously press on the ends of the four plastic latches and pull out the pipe.
The glass is attached to four plastic latches that must be pressed simultaneously - The contaminated mesh is removed from the tube and replaced with a new one. Fitting the filter is accompanied by a characteristic click.
The mesh is put on the suction pipe by hand and fixed - The inner surface of the glass is cleaned of dirt. Assembly of the unit is carried out in the reverse order.
Having removed the hatch cover at the very beginning of disassembly, pause and clean all the dust from the opened opening. Otherwise, some of it will inevitably end up in the tank.
Assembly should be performed carefully, preventing foreign objects from entering the gas tank. After installing the pump flange, attach a ground wire to any stud. After removing traces of fuel, you need to check the tightness of the connections. When the ignition is turned on, the operating pump will begin to increase pressure, and gasoline may leak out through loose joints.
After replacing the mesh, the engine is started and its operation is checked in different modes.
The technology for replacing FGOs on engines with 8 and 16 valves is absolutely the same. There is only a minor difference in the location of the fuel rail diagnostic fitting, which does not affect the procedure.
Video: replacing the fuel pump mesh
How to replace faulty devices
The power system filters are replaced by first disconnecting the battery. The replacement sequence for car modifications with different engines is the same. It is more convenient to remove a fuel module with a coarse filter when there is little fuel in the tank.
- screwdriver;
- socket wrench 10;
- 0.5–1 liter container for draining gasoline from the filter.
Before removing the fuel filter or opening the gas tank, relieve the fuel pressure.
Symptoms of unit malfunction
Malfunctions of the Priora fuel supply pump can manifest themselves in different ways.
Sometimes it fails completely, in other cases it maintains too low pressure in the system. Symptoms of problems are:
- after turning the key in the ignition switch, the characteristic sound of the fuel pump is absent, and the engine does not start;
- when the ignition is turned on, the pump pumps, the power unit starts, but when you try to move away, the engine stalls and starts with difficulty;
- The car jerks while driving, stalls and does not want to start.
The first symptom indicates a malfunction in the electrical circuit that supplies power to the unit. Also, a complete failure may be the result of a breakdown of the pumping device itself, and it has to be replaced. Fortunately, such breakdowns are quite rare. Electric fuel pumps installed on VAZ cars are considered quite reliable devices and operate without problems for 150-200 thousand km.
The remaining 2 symptoms indicate that the amount of fuel supplied to the injectors is not enough for normal driving. If the car somehow starts and idles, then there is no longer enough fuel to move. Since the characteristic symptoms of low pressure in the line are similar to the symptoms of problems with other units and systems, it is necessary to carry out diagnostics and more accurately determine the cause.