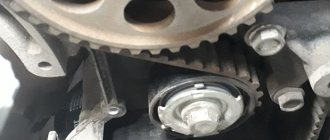
Cars admin26.02.2020
The electronic functionality of the VAZ-2170 Priora and its modifications is significantly higher than that of the tenth Lada model that preceded them, although it cannot be called revolutionary, or even modern. In this sense, the Priora is distinguished from the VAZ 2110 by the presence of a variety of devices designed to provide a certain level of comfort and safety.
These include air conditioning, heated and controlled side mirrors, front airbags, a primitive ABS system, and if we compare the old “ten” modifications, then also electric power steering. Each of these electrical circuits is controlled by a relay and protected by appropriate fuses. All of them are distributed and located in separate blocks.
Relay and fuse blocks
The VAZ-2170 has three relay and fuse blocks:
- main block;
- mounting block;
- additional mounting block.
Luxury "Priors" with air conditioning have another additional block in which relays and fuses are located that are responsible for the operation of climate control equipment.
Main power fuse block
The main unit is located in the engine compartment of the car next to the battery and expansion tank. It is protected from above by a removable plastic casing. The main unit contains only six fuses that are responsible for the operation of the main (power) electrical circuits of the car.
| Fuse designation | Rated current, A | Case color | Electrical circuit |
| F-1 | 30 | Green | Electronic motor controller |
| F-2 | 60 | Blue | Ignition switch relay, power window control module, rear window defroster, radiator fan |
| F-3 | 60 | Blue | Signal, ignition switch, cigarette lighter, hazard warning lights, brake light unit, radiator fan circuit, interior lighting |
| F-4 | 60 | Blue | Electric generator |
| F-5 | 50 | Red | Electric power steering (EPS) |
| F-6 | 60 | Blue | Electric generator circuit |
To replace the fuses in the main unit, you need to disconnect the ground on the battery, remove the cover and replace the faulty part. VAZ-2170 mounting block
Relays and fuses in the cabin
The mounting block is located in the car interior under the dashboard on its left side. It is protected by a removable plastic panel attached to the “torpedo” using three latches. To remove the panel you need to turn each of these latches 900 degrees. After this, the panel will be completely removed.
The location, number, and markings of relays and fuses in the Priora mounting blocks may differ depending on the type of vehicle equipment.
| Relay designation | Purpose |
| In the “Norma” package | |
| K-1 | Radiator fan |
| K-2 | Rear window defroster |
| K-3 | Starter |
| K-4 | Additional relay |
| K-5 | Socket for backup relay |
| K-6 | Windshield wiper and washer motors |
| K-7 | High beam lamps |
| K-8 | Signal |
| K-9 | Alarm |
| K-10, K-11, K-12 | Sockets for backup relays |
| Available in “Lux” and “Lux Plus” configurations | |
| K-1 | Headlight and low beam lamps |
| K-2 | Rear window defroster |
| K-3 | Starter |
| K-4 | Additional relay |
| K-5 | Reserve socket |
| K-6 | Wiper mode switching module |
| K-7 | High beam lamps |
| K-8 | Signal |
| K-9 | Anti-theft alarm (sound signal) |
| K-10 | Fog lamps |
| K-11 | Seat heaters |
| K-12 | Relay for wiper operation mode |
Mounting block fuses
| Fuse designation | Rated current, A | Electrical circuit |
| In the “Norma” package | ||
| F-1 | 25 | Radiator fan |
| F-2 | 25 | Rear window defroster |
| F-3 | 10 | High beam lamp (right) |
| F-4 | 10 | High beam lamp (left) |
| F-5 | 10 | Signal |
| F-6 | 7,5 | Low beam headlight bulb (left) |
| F-7 | 7,5 | Low beam lamp (right) |
| F-8 | 10 | Signal |
| F-9 | 25 | Electric stove fan motor |
| F-10 | 7,5 | Interior lighting, instrument panel lighting, brake light lamps |
| F-11 | 20 | "Windshield wipers" (control) |
| F-12 | 10 | Connector “15” of the instrument panel |
| F-13 | 15 | Cigarette lighter |
| F-14 | 5 | Side lamp (left headlight) |
| F-15 | 5 | Side lamp (right headlight) |
| F-16 | 10 | Connector "15" ABS |
| F-17 | 10 | Left fog lamp |
| F-18 | 10 | Right fog lamp |
| F-19 | 15 | Front seat heater |
| F-20 | 5 | Immobilizer control module |
| F-21 | 7,5 | Fog lights (rear) |
| F-22–F30 | Reserve sockets | |
| F-31 | 30 | Electric package control module |
| F-32 | Reserve socket | |
| Available in “Lux” and “Lux Plus” configurations | ||
| F-1 | Reserve socket | |
| F-2 | 25 | Rear window heater, electrical package module, relay and connector “10” for connecting the rear window heater |
| F-3 | 10 | High beam lamp (right), instrument panel, high beam warning lamp |
| F-4 | 10 | High beam lamp (left) |
| F-5 | 10 | Protection of the mounting block, signal and its relay |
| F-6 | 7,5 | Low beam (left headlight) |
| F-7 | 7,5 | Low beam (right headlight) |
| F-8 | 10 | Anti-theft alarm relay, anti-theft alarm horn |
| F-9 | Reserve socket | |
| F-10 | 10 | Brake light switch, brake light lamps, connector "20", interior lighting |
| F-11 | 20 | Windshield wiper mode switching module relay, wiper mode switch, connector “53A”, rear window heater relay, rear window wiper motor (for VAZ-2171, 2172), connector “25” of the front airbag control module |
| F-12 | 10 | Connector “21” of the instrument cluster, connector “9” of block X2 of the dashboard, connector “1” of block X2 of the electric power steering control module, reversing headlight lamps, parking sensor control module |
| F-13 | 15 | Cigarette lighter |
| F-14 | 5 | Left side light, trunk light, warning light for license plate light, connector “12” of block X2 of the glass unit control module |
| F-15 | 5 | Right side light, glove box light |
| F-16 | 10 | Hydraulic unit of the ABS system |
| F-17 | 10 | Fog lamp (left headlight) |
| F-18 | 10 | Fog lamp (right headlight) |
| F-19 | 15 | Heated front seats relay |
| F-20 | 10 | Side and low beam relay, heater fan relay, lighting control relay, windshield wiper control module, climate system control module |
| F-21 | 5 | Connector “30” of the light alarm switch, connector “16” of the diagnostic block, clock, connector “14” of the automatic climate control unit |
| F-22 | 20 | Wiper motor, wiper motor relay, wiper control module relay |
| F-23 | 7,5 | Connector “20” of the wiper control module |
| F-24 - F-30 | Backup fuse sockets | |
| F-31 | 30 | Connector “2” of block X1 of the electrical package module, threshold illumination lamps |
| F-32 | Reserve fuse socket | |
To remove the mounting block from its seat, you only need a screwdriver with a Phillips bit. She needs to unscrew the screw securing the block, then, pulling it towards you, disengage it from the fastening hooks.
Before replacing relays and fuses, you must disconnect the negative terminal from the battery. To remove the main unit, you will need to disconnect all terminals with wires connected to it, having previously marked their location.
Additional mounting block
The additional VAZ-2170 mounting block is located behind the panel of the right tunnel trim on the left leg side of the front passenger. To get to it, you need to unscrew the screws securing the cladding and remove it.
The additional mounting block contains three fuses and two relays.
| Designation | Rated current, A | Purpose of protection |
| K-1 | Ignition relay (main relay) | |
| K-2 | Fuel pump relay | |
| F-1 | 15 | Starter and main relay interlock circuits |
| F-2 | 7,5 | Motor controller circuit |
| F-3 | 15 | Fuel pump |
To replace fuses and relays in the additional unit, there is no need to remove it from its mounting location. To remove the relay, you should unscrew the corresponding nut securing it with an “8” wrench. Before carrying out work to replace the relay, fuses or the entire unit, it is strongly recommended to disconnect the ground wire from the battery, and also disconnect the wiring harness block of the electronic engine controller from the additional connector mounting block.
Control and protection unit for climate control devices
In “Priors” equipped with climate control equipment, another additional mounting block is installed. It is located next to the main unit, and is attached to the “glass” of the left rack. Depending on the manufacturer of the climate system, the relays and fuses in it may have different locations and purposes.
| Designation | Rated current, A | Purpose |
| Halla system (South Korea) | ||
| F-1 | 30 | Right fan |
| F-2 | 30 | Left fan |
| F-3 | 40 | Heater fan |
| F-4 | 15 | Compressor |
| R-1 | Right fan relay | |
| R-2 | Additional relay | |
| R-3 | Left fan relay | |
| R-4 | Heater Fan Relay | |
| R-5 | Compressor switch relay | |
| Panasonic system (Taiwan) | ||
| F-1 | 30 | Left fan |
| F-2 | 30 | Right fan |
| F-3 | 40 | Heater fan |
| F-4 | 15 | Compressor |
| R-1 | Heater Fan (High Speed) | |
| R-2 | Right fan relay | |
| R-3 | Heater Fan (Low Speed) | |
| R-4 | Left fan relay | |
| R-5 | Heater fan | |
| R-6 | Compressor | |
How to choose
Having decided to replace a relay or fuse in a Priora, take full responsibility for their selection and purchase. Under no circumstances should you buy cheap parts of unknown quality and origin.
It is better to give preference to original products produced by VAZ. As a last resort, buy relays or fuses from one of the well-known companies, such as Bosh, Hella or Tesla.
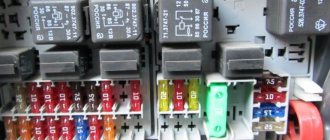
The peculiarity of Lada Priora cars is that they do not have 1 assembly fuse block. The fuse is considered one of the easiest machine elements to install and operate; replacing it is not difficult. Its task is to protect the electrical wiring of the vehicle as much as possible. If electrical parts or systems fail, the mechanic or owner first of all pays attention to the condition of the fuses and whether there are any burnt-out wiring. The Priora fuse circuit is arranged in blocks and localized in different places of the car. This is justified by significant savings in electrical wiring. For example, if there is a short circuit in one place, the rest of the machine will not be affected.
The main mounting block is located next to the heart of the car - the battery, and is located under the hood. Absolutely all parts of this design are marked with the Latin letter “F”, which determines the relatively low power of the equipment.
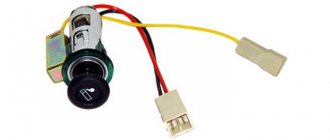
What devices can be connected to the cigarette lighter?
Knowing the current rating for which the Prior's cigarette lighter fuse is designed, you can calculate what power devices can be used. To do this, we multiply the current strength of 15 A by the rated voltage in the cigarette lighter - 12 V.
We find that the power of the connected devices should not exceed 180 W. And the list of devices is very wide, because technological progress does not stand still, making the life of the driver and his passengers much more comfortable. Here are some of them:
• Compressor; • Air purifier and ionizer; • Electric kettle or boiler; • Fridge; • Massage cape or pillow; • Navigator, video recorder, etc.; • Heater on the seat; • Lamp or lantern; • Fan; • Vacuum cleaner; • Splitter.
New devices appear every year. You must be very careful when connecting them to the cigarette lighter. Heavy load can lead to short circuit and fire.
Peculiarities
The body of the product is made of fusible material – plastic; inside there is a specific thread that conducts electric current. What is the hull? This is a system for fastening contacts of a structure with a fusible thread. The unit is connected to the main electrical circuit of the machine. The fuse (fuse) is mounted in a special housing for reliability.
How blocks are placed
There are several mounting blocks in total: two main ones and one additional one, which is located near the front passenger seat on the left side. To access it, you just need to unscrew the screws using a Phillips-type screwdriver. The main unit is located on the left side of the driver, at the bottom of the floor. It is also called "salon".
Opening is very simple: just turn the locks 90 degrees and open the lid. The engine compartment structure is located near the expansion tank, next to the battery. Each box has its own tight lid, which protects the internal mechanism from exposure to aggressive factors. Let's look at each of the blocks separately.
Space under the hood
Each of the elements is marked with the Latin letter “F”. This category includes:
- F1 – a dark green product designed to protect the engine control system and vehicle control unit;
- F2, 3 – PP of a blue hue, which belong to the general category. They are designed to protect all elements and circuits connected to fuses inside the cabin;
- F4 – bright red part, power – 50 amperes. Designed to protect the electric power steering structure;
- F6 - purpose - to protect the power circuit of the generator, a blue element with a power of 60 amperes.
All of the listed fuses are mainly designed for high capacities and currents; their main purpose is to protect the most important electrical components and systems of the vehicle. If any element burns out, the engine will not start, and a complete failure of all electrical equipment of the machine is possible.
Cabin fuses
There are also relays that imply a powerful load of electrical circuits. This placement is convenient: if a malfunction occurs, it is easy to find and diagnose (simply switch a separate circuit). The arrangement of parts inside the cabin is as follows:
- a 25 amp fan designed to blow over the radiator;
- element for heating the rear view glass;
- right and left headlights with high beam, each rated at 10 amps;
- signal (horn), power 10 A;
- "emergency";
- right and left low beam headlights, each with a power of 7.5 amperes;
- instrument panel output, terminal;
- stove ventilation system motor;
- interior light, instrument panel and stop signal (rear);
- "windshield wipers";
- fog lights;
- seat heating system;
- rear light with fog function;
- if necessary - reserve.
Thanks to such an accurate description, it is easy to find the cause of the problem and solve it. Also, it is quite simple to find the fuse for each individual system.
Purpose
A modern car is equipped with a huge number of parts that work thanks to electronics. And each such part can fail for various reasons. But they are all at risk of being damaged due to a short circuit in the wiring. To prevent this situation, as with many non-automotive electronic devices, fuses are used. For convenience, all fuses are placed in one or two blocks.
There are usually two fuse blocks. One of them is located in the engine compartment, and the second in the cabin - most often to the left of the steering column behind the unscrewing panel. The interior fuse box can be located under the seat and in the luggage compartment area. To make it easier to determine whether a fuse belongs to a particular device, a diagram is drawn on the back of the panel in which the icons or names of various devices correspond to the location of the fuses. The car fuses themselves vary in rating, expressed in Amperes. Depending on this, manufacturers use different colors of plastics. So, red fuses have a rating of 10 Amps, and, say, green fuses have a rating of 30 Amps.
In addition to those included in the electrical circuit, the block also contains spare fuses.
The most widely used fuses are plug (blade) fuses. This fuse is a wire made of an alloy of tin with lead or copper. The wire cross-section determines the maximum current value for which the fuse is designed. The fuse is connected to the electrical circuit of a particular device. The current that powers this device passes through the wire. With a sharp increase in current during a short circuit, the wire instantly overheats and melts. As a consequence of this, the electrical circuit breaks and the corresponding device is de-energized.
In addition to disposable fuses, reusable thermobimetallic fuses are also found in automotive fuse blocks. Their structure and principle of operation are contained in their name. So, the design of such a fuse is two plates with silver contacts at the ends. One of the plates consists of an alloy of two metals with different properties. The elasticity of this plate allows the contacts to remain in a closed state. At this moment, current passes through the contacts. In the event of a short circuit, the bimetallic plate overheats and bends. Accordingly, the contacts open. After the plate cools down, it returns to its original position and the current begins to flow through the circuit again. This fuse is installed in the headlight circuit. Therefore, when it is triggered, the light will frequently turn on and off (flashing), and characteristic clicks will be heard in the car cabin. In this case, it is necessary to stop the car, identify and eliminate the malfunction.
In addition, there are fuses in which the thermobimetallic plate does not return to its original position after cooling. The design of the fuses is complemented by a spring and a button. The spring holds the plate, preventing it from bending on its own. So, in order to close the contacts after removing the device malfunction, you need to press the button, thereby releasing the spring.
How to identify a faulty electrical circuit
Simply knowing the location of the fuse is not enough. It is more difficult to find the cause of the breakdown, eliminate it and select a new element. If a malfunction occurs, open the latches and unscrew the cover. First of all, check if the fuse is blown and find out the cause of the problem. What is needed for this? First of all, check the circuit that it protects, carefully inspect it all, from the beginning (node) to the power source. To do this, you can use a simple multimeter or a control lamp.
To detect a break or breakdown, you must perform the following steps:
- one of the probes of the equipment (multimeter) must be brought out to the machine panel. The same applies to the warning lamp;
- the ignition key is turned, the wire touches the terminal of the wire that is being tested. If there is no voltage, it is recommended to inspect the conductor input and take a measurement at that point;
- the steps are repeated at each site, identifying the problematic element.
It is imperative to make a conclusion about the possible cause of the breakdown. Most often, this may be a contact that is not connected or a burnt-out part or wiring.
The mounting blocks of the machine also contain relays that switch the load. Why is it so important to use electromagnetic relays? This is because it is necessary to protect the switch contacts from burning out if heavy load occurs.
Often the cause of a breakdown can be sticking relay contacts or a breakdown of the electric magnetic coil. If such malfunctions occur, the relay is not able to attract an electric magnet, so the contacts do not close. To properly solve this problem, it is recommended to contact a car service for a complete replacement of broken parts.
Reasons why the cigarette lighter does not work on Lada Priora
Over time, the unit may break and require repair. Why does the part fail? Among the common reasons why the Lada Priora cigarette lighter does not work.
- Burnt out heating element. If you often have to connect high-voltage devices to the connector, such as a wheel compressor, the element itself can quickly fail and the fuse will trip.
- Light bulb broken. There is a light around the hole that may stop working.
- Oxidation or poor contact of the cigarette lighter. Over time, contact may be lost between the antennae of the part and the socket itself, as a result of which the element fails. To check this, you need to remove the fuse and then inspect it for oxides. Additionally, you should tighten the fastening antennae. The fuse is put in place.
- The cigarette lighter connection wires have fallen off. Refers to “age-related diseases”. For inspection, you will need to remove the VAZ Priora cigarette lighter from its socket without touching the fuse. In the event of a malfunction, it is necessary to solder the fallen wires.
- Inept tuning is also a cause of failure. Some owners buy low-quality splitters and load them to full capacity. This leads to increased load on the fuses. Promotes accelerated wear of the generator.
- Blown fuse. A breakdown may occur due to a short circuit. To identify this fuse malfunction, you should connect the lamp to the connector. Then turn on the ignition. If it does not light up, then the reason is the fuse. The protective element needs to be replaced.
Features of replacing broken parts
Consumables and replacement parts of a Priora car often need to be replaced. Often the cause is improper use of the cigarette lighter. It consists in the incorrect use of too high currents (from 30 to 40 amperes). What is a cigarette lighter? This is a metal part made in the shape of a spiral, the body of which is made of plastic. It is inserted into a connector specially designed for this purpose. After pressing, the cigarette lighter is connected to the on-board network and can be held in place using plates. At this time, a heating process occurs in the spiral.
This mechanism is unscrewed simply; if it jams, the design provides a special washer. When heated, it melts, shorting the power and causing fuses to blow. This is how the fuse box breaks down. The process of changing parts is quite simple and does not take much time. Another feature of the car is that if the heater and air conditioner are combined inside, the heater may not work at all.
In this case, the location on the surface of the damper, which will then have to be removed, and the micro-gearbox of the motor may change. The latter is connected to a tap that shuts off the supply of antifreeze. Such an arrangement of the air conditioner is impossible for the Priora, since it heats up to the specified temperature, then the sensor inside the cabin is triggered and the heater is turned off. The car becomes the same temperature as the air outside.
If a breakdown occurs in the car and the owner thinks that the problem is in the replacement unit, it is worth removing the box cover and checking the condition of the electrical wiring. The breakdown can be different: a stove that does not heat, a broken fuel pump or a faulty instrument panel.
What to do if fuses often blow in a Priora
A fuse will never blow without a reason. In this case, a short circuit or serious overload may have occurred in the circuit.
If a short circuit can occur due to problems in the electrical wiring or consumer, then overloads occur only at the cigarette lighter fuse.
The use of car vacuum cleaners, compressors and other overly powerful devices in the cigarette lighter socket causes the fusible link to trip. If this happens too often, you can raise the rating of the standard insert by 5 Amps.
After this, you can continue to use your consumers, but you must constantly check the condition of the wiring for overheating.
If a fuse blows immediately after replacement, it is necessary to diagnose the vehicle for the presence of a short circuit in the electrical wiring. It is better to trust this to a professional auto electrician.
Removing the mounting block
First of all, disconnect the terminal from the battery and remove the unit cover. Next, you should unscrew the fastening screw on the instrument panel and remove the MB itself. This is easy to do: pry off the fastening hooks. Dismantle the relay and PP, press out the fixing parts of the electrical wiring terminals. Do not forget to mark all the wires that are removed from the MB - this will help in the future not to mix them up and mount them in the same place. Installation (reverse) is done exactly this way.
What you need to know about the additional block
In order to get to the additional unit, it is necessary to remove the floor covering and disconnect the terminal, block with electrical wiring from the electronic control unit. The fuse is removed using tweezers.
Electrical circuits of automobiles are protected by fusible links that prevent overheating and ignition of the wiring. Knowledge of the Priora's fuse diagram will allow the owner to detect a failed element. In addition, using a burnt element, you can establish an electrical unit operating in emergency mode.
Relay and fuse blocks on a LADA Priora car
The VAZ Priora passenger car, regardless of the type of engine installed, is equipped with several junction boxes. They are located under the hood and inside the car. The use of several boxes made it possible to separate circuits with high and low currents. In addition, separate small-sized mounting blocks were installed, introduced as the configuration expanded.
Main power fuse block
The vehicle's power circuits are protected by inserts installed on the positive terminal of the battery. The block is designed to protect circuits with maximum currents. To gain access to the fuses, you need to remove the plastic cover; this can be done without the help of tools.
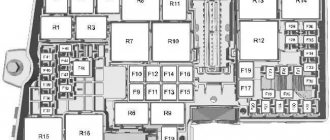
Block diagram and its location in the car
The removal of the most powerful circuits on the Lada Priora into a separate unit located close to the battery ensured maximum protection of the car's electrical system from overloads.
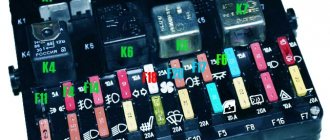
The location and designation of the inserts is indicated in the photo. Depending on the year of manufacture and installed equipment, it is possible to install fuses of different ratings.
Priora power insert block
Explanation of fuse designations
Purpose and rating of the main block inserts.
| Number in photo | Denomination, A | Purpose of the element |
| F1 | 30 | Protection of power supply circuits to the ECM system (propulsion control) |
| F2 | 40 (there is a 60 A option) | Power supply for the cooling fan electric motor, additional ignition system controller, glass heating filaments, electrical package control unit |
| F3 | 30 (there is a 60 A option) | Control of the operation of the cooling fan electric motor, horn, standard alarm siren, ignition control switch, instrument cluster circuits, interior lighting, power supply for brake lights and cigarette lighter |
| F4 | 60 | First generator circuit |
| F5 | 50 | Power supply and control of the electromechanical power steering motor |
| F6 | 60 | Second generator circuit |
The given fuse diagram for the Lada Priora is relevant for cars without an anti-lock brake system. The introduction of a hydroelectronic unit on the Priora-2 series car led to a change in the purpose of the inserts.
Purpose of fuses on the battery for Priora cars with ABS (starting from the one closest to the terminal):
- F1 - ECM protection (30 A);
- F2 - power steering (50 A);
- F3 - generator circuits (60 A);
- F4 - similar to F3;
- F5 - power supply to the ABS unit (40 A);
- F6 - similar to F5, but rated at 30 A.
Mounting block: relays and fuses in the passenger compartment
The unit includes fuses, several relays, and tweezers designed to simplify the procedure for replacing burnt out inserts. The content of the device depends on the vehicle configuration.
Block diagram and its location in the car
The unit is located in the plastic frame of the dashboard at the bottom of the driver's side. The outside of the box is closed with a removable cover installed around the steering column and secured with three locks located along the lower edge. To remove the cover, you need to turn the latches 90 degrees and remove the element from the latches by pulling it towards you.
The oval marks the location of the block installation
On cars, fuse ratings may differ depending on the year of manufacture of the car and the configuration. To determine the value of the fuse link, you should use the operating instructions for the Lada Priora.
When repairing fuses, it is necessary to take into account that the instructions for the Lada Priora car change several times a year. It is not recommended to use a manual from another car.
The “norm” option with the additional installation of an air conditioner has differences in the Priora’s fuse circuit. Elements that protect the device are placed in a separate engine compartment, discussed below. The mounting housing itself has not undergone any changes.
Block version “norm” with air conditioning
The purpose of fuse links in the “luxury” version of the car does not differ from the “standard + air conditioning” version. On cars, you can find both the block model 1118-3722010-00 and the Delphi version 15493150. The cases differ slightly in appearance, as well as in the location of spare inserts and the presence of tweezers on Delphi.
Deluxe mounting block option from Delphi
With the start of production of the modernized Priora-2, the contents of the body changed somewhat. In the interior units of cars, only one space for a relay and two cells for fuses are empty.
Block on Priora-2
Explanation of fuses and relays
Explanation of fuses in the “norm” version.
| Number on the diagram | Denomination, A | Purpose |
| P-1 | 25 | Radiator fan power supply |
| P-2 | 25 | Electrically heated glass on the rear |
| P-3 | 10 | High beam lamp strings on starboard side |
| P-4 | 10 | Likewise on the left |
| P-5 | 10 | Klaxon |
| P-6 | 7,5 | Low beam left |
| P-7 | 7,5 | Likewise on the starboard side |
| P-8 | 10 | Alarm siren |
| P-9 | 25 | Electric heater motor |
| P-10 | 7,5 | Power supply for the instrument cluster (terminal 30), brake light bulbs and interior lighting |
| P-11 | 20 | Windshield cleaning system. Rear window heating control |
| P-12 | 10 | Second power connection for instrument cluster (terminal 15) |
| P-13 | 15 | Cigarette lighter |
| P-14 | 5 | Left side marker signals |
| P-15 | 5 | Same as on the right |
| P-16 | 10 | ABS unit power connection (terminal 15) |
| P-17 | 10 | Left side fog lamp |
| P-18 | 10 | Likewise on the right side |
| P-19 | 15 | Heating threads for driver and front passenger seats |
| P-20 | 5 | Standard immobilizer operating system |
| P-21 | 7,5 | Rear fog lamp |
| P-22-30 | Any | Reserve |
| P-31 | 30 | Electrical package power supply circuits |
| P-32 | Any | Reserve |