All Lada Priora owners have at least once experienced engine oil consumption exceeding the norm and a broken timing belt. Loss of engine oil occurs because:
- – valve stem seals (oil seals) wear out over time and temperature;
- – the valves swing due to worn valve bushings and also break the valve seals;
- – the oil, since the oil seal has little resistance, flows down the valve and enters the combustion chamber.
To prevent this from happening again, it is recommended to replace the connecting rod and piston group in the engine with a plugless one.
practical guide
Piston rings are replaced when repairing the connecting rod and piston group, if they are worn out or damaged. Also, rings are replaced during engine overhauls.
To complete the job, you will need a piston ring mandrel.
Removal
1. Remove the cylinder head.
2. Remove the engine oil pan.
4. Turning the crankshaft by the bolt securing its pulley with a 17 mm wrench, set the piston of the first cylinder to the lower position.
5. Using a TORX wrench, unscrew the two nuts securing the connecting rod cover of the first cylinder.
6. Remove the connecting rod cover.
7. Place the hammer handle against the piston and push it up.
8. Remove the piston from the cylinder.
9. Remove the liners from the connecting rod and its cover.
10. Fix the piston by the connecting rod in a vice. Slightly spreading the ring lock, remove the upper compression ring. Similarly, remove the lower compression ring, oil scraper ring and its expander.
Recommendation
The rings are thin - to avoid breaking them, cut a strip from a plastic bottle slightly shorter than the circumference of the piston. Place the edge of this strip under the lock of the upper compression ring, and then in a circle under the entire ring.
Remove the strip along with the ring from the piston. Remove the second compression and oil rings in the same way.
Comment
The advisability of replacing the rings depends on the degree of wear of the cylinders. Small uniform wear of the cylinders (within 0.05 mm) can be compensated by installing a piston of a different class with a larger diameter.
Installation
1. Thoroughly clean the piston
from soot and deposits. We inspect the piston, connecting rod and pin. Cracks on them are unacceptable.
Comment
We select new rings in accordance with the piston diameter - nominal or repair size.
2. Before installing new rings, use a set of feeler gauges to measure the gap between the piston ring and the wall of the groove into which the ring will be installed.
Table 9.1.3 Permissible gaps between the groove walls and piston rings:
| Ring | Gap, mm |
| Upper compression ring | 0,04-0,075 |
| Bottom compression ring | 0,03-0.065 |
| Oil scraper ring | 0,02-0,055 |
Comment
The permissible gaps between the groove walls and the piston rings are shown in table. 9.1.3. If the gap exceeds the maximum allowable, the piston must be replaced.
3. To select piston rings based on the thermal gap, install the rings one by one into the block cylinder to a depth of 20-30 mm and use a set of flat screws to determine the gap in the lock.
Comment
The maximum permissible thermal gap during wear (for used rings) is 1 mm, the gap for new rings is 0.25-0.45 mm. If the gap exceeds the maximum allowable, the ring must be replaced.
4. Place the rings on the piston. In this case, the oil scraper ring
and install the compression ring with the word “TOP” facing up.
We install new rings on the piston, starting with the oil ring expander.
Using a mandrel, we put on the oil scraper ring, and then the lower compression ring (we put the rings on the mandrel and carefully move them down until they are installed in the groove).
We put on the upper compression ring without a mandrel: having spread the ring lock (no more than is required to put the ring on the piston), we first place the lock on the piston, and then the back part of the ring.
5. Rotate their locks so that they are located at an angle of 120° relative to each other. The expander lock must be rotated 180° relative to the ring lock.
6. Lubricate the cylinder wall with clean engine oil
and the outer surface of the piston.
7. We put the mandrel on the piston and compress the rings with it, periodically lightly tapping the mandrel with the handle of a hammer to self-install the rings.
Warning!
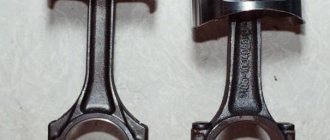
The connecting rod caps are not interchangeable. The engine is equipped with “chopped connecting rods”, the covers of which are made using a special method. The contact surfaces of the cap and the connecting rod are uneven, which ensures a perfect fit of the parts during assembly.
8. We wipe dry the liners in the connecting rod and the cover, and install the liners in them.
9. Lubricate the inner surface of the liners with clean engine oil.
10. Install the piston into the block cylinder.
Warning!
The arrow on the piston crown should point towards the crankshaft pulley.
11. Pressing the mandrel against the block and tapping the piston bottom with the handle of a hammer, we recess the piston into the cylinder (at the same time we control the movement of the connecting rod to the crankshaft journal).
12. Install the cover on the connecting rod and tighten the bolts to a torque of 43.32–53.51 Nm (4.42–5.46 kgcm).
We assemble and install the other three pistons in the same way.
After installing all the pistons, reassemble the engine in reverse order.
Add a comment Cancel reply
You must be logged in to post a comment.
Passenger cars are equipped with different types of engines; power units may differ in volume, power, and design.
If oil consumption in an engine increases, the most common reason for this is worn or broken piston rings; replacing them is quite labor-intensive work, and also requires certain plumbing skills.
Let's move on to the cylinder block
We remove the pallet. Rotating the crankshaft as it is convenient for us, unscrew two bolts on each connecting rod cap. We use a TORX E10 head for this.
We take out the pistons along with the connecting rods. To do this, use the wooden handle of a hammer to press the connecting rod from below and lightly tap it to knock it up. We remove the old liners and buy new ones of the same size according to the markings on them. Here is another stone in AvtoVAZ’s garden, the owner has never climbed into the car from the interior or into the engine, but three pistons were of group “B” and one was “C”. It turns out that at the factory they re-sharpened one cylinder a little and simply put an enlarged piston there, no words. There are no options, we take group “C”, don’t sharpen the engine because of this. We will not touch the main liners either.
We buy a new piston group that does not bend the valves, connecting rods and connecting rod bearings.
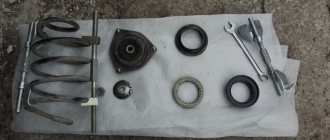
Eliminating longitudinal play of the crankshaft
It was noticed on this motor. To eliminate it, replace the thrust half-rings. Standard and repair sizes are available. We take the first repair size, if they are too tight we sand them down a little. We unscrew the middle main bearing and gently push it with a screwdriver and move the half rings. The mark on it is in the form of three serifs, shown below.
When the half ring comes out a little, turn the crankshaft, it will push it out. There are two types of half rings: white at the front and yellow at the rear; the grooves on them should point towards the crankshaft cheeks.
We install them as we removed the new half rings; if they go in with great effort, you can grind them a little on a small abrasive stone, but not from the side of the grooves. Checking the play.
We tighten the main bearing with a torque of 8 kgf*m.
Assembling the piston
There is an arrow stamped on the top of the piston; it should be directed towards the front of the engine. And there are marks on the connecting rod that should look the same way.
We insert one retaining ring into the groove on the piston. We insert the connecting rod into the piston and, having lubricated the connecting rod and the piston pin with oil, insert it into place. Insert the second retaining ring. Although this operation seems simple, it will take some pains. We inspect the assembled structure; all retaining rings must be clearly in their grooves, otherwise a ring that has jumped out while the engine is running can cause a lot of trouble.
Engine piston rings
In an internal combustion engine (ICE), piston rings (PR) serve as a seal between the cylinder walls (liners) and the piston, due to which compression is created in the cylinders. If you forget to put the PC into the engine during assembly, the engine will not start, since the necessary compression of the working air-fuel mixture will not be ensured.
In passenger cars, three rings are standardly installed on each piston - two compression rings and one oil scraper ring, and oil scraper rings can be stacked, that is, consist of several elements. Compression piston rings (CPRs) are used to create compression in the cylinders and are always made of high-strength cast iron with various additives. The upper CPC has the greatest strength, since it operates in the most severe temperature conditions and experiences maximum loads.
Engine oil piston rings (OPRs) are needed to drain oil from the cylinder walls; if the rings do not perform their function, the engine will consume oil. MPKs can be either cast iron or steel, and cast iron PCs are almost always made in one piece, but steel oil scraper rings can only be assembled (composite). Steel MPC for one cylinder consists of:
- two spring steel rings;
- axial expander;
- radial expander.
Thermal clearance of piston rings
PCs are spring discs with one cut - when installed on the piston, they expand, and in the sleeve they are pressed tightly against its walls. In order to achieve maximum compression of the working mixture, the cylinder walls must be as smooth as possible (without defects), and the shape of the internal cavity must be perfectly round. On the piston, the PCs are placed in special grooves, moreover, they are not seated tightly, and on a cold piston they move freely in the grooves.
Piston rings have thermal clearances:
The clearances must be certain; if they are larger or smaller than the required value, the piston group will quickly fail. One should take into account the fact that when heated, the metal expands, and if the thermal gap of the PC is too small, the piston group will begin to overheat. With large gaps, tightness is not ensured and power losses occur.
For passenger cars, as a rule, the following clearances are established:
- between the grooves and the PDA - from 0.02 to 0.08 mm (for the upper ring the gap should be slightly larger);
- between grooves and MPC – from 0.05 to 0.06 mm;
- at the junction - from 0.25 to 0.5 mm.
As wear occurs, the gaps in the PC increase, and they should not exceed:
- between the ring and the groove – 0.15 mm;
- at the junction – 1.0 mm.
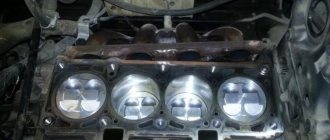
Cylinder head
- The camshafts are new from the factory.
- Aluminum timing gears with adjustment.
- AMP valves are nitrided. They are resistant to high temperatures.
- Bronze valve guides and valve seats. Bronze has the ability to dissipate heat.
- Valve seals Victor reinz.
- Standard valve springs.
- The empty cylinder head is ground to a smooth surface and protrusions in the bores are removed to obtain a smooth surface.
- I recommend purchasing cylinder head bolts from a Fiat car from Payen. They are able to maintain high compression throughout their entire service life.
VAZ piston rings
The Volzhsky Automobile Plant produces engines for front-wheel drive and rear-wheel drive cars; piston rings for VAZ engines were originally supplied by the Michurinsky plant. The Michurins produced a lot of defects in their products, and since 1986, their own production was established in Tolyatti. Currently, there are many different manufacturers that produce PCs for VAZ engines, in particular, these are:
- AVTOVAZ (Tolyatti);
- STK (Samara);
- GOETZE (Germany);
- MAHLE (Germany);
- NPR EUROPE (formerly SM, Japan).
Signs and causes of wear (breakage) of piston rings
On VAZ cars, the engine wears out during operation, and the PCs also fail. Rings can:
- break into two or more parts;
- wear out in thickness;
- have general wear and tear.
Parts often break down due to overheating of the internal combustion engine; in this case, compression in the cylinders decreases and the engine loses power. Signs of a faulty PC are:
- bluish smoke from the muffler pipe, especially often it appears after a long period of idling when the gas pedal is sharply pressed;
- increased engine oil consumption;
- drop in power, the motor stops pulling;
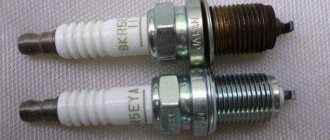
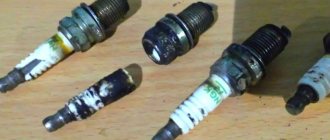
- coking of spark plugs.
If there are signs of a malfunction in the piston group, the piston rings are replaced first. But replacing a PC does not always give the desired effect; often after repair the engine continues to smoke and consume oil. The reason for this is simple - there is wear in the cylinders themselves. In the block, the liners usually wear out unevenly - they take on an oval shape; due to wear, the piston rings do not fit tightly to the cylinder walls and do not provide a tight seal.
About filters and oils
I immediately recommend pouring oil no lower than Motul 5W40, which will provide all rubbing surfaces of the engine with an oil film. Oil and air filter from Bosch.
What is the approximate cost of the above spare parts?
- The bottom of the motor will cost 24,000 rubles.
- Cylinder head 16500 rub.
- Mounted 20,000 rub.
- Oil and filter 5000 rub.
In total, excluding work, spare parts cost 65,500 rubles, or $1,100. Such repairs for a domestic car are too high, since the assembled unit 21126 will cost 75,000 rubles, but in our case you will have an engine with a higher compression ratio, higher compression, good pick-up from below, reduced fuel consumption, power of approximately 120 hp and a resource of 350,000 km minimum. If the belt breaks, the valves will no longer meet the valves; it will be enough to set the marks and install a new belt. Since there will be a long intake manifold and an exhaust manifold without a catalyst, the engine will “breathe” more freely, which means fuel consumption will decrease and power will increase.
Replacing piston rings
On VAZ cars, as well as on all other models of passenger cars, it is advisable to change only the piston rings only if:
- there is no exhaust in the cylinders;
- there are no signs of damage to their inner surface.
If the liners are significantly worn, they need to be bored, and if the last size was already used before, the cylinder block needs to be relined. You can replace the PC on any VAZ engine without removing the internal combustion engine; this will require removing the cylinder head and oil sump. PCs are replaced if the gap at the joints does not exceed 1 mm.
For example, let's consider replacing piston rings on a VAZ-2114 car with an 8-valve internal combustion engine; such work must be carried out on a pit or a car lift:
- turn off the ignition, put the gearbox in neutral, disconnect the negative terminal from the battery;
- drain the antifreeze, remove the air filter housing along with the pipe (injector corrugation);
- remove the valve cover, camshaft, loosen the timing belt and move it to the side;
- disconnect the wires and cooling system pipes from the cylinder head, unscrew the head bolts;
- unscrew the nuts of the exhaust pipe of the muffler;
- We completely free the cylinder head from all fasteners that prevent it from being removed, and we remove the cylinder head;
- if there is protection under the engine, remove it;
- place a container under the engine sump, unscrew the plug on the crankcase, drain the oil;
- remove the lower hatch of the gearbox housing (three bolts);
- Using a 10 mm wrench or a socket wrench, unscrew all the oil pan bolts;
- dismantle the pan, remove the oil receiver;
- Unscrew the connecting rod nuts, remove the lower connecting rod caps, and carefully knock the pistons and connecting rods upward. Pistons should be knocked out through a soft metal drift or through a wooden block. First, you need to carefully knock out the connecting rod bolt without damaging the threads on it, then place the drift on the end of the connecting rod - in no case should you hit the bearings or the seat underneath them;
- It is recommended to remove the connecting rods one at a time, and immediately attach the caps to them; the caps should not be confused with each other, they are placed back strictly in their places, and a lock to the lock is required;
- remove the PC from the pistons, use a piece of the old ring to clean the piston grooves to bare metal. Be sure to check the cleanliness of the groove all around; there should be no coke left in it;
- We install new rings in the grooves, start with the lower MPC, then install the middle compression PK, and lastly the upper one. For installation, you can use a special device, but it is still more convenient to install the rings by hand. If the MPCs are cast iron, they cannot be bent along their axis, they can only be carefully moved apart. Compression rings also need to be bent carefully, to a minimum;
- we install the piston in place using a special mandrel, hammer it in with a wooden hammer handle or a brass or bronze drift;
- We install one piston-rod at a time, and immediately attach a connecting rod cap to each one. The connecting rod nuts should be tightened with a torque wrench, force - from 4.5 to 5.5 kg;
- then we put everything in place - the oil receiver, the engine sump, the cylinder head. We fill the radiator with antifreeze, oil into the crankcase, and start the engine to check. After replacing the PC, the internal combustion engine may initially smoke and consume oil - the engine needs to be run in for approximately 2 thousand km. It happens that despite the seemingly normal condition of the liners, the internal combustion engine continues to smoke even after replacing the rings after break-in. In this case, you will have to bore the cylinders and install a repair piston group.
Conversion of the Priora engine to plugless pistons
To replace the pistons, you need to disassemble the engine. Step-by-step engine disassembly:
- put the car on a lift;
- drain the oil, antifreeze, remove the head;
- remove the pan, unscrew the oil receiver;
- unscrew the connecting rods and dismantle the connecting rod and piston group;
- replace the pistons with plug-in ones (having previously determined the type and size of the pistons);
- replace all gaskets, oil seals, valve stem seals (engine repair kit);
- replace the oil and filter with new ones;
- make valve adjustments;
- assemble the engine.
When replacing the piston, you need to remember the correct placement of the connecting rod and piston relative to the crankshaft and block.
Replacing pistons on a Priora increases engine reliability, normalizes fuel consumption, and makes the engine more flexible in different operating modes.
Replacement of piston rings, connecting rod and pins, if they are not worn out, is not carried out. You can leave your family.
Decarbonization of piston rings
If the engine starts to smoke, there is a possibility that there are rings stuck in the piston grooves. Nowadays, there are many different modern means for decarbonizing piston rings, and many drivers use them to restore engine performance. Among the most popular compositions are:
- Nitrox Power;
- LAVR ML-202;
- Titanium;
- LIQUI MOLY;
- WYNN'S.
How to keep the timing belt in good condition for a long time
To avoid having to constantly buy new pistons, experts recommend that Lada Priora owners follow these rules for operating the car:
- It is necessary to maintain the working condition of each functional component not when it is on the verge of failure, but by regularly maintaining it and preventing breakdowns.
- Periodically renew the belt and monitor the condition of the rollers.
- If the device has 8 valves, when reinstalling, do not overtighten the belt, otherwise it will quickly break. 16-valve devices are not afraid of this problem, because the manufacturer specially installed a semi-automatic roller, which allows connecting 2 slots on the roller to each other when tensioning the belt. Then the tension will be the most optimal.
Which plugless pistons are reliable?
If you do not have the time and desire to constantly care for your car, you should think about converting your engine pistons to plug-free ones, which are characterized by a longer duration of trouble-free operation. Of course, each component has a number of advantages and disadvantages, your task is to choose the lesser evil. Experts recommend taking a closer look at the following non-tube pistons in an auto parts store:
- “Avtramat” - cost about 20,000 - 23,000 rubles per set. For 4 pistons you will have to additionally buy pins, stoppers and rings. If you look at the size category, the devices are classified as group C. The advantage of the “Avtramat” is that the noise level of the car’s movement remains minimal, because the new piston is installed on top of the original one.
- STK, which is praised by many car enthusiasts. They are distinguished by a Teflon coating that protects the “skirt”, they also have a displacer, and the bottom, as in the previous sample, is thicker. The thrust of the Lada Priora after reinstalling the pistons remains the same as before. The set costs from 2,200 rubles, and is sometimes difficult to find.
- ShPG from engine 21124 is another good option for the Lada Priora.
- The STI forged part is suitable for racers. Forging assumes a wide range of revolutions, up to 7800 revolutions in 1 minute.
There are still many kits on the auto parts market that offer plug-in pistons for the Lada Priora, but many of them break prematurely, so before buying new products, read reviews on the Internet.
Features of installing new pistons
To determine the size category of pistons, before purchasing you need to disassemble the engine, drain the oil and coolant, remove the wiring, then the throttle valve with a filter element, the intake receiver, sensors and, finally, the cylinder head housing.
Once you have reached the cylinder blocks with the pistons, remove the old parts by pulling them with the connecting rods through the crankcase, seal the head using gaskets, then install the plugless pistons and reassemble in reverse order.
Attachments
- We purchase the intake manifold from PRO.CAR. Such a receiver allows you to level out the torque plateau so that the thrust that appears at the bottom does not drop sharply to 6000 rpm.
- We leave the throttle valve at the factory.
- Injectors from ZMZ 406 have a higher throughput and are also less prone to clogging.
- Luzar water pump “Turbo” version.
- The remaining elements of the cooling system are installed at the factory.
- The oil pump can be left standard, just install new gears or increased performance gears from PRO.CAR. Be sure to purchase a new oil pickup.
- Reinforced timing belt kit from Gates.
- Insert type exhaust manifold instead of catalytic converter.
- New spark plugs and ignition coils.
- Gasket set.
- Reinforced engine mounts.
Before installing the parts, you need to give the cylinder head for grinding and installation of new parts. After which assembly of the bottom is required.