01/25/2022 1,561 Alarms
Author: Victor
The operating instructions for Pandora 3910 indicate that this is a premium car security and service system with automatic and remote engine start functions. This model is equipped with a built-in GSM module, with the ability to connect to 2 digital CAN buses.
[Hide]
Why should you buy a Pandora alarm system?
When studying the alarm systems presented on the domestic market, vehicle owners should pay attention to the security systems of the Pandora brand.
This manufacturer presented to Russians a wide range of systems that protect cars from theft. Among car enthusiasts, the Pandora dxl 3910 modification is very popular, which, in addition to outstanding technical capabilities, has a large number of advantages.
The Pandora dxl 3910 security complex, a review of which can be found on specialized Internet resources, allows the driver to control all functions via mobile communications or a personal computer, or using a miniature tag. Also, the pandora dxl 3910 system is capable of working both with the (free) application for Android and iOS Pandora info, and with the virtual service P-ON.RU.
Preparing for prescribing
Since programming a new Pandora alarm key fob can only be done by resetting the memory of previously registered devices, prepare all the key fobs that are supposed to control the security complex. All of them must be written into the memory of the central unit at one time, since the moment you enter the key fob programming procedure, information about the “old” set will be irretrievably erased. Be sure to check the serviceability of the batteries in all key fobs and radio tags of the system.
To enter the programming menu, you will need to know the service PIN code. Its factory value is 1111, but it is recommended to change it to your own. Without knowing the service PIN code, you can use the secret code indicated on the card included with the alarm system.
How to install correctly?
Do-it-yourself installation and connection of the alarm system to the VAZ-2114 central locking Do-
it-yourself installation of the system should be done with the battery disconnected in order to prevent short circuits in the wires and damage to the equipment. You must first turn off all electrical appliances and the ignition. To de-energize the on-board network, the wire with the negative contact is disconnected from the battery.
Step-by-step instruction
Installation algorithm:
- The instrument cluster in the vehicle interior is removed. Depending on the design features of the vehicle, this procedure will differ, but in any case, it will be necessary to dismantle the decorative lining in the car interior. When removing, all connectors with wires must be disconnected from the device. There should be a CAN interface behind the instrument panel; all car alarm wires will subsequently be connected to it.
- The lower part of the interior dashboard is being removed. As a result of gaining access to the OBD block, a digital bus is connected.
- A microprocessor device is installed in the free space on the instrument panel. For its installation, you can choose a place behind the glove box or radio. It is prohibited to locate the module near sources of interference, high temperatures and moisture. To prevent liquid drops from entering the device, it must be placed with the connector facing down. Additionally, the block can be wrapped with foam rubber to prevent the negative effects of vibrations.
- The microprocessor module is fixed using plastic ties.
- Installation of the service key is carried out as hidden as possible inside the car. It must be placed so that the consumer has easy access when he is in the driver's seat. You can additionally wrap the button and wire with electrical tape of a standard color, this will ensure its camouflage.
- The transceiver is installed in the vehicle interior. It must be placed as high as possible to ensure high-quality transmission of impulses. There should be no electronic devices or metal products in the vicinity of the antenna module, as they will cause interference. Because of this, the range of the alarm will be significantly lower. The surface of the windshield or rear window must first be cleaned and degreased before installation.
- All additional controllers and a microphone are installed inside the car; they do not need to be placed in the engine compartment. The only exception is the temperature sensor.
- If an additional device is used, it must be placed under the hood, on the cylinder head or on the cooling system pipe. The microphone must be installed so that there are no sources of sound muffling in the place where it is installed. An additional shock sensor is installed in the car's interior, in the central part of the body.
- A limit switch is installed on the hood. If the devices were purchased in addition, they are installed on the doors, as well as the luggage compartment.
- With the additional use of a siren, the equipment is installed under the hood of the car. To place it, you must choose a hidden place that is not exposed to high temperatures or moisture.
- After installation, all elements are connected to the control unit and digital interface. The wires are laid under the decorative upholstery of the cabin, away from moving parts and elements.
The “Auto Install” channel talked about the features of self-installation of an anti-theft system using the example of a Mazda car.
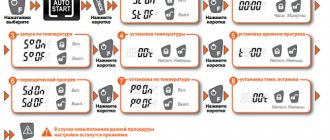
Programming Pandora DX 50
How to disable auto start on Pandora alarm
Don’t forget to program the system for correct operation of auto and remote start.
Recording idle speed
Idle speed is prescribed at programming level 1-3.
After reaching this level, you must turn on the ignition and start the engine (it must be warmed up, idle speed must correspond to the idle speed norm for a warmed-up engine). Wait for a stable idle speed. Then press the “VALET” button once. Successful recording of revolutions will be confirmed by 1 siren beep; in case of unsuccessful recording, 5 siren beeps will sound. After recording, the ignition should be turned off.
At this level, you can start and stop the engine multiple times; exiting the mode will occur only after pressing “VALET”.
Programming keyless bypass of the standard immobilizer
Immobilizer bypass programming is performed at level 1-21.
When entering a level, the LED will turn green. After starting the engine, if everything is connected correctly, the LED will begin to flicker green, and the siren from the base unit will emit a short beep.
To complete the procedure and save the data, you must press the VALET button.
Pandora DX-50S
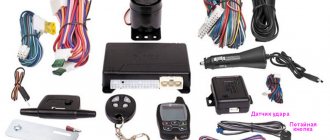
- a high-quality and reliable security system with the most modern electronic components. To protect against electronic hacking, code grabbers use a crypto-resistant command authorization code with a unique algorithm and an individual 128-bit encryption key. The alarm system is equipped with a 2CAN+LIN interface for working with modern cars, as well as an IMMO-KEY port for implementing keyless autostart, while all standard keys remain with the owner (the electronic key is not placed in a secluded place in the car). The system of intelligent remote and automatic engine starting can be activated periodically, by temperature, at a given time, by a decrease in the battery charge level or by days of the week. The complex operates at a frequency of 868 MHz and is equipped with a key fob with an LCD display, which notifies the car owner about the security status (open/closed), sensor activation, and also allows you to adjust the sensitivity of the sensors and store a history of alarm events. The developers of Pandora DX-50S achieved a record power consumption of only 7 mA. In addition, the alarm is equipped with a shock, tilt and motion sensor, which instantly responds to blows to the body, burglary, jacking and attempts to evacuate the car. The security system automatically checks whether the key fob is within the range of the transceiver.
Functional features of Pandora DX 50S:
- interactive dynamic code with individual encryption keys to protect against signal interception and relay by code grabbers;
- intelligent automatic engine start;
- multi-system 2xCAN interface;
- integrated keyless immobilizer crawler with key cloning;
- support for working with digital LIN buses of cars;
- multi-channel RFM interface at 868 MHz;
- double-sided key fob for controlling and monitoring the system status;
- compatible with Pandora Alarm Studio.
Bypass the standard immobilizer of Toyota Land Cruiser 150 Pandora 3910 via RX/TX
To implement the automatic engine start function, it is necessary to make connections to the vehicle circuits RX, TX, SLP. Connections to the RX and TX circuits are made under the steering wheel in the BCM module, (MAIN BODY ECU) in the middle connector.
ATTENTION! The RX/TX terminals in the BCM connector may be missing on some vehicles!
Connect the Starter wire from Pandora to the SLP (Steering Column Lock) wire, in the connector there is the central wire No. 4.
How to install correctly
Pandora alarm programming mode
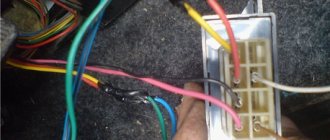
The components are installed in accordance with the recommendations set out in the installation instructions. All switching operations are performed on the machine with the battery disconnected. If it is necessary to connect cables made of different materials, then special couplings are used to reduce electrochemical corrosion. The remaining free cables are twisted into coils and secured with clamps.
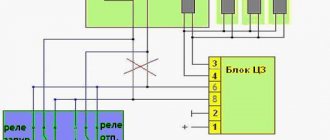
Connection diagram
The connection diagram is attached to the equipment separately. The documentation describes the purpose of the cables included in the patch harnesses. Recommendations for connection are provided, and the ratings of fuses that protect circuits from short circuits are indicated.
When installing temperature sensors, you need to pay attention to the configuration of the device; some of the complexes are equipped with Dallas Semiconductor sensors equipped with 3-wire harnesses
Step-by-step instruction
Equipment installation sequence:
- Remove the structural elements of the instrument panel, providing access to the car’s digital bus connectors. Some modifications involve removing the instrument cluster; the central unit is located deep in the niche. On some machines, the diagnostic connector line is used for switching.
- Secure the unit body with screws or clamps. The location of the device should not be filled with condensation and overheated by hot air from the air conditioning unit. To reduce vibration loads, it is possible to wrap the controller body with foam rubber.
- Decide on the location of the programming key. To ensure increased secrecy, patch cables that imitate factory wiring are used.
- The transceiver unit is located openly on the surface of the windshield. To increase the operating range, the module is installed near the upper edge of the body; it is recommended to lay the cable at a distance from the standard electrical wiring (to reduce interference).
- Place the microphone and additional sensors inside the car; the placement pattern depends on the car model and the wishes of the owner. The temperature sensor and siren are located in the engine compartment.
- After installing the components, cables are laid to connect the connectors. The manufacturer allows increasing the length of the cables; the junction points are protected with insulating materials.
How to install?
To connect the system, use the diagram found in the Pandora 3910 operating instructions.
The installation procedure is as follows:
- Open the hood and disconnect the battery terminal. To disconnect the negative terminal, you will need to loosen the bolt securing the clamp with a wrench. Then the terminal is moved to the side.
- Dismantle the instrument panel. Depending on the car model, the procedure may differ. To remove the facing elements, unscrew the bolts and remove the upholstery. Remove the dashboard carefully, disconnecting all connectors with wires from it. Right behind the tidy you will see a CAN bus; the electrical circuits of the security system are connected to it. The OBD diagnostic connector, power wires, fuel sensor and other components are connected to the bus.
- Then the lower part of the center console is dismantled. Behind the dashboard there is a footwell lighting system.
- Once open access to the OBD connector is obtained, you need to connect the digital bus.
- The main system module is being installed. It must be installed so that, if necessary, the car owner has access to the device, but an attacker cannot find it. We recommend installing the device in the free space behind the dashboard. Alternatively, you can place the unit behind the glove compartment, under the seat or behind the ashtray if there is free space there. Do not install under the dashboard in the area of the hood release lever. Mount the device and secure it in place. To eliminate the impact of vibrations on the module, it can be additionally wrapped in foam rubber.
- It is recommended to install the service button in a place inaccessible to criminals. In this case, the user must have access to this element from the driver's seat.
- The transceiver is installed inside the car. It is best to install it as high as possible to ensure high-quality signal reception and transmission. There should be no metal objects near the antenna adapter; their presence will result in poor signal quality and interference.
- Shock, tilt and motion sensors are mounted in the cabin. The installation location should be selected in accordance with the manufacturer's recommendations. It is advisable to place the sensitivity controller in the central part of the body. It is often placed on the partition separating the engine compartment and the interior. When installing the sensor, do not place a plastic spacer under the device, as its presence will cause the alarm to sound for no reason.
- Limit switches are installed on the doors, luggage compartment and hood. Connection of devices to the control module is carried out in accordance with the diagram.
The Auto Install channel showed the result of installing the 3910 security system on a Mazda CX-5.
Other installation maps and alarm connection points for the same car
- Installation of alarm system on Toyota Land Cruiser 200 2016 - car alarm installation map
- Installation of car alarm and chipless crawler on Toyota Land Cruiser 200
- Car alarm installation map for Toyota Land Cruiser 200
- Installing an alarm system on Toyota Land Cruiser Prado 2016 - car alarm installation map
- Installing a Pandora 3910 car alarm on a Toyota Land Cruiser Prado 150 - bypassing the immobilizer using imi/imo
- Installation of car alarm ZONT ZTC-700 on Toyota Land Cruiser Prado
- Installing Fortin Key Override All on Toyota Land Cruiser 150 2009-2013 PTS
- Installation of Fortin Evo All on Toyota Land Cruiser 150 2009-2012 PTS
- Installing Fortin Evo Key on Toyota Land Cruiser 200 2008-2015
- Connecting Fortin Key Override All on Toyota Land Cruiser 2008
- Installing Fortin Key Override All on Toyota Land Cruiser 1998-2002
- Installing a car alarm on a Toyota Land Cruiser - Connection points, location and colors of wires
Malfunctions and ways to eliminate them
What problems may a car owner encounter:
- The alarm mode is triggered for no reason. The system indicates that the sensitivity, tilt, or motion controller has been activated. Most likely, the cause is improper adjustment or installation of the sensors. Try reducing the sensitivity of your devices.
- The security complex does not send messages to the car owner's number upon request. There may be several reasons. The message center number may be programmed incorrectly. If the installation procedure was performed by specialists, then contact them to solve the problem. The reason may be that the cellular operator has blocked the sending of messages. Then you need to contact a representative of the company providing communication services.
- It is not possible to make a call to the complex from the car owner’s additional number. If you call the system number from another phone, then to identify the user you must enter a guest password. Initially, the “alarm” is assigned code 1234. If the system was installed by specialists, the password can be changed.
- The security complex cannot determine the license plate number of the car owner. Depending on the cellular operator, the company may use different prefixes at the beginning of the number. When setting up the car owner's phone, only those prefixes that are selected by the mobile provider should be used.
- The alarm mode has been activated, but the system cannot reach the car owner’s additional number. The reason should be sought in the operator. The voice mail option may be activated for this number. It needs to be turned off.
Loading …
Advantages and disadvantages of alarms
- Using proprietary developments to ensure vehicle protection. Since standard algorithms are not used to turn on security, the hijacker will not be able to use scanners to intercept signals. Author's technologies provide protection for all areas of the car at several levels.
- GSM connection. Using a special module included in the package, the user can, if necessary, determine the coordinates of the vehicle. This will help you quickly find the car in case of theft.
- Wiretapping the salon. Using a microphone, the consumer has the opportunity to hear what is happening in the cabin.
- Easy to configure basic parameters and control using a mobile device, as well as a monitoring server.
- A clear guide to changing security system parameters.
According to reviews, Pandora 3910 alarm systems have the following disadvantages:
- Complexity of installation due to the multifunctionality of the system. If setting up the alarm does not cause any difficulties for the user, then the installation becomes more problematic - you will need to connect to digital interfaces. As a result, you will need to independently connect the necessary module contacts. If you lack the skills, it is recommended to entrust the installation process to specialists.
- Failure of control elements. In practice, electronic tags often break, especially during long-term operation of the alarm system. If the problem with inoperability is the battery, then the power source will need to be replaced.
- High cost due to the extensive functionality and class of the car alarm.
Advantages and disadvantages
The list of advantages and disadvantages was created based on consumer reviews, let's start with the advantages:
- The presence of auto start allows the car owner to get into an already warmed-up car interior, which is especially important for the winter season.
- Effective machine protection. Many users criticize the system only because it was created in Russia. Despite this, the security complex copes with its duties perfectly even at critically low temperatures. The system consists of many devices and elements that provide protection at different levels.
- The presence of a GSM module will allow, if necessary, to determine the coordinates of the car if there has been a break-in and theft of the vehicle.
- Using the built-in microphone, the car owner can find out what is happening inside the car at any time.
- The presence of a clear manual will allow the car owner to independently adjust the main parameters of the system.
Minuses:
- Difficult to install. If you can set up the system yourself, then the situation with installation is different. If you do not have the skills and experience, it is better to entrust this task to specialists.
- Reviews show that in this model of the complex the key fob often fails. If the remote control is working, then you need to change the battery. In a situation where this does not help, you will have to check and repair the remote control.
- High price. Due to the use of high-tech solutions in production, the cost of the complex will not be small.
Security system installation
A car alarm can be installed by the car owner himself if he has the necessary technical knowledge. During the connection process, he should strictly follow the manufacturer’s recommendations, which are indicated in the instructions supplied with the security system.
The installation of the alarm must be carried out in a certain order:
- The (instrument) panel is partially dismantled, behind which there are: the CAN bus (the corresponding CAN wires L and H will subsequently be connected to it), sensor (fuel), harnesses (power), OBD connector.
- The part of the dashboard (lower) in which the lighting system for the feet is located is removed.
- After gaining access to the OBD connector, the CAN L and H digital bus is connected.
- The base unit of the security system is located, which is connected to the power wires of the machine.
- The system is programmed, all outputs and inputs are configured, and excess wires are bundled.
Nuances of installing a security system
When connecting an alarm system, the vehicle owner needs to pay attention to the color of the cable insulation:
Connecting the Pandora 3910 CAN bus to the Toyota Land Cruiser Prado 150
Connect the CAN bus to the diagnostic connector (OBD ll). By can Pandora 3910 sees all limit switches (including the rear window and hood), ignition, running engine, brake pedal, parking. By can it controls the central locking, emergency lights, unlocking the rear window, and raising the windows. If you have a Prado with a 3-liter diesel engine, then can also block the engine.
Diagnostic connector OBD ll
CAN-L - pin 14, CAN-H - pin 6
System Setup
The Pandora dxl 3910 car alarm has many positive aspects, including the simplest system setup via a laptop. Now we will look at this setting in detail, although if you have experience working with a computer, you will easily understand the program.
Program interface
To set up the system, you will need a mini USB cable, as well as the DXL Loader program, which can be downloaded from the manufacturer’s website:
Firmware, programs and instructions
Site page
After installing the program, connect the base unit and enter the PIN code specified in the plastic card included in the package using the “Valet” button.
Firmware update
Firmware version
It is important to download the latest firmware from the website, as sometimes drivers have had problems with some functions, for example, with the GSM dialing function, or with the Pandora info program. We are looking for the firmware here:. https://alarmtrade.ru/service/prog/
Firmware, programs and instructions
Previously, this mobile application did not work with models below the 5000 series, but it has been fixed for almost a year now. Therefore, download the firmware by clicking the “download” button in the interface.
Firmware update
Then click “Download firmware”. Then select the path to the folder to install the new version there, and click “Open”, “Download”.
Firmware download
After the firmware update is completed, you can proceed to programming the system.
Function programming
Before you start programming, select your car model in section 4, and then go to the CAN section, where, by the way, do not forget to indicate where you connected the relay, that is, which RDM-5 relay is responsible for what.
Car selection
System settings can be saved for later use or transfer to another vehicle. In general, this is where your work ends, if you have done everything correctly before.
Function settings
This system is rightfully considered one of the best, as it has excellent protective functions, wide functionality and ease of connection. Pandora has long become one of the leaders in the domestic market, thanks to a thoughtful approach to creating its systems.
Video
The Autoelectro channel showed how the Pandora 3910 alarm installed on a Toyota Camry works.
Do you have any questions? Specialists and readers of the AUTODVIG website will help you ask a question
Was this article helpful?
Thank you for your opinion!
The article was useful. Please share the information with your friends.
Yes (100.00%)
No
X
Please write what is wrong and leave recommendations on the article
Cancel reply
Rate this article: ( 2 votes, average: 5.00 out of 5)
Discuss the article:
User manual
What you need to know about using the “signal”:
- Activation and deactivation of the security mode can be done using a button on the remote control. To implement the function, the car owner must be within the range of the system, which is about five meters in the range of the car. Press the button on the key fob, after which the complex will begin encrypted data exchange between the device and the control unit. Information will be transmitted via one of 125 channels.
- To turn on the security mode when the Hands Free option is activated, you need to deactivate the ignition in the car and move away with the remote control tag to a distance of about ten meters. When the complex detects the tag moving away from the transceiver, the security mode will turn on automatically. To deactivate the protection, you just need to approach the car. The control module will detect the approach of the tag and turn off the security.
- If the key with the tag has been lost, you can disable the security mode using your smartphone. You need to make a call to the number set in the GSM module. When the security system responds, the car owner must enter the command “998*”.
Controlling the alarm from your phone
The complex can be controlled using a telephone; to do this, you need to call the GSM module number and enter one of the commands:
- to return to the previous system state, press #;
- To have the complex repeat the last message spoken, press *;
- the combination “1*” will allow you to activate the security mode;
- to disable the protection mode, enter the combination “0*”;
- to silently activate the security mode, enter “10*”;
- to disable silent protection, enter the combination “00*”;
- call for help - command “9*”;
- to listen to the history of events that occurred during the car owner’s absence, enter the combination “09*”;
- activation of the microphone for wiretapping the interior is carried out by pressing the “007*” keys;
- to request the balance of the SIM card installed in the GSM module, enter “100*”;
- to remotely start the engine, as well as extend its operation, enter “123*”;
- to stop the operation of the power unit remotely, enter “321*”;
- to request the current coordinates of the vehicle’s location, enter “500*”;
- activation of the power unit pre-heating device for diesel engines – “156*”;
- to disable this function, enter the command “651*”;
- the command “789*” allows you to enable automatic start of the machine’s engine;
- “987*” – prohibition of the possibility of remote engine start;
- combination “666*” ensures blocking of the power unit;
- to disable the machine’s engine blocking, enter the command “999*”;
- full information about the anti-theft system – “258*”;
- to activate the immobilizer, as well as the Anti-hijack function, you must enter the command “888*”;
- To disable immo and the Anti-hijack option, enter the combination “998*”.
The Alarm channel talked about the capabilities of an Android-based mobile application for controlling the Pandora 3910 complex.
When activating or disabling a particular Pandora 3910 alarm function, the system must confirm the action with a voice message.
Key Features and Features
Main features of the complex:
- the presence of an integrated GSM interface, data transmission is carried out over a 900/1800 MHz channel;
- possibility of simultaneous operation of the complex with two digital buses;
- connection of K-Line, LIN, P-Plus, K-Bass, V-Bass buses is allowed;
- a multifunctional interface is used to transmit pulses;
- data transmission between tags and the complex is carried out at a frequency of 2.4 GHz;
- 16 security zones operating independently of each other;
- Sensitivity, motion and impact controllers will allow you to detect unauthorized entry into the car;
- an individual dialogue encryption code is used for data transmission;
- for emergency activation and disabling of the security mode, another individual code is used;
- thanks to the presence of a USB output, the car owner can adjust the parameters of the installed system when connected to the port;
- the package includes a five-channel autostart unit, which allows you to configure and activate the start-up and control system of the power unit;
- the presence of a digital bus allows you to configure the control of the preheating system yourself;
- remote engine start can be configured by command sent from a smartphone on which the mobile application is installed;
- you can set the engine to start according to a timer, air temperature, at a set time, or when the voltage in the on-board network decreases;
- it is possible to control the main functions of the complex using a mobile gadget;
- wiretapping the salon, as well as the ability to listen to events over the phone;
- the presence of an option for remote motor blocking;
- it is possible to implement the function of obtaining the coordinates of the vehicle’s location, we are talking about both current coordinates and data sent to the phone from the alarm memory;
- another feature is the ability to notify the car owner via audio and SMS messages;
- the ability to configure controllers using mobile devices;
- Economical energy consumption will prevent the discharge of a dead battery.
Controlled areas
When the security mode is activated, the complex will control several zones:
- touch controllers;
- car door locks;
- the motion controller protects the interior from burglary;
- limit switches will protect the hood and luggage compartment from burglary;
- the system monitors the voltage level in the car’s on-board network and warns the car owner about a decrease in the parameter;
- the security complex controls the braking system;
- car alarm monitors the operation of the ignition system.
Andrey Popov showed how the Pandora 3910 security system installed on a Hyundai Taxon car works.
Pandora security system models
- Pandora LX includes models that are the most affordable, but can easily ensure the complete safety of the car. These are LX 3030 models; LX 3050 (with auto start); LX 3257; LX 3297 (with CAN module).
- Pandora DXL is the most numerous category, representing mid- and high-end models. All devices in this category are distinguished by the mechanism of an interactive encryption algorithm, the presence of a multifunctional sensor, the ability to connect via CAN, low current consumption and the ability to connect GPS - GLONASS and GSM units.
Alarms with auto start
Among the company's model range there are many worthy and reliable options.
The price of such devices starts from 8,500 rubles (for the Pandora DX-50S model with auto start, CAN/LIN interface and key fob with an LCD screen).
Pandora alarms with auto start have a number of advantages:
- simple and quick system setup;
- good range;
- affordable price;
- the ability to start the engine from a key fob, SMS, by timer or through the Pandora Online Pro mobile application for smartphones, where by logging into the user’s personal account, you can manage the settings of all your cars at once: start engine warm-up, receive information about the technical condition, ensure the effective operation of the security system .
Commands for controlling Pandora from a mobile phone
Today, Pandora car alarms are the best security system for a car with protection against remote hacking, a multi-channel radio path and flexible functionality that can be configured in many ways.
Manufacturers of automobile security systems implement the ability to monitor and control both the anti-theft system and the state of all vehicle systems. Pandora alarms use the latest technologies to provide an unprecedented level of security and service.
When choosing an alarm, for every person, not only security functions are primarily important, but also competent functionality with convenient operation.
How to enter system programming mode?
Self-programming of 3910 by car owners is not approved by the manufacturer, since this procedure is quite complex and can make serious changes to the factory configuration.
Programming can be done in several ways:
- using the Valet service mode key;
- via laptop and software;
- using a smartphone on which you must first install a mobile application.
To use the service button, the car owner must know the password. Initially, the complex is assigned code 1111. To program the system, open the doors and press the Jack key four times, between each click you must pause for one second. When you press the buttons quickly, the complex will perceive these actions as a double or triple click. When each digit of the password is entered correctly, the LED indicator will blink once. If the light blinks four times, this indicates successful entry into the setup mode.
If you want to use a computer for setup, you must first download the DXL Loader application onto it. The laptop is connected to the system via a mini-USB cable. After starting the software, a password is entered to enter programming mode. After programming, you just need to turn off the ignition, this will save the configuration.
User BaronKorf spoke about the features of the mobile application, as well as the web monitoring resource from Pandora.
Pandora PIN selection
Good afternoon everyone) In my last entry I mentioned that the alarm did not accept the PIN code. I was already thinking that nothing could be done, but I decided to still try to solve this problem. First things first) The saga with the alarm system that came with the car began at the beginning of spring. In the evenings I studied diagrams, read the drive, talked to people about this topic, downloaded and read manuals, made printouts, in general, prepared thoroughly. Day X came, the system was completely dismantled, quite a bit of snot from the previous installation, perhaps not the first, was removed.
And then, when connecting to the laptop, in order to upload the settings file created in advance, it was not possible to enter the programming mode. I called tech. Pandora support. It should be noted that the people there are friendly, responsive, and quickly get in touch; this is not the first time I have contacted them. I explained to them how the system behaves, they told me that this was entering the wrong PIN (I almost misunderstood the instructions - it seemed to me that the system was not responding correctly to the input). They said that this was only a replacement of the block, and since the signaling system was already ancient, of course there were no blocks available. If it were modern, the issue would be resolved for 500 rubles - I brought the old unit, received a new one, but, alas. Next, I found the phone number of the previous owner of the car. I contacted him and talked. He promised to find the signaling instructions where the PIN code was written, but several days of waiting did not bring the desired result. I started to storm the Internet, in particular this resource, and it turned out that there was a way to solve the problem. Pavel helped a lot with the implementation xxxPahanxxx Pasha, thank you very much again, helped out once again