Just a few years ago, installing a car alarm with your own hands seemed like the job of experienced electricians. However, the rapid development of Internet communications (forums, video instructions, richly illustrated reviews and informational articles on websites) has prompted many car enthusiasts to think about the possibility of self-installation.
Are there any advantages to installing it yourself, what qualifications and tools are needed for this, what kind of alarms are there, and how to technologically install a car alarm yourself - the answers to these questions are intended to help those who still doubt their abilities.
For video instructions with practical tips on installing an alarm system yourself, see the end of this article.
Tools and materials needed to install a car alarm
A car alarm installer must have a decent supply of tools. This list includes at a minimum:
- Wire cutters - used to cut wires and expose insulation.
- Insulating tape - necessary for insulating twists and wire harnesses. The electrical tape must be of proper quality, soft and well heated. Reliable electrical tape stretches and sticks well only when stretched.
- Screwdrivers, a plastic tool for disassembling the interior - all this will be needed in order to disassemble the panel in the car.
- Steel broach - for pulling wires from the passenger compartment to the engine compartment.
- Multimeter, test lamp - for “calling out” unfamiliar wires.
- A device for cutting power wires - will be needed when connecting autostart circuits.
You cannot install an alarm in your car without a tool. Therefore, you need to get everything you need in advance.
Availability of autorun function
All modern car alarms have an autostart function, which can be activated directly by yourself or by programming the key fob. Like any system, this function has its advantages and disadvantages.
Advantages
Having understood the main features of the automatic start of a car alarm, you can appreciate all the advantages that such a function provides. Among the main positive factors are:
- The ability to go out in the morning to a fully warmed up car. This allows you not to freeze in the car, but to leave the entrance, get into the car and immediately drive.
- Significant time savings, which is so important for a modern person. Using the autostart option will allow you to avoid wasting time waiting for the engine to warm up to operating condition.
- The driver is guaranteed to be able to drive his car even in severe frost. If you set autostart in a certain mode, the engine will start when the temperature drops to the programmed parameter.
- Significant reduction in possible wear of parts, which significantly increases the overall engine life.
Along with the positive aspects of using an automatic alarm system, it is worth noting some disadvantages of its use.
Flaws
The most important disadvantage is the increased fuel consumption. In the cold season, the engine will have to be started several times a night, which will waste additional fuel.
Another disadvantage is the possibility of draining the battery. During the process of starting the starter, a fairly large amount of current is consumed, as a result the battery may be discharged a little faster than expected.
In order not to be faced with a failed battery in the morning, it is important to configure the system correctly. It is necessary to allow the motor to run for about 15 minutes so that the charge is fully restored.
This is interesting: The design and types of front shock absorber struts and instructions for replacing them in 13 stages
The main purpose of the alarm is to ensure the maximum level of comfort during the operation of the car. For this reason, all the pros and cons should be considered in this spectrum. With the right approach, all disadvantages can be significantly reduced. The main thing is to know how to start a car from autostart correctly. You can’t fix only increased fuel consumption, but as you know, you have to pay for comfort.
What does a car alarm consist of?
Before installation, you should study the main components of the security system:
- Alarm block. Processes signals from the sensor and antenna and gives commands to actuators.
- Antenna - receives a signal from the key fob and connects the system with the owner’s remote control. The antenna can be built into the unit.
- Shock sensor is a sensor that responds to impacts and loud sounds. It triggers siren signals when a car thief wants to use the car. It can also be built into the block.
- Service button VALET - in the language of the installers - “Valet”. Used for emergency disarming by entering a PIN code or programming security functions.
- The control key fob is what controls the alarm.
- User's Manual. There are two types: operation and installation. It should be mandatory, since alarms have different control methods.
- Wiring - connects all elements together.
The car alarm system
Siren is not included in the required kit. Various GPS, CAN and GSM modules are also not included. Such devices are purchased separately or as part of security systems.
How does autorun work?
The alarm system is an electronic system that consists of a block with contact groups. It is used to connect wires, as well as a key fob, which serves to transmit a control signal to the unit.
When a signal from the key fob is sent, the system reads the code received from it and simulates a normal car engine start, namely:
- the car's ignition is turned on;
- the clutch is removed and the starter is cranked;
- the system monitors engine starting;
- After the engine starts, the starter stops.
Most modern car alarms have a so-called intelligent autostart, in which the system repeats the start of the starter and increases its operating time if the engine does not start the first time.
After starting the engine, the system turns on programmed functions, such as heated glass, steering wheel, interior heating or air conditioning, etc.
What types of alarms are there?
Automotive systems are divided into:
- analog;
- digital.
Digital ones use the vehicle’s CAN bus to communicate with electronics and greatly simplify the installation process. CAN firmware interacts with the car’s electronics and controls the central locking, horn, door switches, sees many injection parameters and is able to recognize whether the car owner has put the car on the handbrake. Such alarms are more expensive than their analogues, but are most suitable for modern cars.
Digital car alarm operating diagram
Analog alarms are installed on old or budget cars that are not equipped with a CAN bus. This is the same type of alarm system where door limit switches, lock drives, etc. are installed separately. For analog signaling, you need to additionally purchase door and trunk closing drives, as well as limit switches.
Ignition switch contacts
The ignition switch module is equipped with several contacts, but the voltage from the battery always goes to one - to “30”. There is also contact “50”, which is closed with “30” when the starter is started. Use this information when installing an alarm system on any car, even an antique one. Modern cars use many circuits:
Standard ignition switch circuits
In general, to install an alarm on a car, you need to know the designations of all contacts.
Installation of a car alarm, as well as repairs, begins with disconnecting the battery. Then you can call yourself which contacts are connected to terminal “30”:
- Pin 15 is part of the IGN1 circuit;
- “15/2” – IGN2;
- The contact in the ACC circuit is designated as follows: 2, ACC, R.
You can determine the purpose of the contacts yourself, for which you don’t even need to start the car. Use an ohmmeter, but don't forget to disconnect the battery!
When carrying out repairs or installation yourself, it is enough to remove the “negative” terminal from the battery.
Determining the installation location
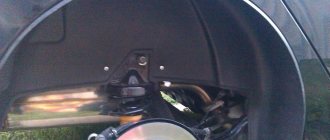
When installing the system, it is necessary to provide maximum obstacles to car thieves. Such an obstacle is a carefully hidden security system control unit.
The block should be in an inaccessible place: under the panel, very deep. The block is mounted in such a way that to remove it it is necessary to disassemble the interior as much as possible, ideally to remove the entire panel. Installers try to place the unit behind the instrument panel.
If the alarm control system has a built-in antenna, then it should be installed as high as possible, on non-metallic products under the car panel.
Setting the sensitivity of the shock sensor
The operating principle of a two-level sensor is based on the piezoelectric effect. It picks up the sound vibrations that occur when the car body is struck. For correct operation, it must be rigidly attached to a metal part of the body. Otherwise, it will react more to the noise around it than to the impact.
The setting consists of adjusting the warning zone and sensitivity level. To do this, you need to turn on the security mode and after 40 seconds lightly hit the body.
The sensitivity levels of the shock sensor are adjusted by two short presses of the first key fob button. Mode switching is indicated by light and sound signals. The corresponding symbols are displayed on the liquid crystal display of the key fob.
The alarm system has many modes and functions, the description of which does not fit into the article format. To fully master the security system, you must carefully study the instructions.
Installing a car alarm with your own hands
Installation of a security system includes the following operations:
- studying the installation map;
- wiring harness for power distribution;
- block installation;
- connecting the central lock and limit switches;
- connection of siren and light signals;
- connection of autostart circuits;
- setting up the shock sensor;
- installation of a GPS search beacon;
- electronic chip programming.
It is important to follow the sequence of operations and take into account that the “plus” and “minus” power are connected last.
Studying the installation map
Any alarm system has its own installation map for a specific car. They are found on the websites of security system manufacturers. If the alarm is connected to an old car with a minimum of electronics, then a card is not required.
The installation map contains information about the connection points in the machine.
Example of a car alarm installation map
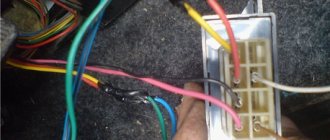
Wiring Harness
An auto electrician who has studied the installation map knows which wire will go where. Then he needs:
- Cut off excess wires on connectors that will not be used during installation.
- Separate the wires into several sections and tie them together with insulating tape. The “coiled” wiring will resemble a tree.
Wiring Harness
After this, you need to start installing the alarm.
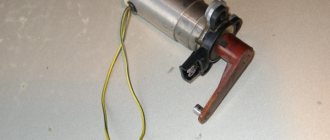
Block installation
Having disassembled and removed the instrument panel, an alarm unit is installed behind it. Secure with double-sided tape and nylon ties.
Installation of the control unit
If the alarm system has a CAN module and has keyless bypass of the immobilizer, you should not bind the unit: it will be needed to calculate the electronic key chip.
The installer must now route the wires into place. The VALET button must be installed in a hidden place.
VALET button
Connecting the central lock and limit switches
Connecting the locks is the most difficult part of installing an alarm system. If the alarm system has a digital connection, then this is not necessary. It is enough to simply flash the block for the desired make and model of the car, then connect CAN low and CAN high.
When connecting via analogue, you need to find out how the standard alarm locks work: by plus or minus. In accordance with the diagram included in the kit, connect the wires as needed. If the car does not have a standard alarm system, it is necessary to install drives in the doors and control the central locking by minus. The drives are connected in parallel. It is necessary to have a supply of wires.
Limit switches are limit switches for doors, trunk and hood. They signal the opening, after which an alarm is triggered.
Installation of the limit switch:
- A hole with a diameter corresponding to the switch is drilled in the rack.
- The wire from the limit switches branches into 5 parts - the trunk and doors.
- The limit switches are mounted in the body pillars, and the free contact is connected to the alarm limit switch wire.
Limit switch wires
After installation, you can briefly connect plus and minus and check the operation of the limit switches. The car is armed, then the door is opened. The presence of an alarm indicates that the limit switches are connected correctly.
Connecting a siren and light signals
The siren is installed in the engine compartment or under the wing. The positive wire of the siren is pulled together with the hood limit switch wire by pulling it through any rubber plug in the engine panel. The minus signal of the siren is connected to ground. The siren can be secured with two metal screws.
Installed siren
Light signals are dimensions or hazard warning lights. The latter has become the most popular and basic. The wires from the alarm are simply connected to the corresponding outputs of the hazard warning button or to the size switch.
Connecting light signals
Connecting autostart circuits
These circuits include:
- tachometer signal;
- handbrake signal;
- power wires of the ignition switch.
The tachometer signal is needed by the security system to control engine operation. Autostart will not work without it. This signal is taken from the tachometer, generator excitation indicator or oil pressure sensor.
The handbrake signal is taken from the indicator on the instrument panel or the limit switch in the floor under the brake handle. If the car is equipped with an automatic transmission, then this signal is not needed: just cut the jumper on the alarm housing or install the appropriate firmware.
Auto start power wires are everything that relates to the ignition switch.
There are four similar wires:
- permanent “plus”;
- start;
- first ignition;
- second ignition (ACC).
Autostart power wires
According to the diagram, they need to be securely twisted with two layers of insulating tape.
Setting up the shock sensor
If it is built into the unit, then the adjustment is carried out through the alarm programming menu using a key fob or using software via a PC.
Traditional shock sensors have two adjustment screws for a flathead screwdriver. First, the sensor is installed on a metal product that has a rigid connection with the body.
Shock sensor location option
Then you need to close all the doors and check the operation of the sensor by hitting the pillar or wheel:
- first level shock sensor - triggered by a light blow to the tire with your foot;
- second level shock sensor - triggered by hitting the stand with your fist.
The first level involves a light blow and a single siren signal. The second level is a long alarm. If the operation is incorrect, you need to tighten or unscrew the screws until the desired result is obtained.
The procedure is repeated until the alarms cease to be false. The tilt sensor is non-adjustable.
Installation of a GPS search beacon
The search beacon is hidden under the car panel and is necessary to search for an already stolen car. There is nothing complicated about connecting this device. It works in tandem with a GSM module, and in all cases is mounted inside the alarm unit as a separate board.
On Pandora alarms, the beacon is a separate device and is registered as follows:
- Enter service mode - 4 short presses on “Valet”.
- Enter GPS programming mode - 1 long press and 9 short presses.
- Supply power to the lighthouse.
Now the system has programmed the operation of the search complex. No further adjustments are required.
Electronic chip programming
This is a bypass worker for the standard immobilizer, which ensures that autostart works.
There are two types of bypass:
- using a key crawler;
- via CAN.
In the first case, a box with a chip from a standard key or a spare car key is hidden under the panel. The device has a transmitting antenna that is wound around the ignition switch. During autostart, the lineman presents the receiver with a standard key and provides start-up.
CAN bypass involves copying a software copy of the standard key and storing it in the firmware. During autostart, the alarm uses a clone of the key and starts the engine with its help.
A typical example of key programming in a Starline car alarm:
- Press the “Jack” button 14 times.
- Turn on the ignition.
- Wait for two siren signals.
- Turn off the ignition.
- Wait for two more signals.
- Turn on the ignition.
- Two short siren signals will sound.
- Connect a PC with the Starline Master program and calculate the key through the security system server.
After the manipulations, the alarm is considered installed.
A set of important requirements
The immobilizer bypass module housing is usually made of plastic. And this is not accidental. Such a module is placed away from metal so that it does not block itself with its interference. Another thing is interesting: the image of the module, if it is installed, is usually not shown in any photo report.
Having connected the signaling, program any option and then remove the battery terminal. If the settings go wrong, most likely the main unit needs repair. The video at the end shows something else. It shows how easy it is to hack an alarm. Based on this information, do not make selection mistakes.
Central locking device
Central locking is a rather complex system that includes electrical as well as mechanical components. This system makes it possible to carry out various manipulations with all car locks at the same time. To do this, the driver simply needs to turn the key or press a small button on the remote control. The system is capable of controlling not only door locks, but also the gas tank hatch lock, as well as the trunk lid. The design of the system can be quite complex, and the process of connecting the security system to the central locking without any knowledge of its structure is impossible.
The central lock consists of several connected elements. This is a control unit, door sensors, buttons, and activators.
Repair
In fact, the central lock tends to break not only due to frost. Activators often become unusable.
Activators are one of the important parts of the entire system. In addition to the fact that activators are performers, the driver's door activator is also a sensor. The fact is that the activator on the driver’s side sends a signal to the control unit when it is pressed and closes everything. There are often systems where, in order to lock everything, you need to press the driver's door lock button. This button is screwed to the activator. Based on this, the driver's door activator causes all activators to operate. Here you will need to disassemble the door and see if the button on the activator is pressed; if not, then raise the activator higher, and if the button is pressed but nothing happens, you need to change it.
System health check
Before restoring the appearance of the car's interior, we perform a check. To do this, return the battery to its original state. The siren should sound. Now we register the key fobs, how to do this is described in detail in the instructions and depends only on the alarm model. After this, we check the operation of the anti-theft itself. There shouldn't be any problems, but if something does go wrong, start checking that the wiring is connected correctly using a multimeter and a probe.
You should not drive with a faulty signal. At best, it will not work at the right time; at worst, it will damage the car’s electrical system.
When buying a new car, drivers are faced with the need to install an anti-theft system. But since it is quite easy to install an alarm system with auto start yourself, many of them refuse to visit a service center and solve this problem at home.