Before the arrival of cold times, checking the heating system will not hurt, especially in Russia where sub-zero temperatures in some regions begin as early as September. So this article about replacing the heater valve on a VAZ 2107 car will be of interest to many car owners who have such cars and do not yet have experience in such repairs.
A typical reason for replacing the heater tap of a VAZ 2107 is that it begins to leak, leaving puddles of coolant on the interior carpets, which of course is not good.
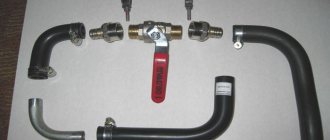
Tool required for replacement:
- key to “7”
- key to “10”
So how can you replace the heater on a VAZ 2107:
— first you need to loosen the clamps on the heater hoses
— now you should remove the hoses from the pipes
In order not to fill everything with coolant, you should make sure that there is a container where it can be drained. Of course, if your cooling system is not very depressurized and all the coolant is already in the cabin.
- using the key to “7”, unscrew 2 screws
— now you can remove the seal from the rubber bands as shown in the figure
— next you should unscrew the screws in the cabin as shown in the figure
— now that the screws are unscrewed, you should remove the interior glove compartment housing.
— as shown in the figure, unscrew the nut of the air duct bracket using a wrench set to “10”
— next you need to remove the latches on the heater body
— after which we can pull out the right air duct
— now you need to unscrew the bolt of the cable fastening bracket on the crane, using a key set to “7”
- when it is unscrewed it should be removed
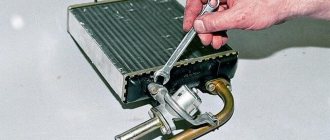
— next you should unscrew the nuts securing the faucet to the heater radiator, this is done with a “10” key
The stove faucet is held on by two bolts, which are screwed into cage nuts. Moreover, the bottom one will most likely fall out during disassembly. When you start putting everything back in place, you should unfasten the 2 spring latches that secure the fan housing on the faucet side. Then, pulling the body down, put the nut in place and tighten the bolt.
This figure shows a diagram of crane dismantling
After dismantling, all remaining parts should be removed
The process of installing a new tap in place is done in reverse order.
I think the article is written in sufficient detail, but if you have any questions, be sure to write them in the comments to the article.
Stove design
The stove consists of the following parts:
- Heater, a stove radiator is installed in it (indicated by the number 5 in the figure), it heats the air penetrating from outside;
- The stove fan, or motor (indicated by the number 14 in the figure), it pumps a flow of warm air into the cabin, it is mounted in a special casing (indicated by the number 16 in the figure) on elastic cushions that dampen its vibration;
- The stove control system is a fan button (indicated by the number 18 in the figure), three control knobs for heating modes - blowing onto the windows, taking air from the cabin or from the street, and opening and closing the stove tap.
1, 9 – air ducts for heating the side windows on the left and right; 2 — air duct for heating the windshield; 3 — radiator casing; 4 — air intake cover; 5 — heater radiator; 6 — radiator valve; 7, 8 radiator hoses for supplying and discharging hot fluid from the cooling system; 10 — rotary deflectors; 11 — air duct damper; 12 — air distribution cover; 13 — fan guide casing; 15 — lever of the air distribution cover; 17 — control rods; 19 - central air duct.
The heating system works in the following order:
- Air for heating comes from outside, through air intakes on the hood.
- Under the hood there is a special box, insulated with a rubber seal, for air flow.
- From it the air flow is directed to the stove.
- Next, the air is heated by a radiator, which is fed with antifreeze and antifreeze. The degree of heating is regulated by the heater tap. The faucet is controlled by a flexible rod using a control lever.
- At high vehicle speeds, air can enter the passenger compartment without the fan being turned on. Therefore, at high speed you can use the stove without additional load on the car’s electrical network. The interior heater is turned on by a fan switch that has three positions - neutral and two speeds: low and high. Speeds are provided by a resistor; it increases the resistance of the circuit and reduces the speed of the fan.
- The fan accelerates the warm air flow through the air ducts to the sides, onto the side windows for good visibility of the rear-view mirrors, and into the grille deflectors, which can change the direction of the air flow for better airflow. There is also a flow of warm air through the air duct to blow on the windshield.
Above in the figure, blue shows the circulation diagram of cold air flows, and orange shows the movement diagram of warm air flows. Main parts of the heating system:
1 — air distribution cover; 2 – fan electric motor; 3 – fan, impeller housing; 4 – heater tap; 15 – radiator.
The stove is controlled:
- Changing the position of the lower cover of the fan casing using a lever (down-up);
- Changing the position of the control unit levers (heating flaps of the side windows and windshield, air supply covers).
What breakdowns most often occur in the heating system?
- Leaking radiator tap, pipes, radiator housing;
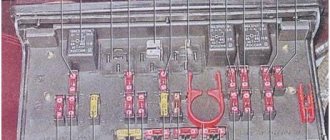
- Malfunction of electrical equipment (fuse, mode switch, oxidation of wires, motor). The fan fuse is located in the mounting fuse block numbered F1 with a rating of 10A; below is a diagram of the mounting block.
Replacing the stove faucet
On a VAZ 2107 car, sometimes the faucet may leak or even become sour. They have to be used intensively and therefore often fail. Before you start replacing the faucet, purchase a set of gaskets for it. The tap is changed when the engine has cooled down.
Replacement sequence:
- Loosen the clamp of the inlet pipe (lower) and remove it from the tap;
- Use the lower lever in the control unit to close the dampers;
- Remove the glove compartment;
- We dismantle the air duct behind the glove compartment - to do this, disconnect it from the side deflector and remove it from the heater housing. Now, using a 7 key, loosen the crane rod and remove it.
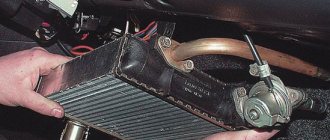
Using a 10mm wrench, unscrew the valve from the radiator;
- We disconnect the pipe and remove the heater valve; antifreeze may leak, it should be collected in a container;
- Using a 10mm wrench, unscrew the pipe from the faucet;
We disconnect the tap and the pipe. That's all, the removal of the tap is completed.
What is a car heater heater
In fact, every car is equipped with an interior heating system, in which the heating device is considered one of the important elements. This part ensures that heat is removed from the coolant and further supplied to the cabin.
Where is the stove heater installed on the VAZ 2104–2107 and what functions does it perform?
The heater of the stove on all traditional Zhigulis is located in a specialized box under the front panel. The product is a heat exchanger, the important function of which is heat transfer from the coolant (antifreeze) with further distribution throughout the cabin. This unit works in the same way as the key heating device of the power unit. For the stove to function correctly, the heat exchanger needs to be constantly heated. This is achieved by connecting the heating device to the engine cooling system using tubes and rubber pipes and constant circulation of liquid using a water pump (pump).
The heater of the stove on the “classic” is located in a specialized box under the front panel
Stove heating device
The heat exchanger consists of two tanks and copper or metal honeycombs. The tanks are connected using soldering or sealant; it all depends on the material used to make the part. In addition to the heater, the key components of the stove are the fan and the control unit, which consists of levers and cables.
1 - additional motor speed resistor; 2 — fan casing; 3 — fan guide casing; 4 — spring brackets of the lower housing; 5 — heater body; 6 — air supply cover; 7 — gasket of the heating device; 8 - stove heater; 9 — sections of coolant pipe; 10 — heater valve; 11 — impeller of the electric heater motor; 12 — electric heater motor; 13 — spring latch of the heater motor; 14 — cushion of the heater motor; 15 — flap of the side air inlets; 16 — bottom cover (damper) of the heater, airflow for the feet
Air from the outside goes through the hole in the hood and enters the air intake casing made of plastic, located in the engine compartment under the windshield. Afterwards, the air flow enters the heat exchanger, which is heated by the coolant. When the car is normal or driving at low speed, the heater fan is turned on in the cabin, which drives cool air through the heater, thereby heating it and supplying it to the cabin.
The heating device of the stove consists of tanks and honeycombs through which coolant moves
When the car is moving at high speed, the fan does not need to be turned on, because the oncoming flow creates enough pressure to pump warm air. The more the coolant heats up, the more heat the heating device gives off. The level of liquid entering the heat exchanger is changed using a tap. Thanks to this, if there is a need to adjust the temperature in the cabin, for example, to make the air less hot, the tap is closed completely or partially using a plastic rod and lever.
Controlling the stove is very simple. There are several handles on the central panel:
- the top one is needed to adjust the position of the stove tap (to the left - the tap is closed, to the right - open);
- the middle handle changes the position of the air supply cover, thus changing the intensity of the warm air supply;
- The lower lever provides adjustment of the damper of the heated glass air channels (position to the right - the air flow goes to the side windows, to the left - to the windshield).
The heater in the cabin is controlled using three levers that can be moved horizontally
Improvement of the heating system
For what reasons can the fan of the VAZ-2110 stove fail?
The design of the VAZ 2107 stove is far from perfect. Therefore, car owners modify it in a variety of ways. First of all, attempts are being made to improve the tightness of air ducts, especially at joints. This allows you to slightly increase the efficiency of heating the interior.
VAZ 2107 owners modify the heating system in a variety of ways
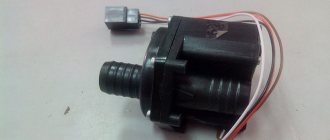
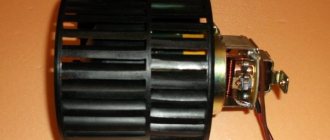
Fan replacement
Often, to improve the operation of the stove, car enthusiasts replace their original fan with a more powerful one, used in other VAZ models (for example, VAZ 2108). The factory fan motor is mounted on plastic bushings, which wear out quickly. As a result, shaft play appears, and a whistling noise becomes audible in the cabin when the fan is operating. Repair and lubrication of bushings in this case, as a rule, do not bring the expected effect. The VAZ 2108 fan electric motor is mounted on bearings. Therefore, installing it in the VAZ 2107 stove will not only increase the efficiency of heating the interior, but will also make the operation of the fan more reliable.
Usually, along with the fan electric motor, a number of other elements of the stove control unit are also changed. The rotation speed of the VAZ 2107 factory fan at a current of 4.5A is 3000 rpm. The VAZ 2108 electric motor consumes 14A at a frequency of 4100 rpm. Therefore, when replacing, you should install the appropriate fuse, resistor (usually from a Niva) and speed switch (for example, from a Kalina).
Video: modification of the VAZ 2107 stove
To dismantle the fan you will need:
- flat and Phillips screwdrivers;
- keys for 7 and 10;
- round nose pliers.
The fan is removed in the following order.
- The instrument panel, shelf and glove box are dismantled.
- Use a 7 key to loosen the casing of the air damper control cable. The cable loop is removed from the lever.
- Use a 10mm wrench to unscrew the nut securing the heater housing.
- Use a flat screwdriver to remove the left and right air ducts from the heater body.
- Use a flat-head screwdriver to remove the latches that secure the fan to the stove.
- The wire terminals are disconnected.
- The fan is removed from the stove body.
- The impeller is removed. If necessary, use pliers.
The size of the new fan (from VAZ 2108) is slightly larger. Therefore, its installation will require some changes in the design of the stove. If only the motor is changed, it will be necessary to make an additional hole in the grille through which warm air enters the lower part of the cabin. If this is not done, the motor housing will rest against the grille.
Replacing the stove body
When installing a fan from a VAZ 2108, you will need to make a new frame, usually from plexiglass. This is quite labor-intensive and will require certain skills.
The material for a homemade frame when modifying the stove can be plexiglass
When making a new frame, all dimensions must be strictly observed. The slightest inaccuracies can lead to vibration or failure of the new fan. Having assembled the structure, you should lubricate the joints with sealant and install the new housing in place. After this, the noise level in the cabin usually decreases, and the stove begins to heat the air better.
When making a new frame for the motor, all dimensions must be strictly observed.
Other stove tuning options
Sometimes the design of the air ducts is modified. Additional holes are made in the stove body into which plumbing hoses are inserted. Through these hoses, connected to the side and bottom air ducts, when the engine is running, an additional flow of warm air is created onto the windows and into the legs.
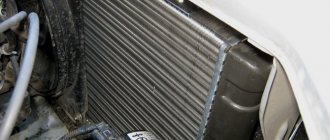
Often the cause of poor interior heating is a clogged heater radiator. The coolant begins to circulate more slowly or completely stops circulating through the heating system, and the efficiency of air heating decreases noticeably. Usually in these cases the radiator is replaced with a new one.
A clogged heater radiator leads to a decrease in the efficiency of heating the interior.
Installation of a new heating tap, in this case on a classic, in the top five
- degrease the flange surfaces of the new faucet and rubber gaskets, as well as the flange surfaces of the pipe and the stove radiator
- Now we apply the automotive sealant with a layer of 1-2 mm on both surfaces of the flanges, wait at least 15 minutes, according to the stated recommendations of the sealant manufacturer
- after 15 minutes we begin assembly, install the rubber gasket on the applied sealant and bolt it to the flange of the pipe book, which goes under the hood
- then, after assembling the flange connection of the pipe and the faucet, we install the rubber gasket on the second surface and fasten it to the stove radiator with nuts and tighten it alternately with a 10 wrench
- After installing the new faucet, under the hood we apply sealant to the pipe and a little later, insert it into the coolant supply hose and tighten the clamp
- Next, in the cabin we install the cable for opening and closing the faucet in the desired position by turning the fastening with a key to 7 and putting the end of the cable and the ring on the faucet lever, after which we tighten the fastening of the cable.
- we install the removed blower thoroughly so that it does not dangle
- We mount the glove compartment lid and the storage shelf underneath it.
Replacing the old heating tap with a new one will also improve the quality of the stove.
inspect the faucet of the VAZ 2105 stove
dismantle the glove compartment door, to do this we unscrew the screws with a screwdriver in three places
new ceramic ball valve for Russian classic cars
application of auto sealant and subsequent assembly.
See also:
Liquid fender liners
VAZ 2105 – Replacing front suspension springs
Trust but check!
Car cooling system: reasons and rules for replacing fluid
Comments:
–> Masters VAZ / Heating system / Classics
Stove VAZ 2105
Principle of operation
Causes of heater malfunction in a car: how to diagnose and fix it
The heating system works simply - to ensure air heating, the driver uses the upper slider to open the antifreeze supply valve to the heater radiator. If the air supply damper is open (the middle slider is in the extreme right position), then the air flow through the box that separates the moisture and the damper enters the stove body. Passing through the radiator, the air heats up, and then moves depending on the location of the remaining dampers.
If the lower slider is moved to the right, then the heated air will go to the windshield area, and if it is positioned to the left, it will go to the center of the cabin and to the side windows. To supply heated air to the feet, the driver needs to lower the lower damper lever down.
When driving at high speeds, the air flow through the air intakes moves intensively, so it is not necessary to turn on the fan. But if the movement speed is not enough, the fan creates forced circulation.
Using dampers and a fan, the driver controls the stove - sets the speed of air movement, the degree of its heating and the area of distribution.
Refinement by sealing joints
The first method is the simplest, but it will not bring big changes to the interior temperature. It consists of sealing the air outlets, so that air will flow better into the cabin.
This will allow you to optimally adjust the air flow, and the windows will be cleared of steam and icing faster. Sealing all existing connections helps to avoid unnecessary air loss, but this does not make the car any warmer.
If this modification is not enough for you, then it’s time to take the bull by the horns and tune the entire stove. It may sound scary, but in fact, modernization is not as difficult as it might initially seem.
VAZ 2105 — Replacing the heater tap
Replacing the faucet of the VAZ 2109 stove high and low panel: instructions
Search.
Forward
Replacing the heater valve Lada 2105 (VAZ 2105)
Before the arrival of cold times, checking the heating system will not hurt, especially in Russia where sub-zero temperatures in some regions begin as early as September.
So this article about replacing the heater valve on a VAZ 2107 car will be of interest to many car owners who have such cars and do not yet have experience in such repairs. A typical reason for replacing the heater tap of a VAZ 2107 is that it begins to leak, leaving puddles of coolant on the interior carpets, which of course is not good.
Tools required for replacement: - key to “7” - key to “10” So how can you replace the heater on a VAZ 2107: - first you need to loosen the clamps on the heater hoses - now you need to remove the hoses from the pipes In order not to fill everything with coolant, make sure there is a container where it can be drained.
Of course, if your cooling system is not very depressurized and all the coolant is already in the cabin.
Factory (standard), ball or ceramic valve, which is better?
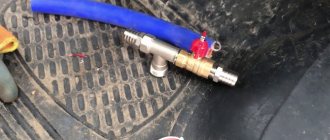
Among car owners on various forums, discussions constantly arise about which heater tap is better. Most often, battles unfold between two options: ball or ceramic. Almost no one doubts that a standard valve based on a rubber membrane is not reliable, more often than others it leaks, “sticks” and is especially susceptible to acidification. As proof of this, see the images above, where the reason for the replacement is a jammed faucet and a fluid leak.
Ball or ceramic?
We recommend purchasing a ceramic faucet. The body of such a faucet is ordinary, but the locking element consists of two ceramic plates with slots that rotate relative to each other.
Ceramic heater tap
A ball valve, in principle, is also not bad; the undoubted advantage of such a valve is its greater throughput compared to a ceramic one (when open, the passage hole is equal to the internal diameter of the pipe). At low temperatures this is especially noticeable, but the likelihood of souring is higher for a ball valve than for a ceramic one.
The stove blows cold air. How to turn on the stove VAZ 2107
» The heater blows cold air: how to turn on the heater on a VAZ 2107 How to turn on the heater so that hot air blows If you are cold in your car, then it’s time to turn on the heater. It seems like a simple question, but sometimes warm air comes out, something hums, but there is no heat and warming up does not help.
Therefore, this article is not just an answer to the question of how to turn on the heater on a VAZ 2107, and what to do if the heater blows cold air, but a consideration of all possible cases with specific recommendations.
Are you sure you turned on something, but the stove doesn’t heat up? First of all, if you are a beginner, check - are you sure you turned on the stove? The stove on the VAZ 2107 has: in fact, a toggle switch for the rotation speed of the stove fan, and three sliders - we’ll dwell on them in a little more detail. Upper: position all the way to the right - fully open the stove tap (maximum temperature); Middle: to the right all the way - air intake from the street, to the left - from the cabin.
As a rule, it heats up faster when taking air from the street. Lower: extreme left position – heated side windows, right – heated windshield.
Control mechanism
The control of the VAZ 2107 stove is mechanical. It consists of a fan switch and a block of sliders. The control mechanism is installed on the center console at the top, which provides easy access to the elements.
There are three sliders of the control mechanism, and each of them controls its own element:
- The top one is responsible for supplying antifreeze to the radiator and is connected by a cable to a tap installed on the inlet pipe. The extreme left position of the slider means the tap is closed (the stove does not heat), the right position means the tap is open (antifreeze enters the radiator).
- Middle – air supply damper control. When you move it to the left, the damper shuts off the air supply from the street (closed air circulation in the cabin), while the right position means the air flow is open (air from the street enters the cabin).
- The lower one controls the damper for distributing the flow through the air ducts. Left position - the flow is supplied through the side and central deflectors, right - to the windshield area. Each of these sliders can be adjusted to any position to achieve optimal stove operation.
RADIATOR AND HEATER FAN
You should know that in order to always keep the interior of a five-wheeler warm and cozy, especially on winter days, you need to be able to increase the amount of heat supplied. Which part is directly responsible for supplying warm air? Of course, the radiator. But there is a problem - at the top five the fan is so loud that it makes you laugh.
It is very small and simply not capable of creating the required flow.
What to do? First, let's compare the fans on the VAZ 2105 and the VAZ 2108. The first motor consumes 4.5 A current and has a rotation speed of 3000 rpm, and the second one 14 A, but spins 4100 rpm. This already says something. It is recommended to replace the fan with another one.
Reasons for decreased performance
In addition to obvious malfunctions due to which the stove does not work or functions incorrectly, there are other problems with the heating system of the VAZ-2107 interior. The main one is a decrease in stove performance.
If the stove heats poorly, then the reason lies in:
- Malfunctions of the power plant cooling system (reduced pump performance, stuck thermostat).
- Radiator clogged.
- Formation of an air lock in the heater radiator.
- The air intake damper seal is worn out.
To find the cause of decreased performance, start by checking the heating of the heater radiator. To do this, heat the engine to operating temperature, fully open the antifreeze supply valve to the stove and hand check the degree of heating of the supply pipe before and after the valve and the radiator itself. If the pipeline is hot before the tap, but not after it, the tap is jammed. If the radiator does not warm up, the reason lies in severe clogging of the heat exchanger or a plug in it. If the pipeline does not warm up even to the tap, inspect the cooling system.
If the radiator warms up well, but it is noted that the stove heats worse, then check the functionality of the air intake damper and the condition of its seal. It wouldn’t hurt to check the stove body and air ducts for leaks and cracks.
To ensure that the VAZ-2107 heater heats well, before the winter period check the functionality of the tap, replace the antifreeze (with flushing the system), inspect the control mechanism and the functionality of the dampers.
Principle of operation
The heating system works simply - to ensure air heating, the driver uses the upper slider to open the antifreeze supply valve to the heater radiator. If the air supply damper is open (the middle slider is in the extreme right position), then the air flow through the box that separates the moisture and the damper enters the stove body. Passing through the radiator, the air heats up, and then moves depending on the location of the remaining dampers.
If the lower slider is moved to the right, then the heated air will go to the windshield area, and if it is positioned to the left, it will go to the center of the cabin and to the side windows. To supply heated air to the feet, the driver needs to lower the lower damper lever down.
When driving at high speeds, the air flow through the air intakes moves intensively, so it is not necessary to turn on the fan. But if the movement speed is not enough, the fan creates forced circulation.
Using dampers and a fan, the driver controls the stove - sets the speed of air movement, the degree of its heating and the area of distribution.
Procedure for replacing the heater tap
You should know that replacing the heater valve must be done with a cold engine. This will avoid all sorts of troubles associated with heated coolant. It is clear that any manipulation associated with the assembly and disassembly of automotive components must be carried out in a certain sequence. This equally applies to work such as replacing silent blocks and replacing the heater tap.
Removal of this tap is carried out in the following order:
- after the car is prepared for repair work, it is necessary to gain access to the engine compartment,
- in the engine compartment, use a screwdriver to loosen the clamp securing the supply hose, after which the hose is removed from the lower pipe of the heater valve,
- The lower lever of the ventilation system control unit is set to the extreme right position. This closes the air dampers on the side air ducts,
- remove the glove box body and storage shelf,
- The nut securing the right air duct to the body is unscrewed. This is done using a 10mm socket wrench. After which the air duct is removed from the stud and disconnected from the side deflector of the dashboard,
- you should loosen the bolt securing the heating tap drive rod using a 7mm socket wrench,
- the rod shell is released from under the bracket, after which the rod tip is removed from the tap of the interior heater lever,
- Unscrew the two bolts securing the tap to the stove radiator. To do this, you will need a 10mm spanner. At this stage, you will also need to secure the lower cage nut so that it does not fall out of the socket. For these purposes, you can use plasticine,
- Now, in fact, you have reached the place where the heater tap is located. At this stage, it is removed - its pipe is removed from the seal, which is located in the partition of the engine compartment. There is also a rubber gasket here - it plays the role of a seal at the junction of the flanges of the heater valve and the stove radiator. During removal, some coolant may leak out of the heater core. To collect it you will need a rag,
- Unscrew the two bolts securing the pipe to the heater tap. To do this, use a key of 10,
- the pipe is removed. The place where the heater valve (its flange) and the pipe connect is also sealed with a rubber gasket.
At this point, the work on disassembling the unit is completed. You should begin installing the heater tap. This is done in the following sequence:
- removed rubber gaskets must be replaced with new ones,
- in the reverse order to that described above, the heater tap is installed,
- the heater valve control lever moves to the extreme right position,
- it is necessary to fill in the missing amount of coolant,
- After the cooling system is filled with liquid, you need to check the tightness of the connections between the heater tap and the heater radiator, as well as the hose. If necessary, parts should be tightened,
- Then all parts are assembled in reverse order.
It should be noted that these works, as well as adjusting the valves, can be performed by you yourself or with the help of car service specialists.
Replacing the heater valve on a VAZ: video instructions
https://youtube.com/watch?v=WU6ywPQrUw4
For a VAZ 2107, replacing the heater valve is one of the most important repairs. After all, this part is responsible for regulating the air temperature inside the car. The use of a crane also depends on the car model. For example, the VAZ 2108 is also equipped with a special damper for air supply, and on the VAZ 2110 and higher models there is no valve at all. On a VAZ 2107, the heater valve, the replacement of which will be presented step by step in this article, performs the function of supplying engine coolant to the radiator. This helps warm the air inside the car.
Removal and installation
If you decide to completely replace the stove, then this is done as follows:
- the ground wire is disconnected from the battery;
- the instrument panel and receiver panel are removed;
- the heater valve control lever is moved all the way to the right;
- the coolant is drained from the heating system;
- the clamps are loosened;
- the rubber hoses are disconnected from the heater pipes (they control the supply and removal of fluid);
- the seal is removed (it is recommended to watch a detailed video before removing);
- two bolts securing the bracket are turned out (they are located inside the engine compartments);
- the bolts of the fastening brackets are loosened;
- the rods are disconnected and the bracket is removed;
- the nozzles are removed on the left and right;
- nut fixing the right air duct for heating the side windows;
- the left air duct is removed in the same way;
- we find four spring-type holders and remove them;
- remove the heater fan casing assembly;
- loosen the radiator casing nuts;
- the ground wire is disconnected and the casing is removed;
- the air duct is removed;
- the old heater is removed;
- The new heater is installed in the reverse order (photo below).
Dismantling, repair, replacement of the VAZ-2105 stove
06/22/2018 For any car operating in the cold season, the importance of flawless operation of the heater cannot be overestimated. You can have different attitudes to the heat, but you’re unlikely to find anyone who likes to ride in a car wearing felt boots and fur mittens
Therefore, any heater malfunction that occurs in winter will be considered a disaster, regardless of the make and model of the car
You can have different attitudes to the heat, but you’re unlikely to find anyone who likes to ride in a car wearing felt boots and fur mittens. Therefore, any heater malfunction that occurs in winter will be considered a disaster, regardless of the make and model of the car.
If we talk about it, then it can hardly be called a technically perfect device - heater breakdowns are not so rare, and the heating efficiency raises questions among many owners.
Therefore, the improvement and repair of the VAZ 2105 stove are procedures that are of interest to the majority of “A” owners who are forced to use a sedan even in severe frosts.
How to independently repair and replace a VAZ 2105 stove.
https://youtube.com/watch?v=hgTNid08qFU
hoses for modification of the VAZ 2107 heater
heating The VAZ 2107 stove may be bad for other reasons. So, many car enthusiasts know that the left pipe, due to the design features of the stove, unfortunately fulfills its function, which is to blow the driver's glass. Because of this, the driver either has to open the window completely, which is irrational in winter, or constantly wipe the glass with a cloth, or modify the heater.
So, you will first need to remove the deflector from the pipe, for which you need to pry it from one side using a screwdriver and slightly pull it forward, after which you need to repeat the same steps on the other side. If you do everything correctly, you should have the deflector in your hands. It is held in place by small tendrils in the body of the torpedo, and you can stick your hand into it and calmly pull the torpedo body out of the deflector. Take a 50mm computer fan and try it on exactly in the center of the deflector housing, leaving marks on the fan dimensions. Using a hacksaw or a utility knife, you will need to make cuts in the plastic, then you need to connect them and break off pieces of plastic. You need to install a fan in the resulting opening, try it, and it must fit tightly, otherwise it will constantly blow.
dangling, you can return the inner part of the deflector, which has blades, to its place, however, most likely, the fan will not allow the blades of the internal part to turn the maximum angle
It is necessary to mark the part that is in the way, and cut it off; you should also cut off everything unnecessary from the blades with the holder - here you must act as carefully as possible, since the blades are very fragile. Assemble the structure and check if the blades move normally
Using cut pieces of plastic, seal all unnecessary rear openings with them - place the plastic on the sealant.
In the car interior, you must first insert a fan into the nozzle area, and then install it and the deflector housing, and you need to direct the fan into the cut hole. You can’t install and forget about the blades. It is best to connect the cooler to the wire to the stove; it also makes sense to put a special button for the cooler, but if this is not possible, then just attach one to its wire with the stove fan.