Replacing the stove radiator
The heating system is quite reliable, but like everything reliable, it comes to its end. Most often it goes to the pipes and taps ; the heater radiator may be the last to leave the distance. Niva VAZ 2121 and its modifications 21213 and 21214 are no exception and problems with the radiator may await them too. Therefore, it is better to prevent a problem than to encounter it in a field on a frosty night.
A sudden cold snap in the Niva’s interior does not mean that something urgently needs to be changed or repaired. For diagnostics, it is not necessary to go to a service station; you can find out everything yourself with a simple set of tools and a head on your shoulders. Actually, the lack of warm air in the air ducts can be the result of several malfunctions:
- air lock in the heating system;
- clogged air ducts;
- inoperative or malfunctioning heater motor;
- clogged heater radiator.
A clogged air intake may come as a complete surprise to the driver. This is especially true for the Niva, which is off-road friendly. Dust, leaves, branches, and other gifts from the forests that are absolutely not needed there can get into the air intake. A faulty heater motor will make itself known immediately, but the radiator will warm up properly, and if it is clogged or leaking, then a replacement is in order.
Before replacing the radiator of the Niva stove, you should think a hundred times whether it needs to be replaced with a new one. It may be better to clean or solder the old one, since a conveyor product is always better than a part from the spare parts stock. Although, it depends on the year of manufacture of the car. In principle, there is no special choice of heater radiators by type - there are only copper and aluminum models. The debate about which one is better will never end, because copper and aluminum are completely different metals with completely different characteristics.
And if we talk about prices, then copper is, of course, more expensive. Its price can be within 2.5 thousand rubles, while an aluminum one will cost no more than 1800. An aluminum heat exchanger has another good ability - it heats up quickly. Perhaps these are all its advantages. The copper part heats up longer, but at the same time:
- retains heat longer; copper has a high thermal inertia;
- copper is quite elastic and does not crack at the seams as often as aluminum;
- a copper radiator can always be restored, repaired, cleaned, soldered, but an aluminum radiator cannot.
Replacing the heater core is quite simple, although it may take half a day. That is why we focused on the quality of spare parts, so as not to redo the work several times. All you have to do is stick to the technology, collect all the screwdrivers you have in the garage (preferably with a short blade), be patient and begin a step-by-step replacement:
- Drain the antifreeze from the main radiator and cylinder block, although if the system is sealed, it is enough to close the heater duct.
- It is better to protect the interior from antifreeze, since some of it will inevitably end up on the floor mats.
- Dismantling the center console, the shelf under the glove compartment and it would be nice to remove the gear shift lever will be in the way.
- You can remove the lower air duct with it, but it’s more convenient.
- Unscrew the screws securing the radiator bracket.
- Loosen or unscrew the screws securing the front panel on the right and left; there is no need to remove the entire panel.
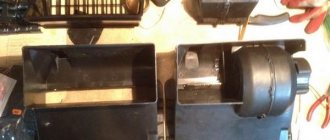
- Remove the rods from the stove tap, dismantle the casing with the fan.
- Dismantle the heater radiator, first carefully removing the pipes and draining the antifreeze from them .
The new radiator is installed in the reverse order, after which you need to make sure that no air lock has formed in the system. This way you can save at least 2,500 rubles, which would have been charged for this work at the service. And for this money it is better to buy a high-quality radiator that will last another ten years.
Fan replacement
Experienced car owners recommend not stopping there and continuing to modify the stove by tuning the fan.
Some people suggest getting rid of the fan installed by the manufacturer and installing a figure eight fan instead.
If you also decide to carry out such a replacement, you need to additionally decide whether you will leave the original control of the stove or also replace it with a “eight” analogue.
Having decided on the second option, take care of purchasing the following additional items:
- fan speed switch;
- additional resistor for the stove.
So, after you have completely prepared all the necessary components, you can proceed directly to the process of modifying the fan.
Initially, you should dismantle the old air supply box. Unfortunately, despite the fact that this requires unscrewing only four nuts, it will not be possible to do this without outside help. Your partner will need to hold the screws under the hood while you unscrew them using a wrench.
After this, you can easily remove the air intake. Clean it if it needs it, and then cut away a small amount of the plastic to provide enough space for the new fan to operate.
Install the fan and carefully inspect for anything that may interfere with the operation of the installed fan. If you find such obstacles, carefully cut them off.
Once you are sure that there is nothing else that can prevent the fan from working, secure it with sealant. There are small gaps around the fan nozzle; it is important to eliminate them by covering them with any material. This will prevent warm air from escaping.
Now the assembled fan is being introduced back into the space in which its old counterpart previously “lived”. Everything is securely fastened and the closing and opening of the hood is checked. In some cases, after the introduction of a “foreign” fan, it is not possible to close the hood normally.
If everything is fine, reconnect all wires and install new controls. Upon completion of the work, be sure to check your results in action.
The stove should work perfectly, and warm air should spread very quickly inside the car.
VAZ 2121 (Niva 4x4): replacing the heater radiator with your own hands
The operation of the stove on the classic Niva traditionally causes complaints from most owners of this car. A frankly weak but noisy fan and poor design of the air ducts do not warm the interior properly. In addition, the operation of the heater is affected by the operation of the VAZ 2121, 2131 in difficult road conditions. The stove radiator, air ducts become clogged, and the pipes are destroyed. Therefore, understanding the operating principles of the heater and the ability to repair it with your own hands become an important task for the Niva driver.
Options for upgrading the heater on Niva
To ensure that the heater works more reliably and you do not have to repair it from time to time, it can be modernized. As practice shows, a modernized stove for Niva will not only be able to work several times longer, but its functionality will also be more efficient. Below are several options that will allow you to modernize the node.
We will not describe them in detail, but know that all these options have already stood the test of time, since they are used by many of our compatriots, so you can have no doubt about their effectiveness:
Price issue
Radiator of the Niva stove
The heater radiator of VAZ 2121, 2131 is not a critical vehicle component. But in cold weather, driving a car with a faulty heater is unlikely to be a pleasure. In addition to the sheer coldness in the cabin, the windows may fog up, which leads to poor visibility, and this is a matter of safety for the driver, passengers and other road users.
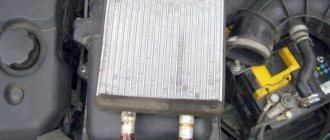
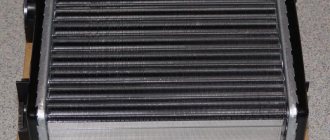
Structurally, the radiator is a heat exchanger, or more simply put, a battery, whose task is to heat the air passing through its grille. Externally, it looks the same as a similar unit on other cars.
The same type of heater radiator is used for “Niva” and “classic” VAZs
The Chevrolet Niva radiator is not suitable for the VAZ-2121, 2131 family. This should be taken into account when selecting spare parts in the store.
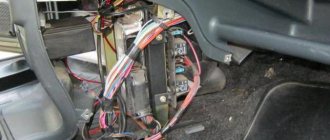
Radiator location
The heater radiator on the Niva is located under the dashboard behind the center console between the driver and right passenger seats. This is the standard location for the heater in most cars. Compared to many other car models, access to the radiator in the Niva is quite simple. This will take about 10–15 minutes for a semi-skilled specialist.
The radiator of the Niva stove is located in a plastic casing under the center console
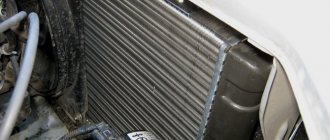
Radiator design and functions
The stove radiator is a unit in which heat is transferred from the heated liquid to the surrounding air. It consists of two horizontal rows of tubes intersecting with vertical metal plates (ribs). On the sides, the structure is limited by panels that provide the functions of tanks. The incoming and outgoing pipes of the cooling circuit are connected to one of the tanks.
There are two unconnected cavities inside the tank. Antifreeze enters through the inlet pipe into the cavity connected to the upper row of tubes. On the other side of the radiator there is a return tank, through which antifreeze flows into the second row of tubes and moves in the opposite direction to the second cavity of the tank and the outgoing pipe. After leaving the radiator, the antifreeze enters the main cooling system of the car. Antifreeze circulating in the tubes ensures heating of the entire grille, thanks to which heat transfer from the radiator reaches maximum effect.
The radiator is installed in the instrument panel console in a plastic casing and sealed around the perimeter with foam tape. Air heating depends on the degree of opening of the valve that regulates the flow of liquid through the radiator. The valve is installed at the radiator inlet and is controlled by the upper lever on the center console.
Cold air comes from the external environment, passing through a hot radiator, heats up and enters the car interior
The main and only function of the heater radiator is to heat the air flow entering the cabin through the air ducts.
Radiators are made of aluminum or copper. The aluminum product does not hold temperature well. A copper radiator works more efficiently, but is more expensive. The advantages of a copper radiator include its maintainability: the ability to seal cracks in the tubes.
Heater (stove) and ventilation system
The ventilation system is supply and exhaust. When the car is moving, air is forced into the cabin by natural pressure through the air intake slots on the hood and sucked out through the holes in the rear roof pillars. To increase air circulation when driving, you can lower the front door windows, and at low speeds, turn on the electric fan. Air flows in the cabin are distributed by air ducts located inside the dashboard. Air enters the windshield through the upper slot-like nozzles on the instrument panel, onto the side windows through the side and, partially, central nozzles (with air flow guides), and to the feet through the holes in the heater casing (with the lid folded back). To control the distribution of air flows, use the middle and lower levers on the center console of the instrument panel, as well as the guides of the central nozzles and their regulators.
Heating system ( stove
) – liquid, combined with the engine cooling system. The heater radiator is installed in the instrument panel console in a plastic casing and sealed around the perimeter with foam tape. Air heating depends on the degree of opening of the valve that regulates the flow of liquid through the radiator. The valve is installed at the radiator inlet and is controlled by the upper lever on the center console.
The ME-255 fan electric motor is a commutator motor, DC, with excitation from permanent magnets. The fan speed is controlled by a three-position switch on the instrument panel. Depending on the selected speed, the electric motor is connected to the vehicle’s on-board network directly (high frequency) or through an additional resistor (low frequency). The rotational speed of the electric motor shaft with an impeller at a voltage of 12 V and an air temperature of 25 ± 10 ° C is 3000 ± 150 min –1. Current consumption at maximum rotation speed is no more than 4.5 A.
The fan impeller is mounted on the electric motor shaft. The electric motor cannot be repaired; if it fails, it must be replaced.
If water enters the cabin through the stove
In 2022, the heating system on Lada 4×4 was modernized. The changes affected both the control knobs and the operating efficiency. Instead of lever control with cable pulls, three rotating handles with servos appeared. The “stove” began to warm up and work better. quieter (on average 2 dB).
Comparison of the heating rate of a car interior with an old and new heater (from 2022) at an outside air temperature of 3.6°
Comparison of the noise level of the climate system of the old and new model
How to increase the heating of the heater (instead of a second stove)
On my Niva VAZ-21310 in winter, at low engine speeds, the heater cannot cope with warming up the interior. To improve the circulation of fluid in the heater radiator, I installed an additional bleeder pump from the Gazelle. To do this, I bought two heater hoses from Zhiguli and four clamps. The pump was secured in the engine compartment and connected to the heater supply hose. The pump can be powered from the heater fan control key. Or install a separate switch, connecting through a fuse to the ignition switch.
Lada 4x4 does not have a cabin filter. While driving, debris and even insects fly into the cabin. I eliminated this design flaw by installing a homemade filter from a medium-density nylon stocking. From its end we cut off a piece of 30-40 cm, without cutting along. Under the hood, remove the frame from the air supply box of the ventilation system. We stretch the stocking over the frame, bend the edges and insert the frame into place. No more garbage will get into the cabin.
Typical radiator malfunctions
There are two main radiator malfunctions:
- Clogged grille and radiator tubes.
- Radiator leakage.
Since the Niva is often operated in difficult road conditions, the likelihood of contamination of the grille from dusty outside air is very high. Clogging of the cells reduces the heat transfer area of the radiator, and as a result leads to a decrease in the heat released from the air ducts into the passenger compartment. In such cases, the stove radiator is dismantled and washed under high pressure.
Clogged radiator tubes are also common. If the outlet pipe is barely warm or cold, then the radiator tubes are clogged. This happens for various reasons, including the entry of foreign objects into the cooling line during repair work. In such cases, the tubes themselves are also washed. To do this, it is not necessary to remove the heater radiator. It is enough to separate the radiator pipes from the cooling system and supply water under pressure into one of the radiator pipes.
A leak in the radiator tubes can be determined by a coolant leak, which usually forms on the right side of the center console in the passenger foot area. As a rule, a leak is accompanied by the smell of antifreeze (antifreeze) in the cabin. Don't rely on the smell of antifreeze alone. Coolant vapor is very volatile and can be misleading as to the source of the leak. The smell of antifreeze also indicates a leak in the engine compartment.
The leakage of the heater radiator occurs due to natural wear and tear of the metal from which it is made. Constant cycles of heating and cooling, exposure to various chemicals and consumable liquids eventually lead to the destruction of the metal and the formation of cracks. Cracks in a copper radiator can be soldered. The aluminum radiator will have to be replaced with a new one.
Typical malfunctions of the VAZ-2121 heater radiator can be eliminated in a garage environment
Possible heater malfunctions and ways to eliminate them
If in VAZ 21214
the stove
has stopped working , then, in principle, repairing it yourself is not a particularly difficult task.
The reasons for the malfunction why the Niva stove refuses to work are given below:
- Failure of the additional resistor. This element of the system is located behind the glove box and is designed to control the ventilating device for pumping warm air into the cabin. The problem is solved by replacement.
- Wear of pipes. Over time, the pipes begin to wear out, and temperature changes especially contribute to this. To detect worn hoses, each line must be carefully inspected. Wear may be indicated by cracks and other damage to the pipes through which antifreeze can escape.
- The heater valve is faulty. A breakdown of this component may be indicated by traces of a coolant leak in the vehicle interior. If the heater tap is being replaced, it is better to use a ceramic device; its service life is usually several times higher than that of traditional metal devices.
- Problems in the operation of the control unit. It is best to have this part repaired by a qualified electrician.
- The heater radiator has failed. On Niva 21213 you can easily replace it with your own hands, we will talk about this below (the author of the video is the OWNER G channel).
It is very easy to find a broken fan resistor - the fan only runs at maximum speed.
NIVA 21214 Removing the heater radiator, replacing the heater faucet.
Removing the radiator of the VAZ-2121 stove
The procedure for removing the heater radiator on a VAZ Niva does not require any special skills or abilities. It is important to prepare the necessary materials and tools in advance. Most instructions for repairing car heaters contain a recommendation to drain the coolant before starting work. In practice, many car enthusiasts limit themselves to draining only that part of the antifreeze that is located in the radiator itself and the nearby pipes of the cooling system.
Preparing tools
To replace the radiator, you will need the following tools:
- pliers;
- slotted screwdriver;
- Phillips screwdriver;
- a set of markers for identifying wires;
- spanner set to “7”;
- socket wrench set to “10”;
- socket wrench set to “7”;
- socket wrench set to "10".
Procedure for dismantling the radiator
All operations must be performed in the following sequence:
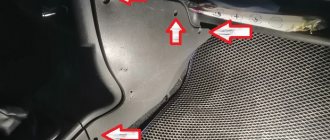
- Unscrew the left self-tapping screw securing the storage shelf. The self-tapping screw is unscrewed with a Phillips screwdriver
- Unscrew the two self-tapping screws on the right shelf fastening. The right side of the shelf is attached to the upholstery
- Unscrew the central fastener of the shelf from the front panel. The central part of the shelf is unscrewed from the front panel
- Carefully lower the right side of the shelf. The right edge of the shelf moves down freely
- Remove the left side of the shelf from the center console panel. There is a special spike on the left side of the shelf
- Unscrew the self-tapping screw securing the floor tunnel lining to the radio mounting panel. The lower part of the panel is also fixed with a self-tapping screw
- Unscrew the screws of the left and right fastenings of the central panel. The process is shown on the right side, the left side is similar
- Remove the radio panel. The panel is moved to the side
- Disconnect the wire connectors from the radio panel. The wire blocks are detached to remove the entire radio panel
- Completely dismantle the panel. After disconnecting the wires, the panel can be easily removed
- In the engine compartment, loosen the clamps securing the hoses to the radiator pipes. Loosening the clamp is shown using the example of the lower pipe; a similar operation is performed with the upper
- Unscrew the screws securing the seal from the front panel. The screws are unscrewed with a socket wrench with a “7” head
- Remove the seal. The removed seal allows you to remove the radiator pipes from the engine compartment
- In the cabin, loosen the nut securing the crane drive rod. The fastening nut is unscrewed with a “7” key
- Remove the heater valve drive rod. The rod is removed from the crane lever
- On the right side of the fan casing, remove the heater tap rod from under the bracket. The rod is disconnected from the fan casing
- Disconnect the spring brackets securing the casing. The staples are pryed off with a slotted screwdriver
- Remove the casing and fan. The casing with the fan is moved to the side
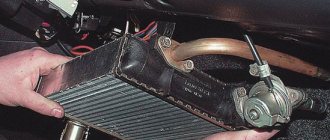
- Remove the radiator. After removing the fan, the radiator is carefully removed from its compartment
- Unscrew the faucet from the radiator. The tap and pipes are turned off with a key to “10”
- Remove the heater valve. The removed tap is checked for leaks
- Remove the lower nut securing the faucet to the radiator. The bottom nut often falls out and gets lost
Disconnect the outgoing pipe.
The two fastening nuts are unscrewed with a “10” wrench
After dismantling, you should carefully inspect the radiator for blockages in the grille and leaks from the tubes. Based on the results of the inspection, a decision is made on the possibility of repair or installation of a new radiator.
Video: installing a radiator
The process of replacing the heater radiator on a classic Niva has been studied far and wide by many car owners. In fact, the procedure is similar to the entire family of AvtoVAZ classics. However, caution and safety precautions should be observed when working. After completing the repair, before driving on public roads, you must make sure that all components and mechanisms of the vehicle are operating normally. Only then should you begin daily use of the machine.
Replacement process
Because replacing a heater core is not an easy process, it should be started when there are compelling reasons and you observe signs that clearly indicate problems in the heating system. Experienced technicians share recommendations based on which you can make a “diagnosis” for your car, indicating that it is time to replace the radiator. If the stove begins to heat poorly, so you constantly feel chills in the cabin of your vehicle, then there is a problem with the heating. If, in addition, you smell antifreeze, then your fears are even more confirmed. You should be even more concerned if you begin to notice that the level of coolant used is constantly decreasing, and under the carpet in the cabin you suddenly find a “swamp” of greasy liquid.
First, of course, check all the pipes and hoses that are part of the heating and cooling system. Make sure they are intact. If this is so, it means that the culprit of such troubles is, after all, your stove radiator, the resource of which has already been exhausted. Even if you don’t have the knowledge of how to change a radiator, don’t give in to the problem. We are ready to help you and give specific recommendations, based on which you will skillfully replace the heater radiator on a Chevrolet Niva with and without air conditioning.
There are two ways to replace the radiator. The first method involves carrying out work that does not require removing the torpedo. However, this method is accompanied by a clear disadvantage, namely that during the task the air conditioner will depressurize, so upon completion it will have to be refilled with refrigerant. The second method can be done by removing the dashboard. Unfortunately, such a replacement of the heater radiator on your Chevrolet Niva will be accompanied by a greater expenditure of physical and time resources. Decide which method will be preferable for you, study the recommendations we offer and get started.
First way
This method is suitable for those who are used to performing all actions at lightning speed, since they cannot allow their vehicle to simply sit idle in the garage. The main disadvantage of this method is that at the very beginning of the action you must release all the freon from the air conditioner. If you want to make the reassembly process easier for yourself, take care of this before disassembling, arm yourself with a marker and mark all the removed bolts, screws and other components.
First, unscrew all the bolts and remove the glove compartment. Next, refocus your efforts on the airbag, if you have one. Remove the passenger air duct by unscrewing the bolts and disconnecting the plugs. Don't be afraid that even when you apply force, the air duct won't give way to you. The manufacturer sometimes glues them together with tape, so increase your pressure and you will succeed.
Remove the pipe located at the bottom, where the passenger's feet are usually located. Next, dismantle the control unit by disconnecting the wires from it. To keep these wires out of your way, you can temporarily tie them together with electrical tape. The next step is to remove the cochlea. You will again have to unscrew several screws, then disconnect the cables and freely pull out the snail. Now go from the hood side, find the air conditioning pipes and unscrew them.
Now we get to the radiator. However, it cannot be dismantled immediately. Initially, you should cut a hole in it, substitute a previously prepared container and drain all the antifreeze remaining in it. Such actions are quite important, because if you ignore them, as soon as you disconnect the pipes and hoses, all the antifreeze will begin to splash in different directions, polluting everything around, including the interior. It will be difficult to continue the process.
Once the antifreeze is drained, you can safely remove the radiator and install a new one. Of course, you can immediately begin the assembly process. Do not forget to visually inspect the outer surface of the pipes and hoses to ensure they are unusable. Otherwise, you will have to repeat this procedure again if you install back the pipe that causes the leak.
Second way
You can also use the second method. First, disconnect the battery, then drain the radiator to the last drop of coolant. It wouldn’t be superfluous to even blow out the expansion tank. Now unscrew the four bolts and remove the radio with its guides. Let's move on to the crucial moment - you have to remove the instrument panel. Press the latch and pull the panel towards you. To make it easier for her to “obey” you, pull her not only forward, but also slightly to the right.
We suggest that you now use a marker and label all connecting parts. In this case, when assembling, it will be easier for you to complete all the necessary actions, and you won’t have to strain your memory. Next, unscrew the bolts and remove the dashboard. The next step involves removing the stove control unit. First, remove its side panel, then slightly pull it towards you, then disconnect the cables and backlight terminals. Next, remove the steering column. On the side of the panel you will see a spacer, which is also important to remove. Direct your efforts to removing the panel amplifier and fan mounts. Now you have managed to get to the stove and air conditioner. These two devices are fastened with four screws, three of them can be easily unscrewed, but the fourth, “the most stubborn” one, will only give in if you bend the edge of the amplifier. Remove the stove tee and its casing. Now nothing will hinder you; you can safely replace not only the radiator, but also, if necessary, even the entire stove. Next, you will need to perform reverse assembly. Take your time, perform all steps in reverse order carefully. In this case, you will be able to complete the replacement in such a way that even the most experienced craftsmen will simply gasp and envy your effective work.
So, the process of replacing a stove radiator is labor-intensive and responsible, but any car owner who is ready to set such a goal can cope with it. Based on our recommendations, it will be easier to understand the sequence of actions, carry them out and get the maximum result.
Replacing the heater radiator (heater)
We drain the liquid from the cooling system with the heater tap open (see here).
We remove the hoses from the heater pipes and the seal (see here).
We dismantle the heater fan (see here). In this case, the negative wire of the electric motor does not need to be disconnected.
We take out the radiator with the tap.
Using a 10mm wrench, unscrew the two bolts securing the faucet to the radiator.
We remove the fastening nuts from the grooves of the radiator tank (for radiator mod. 2105).
Using a 10" wrench, unscrew the two bolts (for the radiator mod. 2101 - two nuts) securing the outlet pipe...
...and remove the pipe with the gasket.
We assemble and install the heater radiator in the reverse order. We fill the engine cooling system with liquid and check the tightness of the connections.
Checking the serviceability of the heater radiator
It happens that the radiator gives off hot air only in the first few seconds after the heater fan is turned on, and then the air remains barely warm. The malfunction may be caused by the displacement of the rubber partition, which divides the tank into two parts. To check, drain the coolant from the cooling system. Place the radiator removed from the car vertically, with the pipes down. We connect a hose with water from the water supply to one of the pipes and slowly let the stream flow. On a faulty radiator, water will immediately run out of another pipe. A working radiator will fill up, become noticeably heavier, and only then will water flow from the other pipe.
How much does a new stove faucet and labor to replace it cost?
In Moscow and the Moscow region the average is . Moreover, the prices for factory, ball or ceramic valves are practically the same.
Replacing a faucet in a car service costs 400 rubles and more.
We recommend changing the heater tap yourself. First, you will save money and gain experience in car repairs. Secondly, this operation will not take much time (about 1 hour), and all the necessary information is given in this article.
Reg.: 01/02/2008 Threads / Messages: 1 / 13 From: Ukraine. Kharkov Age: 60 Car: VAZ21211982
Reg.: 07/15/2008 Messages: 39 From: Donetsk Age: 33 Car: 21214i 2007 color: deep sea.
Reg.: 03/15/2009 Messages: 1310 From: Odessa Age: 30 Car: 21213. 2003 130 thousand passed. HBO Lovato.
Reg.: 08/23/2007 Threads / Messages: 5 / 4030 From: Dnepropetrovsk, Ukraine Age: 34 Car: 21213 96
31″ tires, ShNiva clutch, subframe, expedition vehicle, Gen 80A, air filter 3302, linted bi-xenon, Weber 32DGAS carb, SRPM, wide welded bridge, vertical shock absorbers ShN, ZDT, VUT Omega-B, etc.
Reg.: 03/15/2009 Messages: 1310 From: Odessa Age: 30 Car: 21213. 2003 130 thousand passed. HBO Lovato.
Reg.: 06/27/2007 Messages: 1765 From: Moscow Age: 51 Car: 21213, 1999
Reg.: 08/23/2007 Threads / Messages: 5 / 4030 From: Dnepropetrovsk, Ukraine Age: 34 Car: 21213 96
31″ tires, ShNiva clutch, subframe, expedition vehicle, Gen 80A, air filter 3302, linted bi-xenon, Weber 32DGAS carb, SRPM, wide welded bridge, vertical shock absorbers ShN, ZDT, VUT Omega-B, etc.
Reg.: 03/15/2009 Messages: 1310 From: Odessa Age: 30 Car: 21213. 2003 130 thousand passed. HBO Lovato.
Reg.: 08/23/2007 Threads / Messages: 5 / 4030 From: Dnepropetrovsk, Ukraine Age: 34 Car: 21213 96
The ball one (it comes with 2108999 from the factory) suffers from a leak along the axis, the ceramic one with two slots does not leak, does not sour, but there is an opinion that it has a smaller cross-section, etc. But I washed the stove with a faucet under the water supply and I can say with authority that a ceramic faucet easily passes such a pressure that a standard pump will not create, not an ATE-1 electric pump with 1800 hp.
The standard pipe from the water supply created a stream of 3 meters in both directions and the tap was not a hindrance, although I read about reducing the cross-section and thought about removing it when flushing, now I’m sure that this tap is more than complete, especially since Luzar says that the maximum design quantity is in the slurry pumped through the stove is equal to = 1000 lch, for comparison, I checked how a new pump from a gazelle pumps, produced by KZATE (which is 1400 lph) and a short-circuiting one, produced by ATE-1, and so both hit about 30 cm, and the water supply by 3 meters, with the same diameter of the pipes, the difference, as they say, is obvious.
31″ tires, ShNiva clutch, subframe, expedition vehicle, Gen 80A, air filter 3302, linted bi-xenon, Weber 32DGAS carb, SRPM, wide welded bridge, vertical shock absorbers ShN, ZDT, VUT Omega-B, etc.
Reg.: 03/15/2009 Messages: 1310 From: Odessa Age: 30 Car: 21213. 2003 130 thousand passed. HBO Lovato.
READ How to remove the sunroof on a Volkswagen Polo sedan
Drain the liquid from the cooling system with the heater tap open (see Replacing the coolant).
For clarity, operations carried out in the engine compartment are shown with the engine removed.
In the engine compartment on the front panel, using pliers, loosen the clamp securing the hose to the lower radiator pipe and remove the hose from the pipe (the hose from the upper heater radiator pipe was removed when dismantling the engine).
Using the “7” head, unscrew the two self-tapping screws securing the seal to the front panel
and remove the seal. In the cabin we remove the storage shelf
Using a “7” wrench, loosen the bolt securing the crane drive rod clamping bracket...
The heater valve is attached to the radiator mod. 2105 (aluminium) with two bolts, to the radiator mod. 2101 (brass) - two nuts.
Using a 1/4-inch square socket with a cardan joint, unscrew the two bolts securing the valve to the radiator
Using a 10mm wrench, unscrew the two bolts securing the pipe to the tap
Install the faucet in reverse order
During disassembly, the lower nut securing the faucet to the aluminum radiator may fall out of the radiator tank socket.
When installing the nut in place, secure it in the socket with plasticine.
How to replace the heater radiator on a Niva
The quality of heater radiators on VAZ SUVs is a fairly relevant topic and worries many car owners; the interior of these cars with a standard heating system is not always warm. In addition, the “native” heater radiator of Niva cars may leak over time, and then it has to be replaced.
- 1 Types of radiators for the Niva stove
- 2 (adsbygoogle = window.adsbygoogle || []).push(); Removing the radiator of the Niva stove
- 3 Replacing the Chevrolet Niva heater radiator
- 4 Heater radiator with air conditioning Niva Chevrolet (replacement)
In this article we will look at what types of heater radiators (HR) there are on VAZ 4x4 cars, how you can replace the RF on the VAZ 21213 and Chevrolet Niva models.
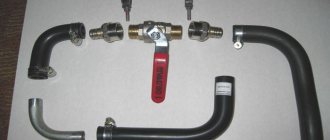
Replacing the heater tap
The standard heater tap on Niva 21213 does not do its job. Since it has a small cross-section, coolant flows quite slowly through the radiator. In addition, it often becomes a place for coolant to leak into the cabin. Therefore, car owners prefer to exchange it for similar models from other AvtoVAZ, Volkswagen, Toyota or Opel cars. For example, the ceramic faucet installed in 2108 has a large diameter passage opening, which increases the performance of the stove. It is better to install it in the pipe that supplies coolant to the stove, otherwise even if it is closed in the warm season, heated air will still flow into the cabin.
Types of radiators for the Niva stove
It doesn’t immediately become colder in the Niva’s cabin – the stove stops working normally for several reasons:
- the heating tap does not switch (stays sour in the closed or half-closed position);
- The motor rotates at low speed;
- the heater radiator is clogged;
- an air lock is created in the cooling system;
- parts turn out to be defective;
- the valve in the thermostat opens prematurely;
- poor circulation is created in the cooling system due to the water pump.
It may still be cold inside the car due to a blown cylinder head gasket in the engine. To make the interior warmer, car owners often install on Niva 21213 cars:
- three-row copper radiators of the stove, they have better heat transfer;
- The heater motor is 2108, they are more efficient than the standard ones on the Niva.
RP for the VAZ 21213 is produced by various companies, and the quality of stove radiators may vary. On the auto parts market you mainly find parts from manufacturers:
- "Orenburg radiator";
- luzar;
- DAAZ;
- SHAAZ;
- "Likhoslavl Radiator Plant";
- Iran;
Based on the material used, RPs can be made of copper or aluminum, each of them has its own advantages and disadvantages. Aluminum radiator:
- heats up quickly;
- cheaper than copper;
- has high rigidity and low weight.
But aluminum RP is not repairable, it is practically impossible to solder it. Other disadvantages of aluminum include:
- rapid cooling, this metal does not retain heat well;
- susceptibility to corrosion, which is why aluminum RPs fail more often than copper ones.
The main disadvantage of copper RP is that it takes a long time to heat up the interior, but even after stopping the engine, it retains heat for quite a long time. Copper heater radiators are approximately 30-50% more expensive than aluminum ones, but this is not so important - in general, the parts are still relatively inexpensive. The problem with copper RPs is different - the quality of the products is low, and it is not so easy to buy parts of acceptable quality.
Chevy Niva car owners often have problems with heating the interior; the car can be cold even in frosty temperatures of -15? C - the aluminum radiator of the stove does not heat very well. Another problem on VAZ 2123 cars is that stove radiators often leak.
Aluminum heater radiators on a Niva car are inexpensive:
- VAZ-2123 (Chevrolet Niva) - on average from 700 to 1000 rubles;
- VAZ-21213 (21214/2105) - from 650 to 1100 rubles.
Copper RPs are sold more expensive, their prices range from 1,500 to 2,500 rubles, the cost depends on the brand of the product, the region of sales and the sellers themselves.
Removing and replacing and installing the heater fan on the Niva VAZ-21213 and VAZ-21214
Dear friends, today we will tell you how to remove
and install the electric heater fan motor on the Niva VAZ-21213 and VAZ-21214.
The procedure is quite simple; we only need two screwdrivers, a Phillips screwdriver and a flathead screwdriver with a thin blade. The reason for removing and replacing the heater motor may be its squealing due to wear on the bushings. Often even new heater motors suffer from this problem, so when replacing the heater motor, we recommend that you install a bearing motor. To get to the motor we need to remove
the lower part of the stove body, and to get to it we need to remove the shelf, the radio panel and the decor on the tunnel.
In general, let's get started, and start by removing the storage shelf under the glove compartment, pick up a Phillips screwdriver and unscrew the following screws:
We move the shelf to the side. Then we move on to the decorative trim on the tunnel, it is also held in place by screws, they are located in this way, see the photo below:
Carefully remove the chips from the cigarette lighter, put the tunnel decor aside, we don’t need it for now. Now let's move on to the tape recorder panel. To begin, use a flat screwdriver to pry up the buttons one by one:
Carefully remove the terminals from them and move all the buttons to the side. We recommend labeling the terminals, this will speed up the assembly process and help avoid mistakes!
Gently pull the plastic nozzles of the stove levers towards you, they will come out with force:
Now again we take the Phillips screwdriver in our hands and unscrew the fastenings of the radio panel to the dashboard on both sides:
Then use a flat screwdriver to pry the panel from above and carefully remove
Now we have access to the stove body. But first, unscrew the turn signal relay to remove it
from it the minus chip of the stove fan:
Now we are interested in the metal latches of the stove, here they are in the photo, there are only 4 of them, two on each side:
They can be removed either by hand or by prying them with a screwdriver. Be careful, they are springy and can fly away in an unknown direction, to the land of lost things
After this, the lower part of the stove body falls into our hands and is calmly removed, we gain access to the culprit of the action. stove motor:
It is also held on by two metal latches; it is more convenient to pry them off with a screwdriver:
After this, disconnect the motor wiring and remove it from the stove body
We remind you that the stove motor is essentially unrepairable and if it “squealed” then the bushings are damaged and then only a replacement is needed. Ideally, straight to the bearing. When assembling and installing, do not forget to put rubber spacers on the motor, otherwise vibration will occur. We perform assembly in reverse order. So you have learned how to independently remove and install the heater motor on the Niva VAZ-21213 and VAZ- 21214
. Good luck to everyone on the roads and fewer breakdowns.
Sources:
https://l2rv.ru/info/kak-zamenit-kran-pechki-na-nive-21214/ https://avtozam.com/vaz/niva/kak-pomenyat-i-modernizirovat-pechku/ https:// remam.ru/vozdsys/zamena-pechki-niva-shevrole.html https://www.lada-niva.ru/niva/23.html https://vazdriver.ru/snyatie_i_zamena_i_ustanovka_ventilyatora_pechki_na_nive_vaz21213_i_vaz21214.html
Removing the radiator of the Niva stove
The heater radiator on the Niva 2121/21213/21214 is quite easy to change, but it is inconvenient to get to. We remove the RP as follows:
- drain the antifreeze from the radiator and cylinder block;
- we spread rags on the floor on the front passenger side, a little antifreeze will still spill;
- remove the shelf under the glove compartment;
- from under the hood, unscrew the clamps and remove the heater pipes;
- remove the draft from the stove faucet;
- dismantle the heating system fan;
- then we take out the RP itself.
VAZ 21213 models are standardly equipped with model 2105 heater radiators, but many owners of VAZ 4x4 cars install RP from Kopeika - 2101-8101060, with such a radiator heater the car becomes warmer. In order for the stove radiator to sit more tightly in the housing, it is covered with foam rubber around the perimeter to ensure a tight seal.
Replacing the Chevrolet Niva heater radiator
The main complaints that Chevy Niva car owners have about their stove heating system is a coolant leak from the stove radiator. Determining the malfunction is quite simple - the carpet on the floor in the front passenger area becomes wet, and the cabin smells of antifreeze. The cause of the leak could also be a stove faucet or a heating pipe, for example, a poorly tightened clamp, but the radiator itself also leaks quite often. Chevrolet Niva RPs are installed from the factory with aluminum, the parts are not distinguished by high quality.
We carry out the work of replacing the stove radiator as follows:
- drain the antifreeze from the cooling system (including from the cylinder block);
- unscrew the screws (3 pcs.), dismantle the right side of the glove compartment;
remove the glove compartment by disconnecting all the wires from it; it can be dismantled quite easily;
- You should place some rags or a plastic bag under the heater radiator, because antifreeze will leak in any case;
- unscrew the two clamps securing the stove pipes, unscrew the self-tapping screws securing the RP in the housing;
- we pull off the hoses and move them as far as possible to the side of the body - this way they will not interfere;
- then we take out the heater radiator itself;
we install a new RP in place, in some cases it is necessary to file or break the edge of the stove radiator body so that the part falls into place; - we install the pipes in place, tighten the clamps;
- put the glove compartment and the side right plastic panel in place;
- fill in antifreeze, start the engine, check for leaks through the RP or stove pipes;
- If everything is in order, the replacement of the Chevy Niva heater radiator can be considered complete.
As you can see, on a Chevrolet Niva car without an air conditioner, replacing the air conditioner is not particularly difficult, but it is not possible to do the work that needs to be done on a car with an air conditioning system.
Replacing the stove Lada 2131 (VAZ 2131)
Dear friends, today we will tell you how to independently remove and install the electric motor of the stove fan on the Niva VAZ-21213 and VAZ-21214
.
The procedure is quite simple; we only need two screwdrivers, a Phillips screwdriver and a flathead screwdriver with a thin blade. The reason for removing and replacing the heater motor may be its squealing due to wear on the bushings. Often even new heater motors suffer from this problem, so when replacing the heater motor, we recommend that you install a bearing motor. To get to the motor we need to remove
the lower part of the stove body, and to get to it we need to
remove
the shelf, the radio panel and the decor on the tunnel.
In general, let's get started, and start by removing the storage shelf under the glove compartment, pick up a Phillips screwdriver and unscrew the following screws:
We move the shelf to the side. Then we move on to the decorative trim on the tunnel, it is also held in place by screws, they are located in this way, see the photo below:
Carefully remove the chips from the cigarette lighter, put the tunnel decor aside, we don’t need it for now. Now let's move on to the tape recorder panel. To begin, use a flat screwdriver to pry up the buttons one by one:
Replacing the heater radiator Niva 21214
Carefully remove the terminals from them and move all the buttons to the side. We recommend labeling the terminals, this will speed up the assembly process and help avoid mistakes!
Gently pull the plastic nozzles of the stove levers towards you, they will come out with force:
Now again we take the Phillips screwdriver in our hands and unscrew the fastenings of the radio panel to the dashboard on both sides:
Then use a flat screwdriver to pry the panel from above and carefully remove
Now we have access to the stove body. But first, unscrew the turn signal relay to remove it
from it the minus chip of the stove fan:
Now we are interested in the metal latches of the stove, here they are in the photo, there are only 4 of them, two on each side:
READ Unauthorized Red Bull promotion reportedly damaged UNESCO website
They can be removed either by hand or by prying them with a screwdriver. Be careful, they are springy and can fly away in an unknown direction, to the land of lost things
After this, the lower part of the stove body falls into our hands and is calmly removed, we gain access to the culprit of the action - the stove motor:
It is also held on by two metal latches; it is more convenient to pry them off with a screwdriver:
After this, disconnect the motor wiring and remove it from the stove body
We remind you that the stove motor is essentially unrepairable and if it “squealed” then the bushings are damaged and then only a replacement is needed. Ideally, straight to the bearing. When assembling and installing, do not forget to put rubber spacers on the motor, otherwise vibration will occur. We perform assembly in reverse order. So you have learned how to independently remove and install the heater motor on the Niva VAZ-21213 and VAZ- 21214
. Good luck to everyone on the roads and fewer breakdowns.
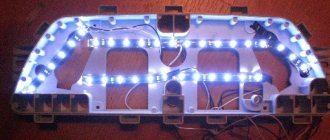
- Modernization of the Niva stove
- Installing the engine from the VAZ 08 stove on the Niva VAZ 21213
- Quiet stove
on Niva due to additional heater fan resistance - Three-row copper heater radiator, for NIVA
- Installation of stove tap 2108 in Niva
- Stove from VAZ 2108 in NIVU
- 1 Modernization of the NIVA stove
- 2 Installation of the engine from the VAZ 08 stove on the Niva VAZ 21213
- 3 Sources
Ball or ceramic?
We recommend purchasing a ceramic faucet. The body of such a faucet is ordinary, but the locking element consists of two ceramic plates with slots that rotate relative to each other.
A ball valve, in principle, is also not bad; the undoubted advantage of such a valve is its greater throughput compared to a ceramic one (when open, the passage hole is equal to the internal diameter of the pipe). At low temperatures this is especially noticeable, but the likelihood of souring is higher for a ball valve than for a ceramic one.
Replacing the heater cable
If you cannot adjust the position of the regulator, the cable may have broken. For replacement, a typical set of wrenches or ratchets and a flashlight will suffice. It is most convenient to use a headlamp; this will allow you to repair the stove without difficulty.
The driver's seat moves back as far as possible. Unscrew the bolts and handles located on the control panel. The panel is dismantled from the driver's side, i.e. at the bottom left. The latches that secure the cables are disconnected. To remove the cable, the fan damper is dismantled. When installing a new cable, pay attention to the fact that its ends on both sides must be twisted into a ring and securely fastened.
Assembly is carried out in reverse order
At the end of the work, it is important to make sure that the cable is working properly by checking