December 11, 2015 Lada.Online 152 989 2
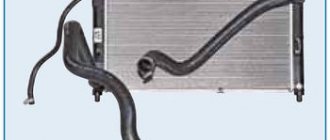
One of the reasons for poor heater performance is the heater radiator. During the operation of the car, it begins to leak and is no longer able to transfer the required amount of heat to the interior. Depending on the year of manufacture and configuration of the Lada Priora, the process of removing the stove (radiator) can vary greatly.
How to replace the radiator of a Priora stove with air conditioning
A failed stove in winter is a very serious problem for the owner of any car, including the Lada Priora. It should immediately be noted that there can be many reasons why a breakdown occurred. Sometimes it will take very little time to eliminate them, but in some cases you will have to tinker. However, often there is nothing particularly complicated in such work, and it is quite possible to do it yourself, even if you have never done anything like this before.
How to replace the heater radiator of a Lada Priora with air conditioning
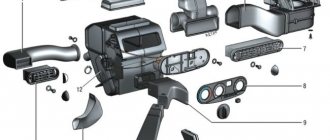
As mentioned above, there can be many reasons why warm air has stopped flowing into the cabin while the heater is on. First, let's briefly look at the design features of the Priora heating system, as well as its main elements. There are no particularly complex electronic devices here - everything is done quite simply, and therefore reliably. The stove on the VAZ-2170 is of a liquid design, and it is combined with the engine cooling system. In fact, here is a classic scheme where antifreeze is heated and warm air is supplied to the car interior. The main elements of the system are:
- radiator;
- fan;
- 2 dampers, with which you can regulate the strength of the flow of warm air and its distribution among the zones of the cabin.
For those who have previously had to deal with the heating systems of VAZ cars, there is essentially nothing new here. The coolant is heated in the radiator, after which the warm air is blown into the passenger compartment by a fan. The driver is able to regulate the intensity of the flow, as well as distribute it throughout the cabin.
It should also be noted that Priora can be found in two different trim levels - with and without air conditioning. In the first case, VAZ installs devices from Panasonic or HALLA on the model 2170. At the same time, cars with air conditioning turned out to be more convenient in terms of maintenance and repair of the heating system, since access to its components was significantly simplified.
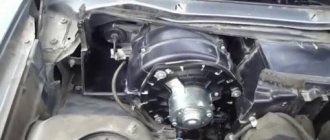
In particular, in order to remove the radiator, it is no longer necessary to dismantle the decorative trim of the windshield. In addition, there is no need to remove the wiper arms. There is also no need to remove the brake booster and heater. All this saves a lot of time; accordingly, all the necessary work can be done faster than on a Priora without air conditioning. Yes, there shouldn’t be any difficulties with this.
In order to remove the heater radiator on a Priora with air conditioning, you will need a minimum set of tools. In particular, you should take:
- wrenches - 8, 10 and 13;
- Phillips screwdriver;
- container for draining coolant.
Having prepared everything you need, you can start working.
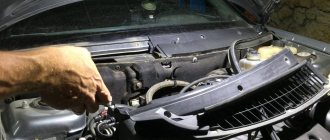
The first step is to remove the rubber seal from the windshield trim - this is necessary in order to gain access to the components we need. The next stage is dismantling the middle part of the engine compartment sound insulation. To do this, you must first remove the hoses from the mounts. It should be noted that in the upper part the sound insulation in the Priora engine compartment is held in place by 3 self-tapping screws, in the lower part by 3 screws, 2 nuts and a washer. Some of the mounts are quite difficult to reach, so it is recommended to use special tool extensions.
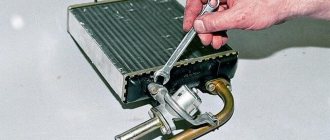
After the middle part of the sound insulation is removed, you will see a foam rubber seal - it covers the stove radiator. To dismantle the cover, you will need to unscrew the 3 screws available here - 2 are located at the edges, the third is in the middle. As a result, we have already reached the pipes - they will also need to be removed. To do this, you must first loosen the clamps holding them. After this, you need to carefully, without tilting the hoses down, pull the pipes up. That's all - all that remains is to pull the heater radiator towards you. This also needs to be done quite carefully, without making serious efforts. Pull the radiator towards you until it comes out of the corresponding fasteners.
It should be noted that it is not necessary to drain the coolant when performing such work in a Priora with air conditioning. Antifreeze will only come out of the expansion tank, and a very small part of it will come directly from the radiator itself. It was said above that the Prior family is equipped with air conditioners from different manufacturers, but this point does not in any way affect the sequence of actions when removing the heat exchanger. The differences here are quite insignificant - only in the number of fasteners. Well, the work itself, as you can see, is very simple. You should not have any particular difficulties when removing the heater radiator. If you are doing this kind of work for the first time, just take your time and remember to be careful.
Clogged filter
Experienced Prior owners have developed an algorithm of actions to find out where the heating system is leaking.
First approach
Before all checks, you need to make sure that the fan is working - it would be unreasonable to go deeper if the main element does not spin. The next steps are as follows.
- The engine heats up to the desired temperature;
- The pipes leading to the heater are probed. Both are hot - okay, one is at ambient temperature - which means there is no filler circulation;
- The hood opens, the tap is located and turns to another position. If it has become stuck, you will have to soak it immediately.
- The system is checked for leaks. The detected ones are eliminated: a constant lack of coolant is also the cause of cold airflow;
- The tap is working, there is no leak - the plug is removed from the tank and the liquid level is checked. Often an air lock forms in the tank; in this case, the coolant is topped up to normal, and the gas pedal is pressed sharply several times. The fluid circulation will resume and squeeze the plug out of the reservoir;
- To make the last step more effective, it is better to drive the front end onto the nearest hillock so that the car’s radiator is lower than the stove radiator.
Second approach
When (or if) both pipes are filled with hot liquid, we move on to the dampers.
- Again you will have to climb under the hood, this time to observe the operation of the damper;
- If it is warped or jammed, you can try to gently shake it with your hand from inside the cabin. To do this, remove the central deflector and unscrew the plastic guides to reach the stuck element. Access is only possible for a thin limb, so it is advisable to invite a female person to the procedure if she does not mind;
- If there are serious problems with the damper (the fastenings have rusted, the plastic has warped due to temperature or it has cracked), alas, you will be faced with difficult work: you will have to disassemble half of the heating system.
Third approach
The microreducer is a complete headache. First, its status is checked:
- The left handle is moved to the “min” position. After a 15-second wait, the engine starts;
- The controller that monitors the self-propelled guns is disconnected;
- The tester measures readings
on both contacts. The resistance should be 800-1200 Ohms for units 1303.3854; 1313.3854 and 1333.3854; for controller 1323.3854 the norm is 3600-5000; - The same operation is carried out in the “max” position. Now the data is in the range of 3200-3500 for the first group and 1200-1600 for 1323.3854;
- If there is no resistance or its unchangeability, the track on the sensor has been erased. It is not sold separately, so you will have to change the entire MMR. It is clear that not all the reasons why the stove does not work and cold air blows on a Priora can be eliminated on your own.
However, by following the above recommendations, you will at least understand what is preventing you from driving comfortably.
And also estimate upcoming expenses. For example, if you have to change the entire SAUO unit, you will have to pay about 1.5 thousand rubles for it. plus the work of an electrician. The Lada Priora car enjoys the well-deserved love and respect of our compatriots. A good price-quality ratio, the abundance of spare parts and excellent maintainability make it a leader in the domestic market. However, being the result of Russian development, this car also has some disadvantages.
As you know, Priora is a deep restyling of the previous model - the 2110th. Therefore, most components and assemblies moved from the “ten”, including the design of the heating and ventilation systems for the interior. Most of the main parts of this system are “decimals”.
Therefore, such unification is very helpful during repairs. Unfortunately, this feature backfires when malfunctions occur. There are quite frequent cases when the stove on a Priora does not work. The situations are different. In one case there may be problems with the fan, in another - with the dampers, etc.
Replacement option for a car without air conditioning
The replacement of the radiator of the Priora stove without air conditioning begins with zeroing the negative terminal of the battery. Then the windshield trim is removed along with the wiper seats to facilitate the work process. The further operation is performed in stages:
- The tubes supplying the refrigerant to the injectors are removed.
- The cover is removed by unscrewing seven screws.
- The tightening element on the hood seal is unscrewed.
- The flat plugs on the engine sound insulation are pryed off and turned out.
- The insulating elements are removed along with the linings.
- The clamps on the radiator pipes are loosened and removed. You will need to prepare a container for draining the antifreeze.
- The wiring connected to the heater is removed.
- The wire holder is removed and moved to the side.
Replacing the heater radiator on a Priora with and without air conditioning
With the onset of cold weather, the driver's interest in the operation of the heater increases sharply. The motorist checks the stove for various faults. In some cases, a radiator failure is detected. How is the radiator of a Priora stove replaced? As a rule, this component cannot be repaired and must be replaced. Having opened the dismantling manual, the driver may discover that the parts in his Priora are located differently than in the instructions. It's all about the air conditioner. The process of removing the heater radiator in older versions of Priora without this option differs from dismantling it in new cars where air conditioning is already present. We will look at both options.
Modern Priors are equipped with Halla or Panasonic air conditioners. There are differences in the operation of the two models, but the location of their installation does not differ, depending on the air conditioner brand, so the process is the same. As an example, we will consider a Priora with Halla air conditioning.
Symptoms of a problem
The Lada 2170 model received a liquid heater, which is connected to the engine cooling system. The radiator is a heat exchange device; due to this component, the air entering the Priora’s cabin is heated. Coolant constantly circulates through the radiator; this part of the heater is subject to wear.
It is worth checking the radiator in the following cases:
- The stove stopped heating properly.
- The coolant level drops.
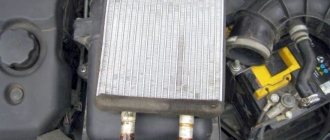
Once you disassemble part of the heater system, you will see a rusty and most likely leaking radiator. There may also be leaks in hoses, pipes and the junctions of these elements. You should check the heat exchanger of the stove only after you have made sure that there are no defects in the operation of the gearmotor and damper.
Replacing the radiator of the Priora stove
To work, you will need a standard set of tools, which includes socket wrenches 10 and 13, side cutters, a Phillips screwdriver, and a wrench 8. In both cases, you will have to disconnect the heating system hoses; the remaining coolant will pour out of them, so immediately place containers under the pipes heater Then the liquid can be returned to the system.
With air conditioning
- First of all, we need to remove the rubber seal of the windshield to gain access to the parts;
As you can see, dismantling the radiator in a Priora with air conditioning does not require draining the antifreeze. Coolant will only come out of the expansion tank and the heat exchanger itself. Removing the radiator in a VAZ 2170 with Panasonic air conditioning follows the same scheme, only a few fasteners may differ. Now you can replace your worn-out heater with a new one!
Without air conditioning
- Work begins by disconnecting the negative terminal of the battery. We remove the windshield trim along with the windshield wiper arms, as these elements will interfere with operation;
- The next step is to remove the coolant supply pipes to the engine injectors;
- The windshield trim is held in place by seven screws. Unscrew it to completely remove the element;
- Now we move on to the hood seal, in its center you will find a tightening screw - unscrew it;
- The engine noise insulation closes the passage to the heater system - pry up the plugs with a flat screwdriver and unscrew the plugs;
- We unscrew the screws and dismantle the sound insulation. Remove both covers;
Clean the heat exchanger and inspect it for damage. If cracks are found on the plastic elements, then you will no longer be able to repair the part - only replacing the stove radiator on a Priora, which is done in the reverse order, will help here.
- Priora instrument panel: indicator designations, error interpretation
- Do-it-yourself PTF Priora installation
- Signs of malfunction, replacing the speed sensor on a Priora
Enter the text of the comment: the climate control does not work, not old, not new, the heater damper opens and closes all the way to the MMR, I change it every year in the spring, the damper does not close, I have to remove the MMR in the fall, everything is new on the computer, the regulator works
I unscrewed the 4 screws that hold the plastic plate near the heater radiator pipes, but for some reason it does not come out of the heater. Priora with Panasonic. I would be grateful if you could tell me.
No heating at idle
It is not for nothing that this issue has been submitted for separate consideration, since it worries many motorists and solving the problem can be much more difficult than one might expect. So, you have a Priora, the heater does not heat up at idle, although when the car is moving, the interior is heated in normal mode. Here you can also identify several possible reasons:
- Insufficient coolant level.
- Leaks that lead to a decrease in antifreeze levels.
- Availability .
If the first two problems can be easily diagnosed and eliminated, then with an air lock the situation is much more complicated. If you have ruled out the first two reasons and the Priora’s stove still does not heat up at idle, you need to eliminate the air lock. You must proceed as follows:
- We remove the screen from the engine.
- We lower the clamp, after which it is necessary to remove the heating tube for the throttle assembly. We choose any of the two.
- Unscrew the cap on the expansion tank. We place a clean rag on the neck and begin to blow into the expansion tank. The air supply should be carried out until coolant begins to pour out of the tube, which was previously removed.
- Immediately place the tube on the fitting and carefully tighten the clamp.
- Installing the screen.
If the option of blowing out the tank does not suit you, then you can go another way. We warm up the engine so that the pressure in the heating system increases. After some time, we turn off the car and remove the hose from the heating of the throttle assembly. In this case, there is no need to remove the cap from the tank. As a result of high pressure, coolant will be forced through the tube. All that remains is to place the tube on the fitting and tighten the clamp.
Now the Priora stove should not cause any difficulties; you know how to fix faults, as well as carry out diagnostics and identify the source of the problems. Let the heater in your car always turn on, work properly and provide comfort regardless of the weather outside.
Often Russian car enthusiasts who drive a Lada Priora complain that the heater is not working well, the vehicle interior is cool, and the car’s side and windshield windows are freezing. In order to understand why the stove on the Priora stopped working, let’s look at the design of the entire heating system on cars of this modification.
Replacing the radiator of a heating device in a Lada Priora car
Almost every motorist who owns a domestic vehicle discovers a malfunction of the car’s heating unit in the winter. After all, only with the onset of severe cold does a person begin to think about how to avoid freezing while driving a car. Naturally, everyone uses a stove for this.
However, what should those for whom this very device has ceased to function properly do? After all, only the heater can ensure that the cabin maintains a normal temperature, allowing for comfortable movement.
In this article we will look at only one reason why the heating device stops working, we will learn about the principles of repairing and replacing the heater radiator installed in a Lada Priora car.
If the motorist is sure that it is necessary to replace the heater core, it may take a lot of time to eliminate the faulty object, since most likely, in the process it will be necessary to replace not just a blown fuse, but to carry out more serious repair work. True, you should not immediately despair because of your ignorance; the material contains detailed instructions to help everyone understand how to replace the stove radiator in a Priora with and without air conditioning.
Replacing the radiator of a heating unit in a Priora that is not equipped with air conditioning
Replacing the heater radiator on a Priora without air conditioning may make sense if warm air has stopped flowing into the cabin, while the heater itself is working. If, in addition to the above problem, there is also a water leak from under the Priora stove, the motorist will have to remove the poorly functioning unit in order to solder the latter. Sometimes repairs are impractical and you have to replace the old device with a new one.
So, first of all, you need to start by removing the negative terminal from the battery. The fact is that the issue here is not only about the safety of the master himself, but also about additional insurance, which allows him to avoid several unpleasant surprises that, if handled carelessly, can arise not only with wiring, but also with electrical equipment.
If you are replacing the heater radiator on a Priora without air conditioning, after de-energizing the system, you can begin to dismantle the windshield trim. At the same time, the wiper levers, which can cause future discomfort during operation, should also be removed.
After this, you should rid the unit of all plastic tubes through which the liquid located in the windshield washer reservoir goes directly to the nozzles. Only after all the above steps have been completed will it be possible to remove the decorative trim located along the edges of the windshield.
In fact, it’s easy to carry out such a manipulation - just get rid of seven self-tapping screws.
Replacing the heater radiator on a Priora can only be done after removing the hood seal. Before dismantling, it should be noted that in the middle of the lining there is a screw that tightens both halves of the structure. Using a screwdriver or any knife, you can gently lift the plugs (this element serves as the “cover” of the screw) and unscrew them.
After this, you can begin to remove the sound insulation, which is located in the power unit compartment. To do everything correctly, you will have to unscrew the screws and remove the pads (there is no clear rule about which of them to remove first: left or right). Then you should get rid of the pipes that go directly to the radiator. A person who wants to understand how to get to the heater radiator on a Priora must loosen the clamps holding the structure itself.
After this, you can remove all the wires going directly to the stove from the connectors. You can remove them using two keys, in particular, one “10” and the other “8”. After unscrewing all four nuts, move the wiring harness to the side, which is held by the holder.
The “13” key will help to dismantle the bracket located on the brake pedal. Only after this can you begin to remove the heater radiator on a Priora that does not have air conditioning. A regular Phillips screwdriver will help you dismantle the device, allowing you to remove 3 screws.
All the rest of the work consists of installing a new unit and reassembling the system in the reverse order of the described actions.
In fact, there is another way to replace the system element of interest. To open free access to this element, dismantling not the stove body, but the vacuum brake booster will help. It is worth noting that this procedure will only be successful if the brake pedal is removed along with it. Such actions help to get closer directly to the left side of the stove and the desired device.
Radiator malfunctions and their consequences
A broken device poses a great danger to the entire cooling system, since its instability can lead to overheating of the power plant. The Lada Priora uses a standard combined cooling system, when the liquid system is supplemented by an air system. Thanks to this combination, it is possible to more effectively maintain the optimal engine temperature under various loads and operating modes.
There are not many malfunctions of this element as such. The main problem with the radiator is the occurrence of coolant leakage. This happens due to a violation of the integrity of the tubes caused by damage to the radiator. Another common problem is clogging of its inner surface. This can be determined due to the constant operation of the forced cooling fan.
The temperature drops, but rises quickly and causes the ventilation unit to turn on again, even when driving at high speed. This is due to the fact that the oncoming air flow cannot cool the coolant due to dirty plates. Contaminants can also be deposited on the inner walls of the radiator tubes, which will impede the circulation of antifreeze. And, as a result, the engine will begin to heat up excessively.
When the device is broken, the power unit overheats.
Causes of malfunctions
The main factors causing problems with the radiator are the following:
- wear of elements of a natural nature (any part sooner or later wears out and fails);
- mechanical impacts leading to damage and deformation;
- operating the engine in violation of the manufacturer's requirements and recommendations.
Breakdown can be caused, among other things, by the use of low-quality coolant, mixing antifreeze with other types of antifreeze, and the use of all kinds of sealants that can clog the pipes and affect the circulation of the coolant (coolant). At the same time, the human factor cannot be ignored when, due to incompetence in matters of radiator maintenance and repair, a part has to be replaced.
Often, simple dirt and poplar fluff that clog the plates can cause the engine to heat up. Due to systematic overheating, the fuel in the cylinders begins to detonate due to the increased temperature of the coolant. As a result, the cylinder head burns out, the block itself becomes deformed from high temperatures, and cracks appear. And ultimately, the destruction of the piston group and crank mechanism completes the picture. It's not far from a major, expensive engine overhaul.
You need to carefully monitor the condition of the cooling system and the radiator in particular.
Signs of trouble
Even a beginner can determine that there are some problems with the radiator. This does not require special knowledge. It is enough to understand in general terms the principle of operation of the cooling system of the Lada Priora.
Troubleshooting
| Symptoms | What are they related to? |
| On the instrument panel, the arrow of the coolant temperature indicator constantly approaches the red zone. | This provokes the inclusion of forced cooling and indicates engine overheating. |
| Constant overheating can also be determined by the deposit on the spark plugs. | During normal engine operation, the coating is sand-colored; when overheated, it is white. |
| It is necessary to carefully monitor the level of coolant in the expansion tank. | A sharp or gradual decrease in level will indicate the presence of a leak, which may be associated with a leak in the radiator. |
Low coolant levels will also lead to rapid overheating. It is easy to find a leak by characteristic smudges on the surface, as well as by the presence of antifreeze or antifreeze where the car is parked.
Preparatory stage
Troubleshooting the heater should begin provided that the power unit and engine cooling system are in order to eliminate their influence. To do this, you need to make sure that the antifreeze is poured in the proper amount, the engine is in good condition and is functioning normally. And after that, find out why the stove on the Priora does not work. First, check the coolant level in the expansion tank. Next, you need to start the engine and warm it up to operating temperature. After this, you need to check the serviceability of the thermostat - feel the thick hoses that go from it to the car radiator.
The top one should gradually become hot. If the rubber hose is still cold, the thermostat is faulty. In this case, you can continue working only after replacing this element. Fortunately, its cost is low.
Another reason why the engine may not warm up to operating temperature is a leaky expansion tank cap. It should keep excess pressure in the system. Often, simply replacing this cover can completely eliminate the problem.
On the Priora, unlike the Tens, the cooling system is organized differently. And the formation of an air lock there is practically excluded. It can occur when the system is leaking or when antifreeze is poured into a completely empty expansion tank. This can be fixed quite simply. You need to drive your front wheels up some hill in a warm car and vigorously apply the gas in place. The expansion tank cap should be removed.
Fan doesn't work
But sometimes another problem occurs with the Priora stove. The driver turns the heater switch, and in response there is silence. The electric motor is not working. What is the reason. There may be several of them:
- The fan motor burned out.
- The heater control unit has failed.
- The fan speed resistor has burned out.
- Broken electrical wiring.
The easiest way to determine if a resistor is broken. In this case, only the maximum speed is turned on, and the stove does not respond to other positions of the handle.
The control unit is checked either by computer diagnostics or by a simple replacement. There are no other options.
The condition of the electric motor can be determined by checking with a test lamp. It is enough to remove the top frill and gain access to the motor connector. Disconnect this connector and insert a test lamp instead of the chip going to the fan. When you turn on the stove handle, the light should light up if the unit and wiring are working properly. If there is no signal, start checking the wires sequentially. If the lamp lights up, replace the electric motor.
Replacing the motor
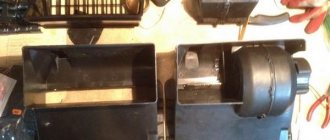
Although Hallo and Panasonic fan electric motors differ in size and installation point, they have one thing in common. Their location is in a vertical position. This allows you to dismantle them without removing the entire heater. As with a standard heater, the heater fan motor on a Priora with air conditioning is secured with 3 screws.
So, replacement. As in the case of a radiator, first of all you need to open access to the stove. That is, remove the frill and protection. Then disconnect the electrical connector. Now just unscrew the 3 fastening screws and remove the fan with the motor. That's it, you can install a new unit in its place. But this is only for the Hallo heater. With the Panasonic compressor, everything is somewhat more complicated. The fact is that it is also separated from the engine compartment by a plastic casing. According to factory documentation, it is necessary to remove the entire heater to replace the electric motor. And this is draining and refilling freon. But our craftsmen found a way out.
Cut the protection at the narrowest point approximately in the middle of the compartment and remove it by unscrewing 2 fasteners. After this, access to the part being replaced is open. Sometimes, however, in most cases, the engine mount prevents you from pulling out the motor. Don't panic. This problem can be solved by disassembling the motor on site. That is, separate it into 2 halves and pull them out separately. Then insert a new one using the same method.
But still, just in case, before replacement, it is better to consult with car service specialists in advance about possible refilling of the air conditioner with freon in case of damage. This is to replace the motor. But with a radiator, such problems, as a rule, do not happen.
Malfunctions of the heater control unit
The operation of the heating system is completely dependent on it distributing air flows, the intensity of airflow to various zones of the cabin and the temperature regime. If it fails, the stove naturally stops working.
There may be malfunctions of the switches (“twisters”). The malfunction of the control unit should be checked last, since this unit is electronic and can rarely be repaired. Therefore, to check it, it is advisable to temporarily replace it with one that is known to work, borrowing it from a friend or in a store with a deposit.
How to replace a stove radiator yourself without an air conditioner
What will be needed for replacement? First of all, the following tools:
- Screwdrivers, figured and flat.
- Wrenches for 8 and 10. (preferably heads with a wrench.)
- Thin pliers for removing clamps.
And, of course, some materials and devices:
- Container for coolant from the system.
- New radiator.
- Foam rubber adhesive strips for the radiator of the Priora stove.
- 2 liters of coolant. (same brand as in the system.)
- Rags.
Having prepared such an arsenal, you can begin this interesting operation of replacing the heat exchanger.
Process description
Place the car level. This is necessary to completely drain the coolant from the radiator of the Priora stove. Place a container for liquid under the bottom of the car. It must be installed in the area of the radiator drain hole of the cooling system. On the right side (along the direction of the car, or on the left, if you stand near the hood). Next you need:
- Unscrew the screw cap and allow the liquid to drain. When the pressure weakens, open the cap of the expansion tank. Wait for the drain to drain and tighten the plug. Disconnect the negative battery terminal. You can begin dismantling the protection. It's called frill.
- First, the windshield wipers are removed. Using a 13mm wrench, unscrew the fastening nuts and remove the brush holders. After this, remove the rubber seal.
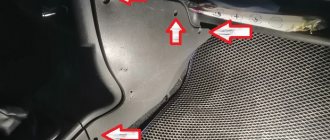
- Unscrew the fastening screws. There are 6 of them on top and 7 along the bottom edge. Now remove both halves of the plastic frill. After unscrewing the fasteners, remove the fabric protection of the glass niche in which the stove is installed.
Now comes the most crucial moment. Most craftsmen, when replacing this part, immediately disconnect the pipes going to the radiator of the Priora stove. However, there is a risk of dousing the heater parts with coolant. There is a more interesting and safer option.
Removing the stove
Now that the frill and protection have been removed, access to the heater is completely open. First of all, you need to disconnect the electrical connectors:
- Micromotor gearbox for damper drive. 2 connectors.
- Electric fan. 1 connector.
- Resistor. 1 connector.
Now unscrew the fastening of the heater body to the car body. One 10mm nut secures the eye on the stove body to the right wing. 8 secures the top to the stud at the top. And two nuts at the bottom.
Once the fasteners are removed, the fun begins. Using a flat screwdriver, remove the 3 screws securing the radiator to the body
You need to act carefully so as not to break off the side, thin pressure relief pipe. After that, remove the screws holding the 2 parts of the heater housing. Move the left part with the fan motor a little to the left, disconnecting them, and pull it out
Move the left part with the fan motor a little to the left, disconnecting them, and pull it out.
After this, you can begin to remove the second half with the radiator. Hold the pipes with your hand and begin to remove the body to the left. When it comes off, set it aside. After releasing the clamps from the pipes, remove them from the radiator.
Necessarily! Place a rag under the radiator, as there is always some liquid left and you should not pour it on the engine compartment.
Installation (replacement) of a new radiator
There are two options here. You can simply replace it by putting the part in place of the old one, before installing the housing. But it is better to install the radiator in the removed half before attaching the pipes.
Important! Be sure to cover the radiator with foam tape! This creates a safety cushion for the part. Having decorated the heat exchanger of the stove with foam, install it in the niche of the housing and secure it with screws. Place the half in place and secure all 3 pipes in place
Tighten the clamps
Place the half in place and secure all 3 pipes in place. Tighten the clamps
Having decorated the heat exchanger of the stove with foam, install it in the niche of the housing and secure it with screws. Place the half in place and secure all 3 pipes in place. Tighten the clamps.
Carefully reassemble the heater in reverse order. Add coolant to normal level. Start the engine and wait for the cooling fan to operate. Press the accelerator pedal and hold the speed at about 2,000 rpm for a couple of minutes. This is necessary to eliminate a possible air lock. Turn on the heater and check its operation in all modes. All! Well, the necessary work has been done.
- Removing the CV joint
- How to determine a CV joint failure
- Computer diagnostics of the Priora heater control unit
- How to fix the stove in a Lada Priora car
We carry out comprehensive diagnostics
Not so easy. Even experienced motorists cannot cope with this task quickly. To avoid doing such a large amount of work in vain, it is better to first diagnose the heating system. You must proceed as follows:
- We probe the channels through which the coolant flows to the heater. They should be warm when the stove is on. In addition, when pressing on the main rubber hoses, resistance should be felt. If resistance is not felt, the pump pump may be faulty. This mechanism is responsible for creating the pressure of fluid flows necessary for normal operation of the heater.
- A little secret that may be useful to Lada Priora owners: does the stove blow cold air for a long time and does not warm up as quickly as we would like? Then you can try filling coolant to the bottom mark in the tank. In this case, the liquid will warm up faster. If you practice this method, you will need to constantly check the coolant level.
- If it works, then we can talk about a problem in the bearing, which is located on the electric fan. This situation cannot be ignored, since in the future the fan may jam and repairs will take place on a much larger scale.
- Is the stove not working? Perhaps the problem is hidden in fuse F9 with a rating of 25 A. Its function is to protect the power electrical lines of the heater. A blown fuse must be replaced. If such a situation occurs with enviable consistency, then it is necessary to check all electrical circuits of the heater, the insulation of the windings on the fan and the presence of an overload in the power circuit.
Main aspects of repair
If the fan does not work or the stove generally stops working, then you need to understand that the repair process is a rather labor-intensive procedure. Before you remove the heater radiator on a Priora or how to remove the fan, you need to do diagnostics. First, the functionality of the thermostat is checked. If the lines connected to the device are warm, then the part is working.
If the fan does not work, first of all you need to check its contacts. Replacing the stove fan does not always solve the problem, especially if it involves oxidation of the contacts. Sometimes simply cleaning the connector from the device is enough to solve the problem. You can always remove the heater fan, but the heater fan does not fail very often. If the stove blows only at maximum speed, the stove rotation speed resistor has burned out.
Problems with the damper gear motor or fan motor
A common malfunction on a Lada Priora car is that the heater does not work. No air blowing at all.
First, you should make sure that it works - at least cold air should be blowing from the deflectors. If not, then you need to check the integrity of fuse F9.
If it is intact, it means the stove fan is not working. "Priora" is equipped with a "ten" fan. Therefore, removing it exactly repeats the procedure on the “ten”. In some cases, the fan does not spin because leaves or other foreign objects have gotten between the impeller and its housing, which can block rotation. In this case, you can hear a characteristic hum.
Cold air can also come out of the deflectors because the gear motor that controls the damper that blocks the flow of hot air is not working. It is also accessible from under the hood.
Often the cause of gearmotor failure is oxidation of conductive contacts. They need to be cleaned with sandpaper by disassembling the body. You should also pay attention to the strength of the air flow. If even at maximum speed the air is blowing weakly, it may be a clogged cabin filter. It is located under the hood in the heater housing and creates additional interference.
Diagnostics of climate control Priors luxury equipment
Like all electronic control units (ECUs), the heater/air conditioning computer is diagnosed either with a portable scanner or with a full-fledged motor tester. It should be borne in mind that this system is controlled through a separate ECU called the comfort unit.
Just like standard diagnostics, the climate control system scan is connected via the OBD-2 diagnostic connector under the glove box. In general, these tests are carried out in a similar way to diagnosing an automatic heating system. With air conditioning features. That is, checking the actuators and sensors of this device.
Replacing the air conditioner radiator in Priora Halla
Radiator leaking on Priora? Don't know what radiator you need? In this article we will briefly describe how to choose the right radiator for a VAZ 2170.
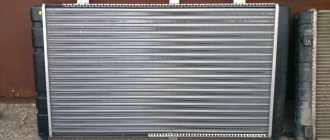
In total, Priora can have up to three radiators:
1) engine cooling radiator,
2) air conditioner radiator (condenser),
3) heater radiator or stove radiator.
Let's talk about the main engine cooling radiator. When selecting, you need to check whether your car has an air conditioner, since in a Priora with air conditioning, an air conditioning radiator is additionally installed, so the engine radiator is made thinner and with different mounts. This entails an increase in its price due to a more complex design, since with a smaller size it is necessary to achieve the same heat transfer.
If you need to replace the radiator on a VAZ 2170 Priora with air conditioning, you should check which air conditioner you have: PANASONIC or HALLA.
This can be done by knowing their differences. Here are some of them:
1) the Panasonic system’s blower speed selection knob has about 16 positions, which provides fewer steps than Halla’s, which has 4 speeds.
2) under the hood, the Hall system lines are aluminum, while Panasonic’s upper line is a flexible black hose (the line is located to the left of the engine protective cover)
How to change the heater radiator on a Lada Priora
In fact, every motorist who owns a Russian vehicle discovers a malfunction of the car’s heating unit specifically in winter. After all, only with the advent of severe cold does a person begin to think about how to avoid freezing while driving a car. Naturally, everyone uses a stove for this. But what should those for whom this same device has stopped working properly? After all, only the heater is able to ensure that the normal temperature is maintained in the cabin, allowing for comfortable movement. In this article we will look at only one reason why the heating device stops working, we will learn about the principles of repairing and replacing the heater radiator installed in a Lada Priora car.
If the motorist is sure that the heater core needs to be replaced, it may take a lot of time to remove the faulty object, because most likely, in the process it will be necessary to change not just a blown fuse, but to carry out more serious repair work. True, one should not immediately despair because of one’s own ignorance; the material contains a carefully written annotation that helps everyone understand how to replace the stove radiator in a Priora with and without air conditioning.
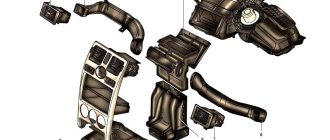
Priora interior heating system
The vehicle is equipped with a stove (heating system) with a climate control system that provides comfort while traveling in the car. They are designed to eliminate problems in the event of cold weather or other weather changes. No one will ask the question why the stove in the Priora does not work, neither the driver nor the passengers.
The car's climate control system includes:
- the stove itself (heater);
- stove fan device;
- temperature sensor in the cabin;
- air distributor housing;
- airways;
- deflectors (directing the flow of air masses).
The air flow from the stove is transmitted to the housing part of the air distributor, from where it is directed along air lines. Through the air ducts, the flow flows to the windshield grilles of the windshield and side windows, to the air mass flow guides in the center and side of the dashboard, as well as to the lower plane of the cabin to the floor pans on the bottom of the body. With the advent of frost, defects in the heating system appear, the most unpleasant of which is that the Lada Priora stove does not work and other malfunctions.