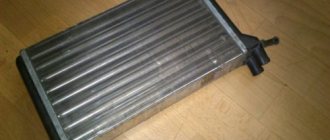
If the windshield of a Lada Priora car is fogged up and looks as if it was smeared with greasy hands after eating pirazhki - driver, beware, your heater is leaking! Maintaining normal temperature in the cabin at different times of the year is necessary in order to feel comfortable behind the wheel. In winter, the stove on the Priora saves you from freezing, which provides the heat a person needs. But you need to take care of it and prepare it for winter in the summer, because being left without heating in winter is not the greatest pleasure. The sore spots in the system that break down more often than others are the gear motor and the heater damper. Priora is a warm car - the original DAAZ is very good, it warms, and is warm in winter, because its radiator has the correct structure and fluid circulates inside. If you install the Chinese Luzar, you will freeze at -20 - I checked it personally. I put this luzar on, then took it off. The heater radiator is available for cars with and without air conditioning. The structure of the node is slightly different.
The stove block of the Priora car is indicated below in the figure. As you can see, in addition to the block, the entire assembly consists of many spare parts. On the Priora, the stove has a conventional design - having taken the time to diagnose, you need to completely check the entire system in order to make an “investment” in the future - in winter you will need to look for a heated garage for repairs. If the Priora blows cold air or does not heat well, these are signs that something is wrong inside, and this malfunction needs to be sorted out.
How to repair or replace the gear motor of a Lada Priora stove yourself
The air conditioning and heating system for the interior of the VAZ-2170 car is implemented quite successfully. And yet, its design contains functional elements that most often fail and need repair or replacement. One of such devices is the heater damper gear motor, which is responsible for closing and opening the damper. If it functions properly and responds appropriately to signals from the heater control system, then the air entering the car interior is heated and cooled in a timely and proper manner. If the gear motor of the Priora stove begins to malfunction or fails altogether, controlling the operation of the damper becomes impossible, as does setting the optimal temperature of the air flow.
The ability to regulate the temperature of the air pumped by the stove is the main sign that indicates a breakdown of the micro-gearbox. Both external factors and internal malfunctions can cause problems in its operation. The first include a violation of the integrity of the voltage supply circuit to the device and errors in the control unit itself. However, in this article we will look at how to repair the Priora heater damper gearmotor by eliminating its internal faults, or replace the device if it cannot be restored.
Removing the heater damper gearmotor
In order to check the functionality and ensure the maintainability of the micromotor gearbox, it will have to be dismantled. There is nothing complicated in this process, but you need to know and follow the sequence of actions. You will learn how to remove the heater gear motor on a Priora from the guide below:
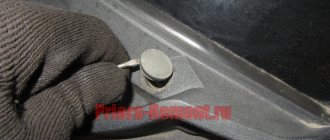
- First you need to remove the windshield wipers. After this, the frill must be dismantled, which any car owner can handle - to do this, you need to unscrew the fastening screws located in the upper part of the protective element under the plugs and on the bottom of the casing. Don't forget also about the screw connecting the edges of the two skins.
- After removing the frill, pay attention to the antifreeze tank, which is located next to the vacuum brake booster - you need to disconnect the outer pipe from it and pull it through the hole in the casing.
- Next, remove the antifreeze tank from its seat to gain access to the casing. The casing itself, or rather, its left part, should also be removed, and as for the second part, its dismantling is not necessary.
- The fastening of the antifreeze tank must also be removed (attached with two bolts and one nut), since it will interfere with the process of dismantling the gearmotor. You will also have to remove the rods and the wiper drive motor.
- After this, access to the heater damper gearmotor opens, which is removed by unscrewing three mounting bolts.
After removal, the device is disconnected from the power supply and is subject to diagnostics for repairability. If it turns out that restoration of functionality is possible, appropriate repair work is carried out. Otherwise, the only solution is to replace the gear motor of the Priora stove. But first, let's look at the troubleshooting process.
How to repair a heater gearmotor on a Lada Priora
It is known that there is only one result of failure of the heater micromotor: it is not possible to change the position of the damper, as a result of which only cold or only warm air enters the cabin. In this case, the reasons for the breakdown of the device itself can be both external and internal. The first includes a break in the engine power supply circuit and the occurrence of an error in the heater control unit. It is perhaps best to entrust the troubleshooting of these problems to a specialist. As for internal breakdowns, such as mechanical damage to a plastic gear or a malfunction of the micromotor of the Priora heater damper gearbox, in some cases you can deal with them yourself. The sequence of actions is as follows:
- Before disassembling the gearmotor, remove the plastic adapter from the shaft, which operates the same heater damper.
- Next, disconnect the two parts of the plastic body of the device by acting on the fasteners with a flat-head screwdriver (sometimes you have to use two screwdrivers at once). Disconnect the halves of the housing, removing one of them from the motor shaft, as carefully as possible so as not to lose small parts that fall out.
- You will see a micromotor and plastic gears - inspect them externally for broken teeth. It should be noted that the working stroke of the gears does not exceed 45 degrees. Therefore, if several teeth are missing on one of them, the problem is eliminated by turning the gear. If damage is noticed on a sector (a wheel with an incomplete circle), then in order to rotate it to the desired angle, the metal shaft will have to be heated with a burner or on a gas stove. By the way, for normal operation of this sector it is enough to have only nine whole teeth.
- If upon inspection it turns out that all the gears are operational, then the problem lies in the failure of the electric motor. First, you should check whether power is supplied to it - to do this, connect a regular Krona battery to the motor contacts. If it works, then the cause of the malfunction is external, otherwise you will have to disassemble the micromotor.
- From the side where the wires are connected, straighten the housing where it is fixed, after which you can remove the insides of the engine. To do this, press on the shaft and press it in. Now you can see the two brushes and the armature windings. Make sure that there are no traces of soot or melting on the windings. And also, often at the point of contact between the commutator and the brushes, carbon deposits form, preventing normal contact - the contamination should be removed.
- Upon completion of the repair procedures, assemble the electric motor, test it using a Krona battery and assemble the gearmotor itself.
If, when disassembling and inspecting the internal structure of the motor, it is discovered that one of the armature windings is damaged, then repairing it will be impossible. In this situation, you will need to replace the Priora heater gearmotor.
Important! When handling the micromotor of the gearbox, you need to be as careful and careful as possible, since sudden movement or impact with too much force can lead to damage to its internal parts and further unsuitability for repair.
Replacing a Priora heater damper gearmotor involves dismantling it and installing a new analogue. We described above in the article how to remove the device from the car. As for the installation of a pre-purchased micromotor gearbox, it is performed in the reverse order of removal.
Detection and causes of malfunction
The main indicator of gearmotor failure is the inability to regulate the air temperature of the car heater. You can check the performance of the micromotor gearbox by supplying electricity from the battery to its motor in the middle position. In the same way, you can check the functionality of the controller, the failure of which also leads to the impossibility of temperature control.
The following defects may be the cause of gearmotor failure:
- violation of the integrity of the electrical circuit, that is, the supplied voltage does not flow to the engine, the gearmotor cannot function correctly;
- a defect in the autonomous heater control unit, as a result of which the reducer does not supply air at the required temperature.
Heater diagram VAZ 2110
Lada Priora Sedan [243] › Logbook › Quick replacement of the heater gear motor (Priora without air conditioning)
Who remembers my last fart-bursting BZ, welcome to the continuation)) Well, in general, this, let’s say, the second part is precisely for those who are faced with the same problem and want to get by with a little blood. A year ago I already changed the gear motor and for this I disassembled, so to speak, the entire motor shield. Namely, I cut half the stove body and, bending it, changed the gear motor. This method is much simpler than what some do, namely with the removal of the GTZ and vacuum. But this time I decided to try to make it even simpler. I think the experience will be useful to someone. I was surprised how quickly I did everything. What’s nice is that you don’t need to unscrew, remove or move the stove.
I’ll describe step by step how I did it:
1.
Unscrew and remove the wiper arms and frill;
2.
In my case, I unscrew the spacer of the glasses, unscrew the small air venting pipe from the expansion barrel (nothing will flow out):
We pull this pipe out of the upholstery and bend it back somewhere to the left, towards the receiver, just so it doesn’t get in the way. 3.
Now you can safely pull out with your hands a small part of the engine shield upholstery, which is behind the expansion tank:
4.
Next, without unscrewing the pipes or draining anything, pull the expansion tank up and move it to the side. Now is the most convenient time to unscrew and pull out the trapezoid. We turn on the ignition, wave the wipers, and when they are in the maximum vertical position, turn off the ignition. In this “pose”, the trapezoid is most conveniently pulled out. After removing the trapezoid, unscrew the mounting area for the expansion barrel on the side of the wing (two 10mm bolts). There is no need to remove it completely. We also bend it, it is very soft. We see this picture:
5.
Next, bend the small bracket that holds the wiring:
Life hack: gear motor and other components of the Priora car heater
If the windshield of a Lada Priora car is fogged up and looks as if it was smeared with greasy hands after eating pirazhki - driver, beware, your heater is leaking! Maintaining normal temperature in the cabin at different times of the year is necessary in order to feel comfortable behind the wheel. In winter, the stove on the Priora saves you from freezing, which provides the heat a person needs. But you need to take care of it and prepare it for winter in the summer, because being left without heating in winter is not the greatest pleasure. The sore spots in the system that break down more often than others are the gear motor and the heater damper. Priora is a warm car - the original DAAZ is very good, it warms, and is warm in winter, because its radiator has the correct structure and fluid circulates inside. If you install the Chinese Luzar, you will freeze at -20 - I checked it personally. I put this luzar on, then took it off. The heater radiator is available for cars with and without air conditioning. The structure of the node is slightly different.
The stove block of the Priora car is indicated below in the figure. As you can see, in addition to the block, the entire assembly consists of many spare parts. On the Priora, the stove has a conventional design - having taken the time to diagnose, you need to completely check the entire system in order to make an “investment” in the future - in winter you will need to look for a heated garage for repairs. If the Priora blows cold air or does not heat well, these are signs that something is wrong inside, and this malfunction needs to be sorted out.
The principle of operation of the stove - what it consists of on Priora, article numbers
For the VAZ-2170 restyling, two types of heaters were installed - with a Panasonic control controller or with an NSS control controller. The last type contains the following parts:
- air recirculation damper gearmotor (21700-8127300-10);
- Priora car heater fan (motor) (21700-8118020-10);
- air filter (21700-8122090-00);
- motor speed controller (2170-38127025-10);
- heating system damper motor (21700-8127200-10);
- heater radiator (21700-8101060-10);
- outlet hose (21700-8101208-00);
- outlet pipe (21700-8101200-10).
As for the second option from Panasonic, the device around the radiator of the heating system on the Priora is slightly different:
- recirculation valve (21700-811908-00);
- fan (stove motor) (21700-8118020-10; 21700-8118020-00);
- vacuum hoses with check valve (21700-8119100-00);
- solenoid valve (21700-8119130-00);
- air filter (21700-8122020-00);
- inlet pipe (21700-8101200-00);
- damper gear motor (21700-8127200-00);
- radiator temperature sensor (21700-8101250-00);
- radiator (21700-8101060-00);
- outlet hose (21700-810120800).
The pre-restyling car has a lot of parts from the “tens” - even the gearmotors are different. Much was inherited from the VAZ-2110, and the first cars before restyling were almost completely equipped with its heater. The assembled stove for the VAZ-2170 Priora pre-styling received catalog number 2111-8101012-10, a more updated version – 2170-81010-12. Price from 5500 rubles.
The device is as follows:
- air flow reducer (2170-81271-00);
- air temperature sensor (inside the car) (11186-81280-50);
- control unit (switches that are built into the central console to set operating modes) (21703-81880-20);
- resistor for setting the motor speed (2123-81180-22);
- heater motor (2111-81180-20);
- damper gear motor (2110-81272-00);
- air filter (2110-81220-20);
- radiator (2110-81010-60).
The heating radiator of the Priora car can operate in two modes: automatic and manual.
- The manual mode is performed when a person independently sets the desired temperature in the cabin on the control unit.
- The automatic mode operates almost constantly - the required and actual air temperature is checked and the control controller issues a command to change the damper angle, supply hot or cold air to bring the temperature to the set level.
When the driver adjusts the settings on the control unit, the resistor sends a signal with the necessary data to the motor. The fan can produce maximum power, although the resistor will not be used to its maximum. The same process with the direction of air - the driver sets it, and the gearmotor sets the desired position of the damper.
By its principle, the heating device “lies next to” the engine cooling system. When the driver turns it on, the heater tap opens, and hot coolant moves through the pipes, which passes through the radiator of the Priora car’s heater and returns back. This increases the distance over which the coolant circulates.
Therefore, turning on the heating is one of the ways to cool the engine. It will really become hot in the cabin, because all the heat will be directed there, and the engine will give off this heat more and more, the temperature of the coolant will drop.
Malfunctions
For normal operation, the heating system needs: tightness, integrity of parts and normal antifreeze. The first step is to check the relay and fuse - after all, this unit contains electrical appliances inside. If the unit's electrical network is not in contact with the ECU, there is no point in turning the controls on the heater control unit.
The heater fuse on Priora has the number F9. In order to get to it, you need to remove the plastic plug above the driver's left knee (under the headlight switch) by unscrewing three bolts around its perimeter.
Once the fuse has been inspected and no deficiencies have been identified, further diagnostics can begin.
Perhaps the most annoying thing in any car is the situation when, even at the hottest summer temperatures, the heater does not turn off. This happens because the damper does not block the air flow. The heater damper on the Priora is controlled by a gear motor, which stops after its operating life has expired - it will have to be replaced.
While driving a VAZ-2170, you should carefully look and listen to what you see and feel. If heat should come from the cracks, but it doesn’t, then something is wrong with the seal or the damper gear motor. For example, if the glass becomes greasy, as if it was smeared with your hands, it means that the heater radiator is leaking. However, these are not the only signs of a heater failure.
Description of design
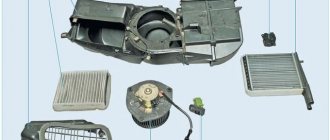
Heater parts
: 1 — filter cover; 2 — heating and ventilation system filter; 3 — heater housing; 4 — micromotor-reducer of the heater damper; 5 — heater radiator; 6 — additional heater fan resistor; 7 - heater fan
The car is equipped with a heating and ventilation system, which serves to create the most comfortable conditions for the driver and passengers, regardless of weather conditions. The heating and ventilation system includes: heater, heater fan, cabin air temperature sensor, air distributor housing, air ducts and deflectors. The air from the heater enters the air distributor housing and then into the air ducts. Through them, air is supplied to the windshield and side window vents, to the central and side deflectors on the instrument panel, as well as to the feet of the driver and passengers.
Heating and ventilation control unit
The system is controlled by turning the handles located on the heating and ventilation control unit. The control unit is installed on the instrument panel console.
Interior temperature sensor
To maintain a given air temperature in the car interior at a constant level, there is a cabin air temperature sensor installed in the headliner trim.
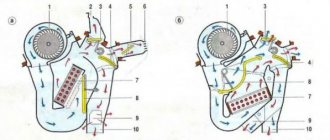
Heater assembly
: 1 — micromotor-reducer of the heater damper; 2 — heater control damper; 3 — additional heater fan resistor; 4 — blowing hose for the fan motor; 5 — heater fan; 6 — filter cover of the heating and ventilation system
The heater is installed in the engine compartment under the right windshield trim and is attached to the front panel. A filter is installed at the heater inlet to clean the air entering the heating and ventilation system.
The heater housing contains a heater fan, a heater radiator, a heating and ventilation system filter, an additional fan resistor and a heater control damper connected to the temperature regulator. The heater radiator is connected by hoses to the engine cooling system. Coolant constantly circulates through the heater radiator. The heater control damper directs outside air to or bypass the heater core. In intermediate positions of the damper, part of the air passes through the radiator, and the rest bypasses the radiator. In the extreme positions of the damper, all air passes through the radiator or bypasses it.
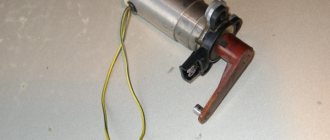
Heater damper micromotor
: 1 — micromotor-reducer; 2 — damper position sensor; 3 - output shaft
The heater control damper is turned by a micromotor-gearbox mounted on the left side of the heater body. The output shaft of the micromotor-gearbox is connected to the damper axis.
Location of the air distributor housing and air ducts on the instrument panel
: 1 — side deflector air duct; 2 — air duct for blowing glass; 3 — air distributor housing; 4 - damper; 5 — damper gear motor; 6 - air duct for blowing the feet of the driver and passengers
The air distributor housing and air ducts are fixed on the reverse side of the instrument panel. The air distributor housing contains air flow control flaps, which are controlled by the air flow distribution regulator. The dampers are turned by a gear motor mounted on the air distributor housing. By controlling the flaps, the regulator directs air flows through the air ducts to the central and side deflectors, to the feet of the driver and passengers, as well as to the nozzles located in the instrument panel for blowing the windshield and front door windows. When the car moves, air is forced into the passenger compartment at high speed through the holes in the right facing of the wind window. To increase the air supply to the cabin while the car is moving, as well as when parked, a heater fan is used. The intensity of air supply is determined by the fan rotation speed. The fan motor can rotate at four speeds, depending on the connection of an additional resistor.
Air outlet hole in trunk lining
Air leaves the car interior through valves installed on the rear panel of the trunk, behind the bumper. In the rear part of the trunk lining, opposite the valves, there are holes for air outlet.
Cabin air outlet valves
(with rear bumper removed)
When loading the trunk, do not block the air outlets in the trunk lining.
So I ordered a new type of low-pressure power steering hose and decided to replace it on a free day off. There was still no time, and then one fine evening I went home after work, and hot air was coming out of the stove, I saw the switch was in the warm position, “Oh yeah, I turned it on in the morning and didn’t switch it back,” I thought, I switched That means I’m going back and moving on. Nothing happens, the air is still steaming, I’m spinning and spinning in no way. That's it. We've arrived, I thought. I checked the temperature sensor, the fan is spinning, which means the problem is in the gear motor. Okay, I'll take it apart and have a look, I still wanted to check the heater motor, because... It made a terrible noise when turned on, and at the same time I’ll change the return hose. I was planning to go to a friend's house this Saturday for repairs. From the very morning the weather was not good, it started to rain, but by lunchtime the rain stopped and I went. Since the gearmotor was a priority, I decided to start with it.
First, we remove the inner lining of the engine, wipers, frill.
In order to maintain the most comfortable temperature in the car, the automaker has provided several methods, in particular, heat regulation depends on the lighting built into the design, located on the ceiling, a sensor, as well as on the heater damper gear motor. In the material below, we will consider the principle of replacing and repairing a gearmotor that has ceased to fully perform its functions. Almost always, such a malfunction is accompanied by the inability to completely close the damper, as a result of which the warm air flows that enter the car interior are mixed with cold air, which does not allow the car to warm up to a comfortable temperature. To correct the current situation, you can resort to replacing or at least partially repairing the damper gear motor, which is installed in the heating unit of the Lada Priora.
Repair, diagnostics and replacement of the heater damper on Lada Priora
A comfortable temperature in the interior of the Lada Priora at low temperatures is maintained using a stove. If it breaks down, noise appears in the heater operation, and the ability to adjust the temperature, direction and intensity of the air flow is lost. In most cases, the sources of problems are the motor or damper of the Lada Priora stove, which fail.
Heater device on Priora
The liquid-type heating system on the Lada Priora is structurally connected to the engine cooling system and includes:
- radiator or heat exchanger of the heating system;
- a fan supplying air to the cabin;
- damper that regulates air temperature;
- heater damper reducer;
- damper for flow distribution on deflectors;
- deflectors.
A failed heater damper on a Priora does not close completely, so the warm flow mixes with cold air without warming up to the required temperature and the cabin is always cool and uncomfortable. To fix the problem, you need to remove, replace or repair the heater damper gear motor.
Replacing the gearmotor
If the damper does not work, hot or cold air blows from the heater, and the ability to adjust it is lost. In such a situation, the cabin heater gearmotor must be replaced.
Replacing the damper on a Priora begins with raising the hood and removing the wipers. To do this, remove the plastic caps and unscrew the nuts with a 14 wrench, after which they are easily removed. Next, the left and right frills are dismantled by removing the rubber pad, protective plastic caps and unscrewing six screws. Then the plastic soundproofing of the engine compartment is removed, the cooling system hose passing through it is carefully disconnected from the expansion tank, then the tank itself is removed. To avoid draining the coolant, the holes in it must be plugged.
To inspect the heater gear motor, remove the expansion tank mounting bracket by unscrewing two bolts under the wing and removing the protection above the left front wheel. After this, the wiper motor and trapezoid are dismantled.
Now the unit is being dismantled; first you need to carefully disconnect the heater damper sensor and the power supply contacts. After this, install and check the new spare part, reassemble everything in the reverse order, and the replacement of the stove gear motor is completed.
Video: Replacing the gearmotor of the Lada Priora stove (Lada Priora)
Gearmotor repair
In most cases, the extraneous sounds produced by the heater damper drive on a Priora are associated with cracking of the plastic gear. When its teeth are cut off, the mechanism stops working normally. Replacing it is quite difficult, but possible. After dismantling the gearbox, release the compressed plastic cover and bend it, then carefully remove it.
After carefully inspecting the mechanism, determine which gears are faulty and install new ones. Determine the condition of the commutator, bearings and brushes of the mechanism. Lubricate the bearings with silicone grease, which does not harm other structural elements. If after assembly the system functions normally, replacing the heater gear motor will not be necessary.
Adjusting the heater damper
Sometimes the reason that the car interior remains cold is that the heater damper does not open, despite the fact that the gear motor is trying to turn it to the desired position. In most cases, the damper regulator, which is responsible for setting it to the desired position, is to blame.
This is possible on the heater dampers both with and without air conditioning due to a clogged cabin filter, which needs to be changed in a timely manner. Dust and leaves prevent the damper mechanism from opening normally.
Another reason is that the thin plastic of the damper simply warps at high temperatures in the heating line, and it stops reaching the desired position. As a result, the stove does not switch to different modes or the flows are distributed unevenly. Most often, the damper regulator remains in the “in the face” position, but the glass does not blow.
If the damper does not switch, you can remove the panel between the driver and passenger seats; it is located directly behind the central heater grilles. Sometimes you just need to change the seal to which it is pressed, or remove debris that has accumulated in it. After this, you need to check the heater damper in operation and you can assemble the panel.
Principle of operation
First of all, you need to understand the principle of operation of the Priora heating system.
The SAUO unit, which controls the heater, receives appropriate instructions from the temperature sensor located in the car's interior lamp. After that, it compares these readings with the temperature set by the driver. If this difference is significant, the ACS sends a control pulse to the heater micromotor reducer, which controls the rotation of the damper. The direction and power of the flow of air supplied from the heater radiator to the passenger compartment depends on the magnitude of this rotation.
Signs of malfunction
If the air distribution damper does not work, this can lead to the following malfunctions in models without air conditioning:
- Only hot or cold air enters the car interior (regardless of the position of the heater control knobs);
- Instead of hot air, cold air enters the cabin.
In cars with Panasonic air conditioning, these cases are compounded by improper distribution of cooled air flows.
Failure of the distributor to take the desired position may be due to:
- with loosening of its fastenings and the gear motor drive;
- its deformation from hot air or breakage;
- adhesion to sealant residues.
In these cases, the Priora stove damper is blocked in one position. At the same time, clicks of the rotating mechanism are heard inside the car (the gearmotor that controls its position is knocking).
Replacing the radiator of a Priora stove with Halla air conditioning
Introduction
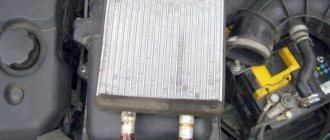
With the onset of cold weather, car owners begin to use the interior heater. Lada Priora is a fairly warm car with a well-designed interior heating system. But there are times when, with the onset of cold weather, the interior is cold and the culprit for this is the heater radiator, which is what will be discussed in this article.
Priora is a car with an increased level of comfort. In the “luxury” configuration it is equipped with a climate control system with Halla air conditioning. This installation is quite reliable and easy to maintain.
It is necessary to monitor the condition of the heater and keep it clean. To do this, you need to change the cabin filter in a timely manner to protect the heater radiator from contamination. You can read how to properly replace the cabin filter here.
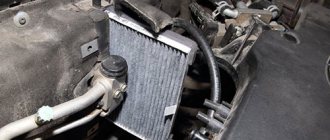
Where is the radiator
The heater radiator is located in the engine compartment near the exhaust manifold. Replacing the heater radiator with Hall air conditioning is quite simple and not complicated compared to a Priora without air conditioning, where to replace it you have to disassemble the interior heater and remove the frill.
The culprit is the radiator
There are a huge number of malfunctions of the interior heater, but the main one is a malfunction of the heater radiator. The reasons why the stove does not heat in winter may be a clogged radiator, both outside and inside.
The cost of a heater radiator with a hall air conditioner is from 1,500 to 2,500 rubles.
If the radiato is clogged from the outside:
It happens that when using a car without a cabin filter, excess debris may fall onto the radiator of the heater, which under the influence of the heater fan can clog it.
In order to eliminate this ailment, it is enough to remove the radiator and wash it.
The heater radiator is clogged from the inside:
There are cases where the radiator becomes clogged from the inside due to old coolant. Corrosion products accumulate on the thin walls of the radiator and clog it, which prevents antifreeze from entering and passing through. Therefore, if the coolant cannot circulate normally through the radiator, then it will not be able to heat up and give off heat.
Eliminated by removing the radiator and flushing.
Heater radiator leak:
When the radiator leaks, an unpleasant odor appears in the cabin, the car windows begin to fog up and become covered with a greasy coating. Driving such a car becomes uncomfortable; if there is a large coolant leak, there is a chance of losing a large amount of antifreeze and overheating the engine, which can lead to expensive repairs.
Radiator replacement
The first thing you need to do before replacing the heater core is to prepare the tool.
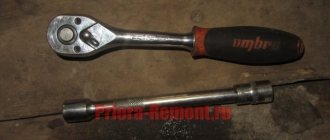
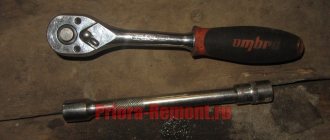
Required tool:
- Screwdriver “+” or “-”;
- Ratchet with a “13” head or a “13” spanner;
- Sealant;
- Antifreeze 5l;
- Container for draining antifreeze;
After preparing the tool, you can start working
Step-by-step instruction
- For convenience, it is necessary to remove the intake receiver corrugation from the throttle valve, as well as remove the air filter box along with the mass air flow sensor.
- To do this, you need to: loosen the corrugation clamps from the air filter, loosen the low crankcase ventilation clamp, remove the mass air flow sensor chip and remove the air filter box from the rubber clips.
- We drain the coolant by unscrewing the plug in the cylinder block (if the coolant does not flow, you need to open the expansion tank cap).
- Next, remove the rubber hood seal from the frill.
- We remove the hoses from the sound insulation of the engine compartment (attached with latches).
- We bend the sound insulation of the engine compartment downwards after unscrewing 3 screws on top, 2 bolts of the air filter cover and 1 bolt near the brake cylinder.
- Remove the foam seal
- Loosen the radiator clamps and remove the hoses from the radiator and bend them down.
- Unscrew the three screws of the radiator cap and remove the radiator by pulling it towards you.
- We remove debris and wipe the radiator seat.
- Install the new radiator in reverse order.
After replacement, you need to let the car warm up to operating temperature and check the coolant level, top up if necessary.
Replacement of the heater radiator with Halla air conditioner is complete. We hope our article was useful to you.
Video on replacing the heater radiator of a Lada Priora with air conditioning
Adjusting the air damper drive of the carburetor 2108, 21081, 21083 Solex
To ensure a confident start of the engine and its subsequent normal operation, correct adjustment of the carburetor air damper drive (“choke”) is necessary.
If it is adjusted incorrectly, for example, due to the fact that the air damper does not close completely, the car engine may not start at all. If the air damper does not open completely, this immediately affects the increase in fuel consumption; in addition, it becomes almost impossible to adjust the idle speed.
Adjustment Tools
Open-end wrench (8mm) 2 pcs
Checking the operation of the damper drive
— Remove the air filter cover
— Fully pull out the carburetor choke control handle (“choke”)
We look at the carburetor from above. The air damper must be closed. There should be no gaps between its edges and the walls of the mixing chamber.
The air damper of the carburetor 2108, 21081, 21083 Solex is completely closed
— Fully recess the “choke” handle
The damper should be strictly vertical.
The air damper of the Solex carburetor is completely open (the “choke” handle is pulled out all the way)
If the air damper does not close completely or does not open completely, it is necessary to adjust its drive.
Preparatory work
— Remove the air filter housing from the carburetor.
Removing the air filter housing on the VAZ 2108 engine
Adjusting the air damper drive (“choke”)
— Fully recess the “choke” handle
Thus, we open the carburetor air damper.
— Loosen the locking screw of the drive rod end on the air damper control lever
— Hold the screw sleeve with one 8 mm wrench, and loosen the screw with the other
— Loosen the screw of the rod sheath clamp
Parts of the air damper drive of the carburetor 2108, 21081, 21083 Solex
— Make sure that the “choke” handle is recessed all the way
— Turn the air damper control lever by hand until it stops
As a result, the air damper should close completely, blocking the cross-section of the first chamber.
Replacing the gear motor of the Lada Priora stove with your own hands
Hello. Today I’ll tell you how to replace the heater gear motor on a Priora at home. This step-by-step photo report will allow you to make such repairs yourself, that is, with your own hands.
Before getting started, a few words about the signs of malfunction of this unit.
Signs of a malfunction of the heater gearmotor Lada Priora
Most often, breakdowns of the heater gear motor manifest themselves as follows - the stove, despite the set temperature, blows either cold or warm. In addition, quite often there are cases when a malfunction of the gear motor of the Priora stove manifests itself in the form of characteristic knocking sounds after you turn on the heater.
Causes of malfunction
The main reason is that the gear is broken, this can be either a crack that prevents the gear from rotating, or a broken tooth that causes the gearmotor to jam. It also happens that the unit fails due to a faulty motor.
How to replace the gearmotor on a Priora?
Note. There are many different instructions on the Internet on how to do this work easier. Some argue that to replace the gearmotor you do not need to remove the reservoir and wiper trapezoid, others argue that you only need to remove the reservoir. This method involves the complete dismantling of all parts that limit access to the stove gear motor.
This video is a clear example of how you can replace a gear motor without removing anything.
1. First of all, you need to open the hood and remove the wipers. Then you should remove the frill (plastic cover).
2. Next, you need to unscrew the three screws that secure the trim (sound insulation) of the engine compartment.
3. After this, disconnect the hose that passes through the trim of the engine compartment to the expansion tank. To do this, loosen the clamp using a screwdriver.
4. When the pipe is disconnected, you can remove the tank by pulling it up and move it to the side so that it is not in the way.
5. Now you can remove the engine compartment trim. To do this, gently pull it up.
6. The next step is to dismantle the expansion tank mounting bracket. To remove it you will need to unscrew the two mounting bolts marked in the photo.
7. Now it’s time to dismantle the wiper motor, as well as the trapezoid; to do this, unscrew one bolt and two nuts marked in the photo.
8. After all the above steps have been completed, we can easily remove the heater gear motor. To do this, you only need to unscrew the three bolts that secure it.
9. After the fastening bolts are unscrewed, you can safely remove the heater gear motor. Turn off the power and replace the faulty unit with a new one.
This completes the replacement process. Assembly is carried out in reverse order. Before starting assembly, check the new gear motor for serviceability.
Important points
There are a couple of nuances, without mentioning which this article would be incomplete:
- The old gearbox should be removed very carefully. A long shank sticks out of it. If you remove the gearbox at an angle, you can damage the edge of the hole for the shank. If this happens, installing a new gearbox will not be so easy. Therefore, advice: when removing the gearbox, it should be pulled in a plane parallel to the floor;
- When buying a new gearbox at a car dealership, you should only buy the original VAZ one. Yes, its quality leaves much to be desired. But this is still better than buying a fake gearmotor, which the spare parts market is literally flooded with now. You can spot a fake by price. A normal gearmotor on a Priora costs 700 rubles and more. And a fake rarely costs more than 300 rubles.
So, replacing a heating gear motor is not a very difficult task and even a novice driver can do it. If a person has held a screwdriver in his hands at least once, he can handle it. All you need to do is follow the above recommendations exactly.